
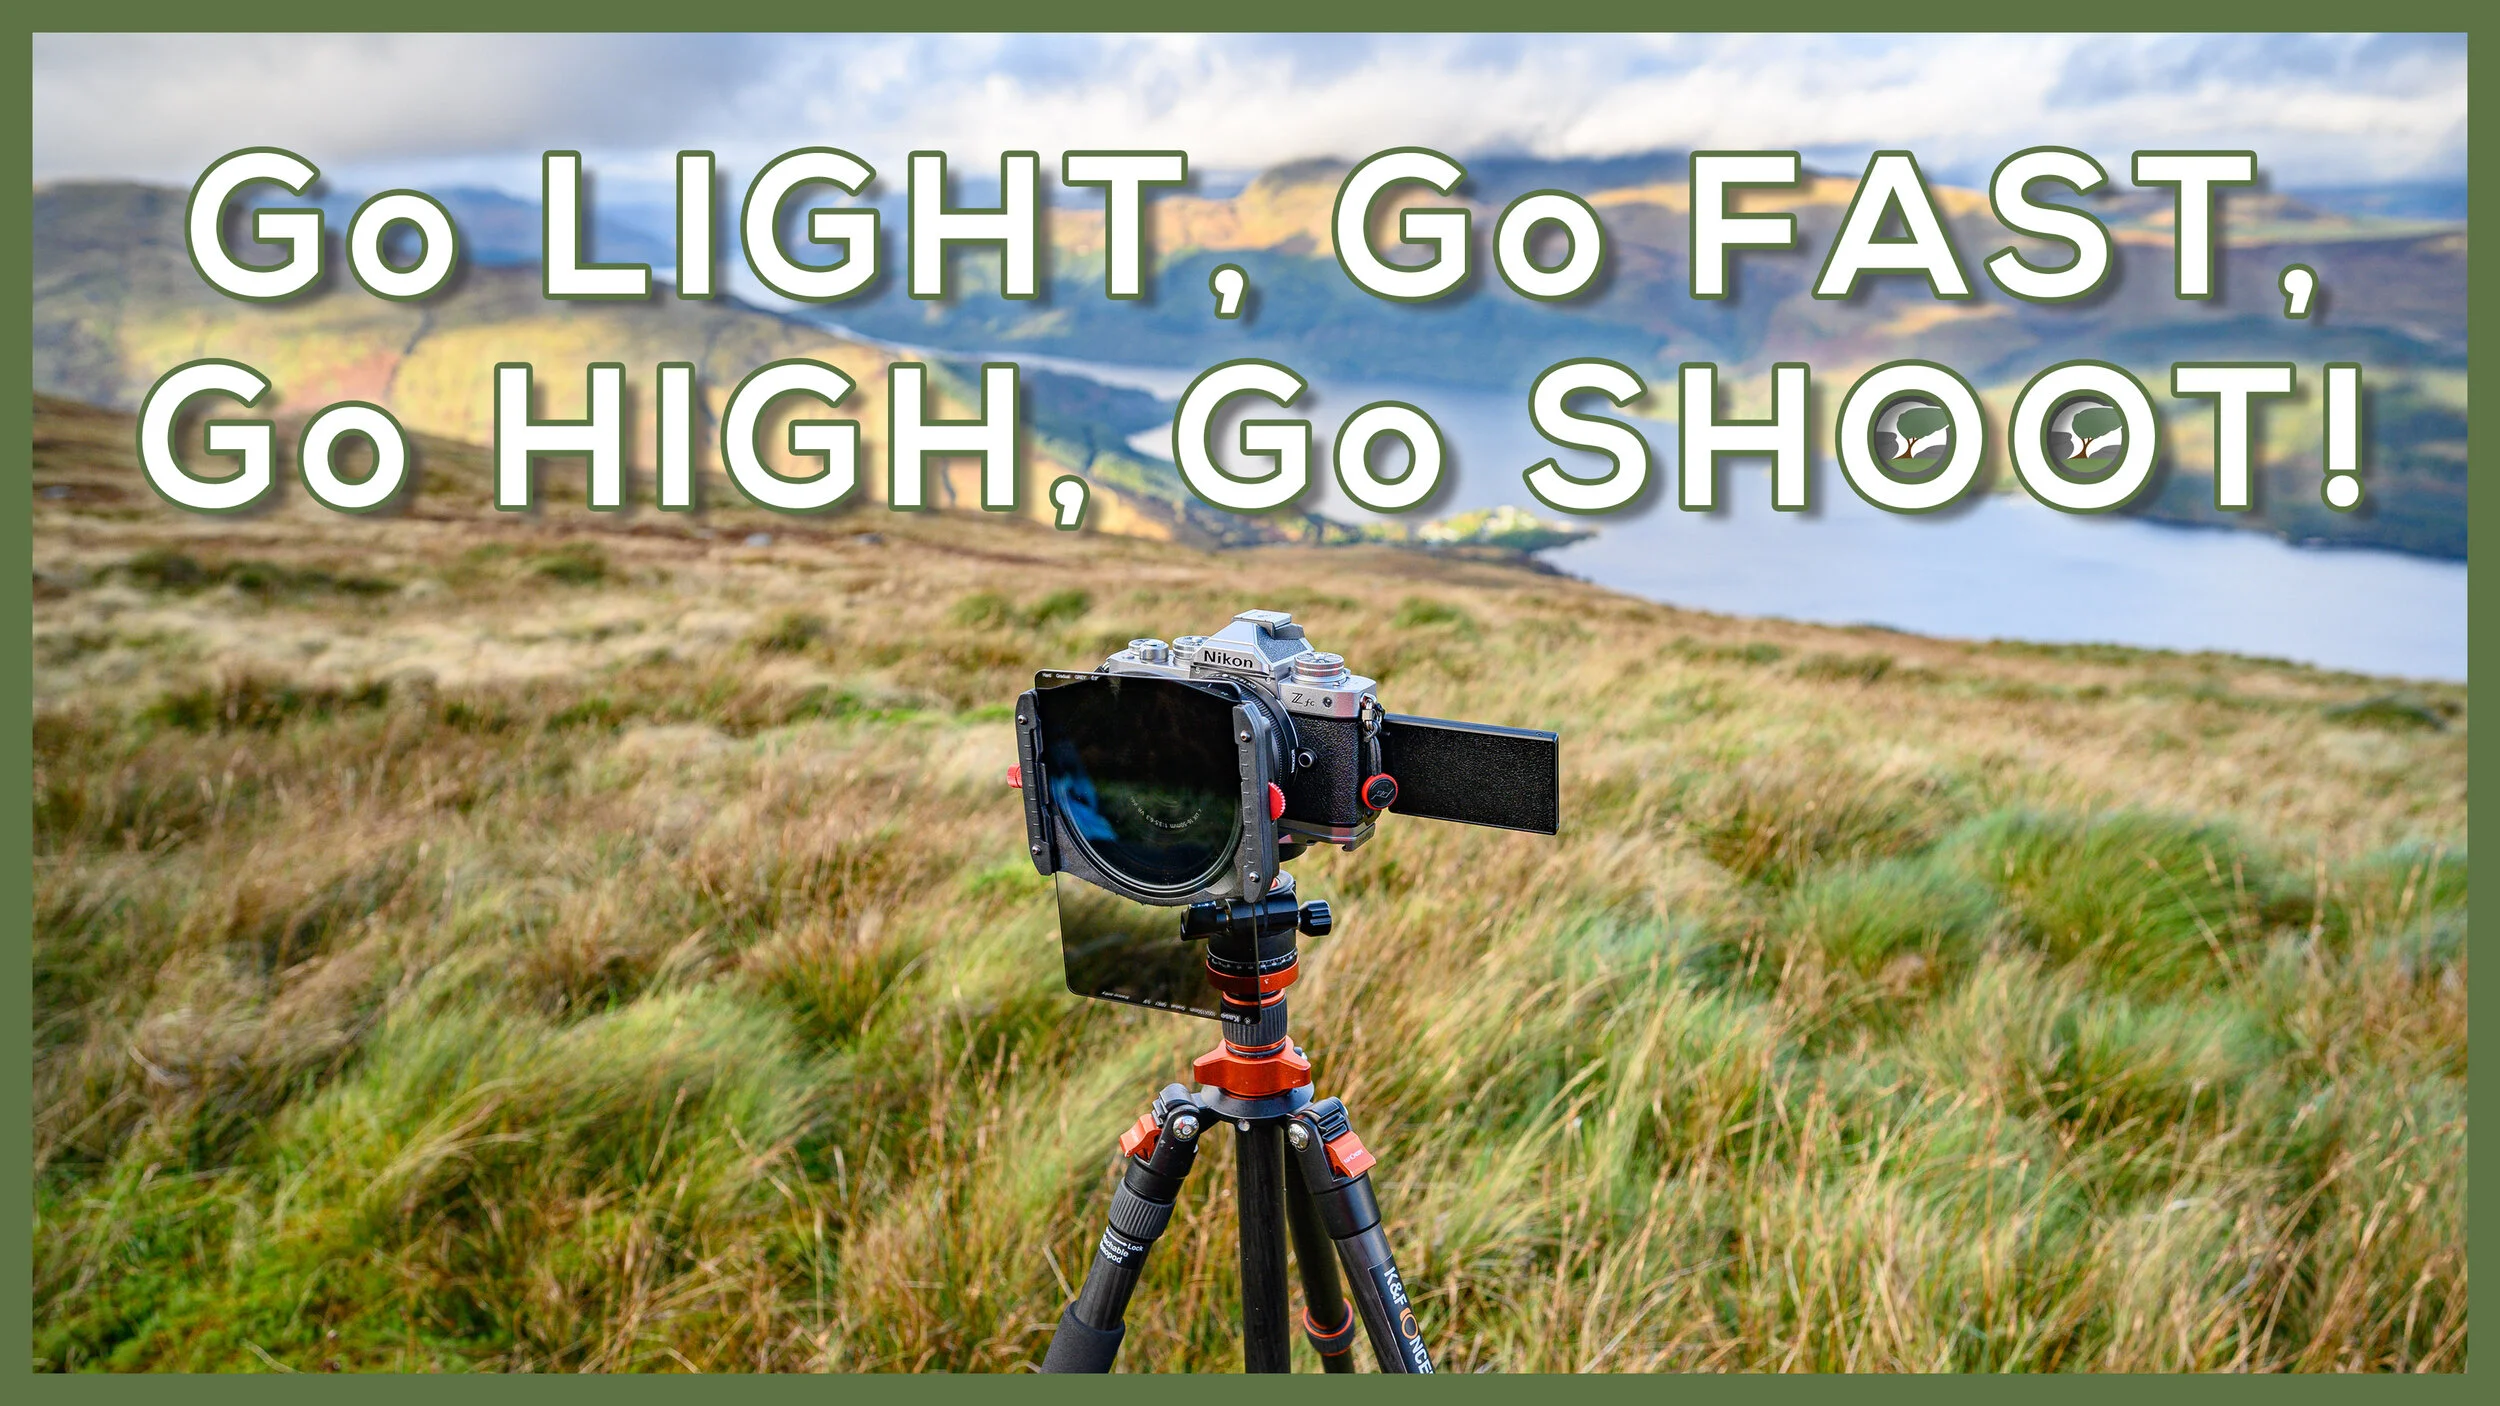
Lightweight Landscape Photography
In this video, I decided to trim a little weight from my landscape photography kit bag. On a recent trip to the Scottish Highlands, I decided to put my kit bag on a diet so that I can make a faster, easier ascent of Beinn Dubh. Watch to discover what I've changed and to see the landscape photographs I captured.
Back to the Homeland
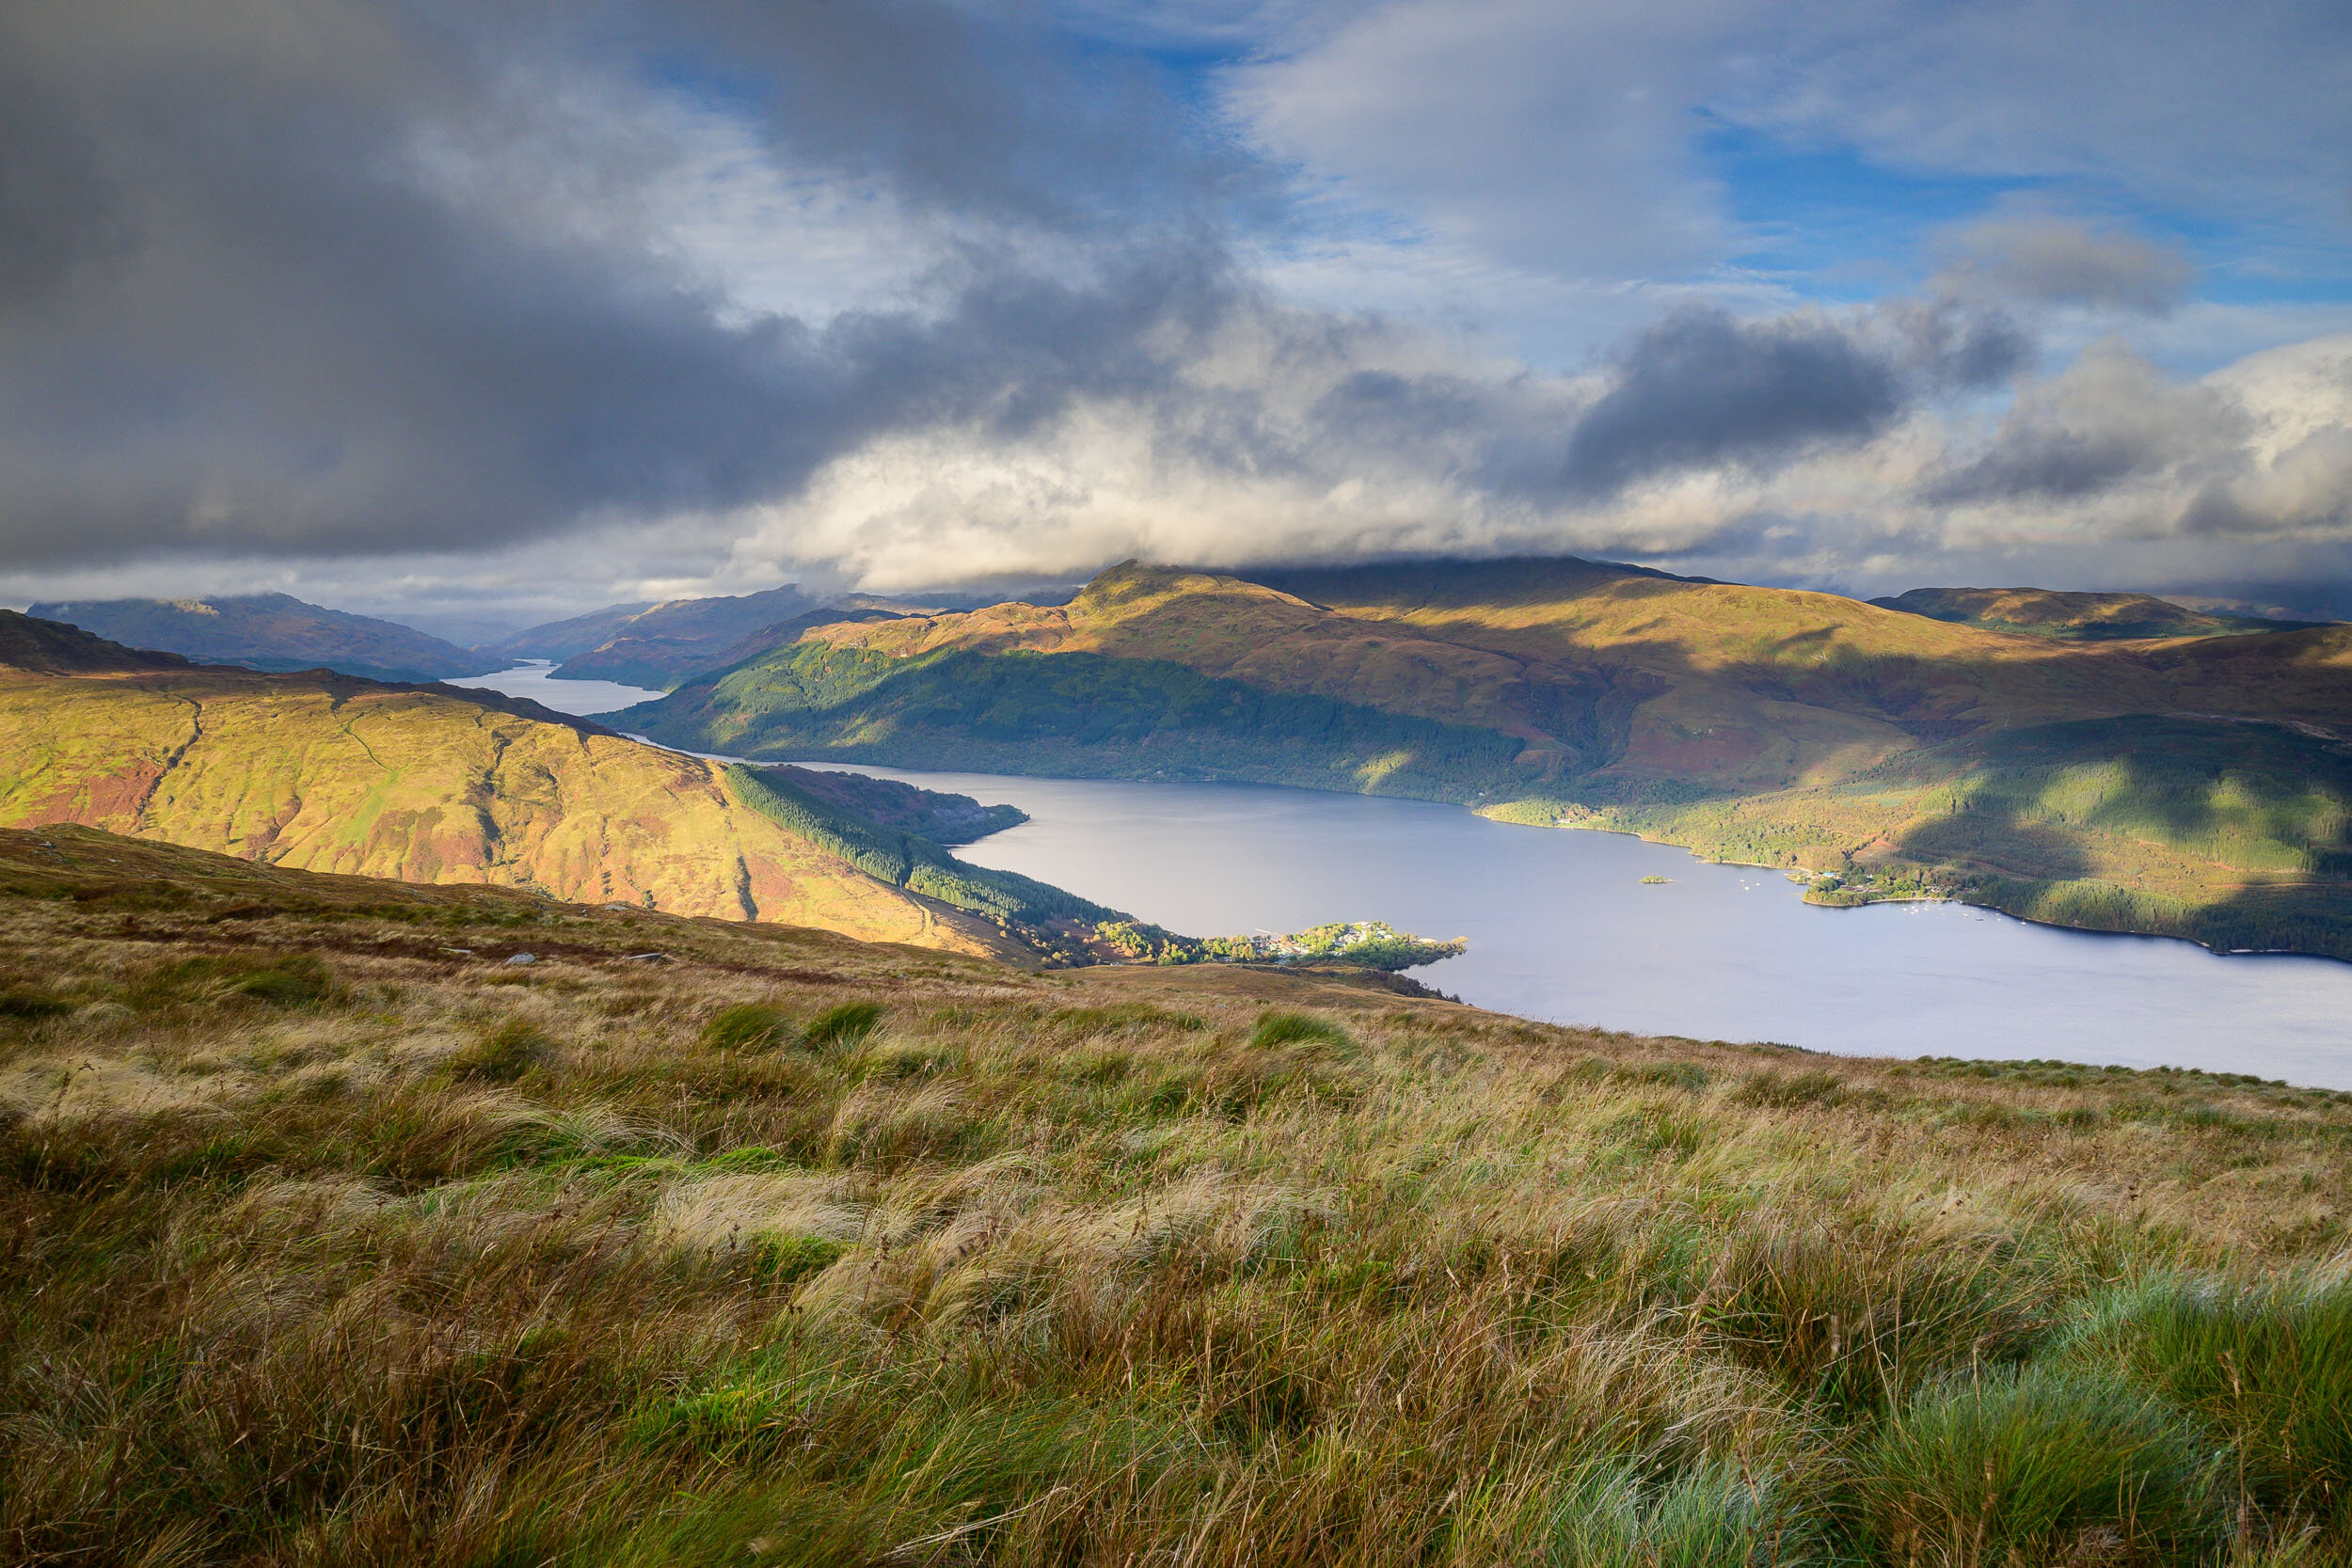
After a two year absence, I’ve finally made it back to my homeland. Back to Scotland! It’s been one thing not to do any international travel because of COVID, but another entirely for it not be safe to travel to Scotland. Though I live in the south-west of England, my heart is still Scottish, and I still have family who lives up there. It’s been hard not being able to visit.
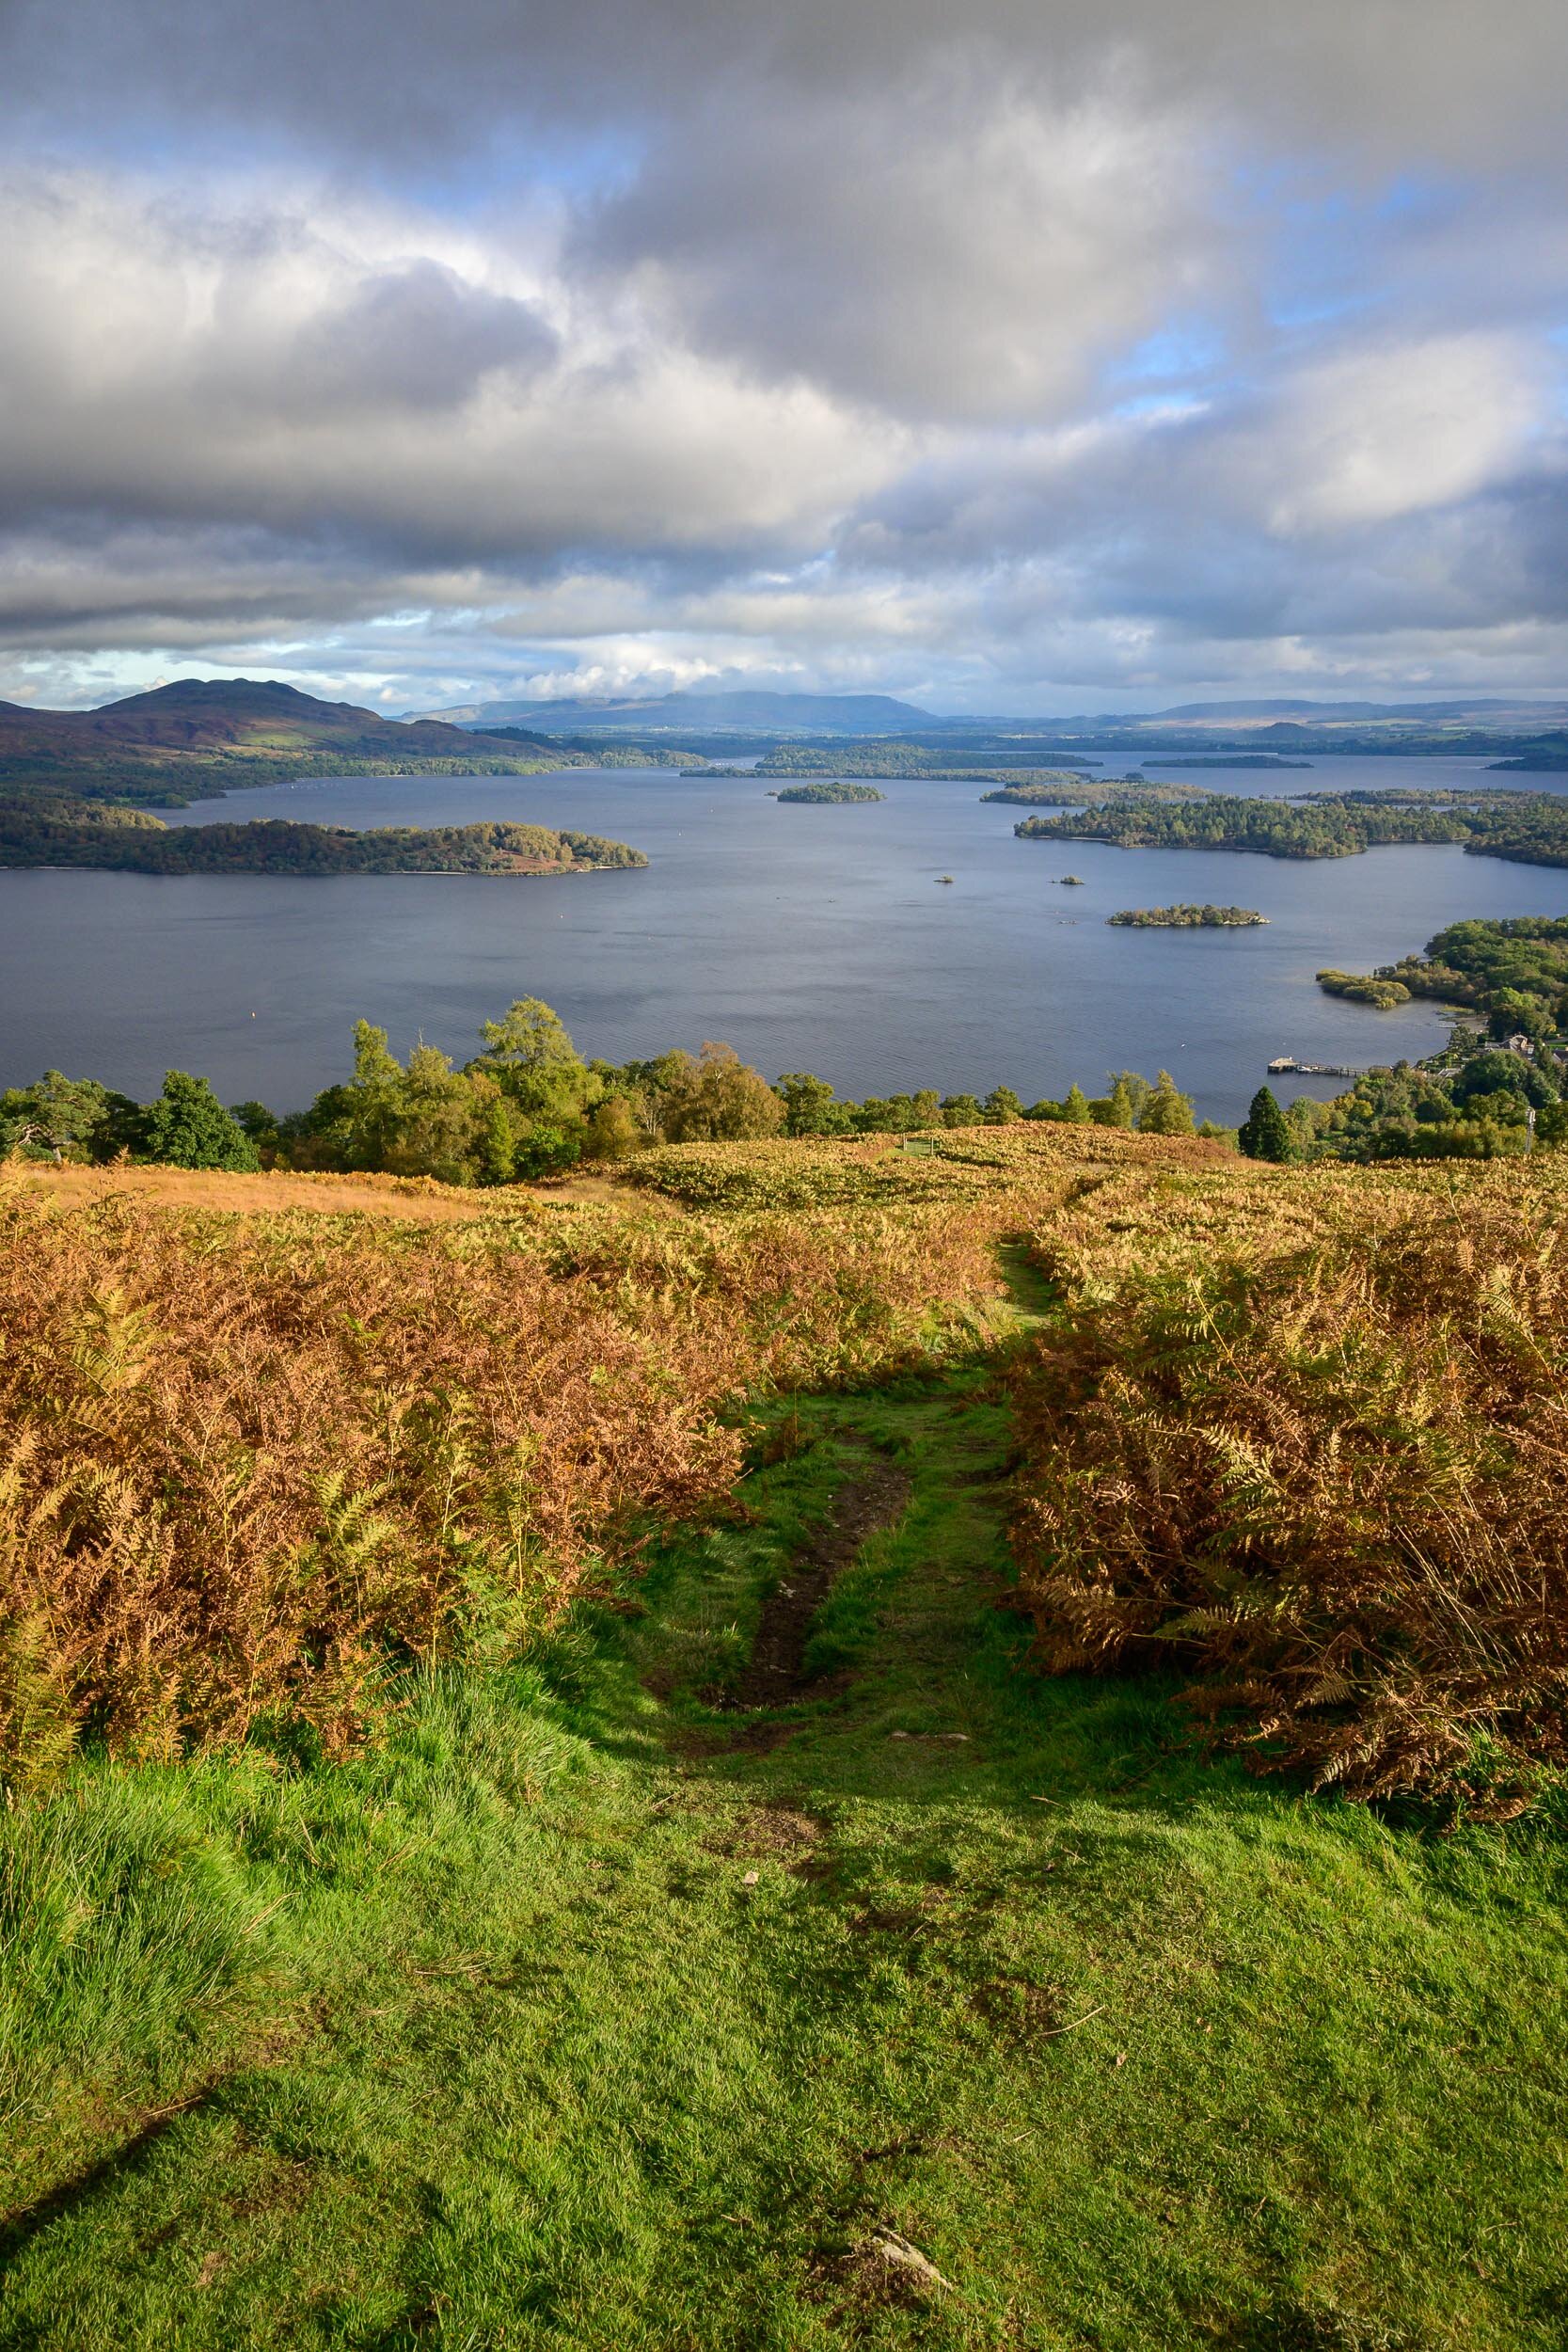
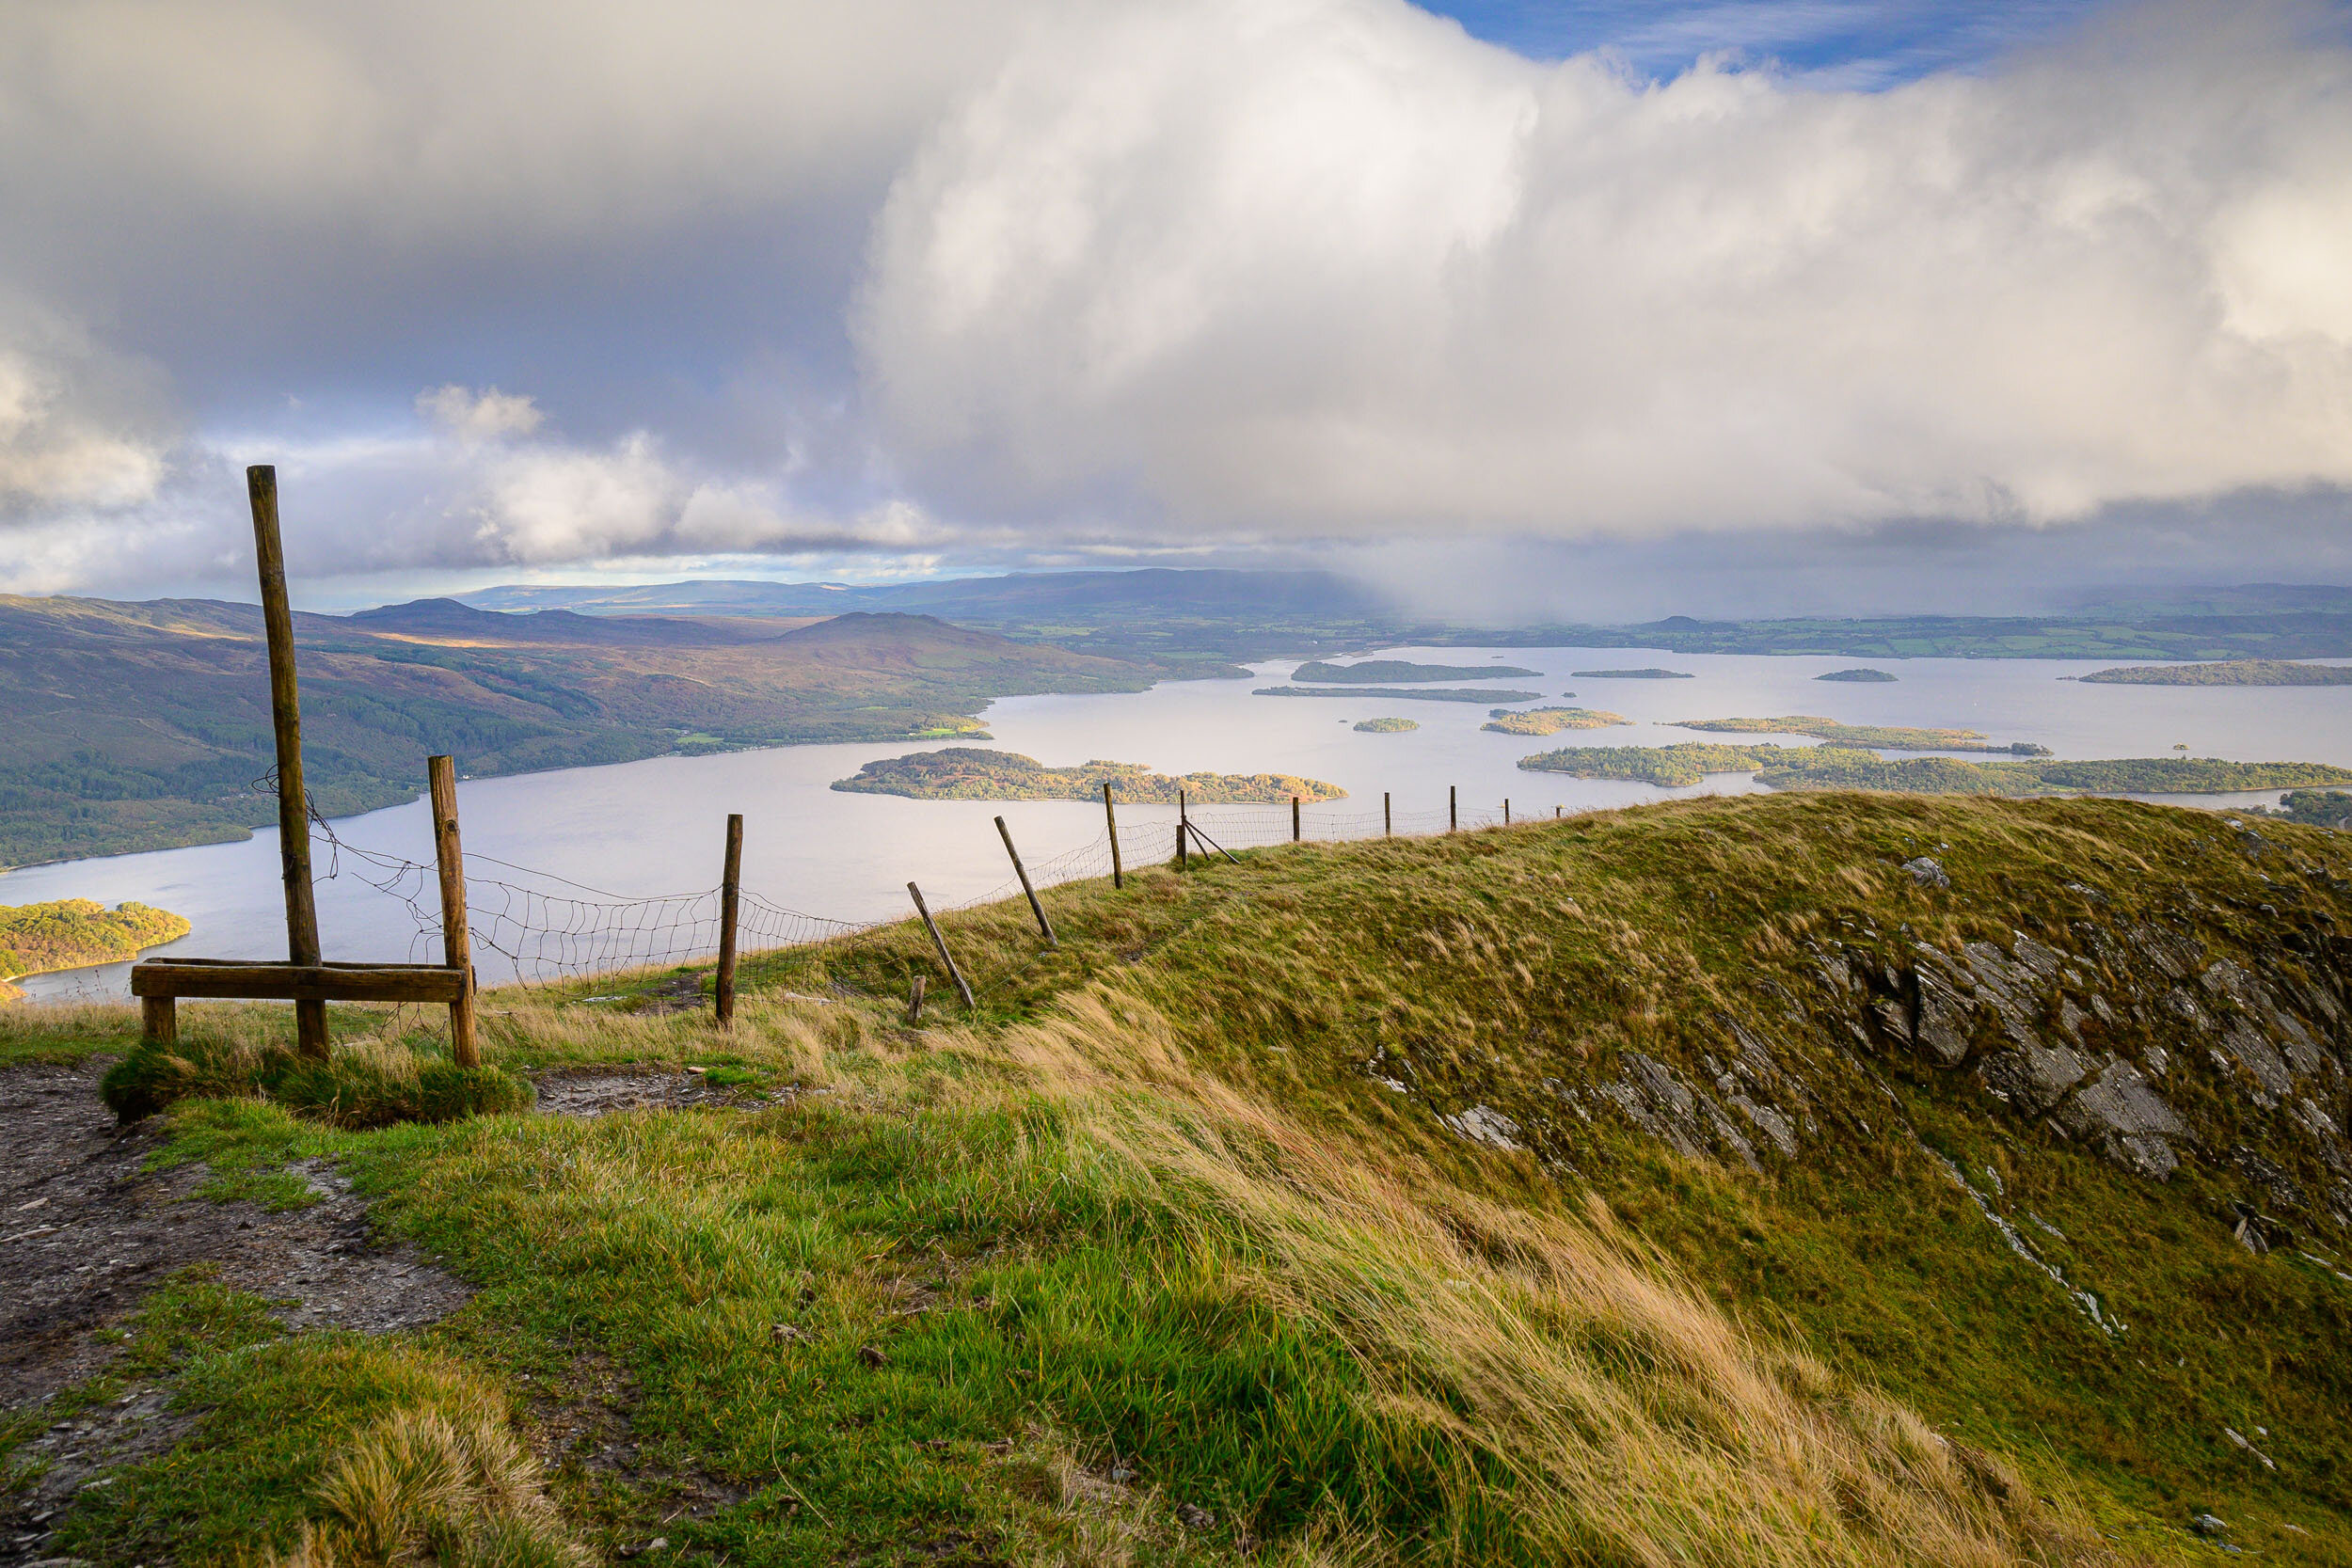
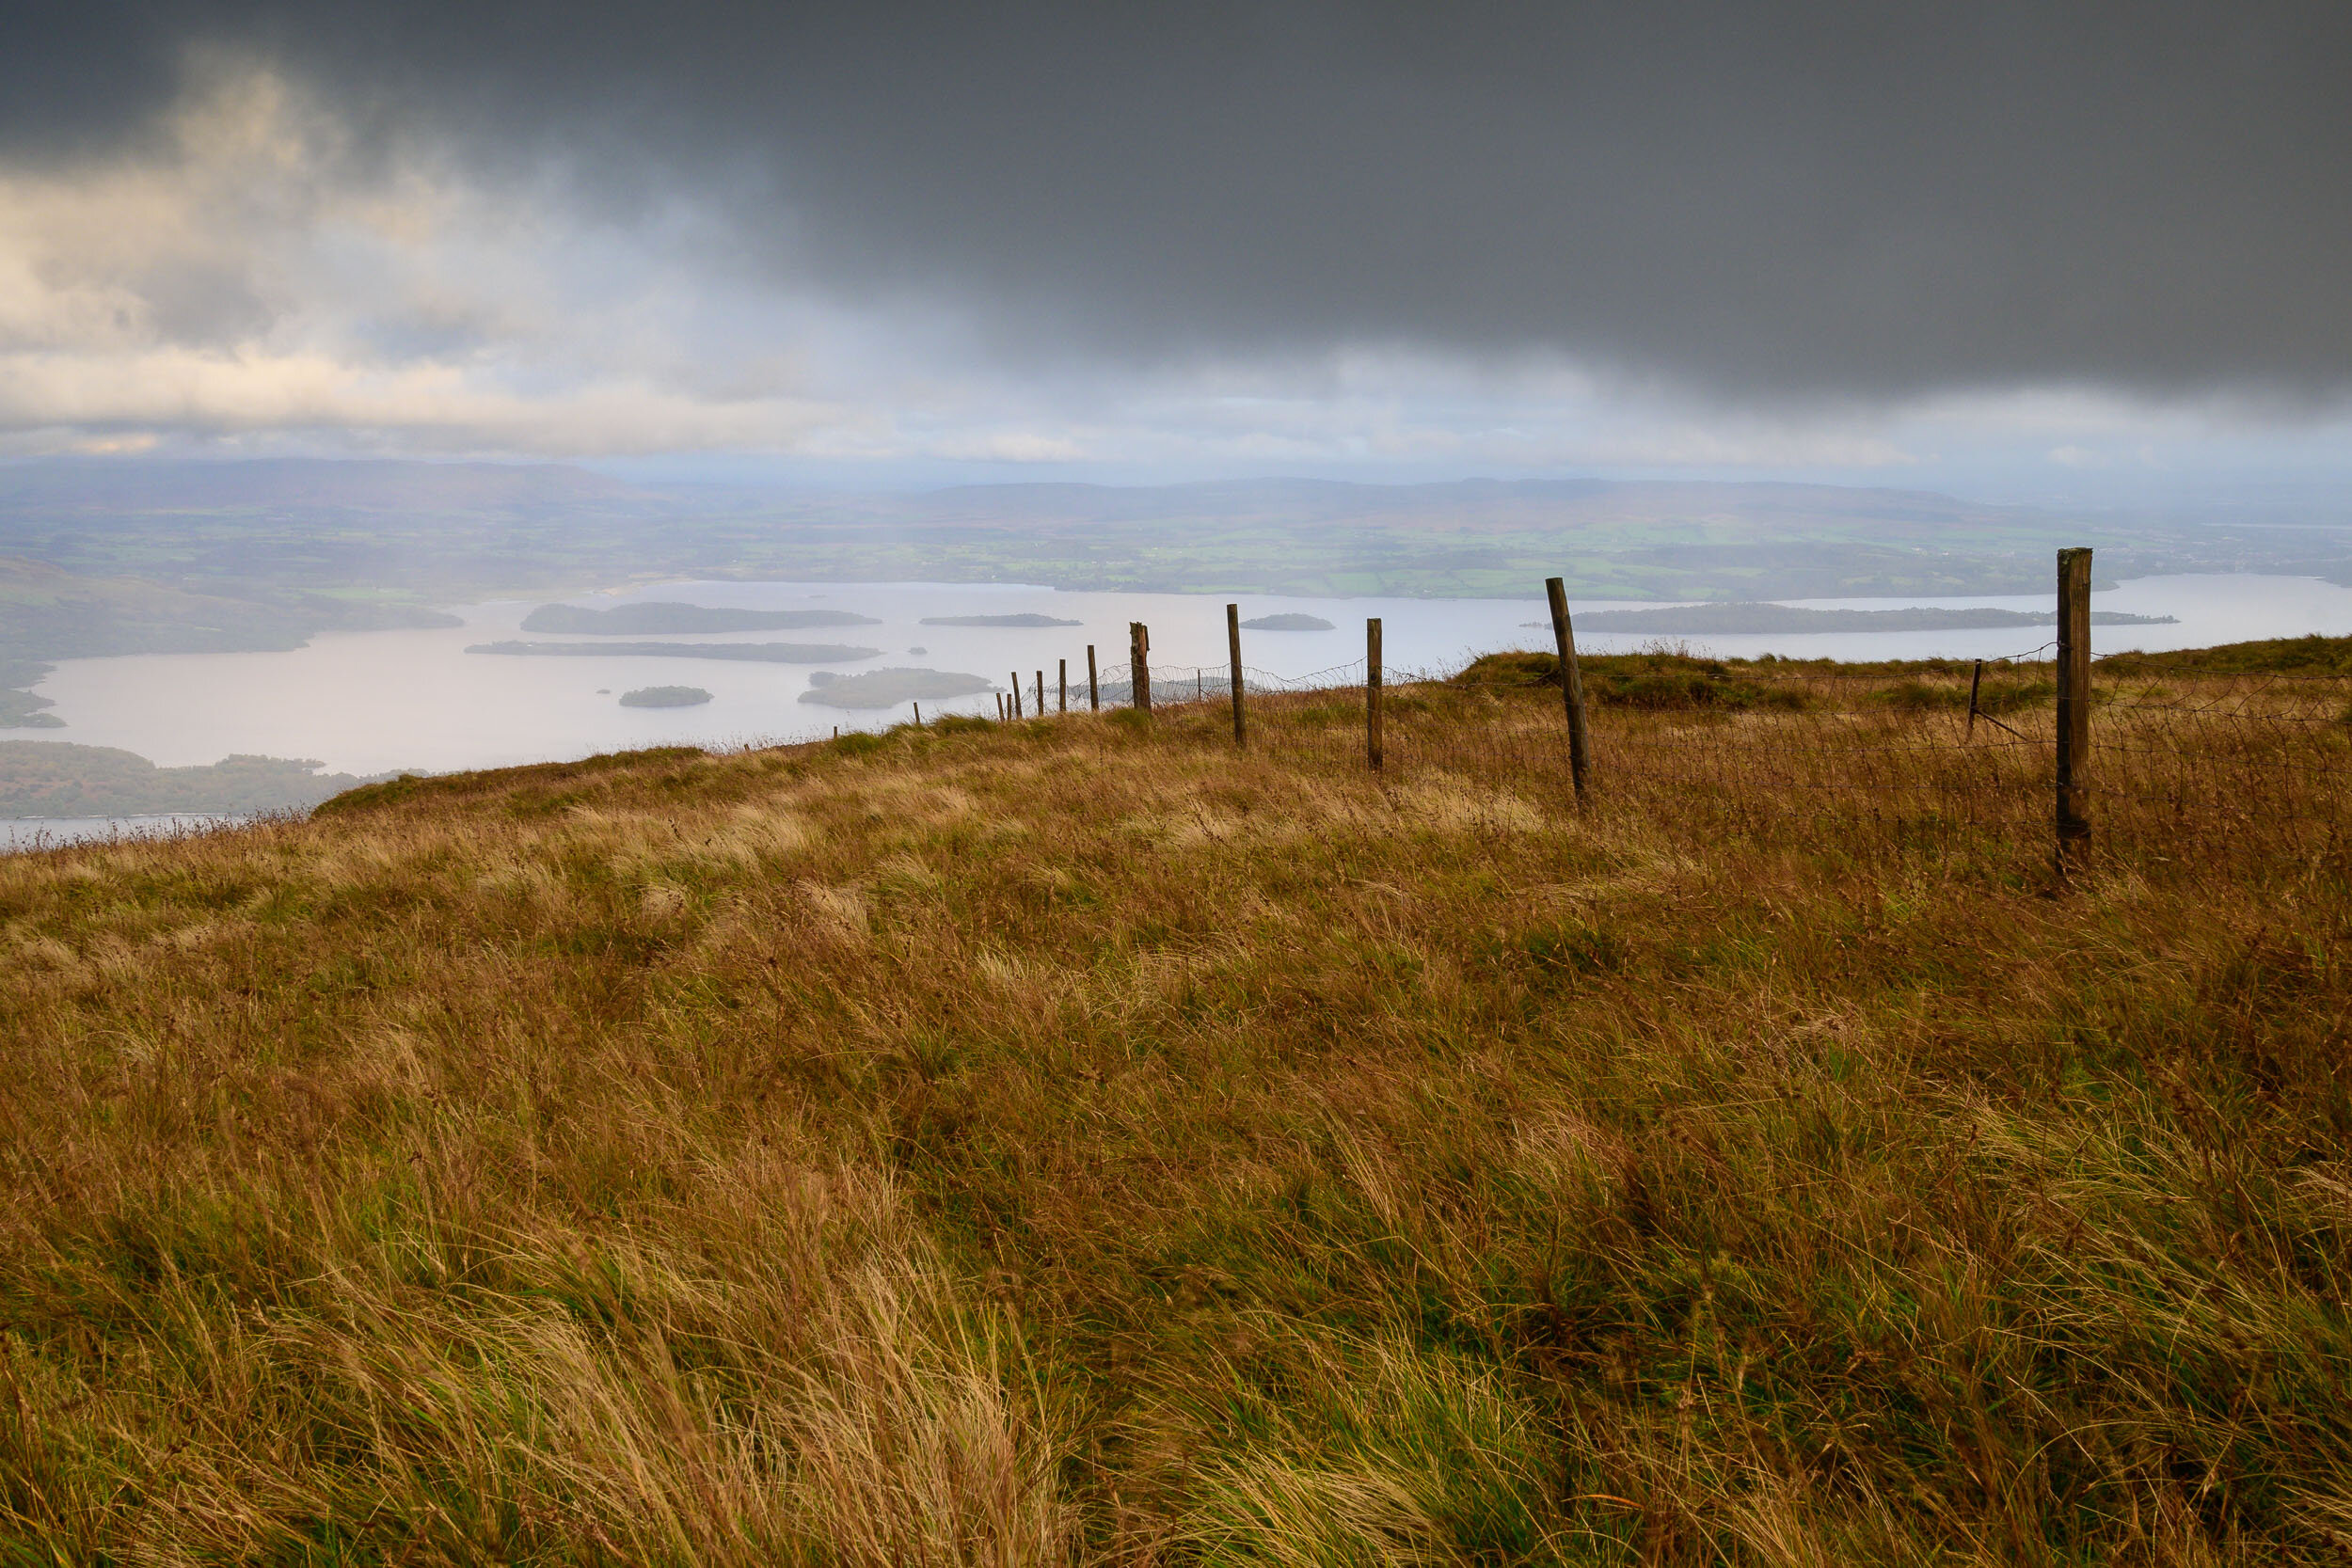
So, I was over the moon when I was able to make plans to return to Scotland. The primary purpose of my trip was to visit family but there was no way I wasn’t going to make an ascent of a hill or mountain when I was there. A quick review of OS maps revealed Beinn Dubh on the shoreline of Loch Lomond. It’s a hill I’ve driven by many times but never walked up. As it was enroute it was the ideal candidate for a quick walk.
To make a quick ascent it was necessary to cut down on some of the weight of my normal photography gear. I needed a lightweight setup. In this video, I not only share with you the photographs from my ascent of Beinn Dubh, but I also share with you my lightweight kit bag. Let me know in the comments below what your lightweight kit bag is.
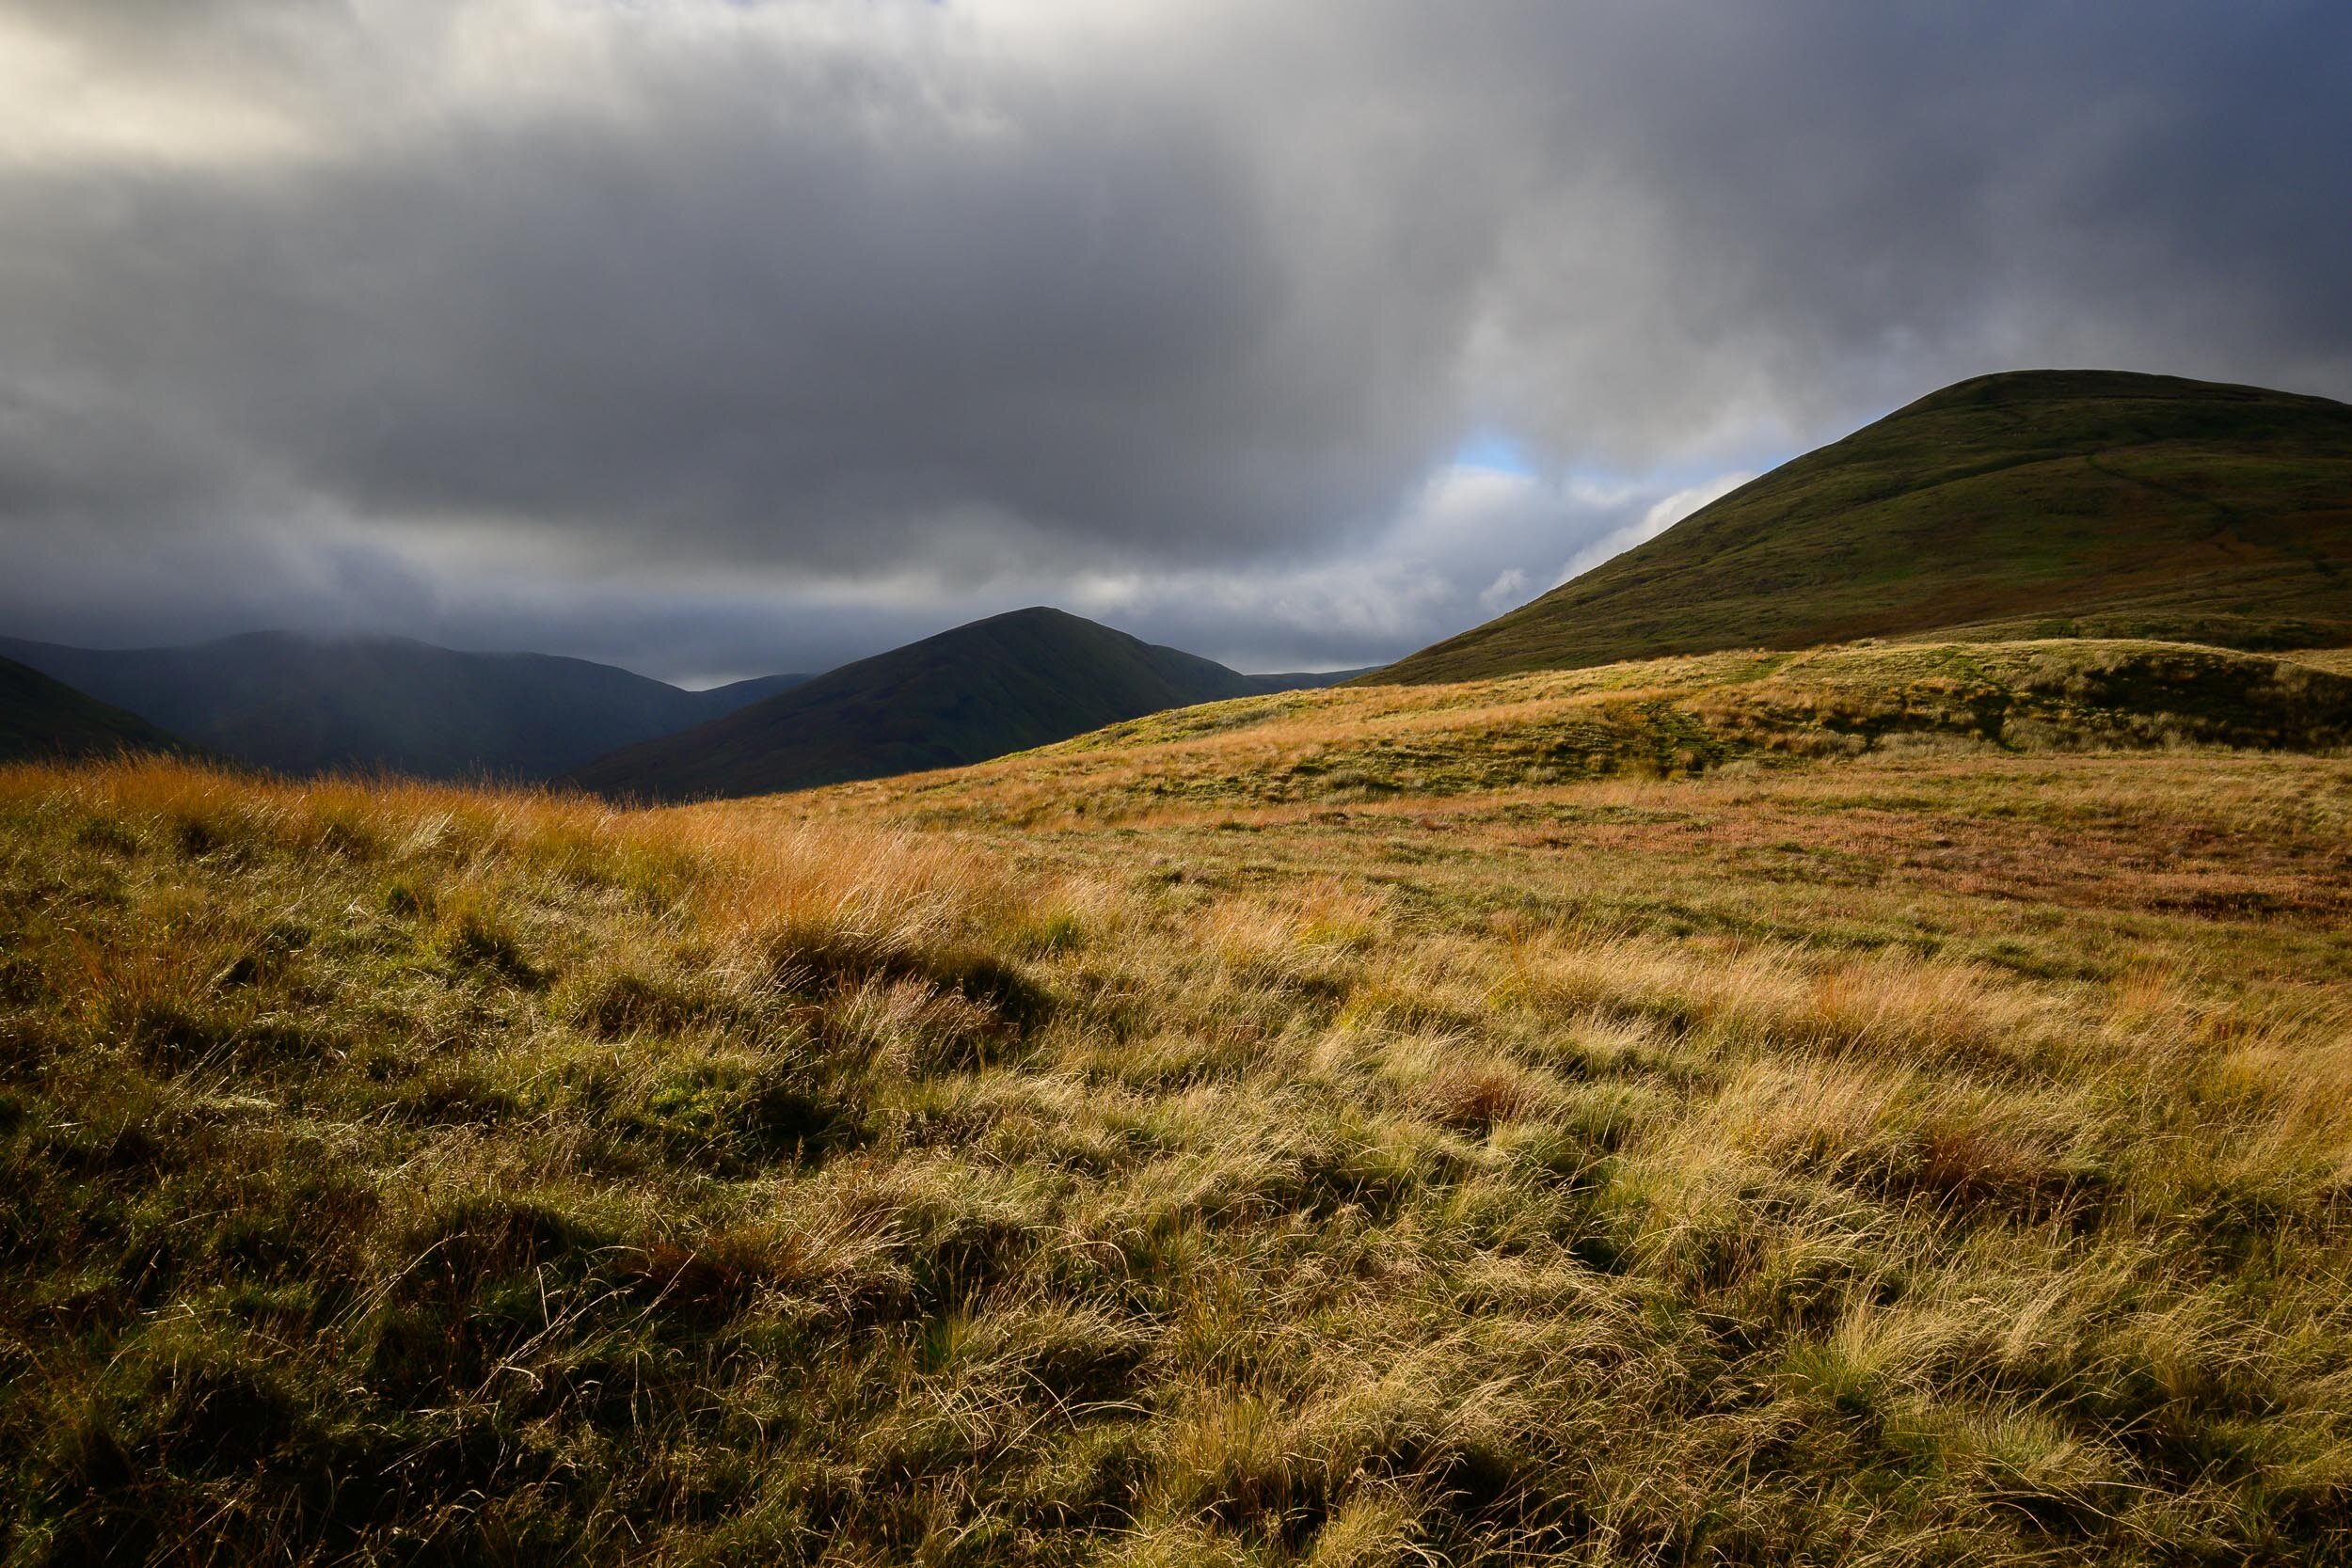
Landscape Photography of Loch Lomond and Beinn Dubh
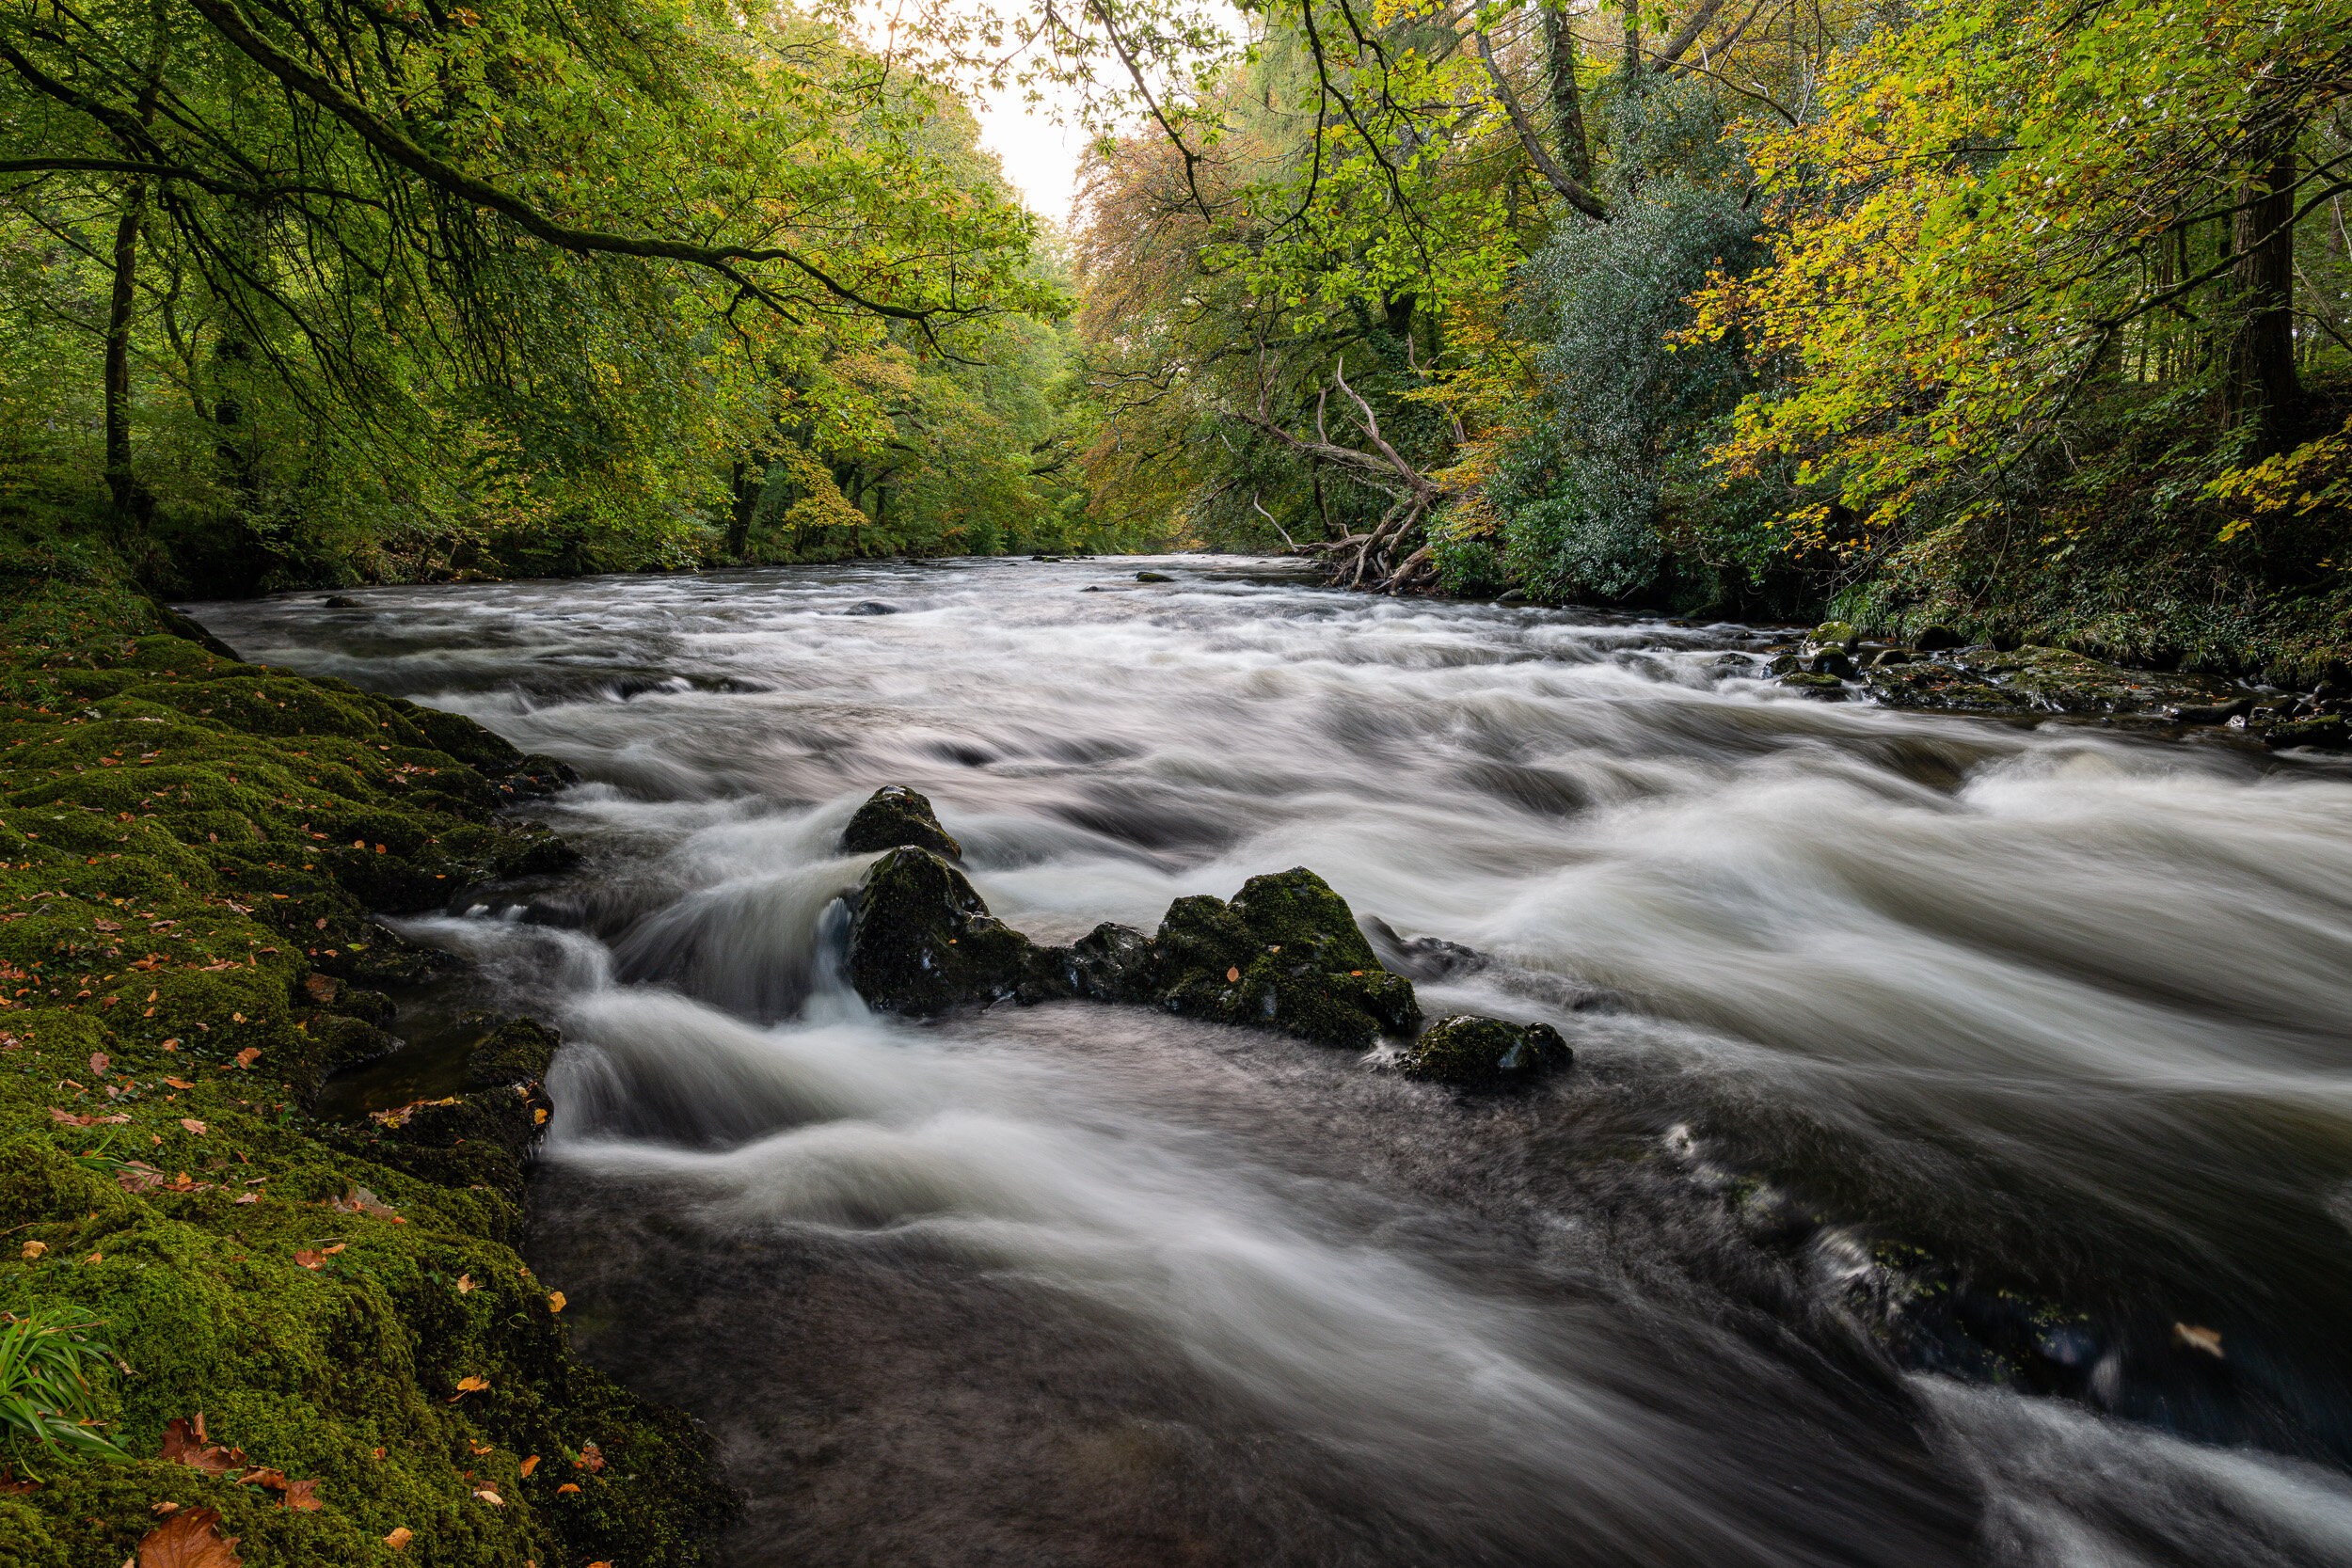
Discovering Beauty in a Winter Woodland
In the blog this week I head back to Holne Bridge to show you why I’m photographing one of my favourite autumn locations in the middle of winter.
Inspired by a Bit of Luck
I recently shared a blog post in which I talked about having a Plan A, B and C and how I ended up photographing one of my favourite autumn locations in winter. The photographs I captured surprised me and they made me realise that I was maybe missing a trick by ignoring Holne Bridge in the winter.
If I was missing a trick then I thought other photographers might be missing out on great photographs from their favourite seasonal locations by not shooting them off-season. As I already wanted to head back to Holne Bridge to capture some more winter landscape photographs I decided that I would create a video of my experience and share it with you in the hope that it will inspire you to do something similar.
Using a Circular Polariser
Over the last few weeks I’ve been chatting to a fellow photographer who is just starting out with his use of filters and I said one of the most important filters for most landscape photographers is the circular polariser. This statement was particularly true for me at Holne Bridge. In fact when it comes to photographing water the circular polariser is an essential bit of kit for me.
In the photographs below you’ll find an example of the same scene, one photograph was taken with the polariser on, and the other with no polariser. I think it clearly shows how much of a difference this filter can make. I’ve included a little demo of the effects of a circular polariser in the video as well. (If you are interested I use the Kase Filters K9 circular polariser).
I really hope you enjoyed this video and that it’s maybe inspired you to visit one of your favourite locations off-season. If it has or you already do something like this then please let me know in the comments below.
The Photographs
As always, here are the photographs that I captured in the video. Just click on them to see them in a larger format.
Holne Bridge at Winter, Dartmoor, Devon - Nikon Z7, Nikkor 14-30mm f/4 at 23mm, f/13, 1/4 sec at ISO 200, Kase Filters K9 holder and CPL.
The same image as above but without the polariser.
Winter River at Holne Bridge, Dartmoor, Devon - Nikon Z7, Nikkor 14-30mm f/4 at 18mm, f/13, 1/4 sec at ISO 400, Kase Filters K9 holder and CPL.
Super Wide Seascapes with the Kase Filters K9
In the blog this week I head out to one of my favourite coastal locations with the new Kase K9 filter holder and polariser to capture some super wide seascapes.
Switching to the Kase Filter System
Back in July I shared with you my thoughts on the Kase Filter system. I had made the switch from Lee Filters to Kase Filters back in late 2018, but I wanted to give them a proper test before I told you what I thought about them. If want to see that video and see the images of Boscastle harbour that I captured that beautiful summers evening then check out this blog post here.
Going from Kase K8 to the Kase K9 Filter Holder
As I said in that video, I was very happy with my Kase filter system including the K8 filter holder and slim polariser. I know nothing is perfect but I honestly didn't think there was room for improvement with the K8. That was all true until I picked up a Nikon Z7 with the Nikkor 14-30 mm f/4. With my previous wide angle lens, the Nikkor 16-35 mm f/4, you could happily shoot at 16 mm with the K8 and polariser with no vignetting. However, at 14 mm on the Nikkor 14-30 mm with the K8 and polariser, you could get a little bit of vignetting (the same applies for the Sony GM 16-35 mm.
So when the team at Kase Filters UK told me about the improvements they had made with the K9 and asked if I'd be interested in trying it out I jumped at the chance. I was keen to put this new K9 filter holder and polariser to the test but I needed a suitable location. Where could I shoot super wide angle images that need a polariser? Dawlish Warren beach of course!
Super Wide Seascapes
The removal of vignetting at 14 mm isn't the only improvement to the K9, there are a number of other minor, but very welcome improvements as well. If you want to know what they are, or if you should upgrade to the K9, then check out the video below:
When I got my Nikkor 14-30 mm f/4 lens I didn't think I'd notice that extra 2 mm or use it that often, but as it turns out I really appreciate it. Not only does it give me more creative options in certain scenarios, but the image quality and sharpness, particularly around the edges seems to be much improved over my trusty old 16-35 mm f/4. It's also good to know that I've also got a filter system that can make the most of those super wide angles and help me create images like this:
Dawlish Warren Sunrise #1, Devon - Nikon Z7 with Nikkor Z 14-30 mm f/4 at 14 mm, f/11, 1.6 sec at ISO 64, Kase Filters K9 holder, CPL, and ND grad.
Dawlish Warren Sunrise #2, Devon - Nikon Z7 with Nikkor Z 14-30 mm f/4 at 14 mm, f/13, 1 sec at ISO 64, Kase Filters K9 holder, CPL, and ND grad.
I hope enjoyed this quick look at the K9 and the images I captured that morning on Dawlish Warren. If you've got any questions about the Kase Filters system, the K9 or the images I captured let me know in the comments below.
A Quick Word on Moving to the Kase System

Since moving to the Kase Filters system a number of regular readers of the blog and viewers of my YouTube channel have asked about how easy it is to move from another filter system to Kase. Well, the good news is that if you are coming from another 100mm based system such as the Lee100 Filter System, most of your existing ND and ND grads should work just fine in the K9 or K8 holder.
The Lee Filters range of Stoppers, which have foam on the inner edge, need to be slotted in with the foam facing outwards (as shown in the image).
Kase circular polarisers (CPLs) are designed specifically for each of their filter holders so you probably won’t be able to use a CPL from another manufacturer. The good news is that the K8 and K9 filter holder kits come with the correct CPL for that holder.
I appreciate that changing filter systems can be costly and the need to gradually transition is an important one so I hope this information is useful for you. I would of course recommend you plan to replace your ND and ND grads with Kase equivalents as Kase filters have some useful benefits (which you can hear about in the video below).

Return to Holne Bridge
This week I return to Holne Bridge on Dartmoor to try out a new camera and to give my father-in-law a helping hand with his photography.
Almost Autumn on Dartmoor
Out of all the seasons to photograph I find autumn the most difficult. Despite the autumnal season lasting a few months, the colours are really only at their best for a few weeks. If there are a few windy days this can shorten that period even more. The result of this really short period is that I sometimes miss the best of autumn all together. Last year was one of the few years that I actually made it out when the colours were nearly at their peak. I was lucky enough to capture images from Fingle Bridge and Holne Bridge.
Encouraged by what I captured last year I was really keen to get out again this autumn. Though my primary plan was to head out when the colours were at their best, I thought it would be useful to also head out early on in the season as well. I wanted to do this for a number of reasons. Firstly, I promised to take my father-in-law out for a shoot as he was going on a Dawn2Dusk Photography workshop and wanted to refresh his skills before going. I also wanted to refresh my knowledge of Holne Bridge, which I think is a great location for shooting autumnal landscapes.
The final reason was I wanted to try out the Panasonic Lumix S1R. This camera was on loan to me and I was keen to familiarise myself with it before putting it to use on the project I had planned for it. Fortunately for me I was already used to the handling and interface thanks to my use of the Panasonic Lumix G80 (which is my primary vlogging camera). However, the S1R has a much richer set of features and configuration options compared to my G80 so there was still plenty to familiarise myself with.
Two Mirrorless Cameras
Even though I had the S1R with me, I also decided to take along my Nikon Z7. There wasn’t any special reason for this other than I had a 24-105mm for the S1R and a 14-30 mm for the Nikon Z7 and I wanted to cover a wide range of focal lengths. I’m not planning on reviewing or comparing the two cameras (that’s not really my thing) but if you do want to see how the photos compare I have included a couple of shots from each camera for you to have a look at.


From my perspective the image quality from both cameras was superb and the only differences in the actual output are as a result of post-processing and focal length.
You’ll be able to see what I got up to with the S1R in a few weeks time so stay tuned!
Vibrant Colours
Moving away from gear and back to photography, even though I was a little early for peak autumnal colours the colours I did find were wonderful. There were splashes of yellow from the leaves but there was still a lot of green about which looked wonderfully vibrant.
Holne Bridge #5, Dartmoor, Devon - Nikon Z7, Nikkor Z 14-30mm f/4 at 14 mm, f/11, 2 seconds at ISO 400. Kase Filters K9 filter holder and CPL.
Despite the high water levels and the low light levels (we arrived a little to close to sunset), we both had a great time photographing this stunning Dartmoor location. I familiarised myself with the S1R and Holne Bridge, and more importantly, my father-in-law got himself into the swing of taking photographs again. Considering we were there for probably less than an hour we both felt it was a productive session.
Do you have plans for some autumnal photography? What locations do you like to shoot in the autumn? Let me know in the comments below.

Get Your Camera Out!
With sunrises now being at a much more sociable time of the morning I decided to get myself back into the swing of early morning rises and head to my favourite local beach.
Summer Sunrises
I like to think I don't have much of a problem getting up early in the morning so I can capture sunrise images. During the summer months the shock of a 3 am alarm call is enough to shake the resolve of even the hardest landscape photographer. While I can and have got up at this time in the morning it often means a fairly difficult rest of the day.
The difficult part is when I return from the shoot. It would be lovely if I could just come home, have some breakfast and then have a nice little nap. For a couple of hours. In reality though I have to plough through the rest of the day as if I had just got up at 7 am. It's hard to function with little sleep and still behave like a normal human being. It is for those reasons that I will only get up for a 5 am sunrise if the weather is promising to be epic or I am meeting someone.
Winter Sunrises
As the nights start to draw in it's getting harder for me to get out to shoot sunsets, so as I sat at my computer the other day planning out my photographic week it suddenly dawned on me (excuse the pun), that sunrises are now at a much more sociable hour! With a 7 am sunrise I don't have to set an alarm until 5 am, maybe even 5:30 depending on the location.
To get myself back into the swing of early morning rises I decided that I would make life easy for myself and go somewhere I know and that is local. If you've been reading my blog for a while you'll know exactly the location I'm talking about. Yep, that's right, Dawlish Warren. I've created many videos and blog posts from this location. There are too many to list here, so if you want to see what I captured on previous trips just use the search box at the top of The Exposed Blog page and search for Dawlish Warren.
Dawlish Warren - 2015. Nikon D750, Nikkor 16-35 mm f/4 at 35 mm, f/13, 72 secs at ISO 100.
Get Your Camera Out!!
I was actually rather excited to be heading out for a dawn shoot at Dawlish Warren. Not only I had I not been on a sunrise shoot for a while but I also hadn't been to Dawlish Warren for some time. It was hard to tell exactly what the sunrise would be like from the weather forecast but I wasn't going to let that put me off.
I arrived at Dawlish Warren about 6 am, roughly an hour before sunrise. As I strolled along the beach I took in a big lung full of fresh sea air and decided that there was no place better to start the day. I was the only person there and it was wonderful.
When shooting the beach at Dawlish Warren I normally like to shoot past groyne 9. Dogs aren't allowed past groyne 9 at any time of year so there is no risk of jumping dogs and unwanted footprints in the pristine sand. As I got to groyne 9 I could see a heavy bank of cloud on the horizon where the sun would rise from. This could be a problem but I decided not to let it get me down and so I sat down on one of the sand dunes to see how things might pan out.
As I watched the waves roll in that pesky bank of cloud wasn't shifting. The sky above Dawlish Warren was looking good with plenty of breaks in the cloud which, if the sun could break the horizon, would light up nicely. The time for sunrise approached, arrived, and went, but no sign of the sun in the sky.
Sitting there I did think to myself that I might not even bother getting the camera out. It's not as if I'd never been here, or would never return, or that I didn't have any good shots from this location. Experience has taught me though that it is always worth getting the camera out! So I got my camera out and I have to say that I'm glad I did. As the sun finally broke above the bank of cloud the sky started to get interesting. Not amazing, but interesting enough for me to want to take some photographs. I soon found my creative juices flowing and I got busy with the job of creating photographs.
Dawn at Dawlish Warren, Devon - Nikon Z7 with Nikkor Z 14-30 mm f/4 at 14 mm, f/13, 99 sec at ISO 64, Kase Filters K8 holder, CPL, and 6 stop ND.
Do you shoot sunrises all year round or wait like me until the autumn and winter months? What is your favourite sunrise location? Do you always get your camera out or have you gone home having taken no pictures at all? Let me know in the comments below.

Burnham-on-Sea
This week I head to Burnhan-on-Sea to shoot the lighthouse. I's a location that I've been meaning to photograph for a long time!
I’ll Get There One Day
I have over 400 pins in my custom Google Map but most of them I have never visited. Some of them are in far-flung locations like Iceland and the Faroe Islands, while some of them are just up the road. One such location is Burnham-on-Sea but despite its close proximity to home I've never really photographed it before. I did go a few years ago to check out the location to see if it had potential, but I've never made it back.
From that initial visit I knew the type of conditions I wanted to shoot my image in. Sunrise, high (outgoing) tide, and broken cloud. The trouble with setting yourself specific conditions like that is that they rarely all come together at the same time. When you have limited opportunities to be out with the camera like me, then having very specific conditions really does limit you. So for well over a year I never actually made it back to Burnham-on-Sea.
Fortunately for me fellow photographer Andi Campbell-Jones is a bit of an expert on shooting the lighthouse at Burnham-on-Sea, so when he asked me if I wanted to join him one evening I couldn't say no. If it was going to be good enough for Andi, it would be good enough for me!
It was good to finally get out with Andi to do a spot of landscape photography. I'd got to know Andi through my use of Kase Filters and even though we'd managed to meet each other in person a couple of times we'd never quite managed to get out with our cameras. This is despite both of us living in the same town!
I Made It!
Arriving at Burnham-on-Sea the conditions were looking very favourable, particularly the tide height. I always knew a high tide would work best, but as Andi informed me it needed to be of a certain height before it would surround the feet of the lighthouse. This was very useful information for future shoots so as soon as I got home I added it as a note (along with some other handy hints) in the pin for Burnham-on-Sea location in my custom Google Map.
Burnham-on-Sea Lighthouse #1, Somerset - Nikon Z7, Nikkor Z 14-30 mm at 30 mm, f/13, 106 seconds at ISO 64, Kase Filters K8 filter holder, CPL and 10 stop ND.
With the tide now around the legs of the lighthouse I soon got to work on getting some compositions. This wasn't proving as easy as I first thought it might be. Andi's knowledge of the location was apparent as he seemed to know exactly what he was doing (which was later proved in the images he published. I think the main challenge for me was finding a balanced composition. There was some wonderfully heavy cloud in the sky which when shot at wine angles looked very impressive. However, shooting at the wide angles also revealed the much clearer patch of sky to the left. For me, this left the image feeling a little unbalanced, and this light patch was reflected in the water as well.
Burnham-on-Sea Lighthouse #2, Somerset - Nikon Z7, Nikkor Z 14-30 mm at 14 mm, f/13, 13 seconds at ISO 64, Kase Filters K8 filter holder, CPL and 6 stop ND.
One of the other challenges I had was exposure time. The lighthouse and beach is a scene that suits a long exposure. By smoothing out the sea the scene takes on a different tone reducing the distractions of the waves allowing the viewer to focus on other elements such as the lighthouse itself. I struggled to find an exposure duration that would flatten the water but not add to much blur to the clouds. I don't mind blurring the clouds, but if I do I want to make sure it looks intentional and not as a by-product of another decision I've made. I could have gone with a really long exposure but with the fading light and a lack in confidence of a single composition I didn't want to commit 4 minutes of my limited time.
Burnham-on-Sea Lighthouse #3, Somerset - Nikon Z7, Nikkor Z 24-70 mm at 24 mm, f/11, 2 seconds at ISO 64, Kase Filters K8 filter holder and CPL
While I did get some pleasing images from the shoot, my inexperience of the location was clear. This doesn't trouble me. After all, this is all part of the photographic experience. Going to new locations, trying out new things and learning. I gained a lot of knowledge of this location both from Andi and from actually shooting it! One thing is for sure I will be returning and armed with some local knowledge of my own now I'm sure it won't be long before I'm back.
Burnham-on-Sea Lighthouse #4, Somerset - Nikon Z7, Nikkor Z 14-30 mm at 14 mm, f/11, 30 seconds at ISO 64, Kase Filters K8 filter holder, CPL and 6 stop ND.

Photographing Boscastle and Using Kase Filters
I'm back with a new video! This week I head to the picturesque village of Boscastle in Cornwall to capture some images of the distinctive S shape harbour. I also talk a little bit about filters and what I like about the Kase Filter system which I'm now using.
Back to Boscastle
Boscastle has a special place in my photographic heart. It was about 5 years ago that I decided I really wanted to start learning the craft of photography so I spent the day with local photographer Ross Hoddinott for a bit of 1-2-1 tuition. The first location we visited was Boscastle and from that viewpoint on Penally Hill I probably learnt more about composition than I'd done in the previous 5 years.
Since that day I've been returning to that viewpoint every year to capture images the harbour. Some years have been more successful than others but I've always enjoyed looking down onto that distinctive S-shaped harbour and the hills that run along with it. There's more than just the harbour to shoot as well. There are a couple of great viewpoints closer to the coastline that are worth checking out. Read my blog post Sunrise at Boscastle to see them.
A Slight Break in the Weather
While the lovely summer weather we've been having here in the south-west is fantastic, it's not exactly been optimal for landscape photography. I love the extended hours of light that allow me to travel further and get out more, but those pesky blue skies don't always translate well into good landscape photographs.
After a few weeks of "great" summer weather there was finally a break from the blue skies and the weather forecast was predicting some decent cloud cover that would hopefully make things a bit more interesting. Fortunately for me it was also going to be high tide around sunset as I was keen to shoot some long exposure seascapes. All I had to do was pick a location. Boscastle immediately sprung to mind!
Kase Filters
Even though I'd already made one of my 5 Minute Photo Adventure videos from Boscastle I was so optimistic about the conditions that I thought it would be worth making another vlog from there. As I was going to be shooting long exposures seascapes I thought it would also be an excellent opportunity to talk about Kase Filters. A few months ago I needed to purchase a new filter system and after recommendations from some fellow photographers I know I decided to go with the Kase Filter system. You can hear what I think about them in the video and watch me put them to use.
If you'd like to see how I got on with my latest photography adventure to Boscastle and hear my brief thoughts on the Kase Filter system, then check out the video below.
A Summers Evening in Boscastle
So was my evening in Boscastle a successful one? Let’s find out.
As you will have seen in the video I actually got the better light early on in the evening. Normally the light gets better the closer you get to sunset but due to atmospheric conditions the light fizzled out a bit as the evening progressed. The following image is my favourite because it has the golden light on the foreground rocks as well as the hills surrounding the harbour.
Last Light at Boscastle Harbour, Cornwall - Nikon D850, Nikkor 16-35mm f/4 at 20mm, f/13, 100 seconds at ISO 64, Kase Filters CPL, 6 Stop ND and ND Grad.
The other two images I took are pleasing enough but compared with the first I think they lack some depth and colour.
Boscastle Harbour at Sunset, Cornwall - Nikon D850, Nikkor 16-35mm f/4 at 19mm, f/13, 100 seconds at ISO 64, Kase Filters CPL, 6 Stop ND and ND Grad.
Out to Sea, Boscastle, Cornwall - Nikon D850, Nikkor 16-35mm f/4 at 18mm, f/13, 160 seconds at ISO 64, Kase Filters CPL, 6 Stop ND and ND Grad.
Overall though I was very happy with my adventure to Boscastle and the photographs I took. Does that mean I won't go back? Of course not! There will always be new compositions to found and different conditions and lighting to work with.
I do hope you enjoyed the video and photographs and that it has inspired you to visit Boscastle. If you are looking for more Cornwall locations to inspire your photography then check out some of my other posts from Cornwall. If you've got a favourite Cornish location that you want to share then let me know in the comments below. See you next time!