
Landscape Photography Adventure in the Lake District - Part 3
In this special blog post, I share with you the final part of my landscape photography adventure video from the Lake District.


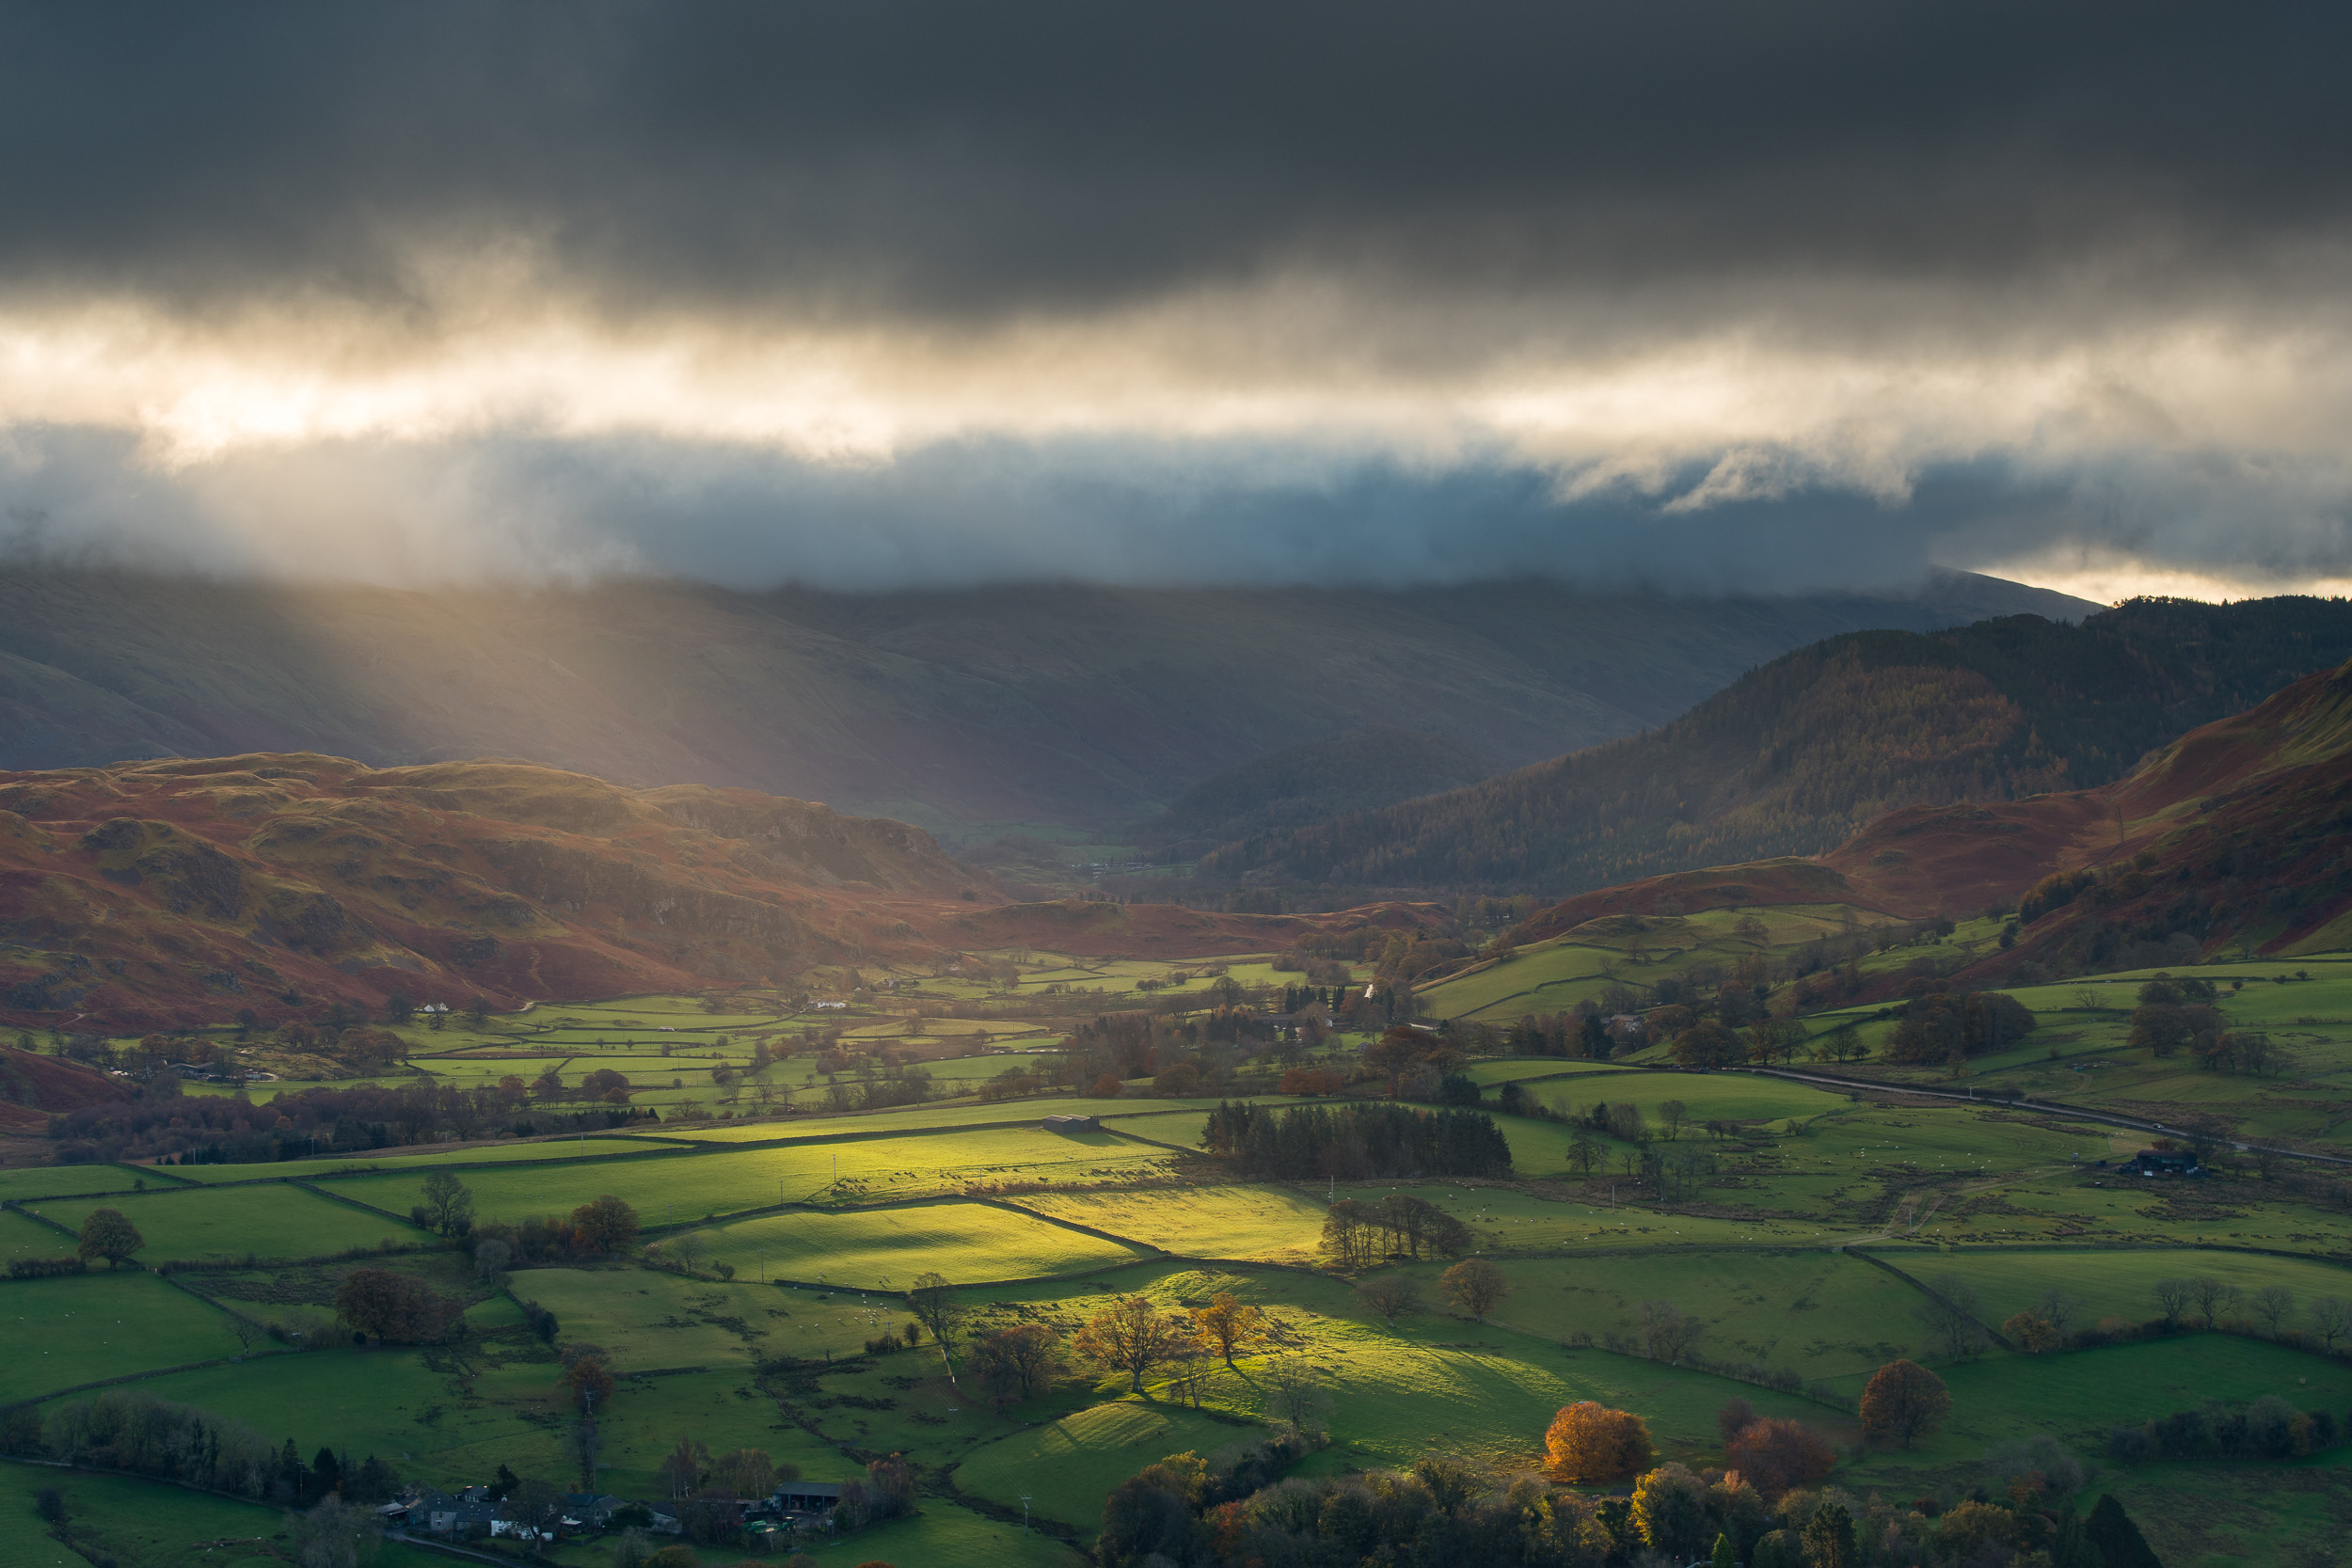
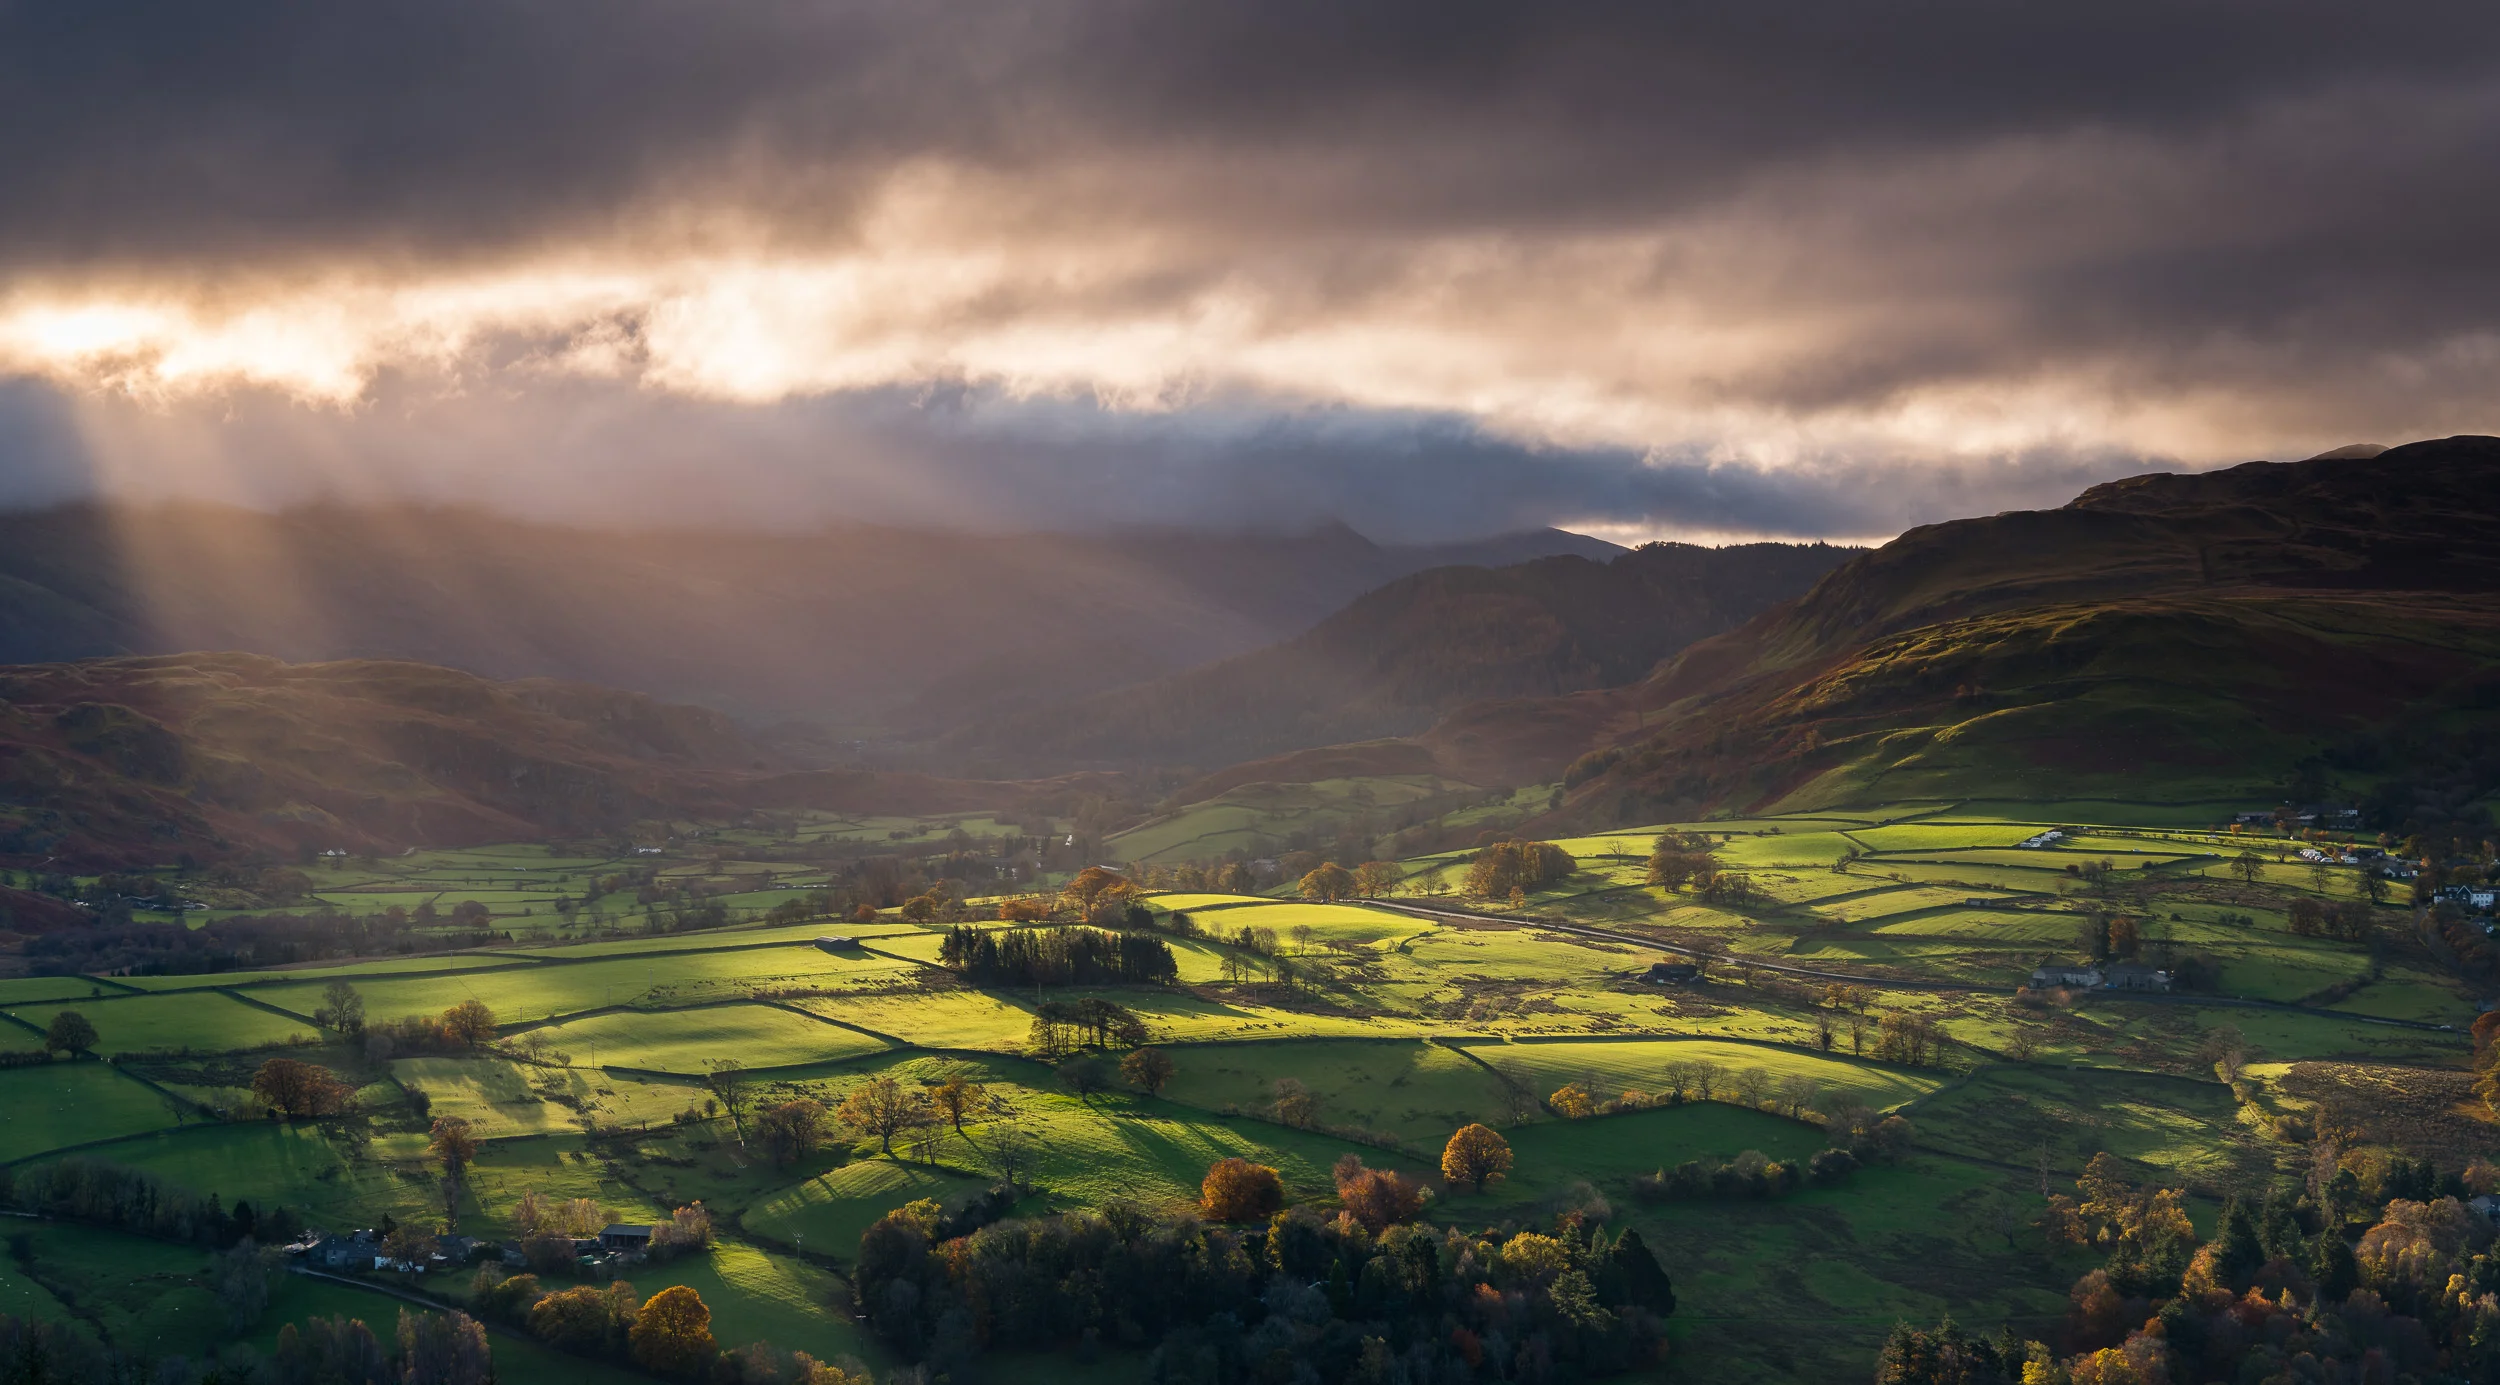
If you watched part 1 and part 2 you'll know that I didn't have the best of luck with the weather. For two days I had grey, flat light, and while I was capturing nice images, they just lacked the dramatic light that I know the Lake District can produce. Then, and I'm not joking here, the light broke through the clouds in the last 15 minutes of my adventure. I was just about to pack up and leave as I need to get back to my hotel to check out when all the action happened.
As long as I could go away with one great image I would have been happy. It just happened that on this trip I needed to wait until the very end of my trip!
Overall I had a really good time in the Lake District. While the photography was challenging at times, it was also a lot of fun. As is often the case with these trips the enjoyment comes from more than just photography. I'm a big fan of the outdoors, so just being outside and wandering about some of these great spots and locations is a wonderful experience. I also met some great people on my adventure. From fellow photographers, hill walkers, and even a fell runner. I guess I like to talk as much as I like to take photographs!
I hope you enjoyed this three-part blog and vlog on my recent Lake District adventure. I'm already making plans for more adventures next year, so remember to stay tuned.
So have you ever photographed the Lake District? What has been your favourite 15 minutes of photography? Let me know in the comments below.

Same Spot, Different Photo
In this blog post I discuss why I was back photographing Trevose Head again and how despite putting my tripod legs in almost exactly the same spot as before I ended up with a unique image.
The Perfect Location?
I like shooting at Trevose Head on the north Cornish coast. I never seem to leave that location without having taken a decent photograph. Sometimes I even leave there with a great photograph. I also just enjoy being there. It's an amazing bit of coastline with its lighthouse, rocky cliffs and crashing waves. It can get very windy, and salt spray on your equipment can be a challenge, but just being there and watching the sunset over the coast is a pleasure.
If you want to see what I'm talking about then you should check out my 5 Minute Photo Adventure video from Trevose Head.
But what makes Trevose Head so special? Why do I keep putting my tripod legs in the same spot? I think one of the great appeals with Trevose Head is that it works in a variety of weather conditions. It doesn't seem to matter if the weather is good or bad, overcast, windy, or even what season it is. Don't get me wrong. It's not the perfect location. No location is. However, if you can vary your technique and adjust your style to the conditions then it's one of those locations where you stand a good chance of making a decent image.
Here are some of my previous images from Trevose Head.
Whose Tripod Holes Are They?
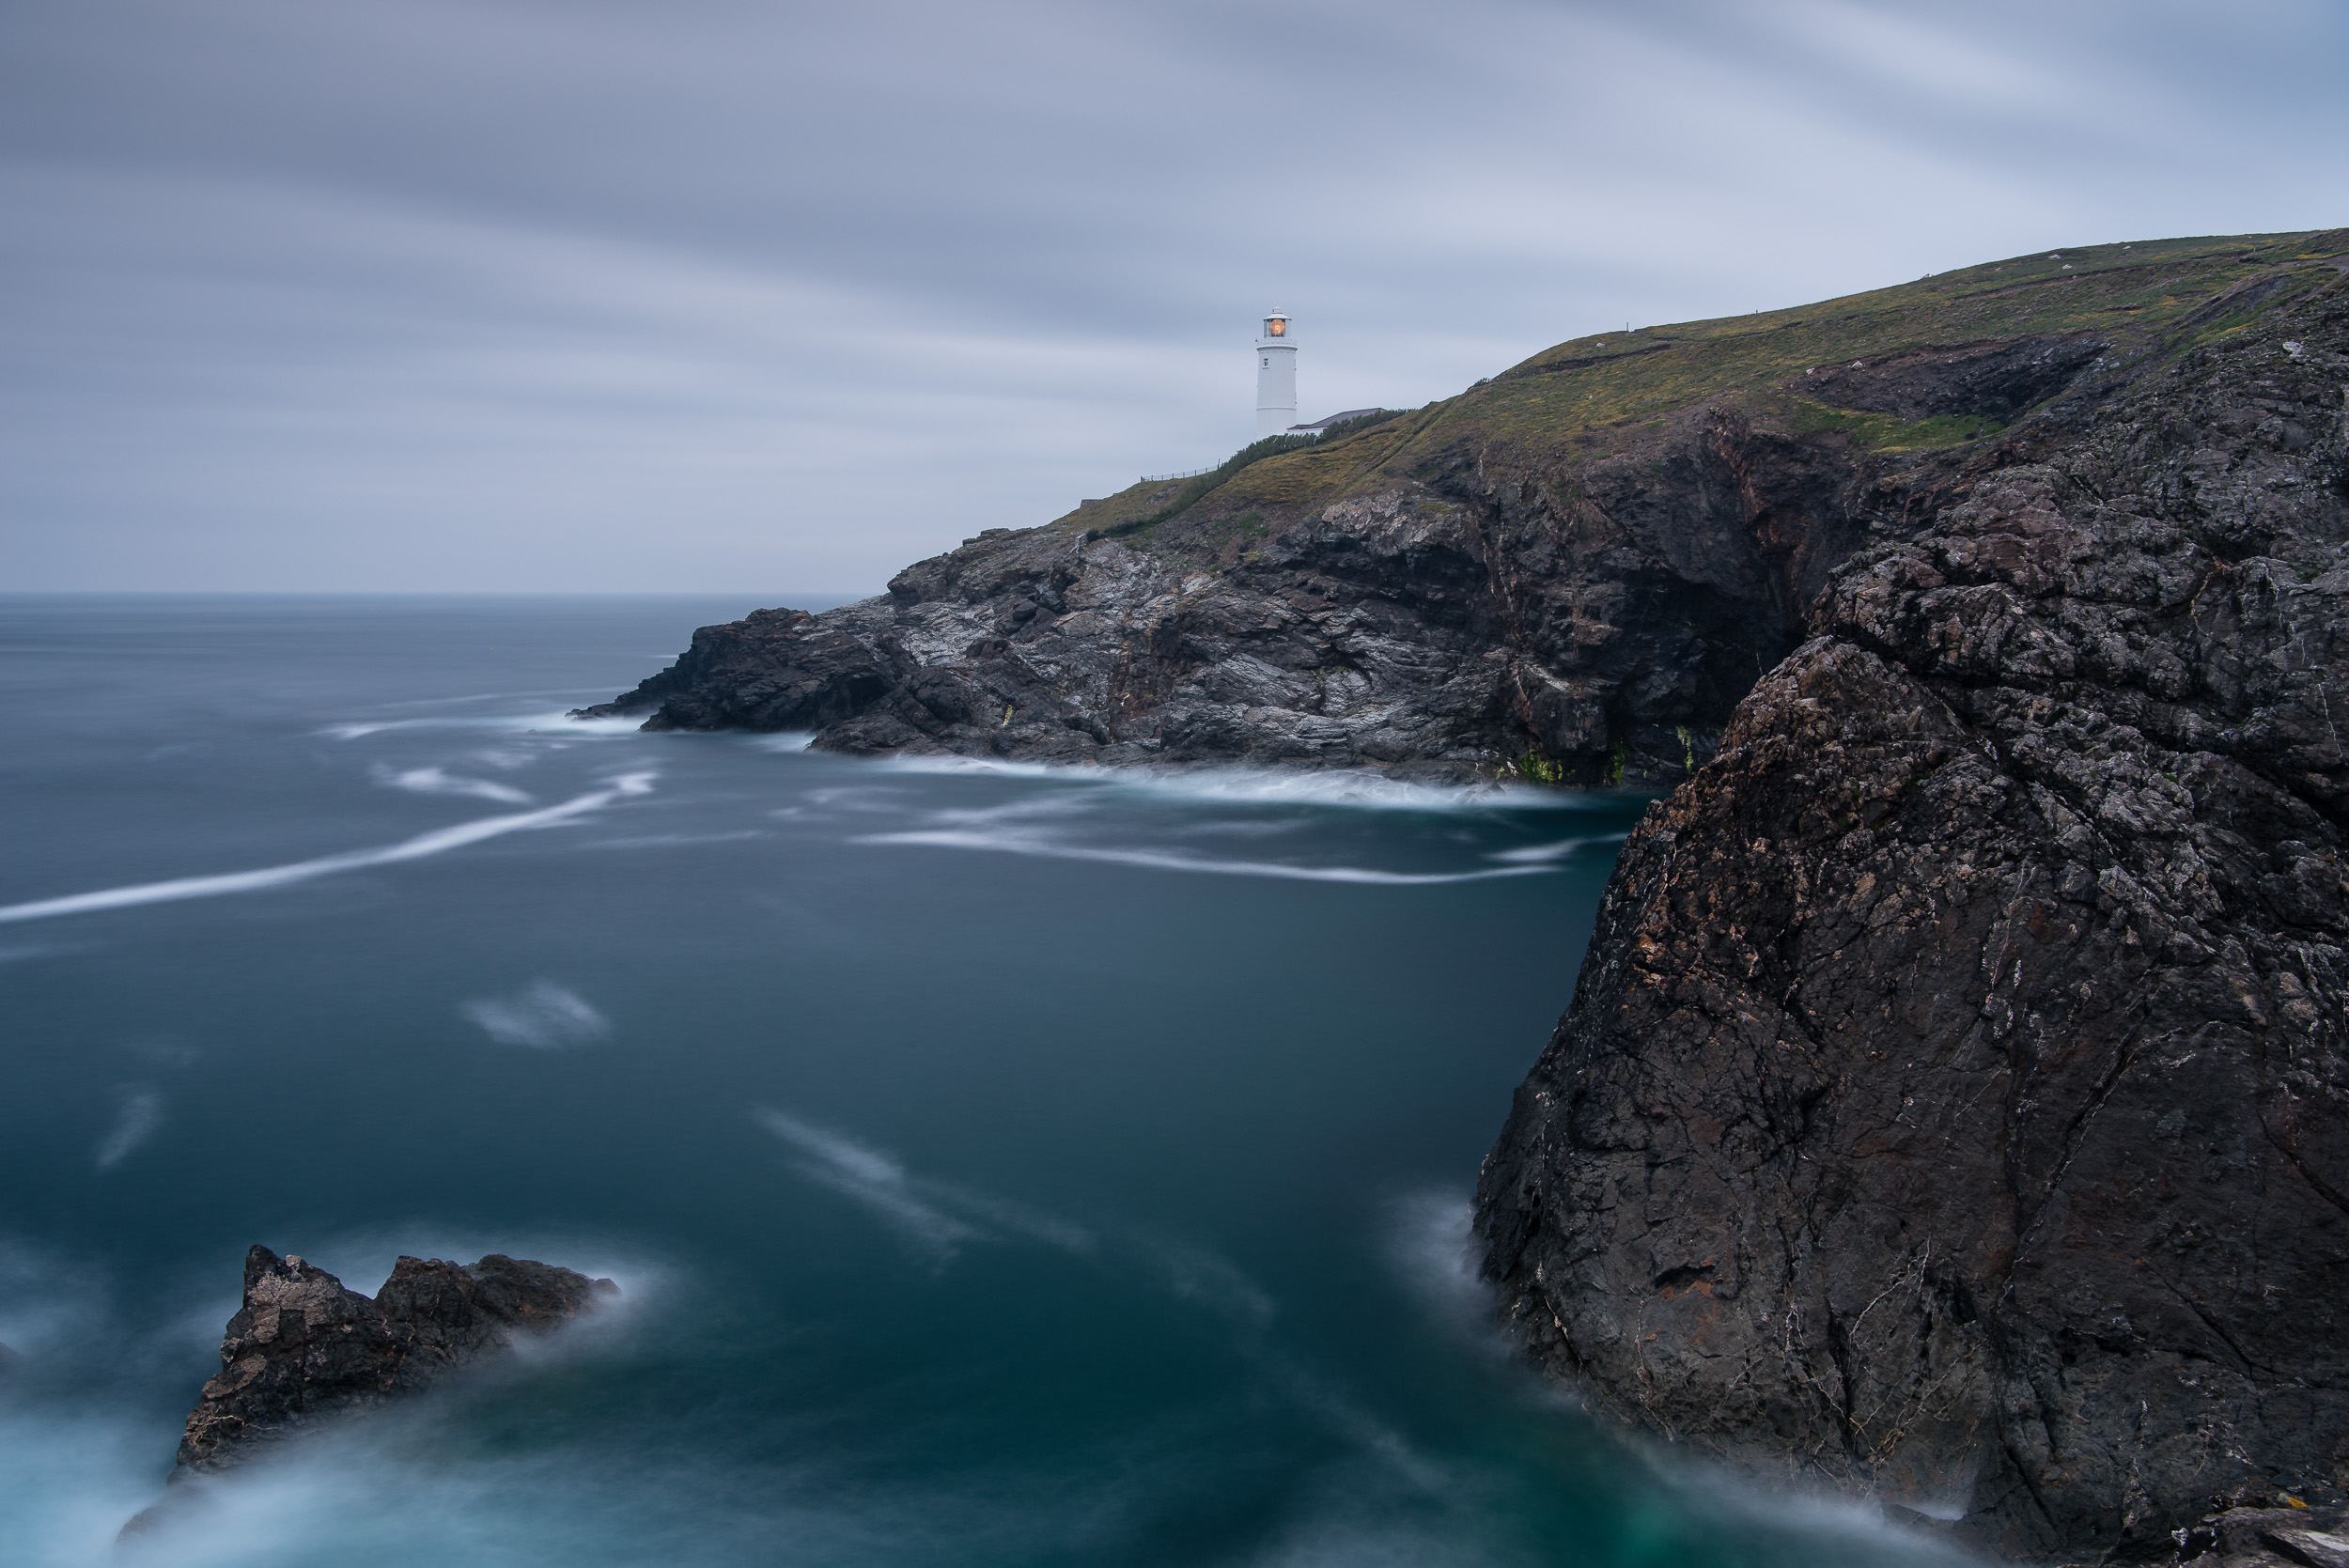
I've just returned from another visit to Trevose Head and the image I captured there inspired me to write this blog post. Though I've previously captured some images that I'm really happy with from Trevose Head, I still thought I could capture something new. So when my friend asked me if I wanted to join him for an evening's shoot at Trevose Head there was only one answer.
It was going to be tough to get there before sunset though. The earliest I could leave home was 7 pm, and given that it is around a 90-minute drive that would only leave me about 40 minutes to jump out the car, make the short walk, setup, and capture something. But the weather forecast looked good and based on my previous experience from that location, I knew the journey would probably be worth it.
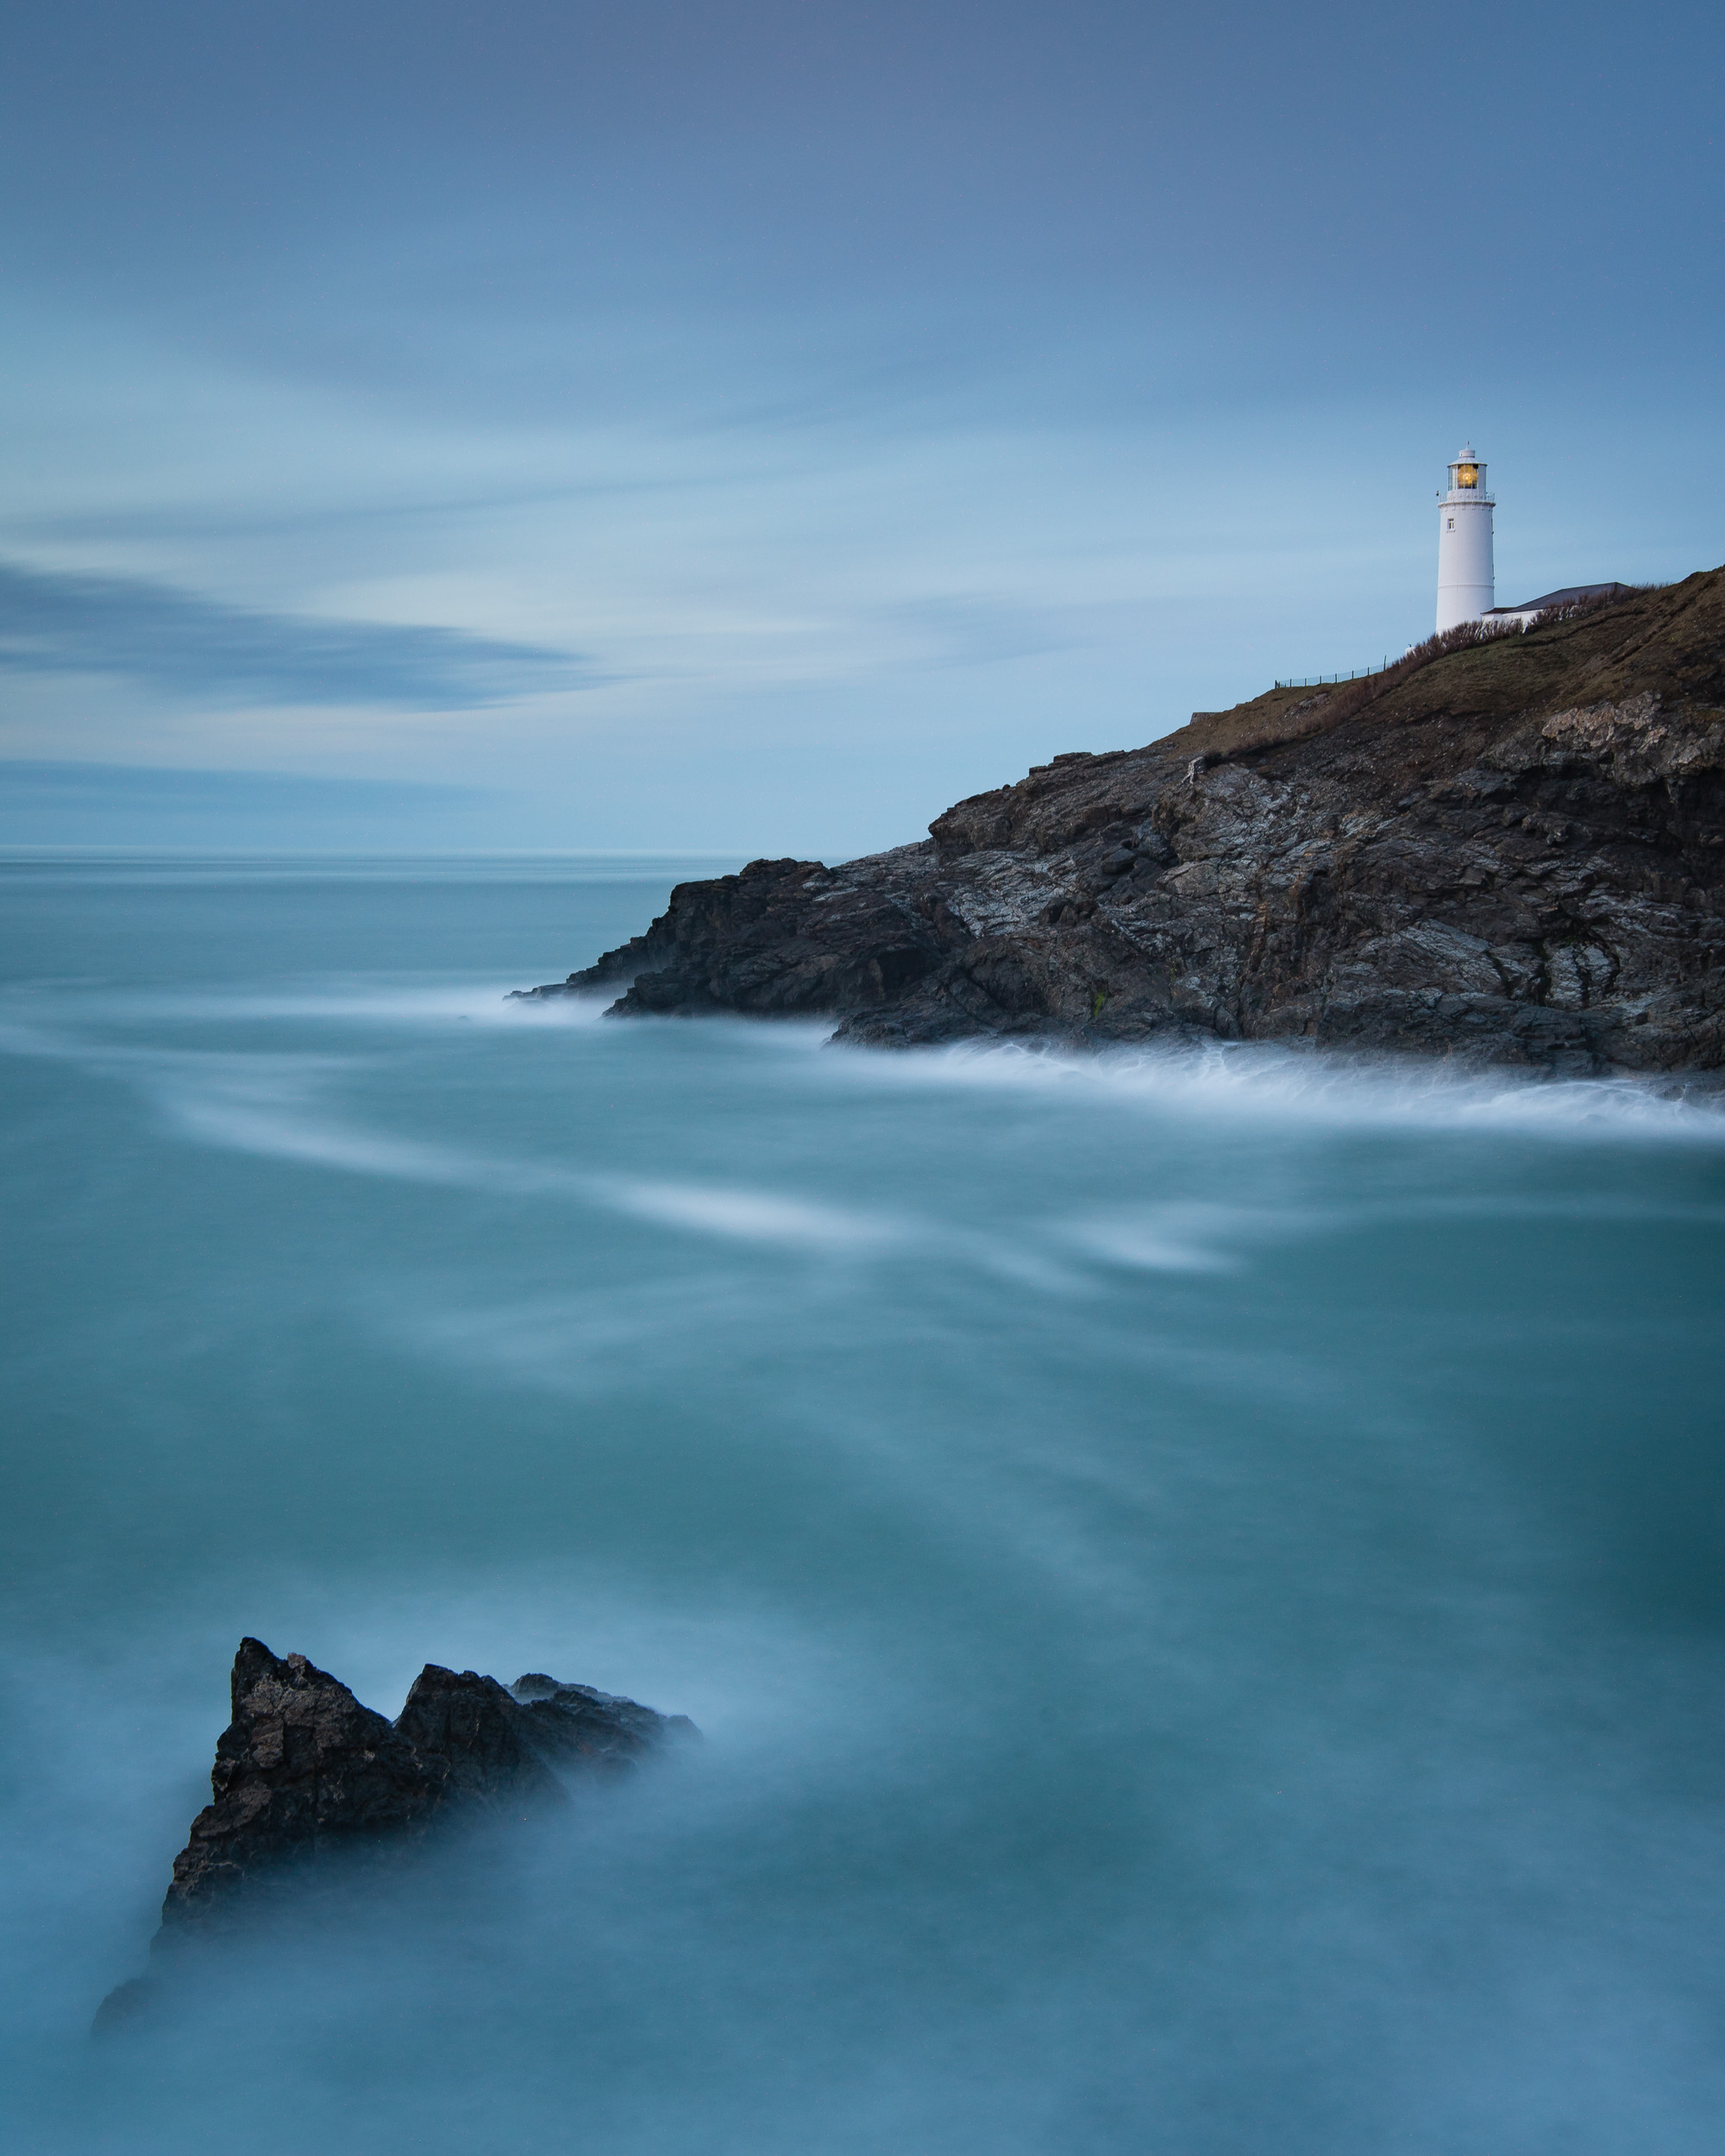
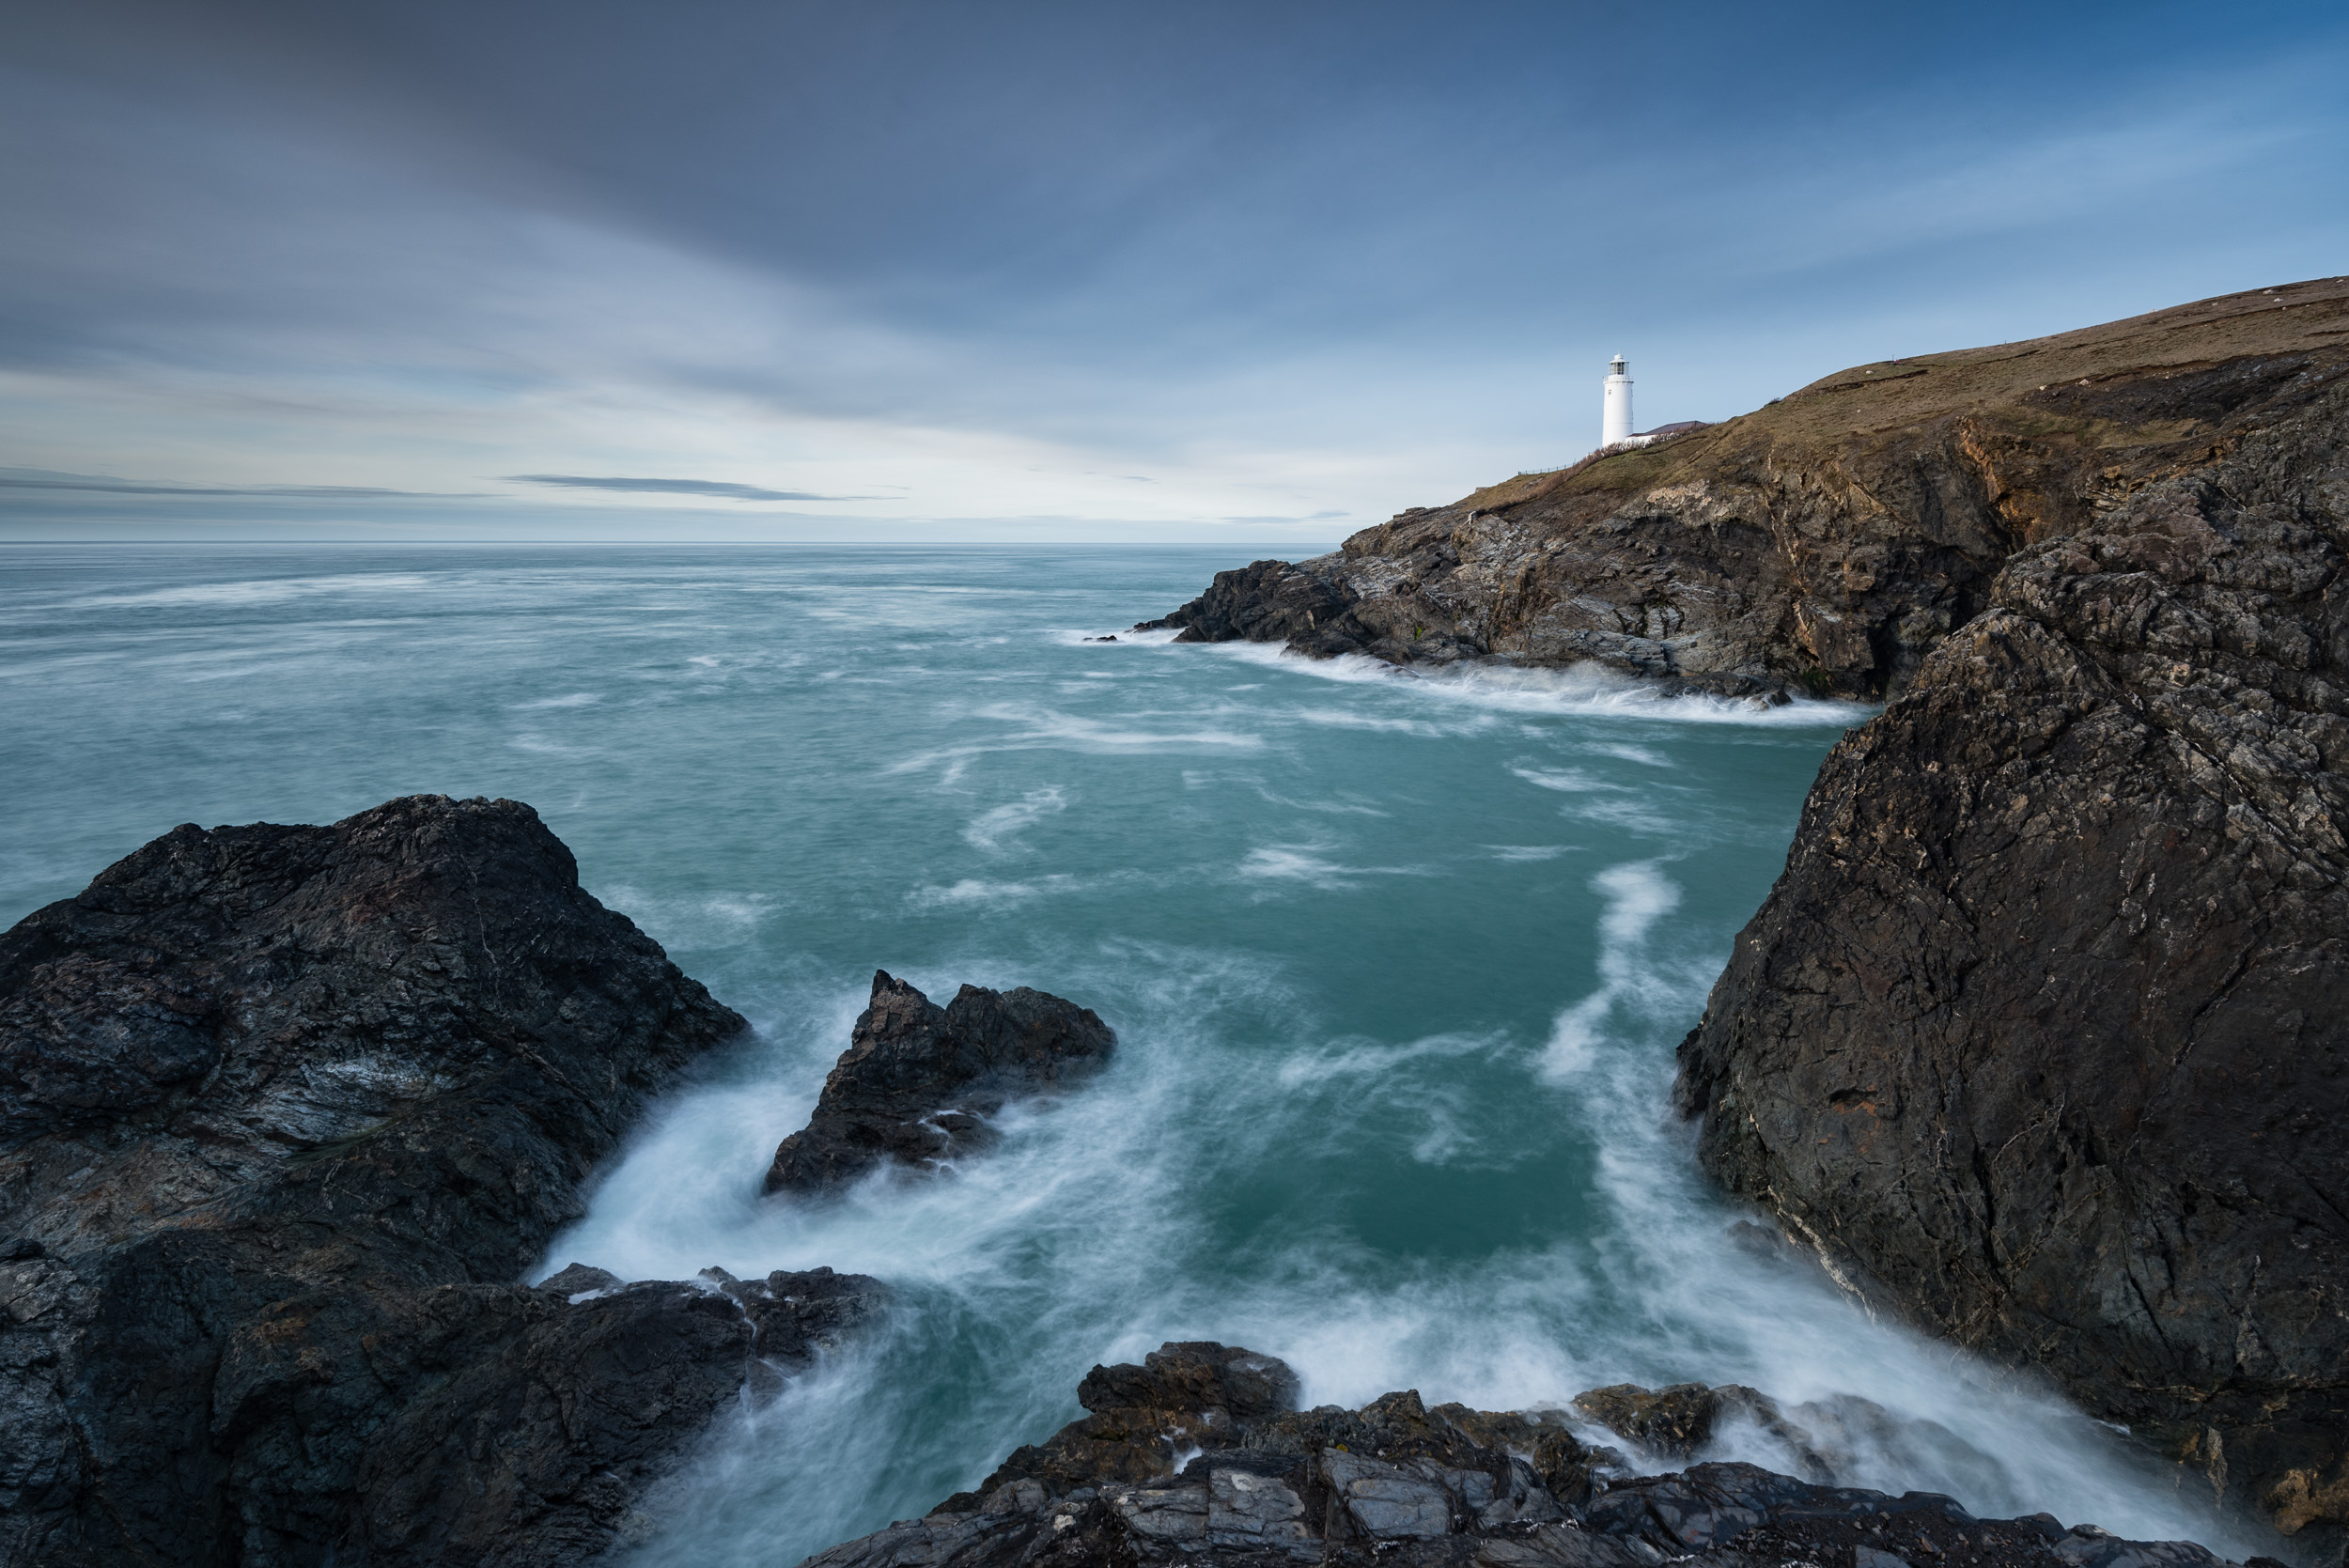
When I got there my friend had been shooting for a while and after a quick catch up, I got to work. For me, the best location to shoot Trevose Head is from Stincking Cove looking north east towards the lighthouse. Being a cliff top location there isn't a huge amount of room to move about, so my tripod legs were probably placed in the same spot as they usually are. However, even with my inability to move around a lot there is still plenty of variation to be had by shooting different focal lengths and exposure times.
What made my image different this night was the light. Photographers, including myself, do talk about the "light" an awful lot, but hopefully in this image you can see what a difference the light can make:
Nikon D750, Nikkor 16-35mm f/4 @ 22mm, 0.5 sec, ISO 100, f/16, Lee Filters circular polariser, ND grad.
I'm not saying this image is necessarily any better than some of my other images taken from the same spot, but it is a very different image from my darker, moodier images that I've taken there previously. The light was only there for a few minutes but I love the way it reflects off the sea, the cliffs and the lighthouse. It just shows you that every visit to a location can be unique and therefore produce a unique image.
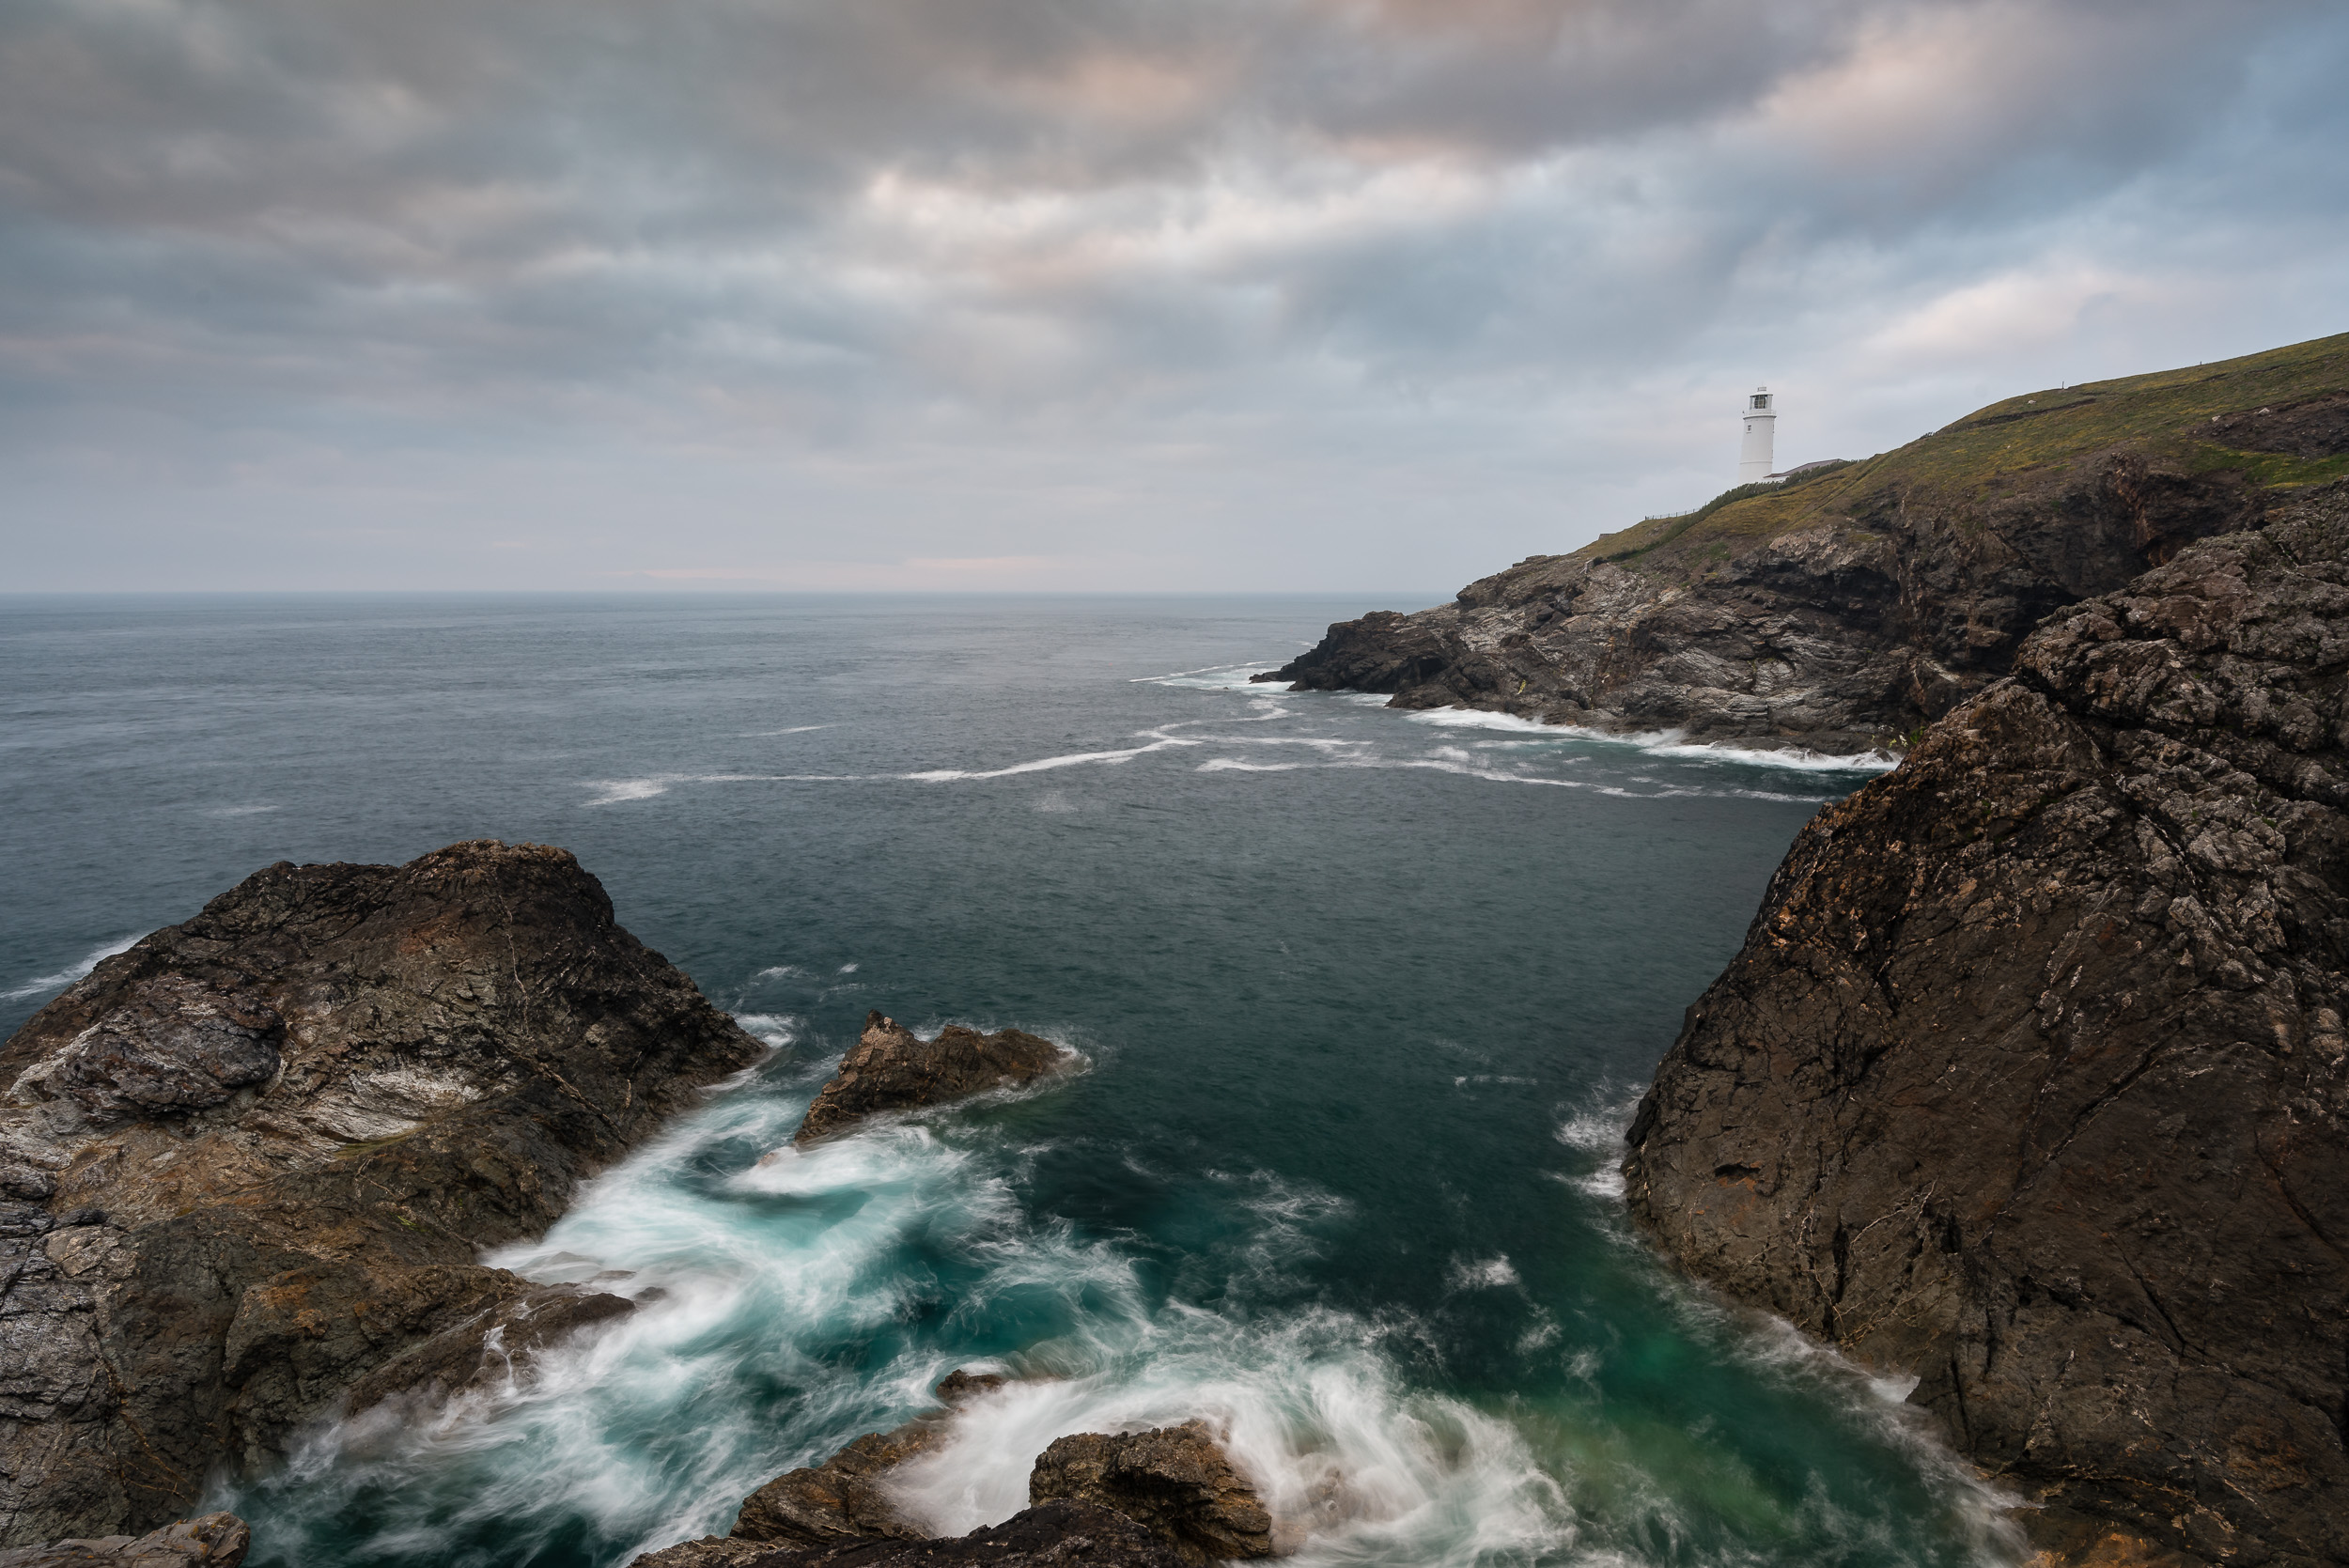
To ND or Not To ND
I'm a big fan of the ND filter. I use them a lot and you can see how I use them in this video. That doesn't mean I will use them in all my images though. I try to use them creatively if I think the image will benefit from a slightly longer exposure. I do tend to go for longer exposures for my seascapes as I like the resulting smooth water or the patterns that are painted by the moving water. You'll maybe have noticed though that the image I've just shared above isn't a long exposure. At the time I felt that smoothing out the water wouldn't be the right thing to do for the image I wanted to create. I liked the choppy water and the way the light reflected off the tops of the waves.
I did take a long exposure and while I am of course very happy with it, I still very much prefer the shorter exposure.
Nikon D750, Nikkor 16-35mm f/4 @ 22mm, 30 secs, ISO 100, f/16, Lee Filters circular polariser, ND grad.
Ignore Those Who Say...
All this talk of returning to a location to take the "same" picture reminds me of a Twitter post that I saw recently. I can't remember what it said exactly but it seemed to involve a number of photographers talking about a photograph of a few sets of tripod legs all crammed into the same spot. The general gist of the conversation was that these photographers lacked any original thought and were just copying each other or those that were there before them.
Though I didn't reply to the Twitter post, I couldn't have disagreed more for two reasons. Firstly, who's to say that just because a photograph has been taken from a spot before that another photographer can't take a similar image. If you are just starting out in photography I would actively encourage you to visit locations that you've seen in other peoples images. I even don't see any problem with trying to replicate the composition. It's often a good way of learning. If you have been inspired by an image you have seen then why not try your hand at that location.
I bring this topic up now because even though I have visited Trevose Head a few times and taken photos from the same spot, I get different results each time. So I would encourage you to put your tripod legs where my legs were and take the same photo. Your image will be unique and hopefully special to you.
The other reason I disagree with that Twitter post is that if you put two photographers in the same location at the same time you'll likely end up with two different images. An example of this was when I met a very nice photographer called Johnny Baird during a trip up to Scotland to photograph Glencoe. We both stood in the middle of the River Coupall, photographing Buachaille Etive Mor at sunset and despite the close proximity of our tripod legs, we shot very different images. Just because we were in the same location at the same time, how we choose to interpret the scene, choice of equipment and setup all meant we ended up with different images.
Don't let anyone tell you that a location has been overshot or that you must find a unique location for your photograph to be worth anything. So next time you're in Dorset, go to some of its most iconic locations such a Durdle Door and join the dozen other photographers that will be there and get your very own image.
Do you have a location that always delivers results for you? Did you prefer the long or short exposure that I took? What are your thoughts on visiting well shot or iconic locations? Let me know in the comments below.

Brentor Church
In the blog this week I head off to Brentor Church on the edge of Dartmoor. Read about how the cold weather almost sends me home early but by sticking around for a break in the weather I was treated to some lovely evening light.
A Bit of Inspiration
I often look for inspiration using my personal locations map that I created using Google Maps. One evening I was looking for something local to shoot when I noticed a map pin on Brentor (St Michael de Rupe) Church on the edge of Dartmoor. I've shot the location a few times but never got an image that I was really happy with, so I thought this would be a good time revisit the old church on the hill.
The weather forecast was for broken cloud and no rain, and the direction of the sunset was favourable for good lighting along the side of the hilltop and church. I had been stuck in the office all day and I was looking forward to getting outside into the fresh air and taking some images.
Wild Dartmoor
The weather at home that day had been very summery so when it came to outdoor clothing I decided to keep things light and I left the thermals and down jacket at home.
When I arrived at Brentor things were a little different than they were at home. Why I should be surprised by this I don't know! It is Dartmoor after all and having four seasons all in one day isn't exactly unheard of. Certainly not to be put off I got my bag out of the car and made the short walk to the viewpoint.
To say that there was a bit of breeze up there would be an understatement! It's not necessarily the height of the location but more that it is very exposed. It wasn't long before I had put on my lightweight jacket, shortly followed by hat and gloves (which I always keep in the bag, fortunately). With the skies being overcast and my body temperature dropping, I was soon feeling uncreative and considering making an early exit and going home.
Game On!
If there is one thing you can count on when photographing Dartmoor is rapidly changing conditions. While I was sitting there gradually getting colder I was keeping an eye on the weather behind me. I could see in the distance some significant breaks in the cloud which I was hoping would lead to more interesting skies and give the sun a chance to break through. So I toughened up and waited!
I got the camera all set up and ready. Breaks in the cloud and splashes of light can be fleeting, so I needed to be ready. I then waited patiently and watched with eagerness as the rays of the sun that were breaking through the cloud gradually got closer and closer.
When the weather did break over Brentor it did so for only 10 or so minutes. I captured a few frames keeping an eye on the cloud converge over the old hilltop church and how the light was breaking on the hillside.
Nikon D750, Nikkor 16-34mm f/4 @ 18mm, ISO 100, 1/6 second, f/13, no filters.

The quality of the light can change dramticaly over a short space of time.
The quality of light can really make or break an image and without light from the setting sun as it broke through the cloud this image would have been much flatter. It's not to say that this image is perfect, far from it, but given the conditions I was working with I was happy with the results.
I tried a few variations on my composition and I even tried increasing the ISO for a shorter shutter speed. I thought that the shorter shutter speed would freeze the grass blowing in the wind, but I decided that keeping the movement of the grass better reflected the mood I was looking for.
So my evening up on Dartmoor was a bit of a roller coaster. Nothing hampers your creativity more than being cold and I really should have known better to head up to Dartmoor without a warm jacket! But I'm glad I stuck it out as at the end of the day as I got some nice images and a lung full of fresh air.
So have you photographed Brentor church before? Would you like me to make a 5 Minute Photo Adventure video there? Have you ever been out with the camera without suitable clothing? Let me know in the comments below.

Bowerman's Nose - 5 Minute Photo Adventure
In this blog post, I show you my 5 Minute Photo Adventure video of Bowerman's Nose on Dartmoor. I also discuss the image I took there and how it compares to the previous images I took of this unique location.
I have a bit of a long history with Bowerman's Nose on Dartmoor. I last wrote about this location back in October 2016 in a post entitled Perseverance - Photographing Bowerman's Nose. In that post, I talked about my desire to capture an image that I felt did this unique location justice. On paper, it shouldn't be too difficult to shoot but it's a location that needs good light. I've come close a couple of times and last time I got pretty close to what I was looking for.
Probably my best image of Bowerman's Nose.
But there's more to this location than just my desire to create an image that meets my vision. Simply put I like shooting there and I think you would to. To help inspire you I thought I would create one of my 5 Minute Photo Adventure videos.
You can see the Bowerman's Nose video right here:
Near Epic Conditions
As you'll have seen in the video, I had near epic conditions. It was looking like I wasn't going to get any good light when all of a sudden the sun dropped below a cloud and bathed the moor in a bright orange light. It was spectacular.
If only the light had reached Bowerman's Nose... Nikon D750, Nikon 24-70mm f/2.8 @ 35mm, ISO 800, 1/50 second, f/16, Lee Filters ND 0.9 soft edge grad.
What that image is really missing is light on the side of Bowerman's Nose. The light being scattered on the trees in the background is lovely and if it had just reached where I was it could have lifted the image from OK to spectacular. Just take a look at the image at the top of this blog post to see what a difference good light can make to Bowerman's Nose.
I've seen Bowerman's Nose in all sorts of light, and this last visit to shoot my video has actually inspired me even more to visit it again. I know this location has all sorts of potential and I hope you have seen that to. As I said in the video, Dartmoor is one of the best places to come as a landscape photographer and if haven't already been hopefully this video will give you that extra nudge.
Have you photographed Bowerman's Nose? Have you experience near epic conditions? Let me know in the comments below.

Back to Boscastle
In this blog post I tell you about my trip to Cornwall to shoot Boscastle one cloudy Saturday afternoon in January.
Decisions, Decisions, Decisions
It's been a reasonably busy start to my photography in 2017. January had already seen me visit Dawlish Warren, Dartmoor and Colmer's Hill in Dorset, so when faced with a photography free weekend I was content to stay at home and clock in some family time.
However, it appeared that the photography gods were looking down on me and unexpectedly my wife decided to take the kids to the cinema. So while the offer to go and see Sing was tempting, I was also offered the chance to go and do something myself. What could I possibly do with a few spare hours on a January afternoon….?
Well, it wasn't going to be DIY that was for sure so I got busy looking at my photography locations map and got to planning a shoot. I had already shot Devon and Dorset this year so I thought why not finish January by going to Cornwall. But where would I go? This is the good thing about keeping a locations map, it allows me to visualise possible shooting locations so I could see which of my Cornish locations would suit my time constraints, weather and time of day.
I eventually decided on Boscastle, a location I've shot a couple of times before. The high viewpoint above the curvy harbour entrance, dramatic coastline and forecast cloud cover would, I decided, make for an excellent sunset coastal location.
An image of Boscastle that I took in May 2016.
Taking a Friend
Landscape photography can often, for me at least, be a solitary past time. After all, getting up at 5 am to visit Dartmoor in freezing conditions in the off chance there is a good sunrise is not exactly on top of everyone's list of things to do. However, this was a Saturday afternoon and while it wasn't exactly a warm and pleasant day I did think my father-in-law would be up for a session with the camera. So I gave him a call and he jumped at the chance. So we packed our stuff and hit the road to Cornwall.
Dramatic Boscastle
It's just over an hour's drive to Boscastle from home so there was plenty of time to analyse the weather as we got closer to our destination. Things were looking very positive. The heavy, but intermittent rain showers meant the sky was full of cumulonimbus clouds as well as the odd thunderstorm cloud with high altitude anvils. As we drove we had visions of a setting sun illuminating these big clouds in a golden orange colour as they travelled along the dramatic Cornish coast. It might just be one of those great trips out with the camera.
It's a short walk from the harbour car park to the viewpoint, but it does require a small ascent to get an elevated viewpoint. It's worth the effort though and the excitement of the shoot gave us more than enough energy to get up the hill.
Once at the top we set up our cameras and got ready to start taking some epic images. However, as has been the way for me recently, I could spot a few problems. The big dramatic rain clouds had now for the most part all passed by leaving only small patches of cloud. There was also a big bank of low cloud on the horizon which I knew would block the last of light when the sun dipped down behind them. Still not to be put off I got shooting and took this image just as the sun dipped below the distant cloud line.
Nikon D750, Nikkor 16-35mm f/4 at 16mm, 0.8 seconds, f/16, ISO 100, Lee Filters Circular Polarizer, Lee Filters 0.9 ND Grad. Processed in Lightroom CC.
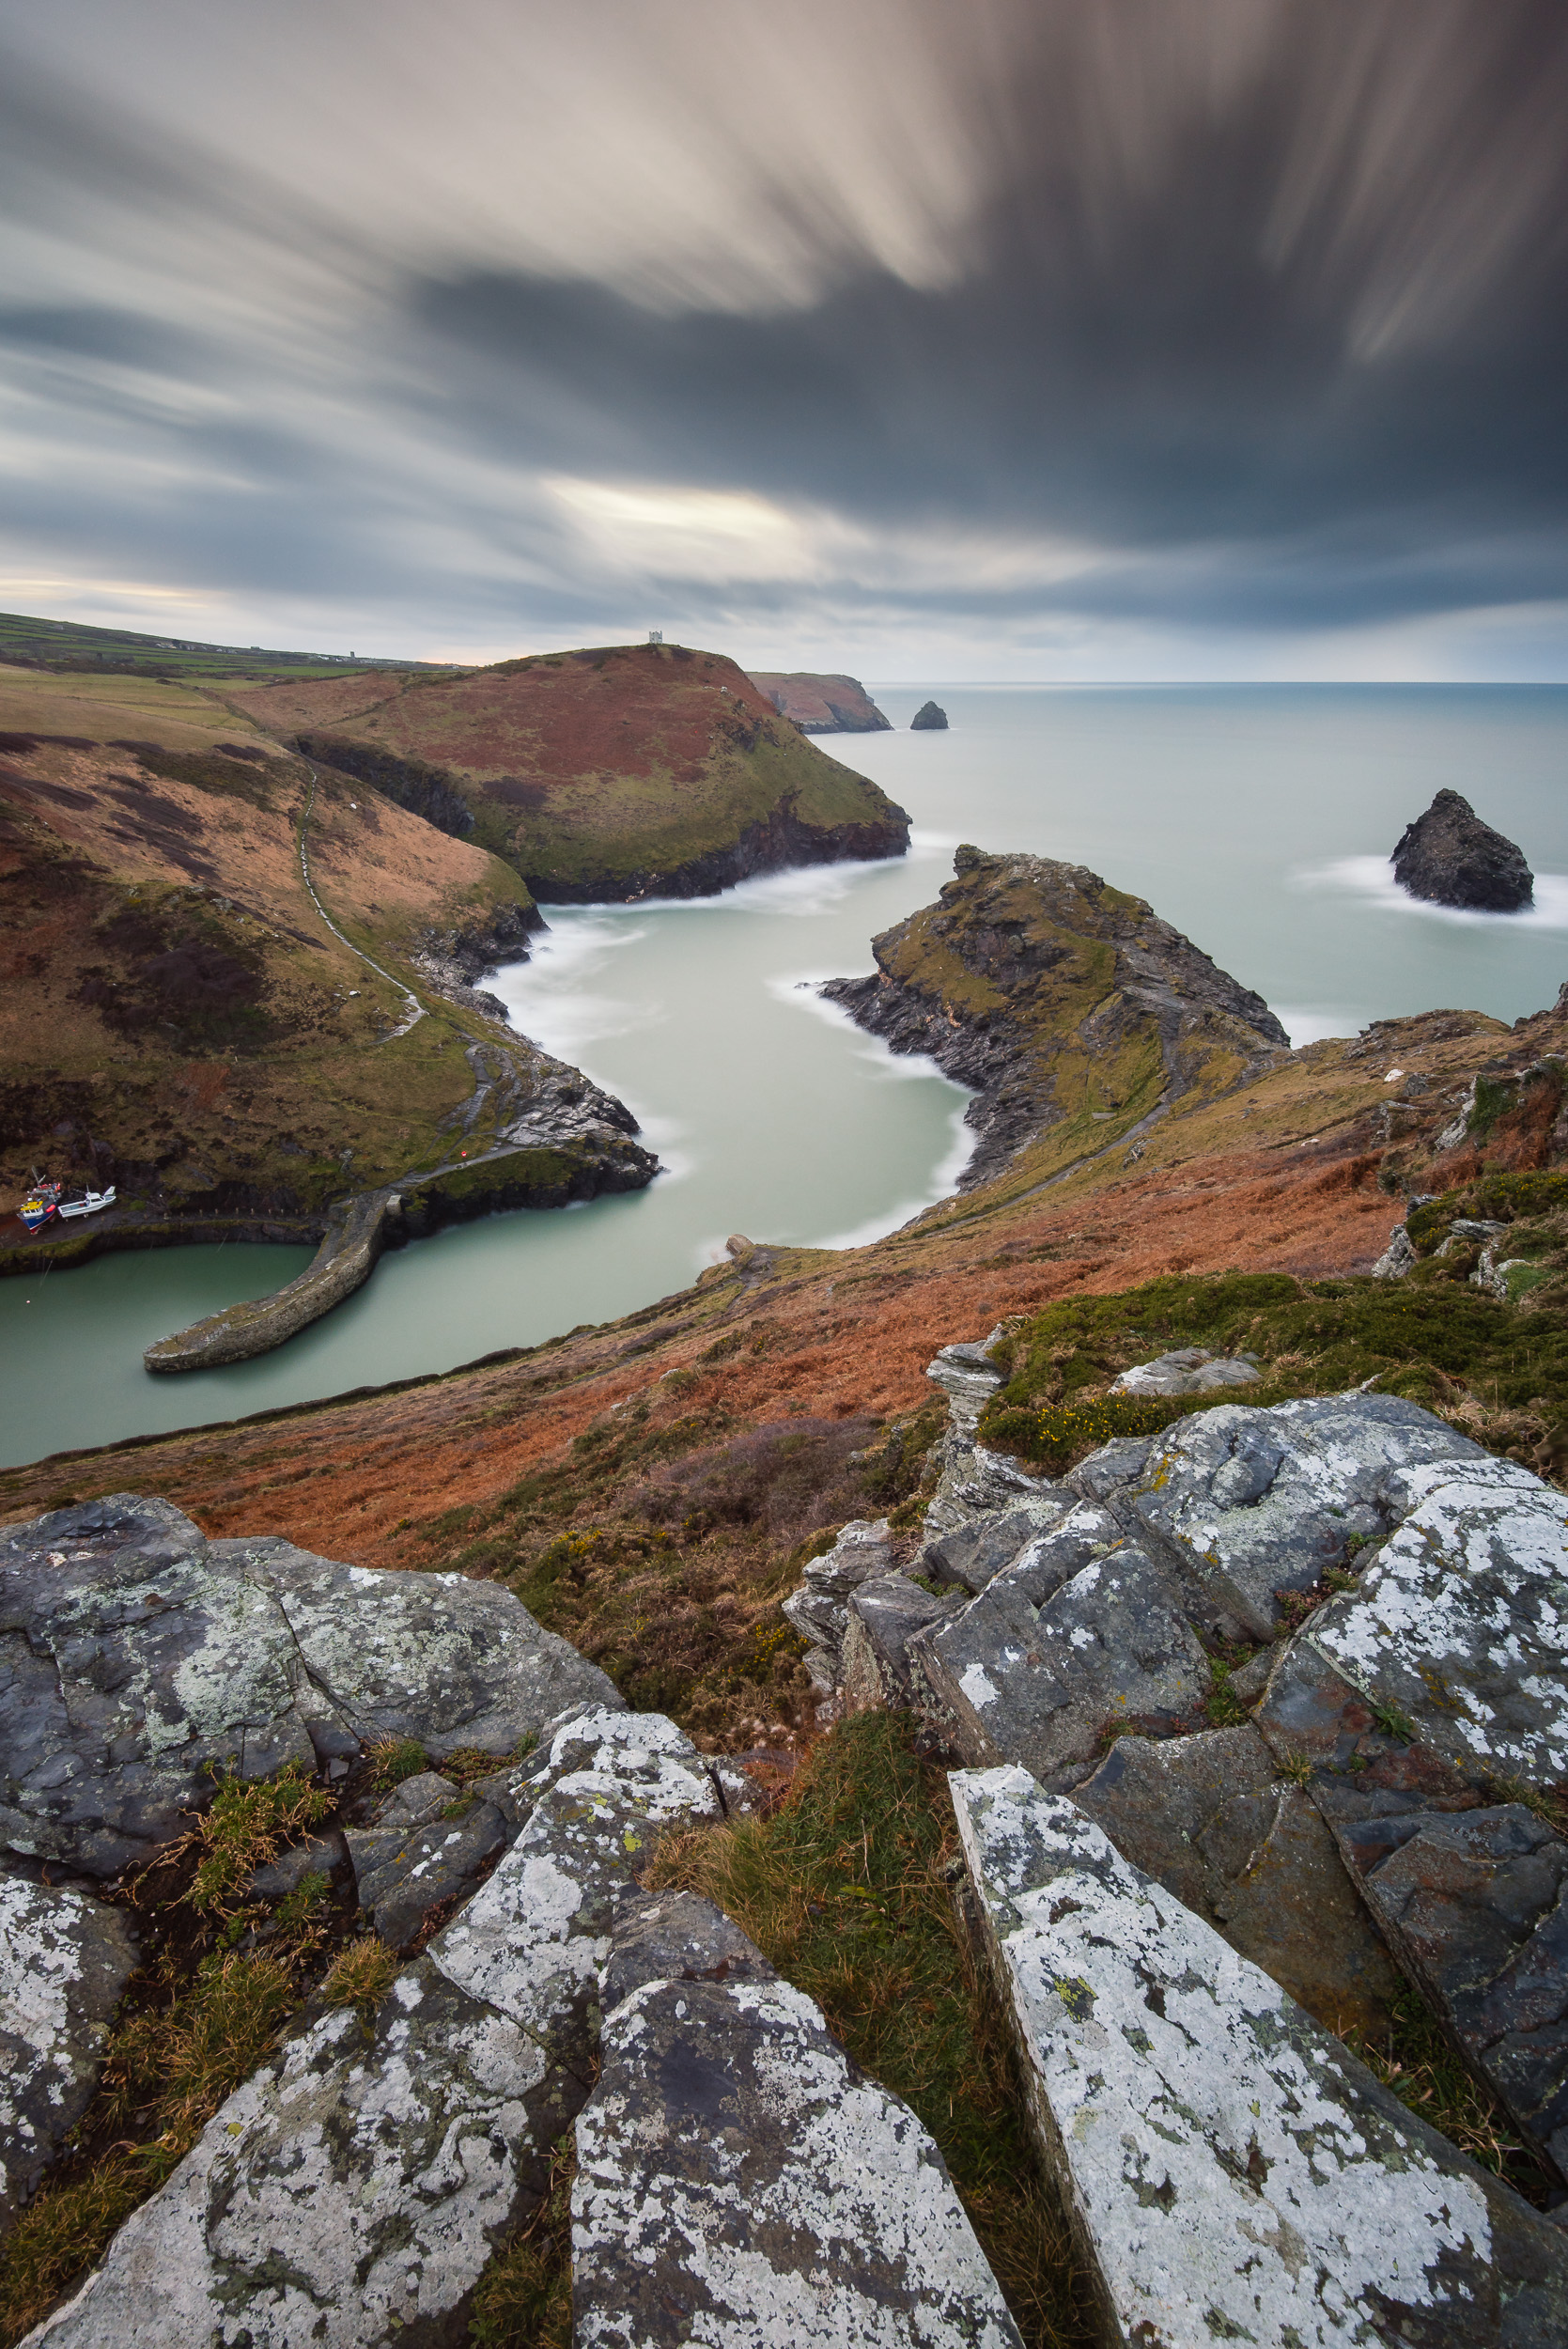
We kept shooting until sunset but the conditions obviously did not improve. Landscape photographers bang on about the quality of light all the time but for very good reason. I know Boscastle is a fantastic location for capturing images but in flat winter light, even the most dramatic of locations can look a bit drab. I tried taking a few long exposures which provided the movement in clouds I was looking for but without good light, the image remains flat and grey.
As it started to get dark we decided to call it a day and head back to the car. Though the conditions hadn't been as we had hoped, we had at least had a good old chat and most importantly been out with the cameras.
Being Positive
Though January hasn't resulted in the capture of any portfolio class images, I am, as always, very happy to have got out with the camera. Despite work and family commitments, I have managed to get out with the camera every weekend in January. I even managed to create a video on how I use ND filters.
I rarely consider a trip out with the camera to be wasted effort. I often talk about the value in practising the craft of photography on this blog and so if anything this trip to Boscastle was still time well spent. Photographers can often set unrealistic expectations on ourselves to capture amazing images each time we go out. However, unlike full-time photographers, my time out with the camera is set around work and family commitments rather than when the conditions are likely to be optimal. I can't always capture amazing images, but I can make sure I'm well prepared for when they are.
So how do you balance your photography with other commitments? Will you wait for the best conditions or head out for the fun of it? Do you like to go out shooting with a friend or prefer solitude when out in the landscape? Let me know in the comments below.

Using the Super Stopper in Sidmouth
The Lee Filters Super Stopper isn't exactly a filter you would use every day but it does have its uses. Read about how and why I used for a shoot in Sidmouth in my this blog post.
Free At Last
In my last couple of blog posts I may have mentioned that I'm finding it difficult to adjust to the short winter days. Opportunities to get out with the camera seem to be few and far between. Last weekend was different though. I didn't have too much on and the weather was looking favourable for some landscape photography.
Sidmouth Inspiration
My first challenge was to find a suitable location that I could shoot. In reality it didn't take too long. My decision to shoot the coast at Sidmouth in South Devon was driven by two things. Firstly I was inspired to shoot there. I've spoken about the importance of inspiration before on my blog before and how useful it can be.
My inspiration to shoot Sidmouth came from two photographers, atmoorehead and Neil Burnell.. Both of them had been shooting the curling stone groyne at the east end of the beach. I liked the images they had created so I wanted to go there and put my own spin on the location.
Super Stopper Time
The 2nd reason for choosing Sidmouth was that it was a coastal location that would be ideal for testing out my recently purchased Lee Filters Super Stopper. I'm a big fan of Lee Filters and use the Little Stopper and Big Stoppers in a lot of my images. When the Super Stopper was first announced I have to admit that I didn't really see the point but after seeing some of the images produced by Mark Bauer with the Super Stopper I pulled the trigger and picked one up.
My original plan was to shoot some midday long exposures during a recent Lake District trip but given the challenging weather it wasn't really the best time to try out this 15 stop monster. However, as I was planning my trip to Sidmouth it soon became apparent that this could be the perfect time to give the Super Stopper a go. I would be arriving around 2.30pm when there is still plenty of light, the tide would be coming in, and the light from the west would be illuminating the groyne. My only slight concern was the lack of cloud in the sky. It was apparently going to be very clear but I could live without the perfect conditions!
Setting Up For a Very Long Exposure
When I arrived at my location in Sidmouth things were looking favourable. The sun, which was already relatively low in the sky, was illuminating the inward curve of the groyne rather nicely and the tide, which was due be high at 16:08, was already a good way up the beach. I was glad I had got there early as the area was busy with people and where I was going to shoot from was a bit of a one tripod only location.

Base image with no filters. (Image unprocessed).
So with my tripod out I got to work on my composition. I had originally thought I would go for a vertical composition but it soon became apparent to me that a horizontal composition would work best as it provided more room for the groyne to curl out into the sea and into some empty space. With my composition locked in I took my base image. My base image is the image I take with no filters so I can easily check it for sharpness and exposure. Being a coastal location I reached for my Lee Filters Polariser as this would not only take off some reflections from the surface of the sea but it also removed all the reflections from the groyne where the water had been splashing.

The addition of the polariser reduces the reflections on the groyne and brings out a little more detail in the sky. (Image unprocessed).
However, the addition of the polariser always lengthens the exposure by a few stops so I had lengthen my shutter speed from around 1/80 sec (at f//11) to 1/25. Though I was happy with the effect the polariser was giving I was already concerned about how long the exposure was going to be when I added the Super Stopper. Using the Lee Filters app on my phone I worked out that a 1/25 second base exposure with a Super Stopper would require a 21 minute exposure. For my first use of the filter I felt this might be too long, but a Big Stopper would only give me 40 second exposure (which was not long enough for the image I wanted)
I had two options. I could either open up the aperture or increase my ISO. While opening up the aperture would have decreased my exposure time, I would have lost the depth of field I was looking for so I increased my ISO to 400. This effectively gave me a Super Stopper exposure time of around 8 mins. Much more manageable.
The Results
With everything set I got to taking some really long exposures. I modified my composition a couple of times which meant going through the whole setup process again but using the Super Stopper was never going to be a fast process. I also had to gradually increase my exposure length as the amount of light decreased. However there is a certain sense of excitement with really long exposures. I was investing 8 to 10 minutes for each exposure and the sense of not knowing exactly how the image would look was exciting.
Final image (processed in Lightroom). Nikon D750, Nikkor 16-35mm f/4 at 26mm. 641 seconds at f/11, ISO 400.
A Small Critique
I'm very happy with the end result and it's the image I had envisioned when I started planning this shoot. However, it's not perfect. Though I was shooting at a time very close to high tide, it wasn't quite high enough. I would have liked there to have been no beach visible in the lower right side of the image. There was a high tide of 4.06m so on my next visit I will try and plan it for when it's a little higher.
However, tide height aside, all the other elements came together nicely. The time of day and time of year were perfect to allow the golden light of the sun to reflect of the west side of the groyne. It's very rare that everything is perfect so for a Sunday afternoon shoot I'm still very happy.
Why Not Just Use a Big Stopper?
You might be asking yourself why I didn't just wait for sunset and then use a Big Stopper. Why purposely shoot earlier so you can use a Super Stopper? Well, it all had to do with the light. As the sun set the quality of the light reflecting off the groyne was nowhere near as nice as it was 45 minutes before. In order to realise my vision of a long exposure I need to have that 15 stop ND filter. So yes, while it was a specific set of conditions that required the use of the Super Stopper, it would have been an image that would have either not been possible to get or would have been more difficult. The Super Stopper is probably never going to be a filter that I use a lot, but now that I have it and have seen how I can put it to use, I'm glad I have it.
So are you a fan of long exposures? Do you own the Super Stopper? Are your creative ideas driven by the location you are visiting or by a vision of the image you want to create? Let me know in the comments below.

Landscape Photography in the Lake District
In this blog post I write about my 2 day photographic adventure in the Lake District. Read about how despite the challenging weather I still came away with some great images and a sense of satisfaction.
Escape to the Lakes
When a photographer friend of mine invited me to spend a couple of days shooting the Lake District in the height of autumn I literally jumped at the chance. Over the last decade or so I had visited the Lake District a number of times with my family and enjoyed it immensely. After all if you like the outdoors there really isn't much not to like about the Lake District. This was going to be a different type of visit though. This visit was going to be all about photography and I couldn't wait!
The plan was to spend two full days shooting various locations around the Keswick area taking in tarns, lakes, hills and of course the odd jetty. Our only restriction was dates. Free time for photography has to fit in around family and work time, so when we picked our dates we were committed, no matter the weather.
November seemed to take an age to come round but when it did my levels of excitement had almost become palpable. I had packed my stuff two days prior to departure and when I did hit the road the 300+ mile journey flew by. I couldn't wait to get shooting but as I would soon find out, the Lake District weather was going to be typically British.
High Brandelhow Landing
It was a 5:30 am alarm call on the first day and despite the lack coffee I was in high spirits and ready to get shooting. Our first stop was High Brandlehow Landing, a pier on Derwentwater. It's a classic Lake District composition with a pier but it was an ideal location to get the photography brain into gear.
My first instinct was to shoot the pier vertically but I actually ended up preferring the horizontal version. Using the Little Stopper at ISO 100, f/11 gave a 2 minute exposure but I was loosing the detail in the sky. Setting the camera to ISO 200 gave me a one minute exposure maintaining some texture in the sky.
Stock Ghyll
Despite the sky being almost completely overcast it had been a reasonably successful start to the day. After breakfast though the weather turned rainy so we decided to head into the woodland at Ambleside and walk along Stock Ghyll.
Photographing Stock Ghyll was a real challenge as I spent most of the time clearing rain water from the camera. I found it difficult to concentrate on my composition. I later tried to shoot the waterfalls but couldn't really find a composition I liked.
Grasmere
After drying out over a pub lunch we took the short drive down to the southern end of the lake at Grasmere. Though it had stopped raining the weather remained resolutely overcast which was a shame as there was barely a breath of wind and the reflections were stunning.
Lovely reflections, just a shame about the light. This image is a 2:1 crop from the original frame.
Latrigg Fell
With a renewed sense of optimism on the morning of day 2 I headed down to the hotel lobby to meet my friend. Unfortunately he was taking shelter from the down pour of rain. Not to be put off we checked our respective weather forecast apps and agreed that an ascent of Latrigg Fell could be rewarded with some nice light come sunrise.
The weather at dawn was not great but we dug in and waited.
As time progressed some splashes of light started to appear on Cat Bells. This image is a 3:1 crop of a 9 vertical image panoramic stitch.
The dawn light struggled to get through the clouds but when it did it provided little moments of magic. This is 16:9 crop from the original frame.
Castlerigg Stone Circle
While ancient stone circles don't necessarily offer a lot of interest for me, the location of Castlerigg Stone Circle is still an interesting location to shoot. You don't necessarily need to include the stones in your compositions.
Bad weather can work in your favour as well. I just needed to wait for a break in the light which came and went in the space of seconds. You just have to stand there with the finger on the shutter....waiting....till you get that fleeting moment of light.
As I've written about before, its important to look around to see what else is happening. I was focused so much on getting the previous image that I almost missed this one.
Tarn Hows
After our trip to Castlerigg we headed up to Ashness Bridge. It was a short stop as no sooner had we got our cameras out it started to rain heavily. So as we approached the end of day 2 we decided that we might try and catch last light at Tarn Hows. The weather hadn't exactly been kind to us up to that point and unsurprisingly it didn't improve that much.
This scene just need a splash of light on the trees but it wasn't to be.
Cat Bells
I was due to make the long trip home the morning of the 3rd day, but I couldn't resist one more dawn shoot. My friend had hit the road at 4am to go home, so as I was on my own I decided I would make the 450m ascent of Cat Bells. Despite the the previous two days of poor weather, I remained optimistic as the weather forecast looked like it might produce some nice early morning light.
My vision for this image was to get some morning light break over the fell peaks (Robinson and Red Knot). I waited and waited but this was as good as it got.
As is often the case in the Lake District, the moments of good light are brief but wonderful. This image of Rigg Beck and Causey Pike is a 3:1 crop from a single frame.
I was on my way down from Cat Bells and looking forward to breakfast but sometimes you just have to stop and unpack all your gear again. The light on Lonscale Fell was too good to miss.
Fun but Challenging
There was no doubt that I was extremely excited about my trip to the Lake District. Having seen so many autumnal images of the area I was keen to produce my own spectacular images. However, as you can see from my images old mother nature had a different plan which mostly involved rain and overcast skies. Even when it was dry there was very little of that magical light that you want to really lift a scene. When it did rain I would just spend most of time trying to keep my gear and filters clear of water. This can be infuriating and doesn't leave much time for the creative side of photography.
So was the trip a failure? Of course not! Yes, it was challenging, difficult and sometimes frustrating but I was in the Lake District, in autumn, with my camera. Sure it would have been nice to have better weather but sometimes as a landscape photographer you have to work with what you get. As I write this blog and look back at the photographs there is a lot to be happy about. Those little breaks of light like I saw on Cat Bells, or the stormy sky over the trees at Castlerigg just goes to show that there is an image to capture in almost any weather condition.
For me landscape photography is also about the adventure, about being outdoors. This trip was an adventure and I managed to capture some dramatic images of the Lake District, so I'm calling my trip a success!
Do you have a bucket list of locations or areas you want to shoot? Have you turned up to a location and faced a few challenges? Is there any type of weather you wouldn't go out in? Let me know in the comments.
Remember to check out my Instagram and Flickr feeds so you can see even more of my images. See you next time!
Perseverance - Photographing Bowerman's Nose
In this blog post I discuss the power of perseverance and why I keep going back to Bowerman's Nose on Dartmoor.
A Slight Obsession
I can't exactly remember how I found out about Bowerman's Nose. It might have been in a magazine, or a book, or even on Flickr. How I found out about this location is largely irrelevant though. My desire, or maybe obsession, in capturing an image of Bowerman's Nose that meets my artistic vision is more to the point though.
For those of you who haven't heard of Bowerman's Nose, it's a tall pillar of granite on Dartmoor. It's very distinctive and is surrounded by rolling hills. Given the right light and conditions it can make for a beautiful photograph. The problem for me is that I've never really managed to capture an image that does the location justice. Some of my early failings were due to poor technique, but latterly it's more to with poor conditions.
Part of the reason I'm probably so obsessed by this particular location is its close proximity to home. It's less than a 45 min drive and it's reasonably easy to get to (as long as you don't mind opening a gate and getting creative with your parking). This means that it is often my go to location on Dartmoor when the conditions are looking favourable.
Meeting Mr Bowerman
I probably made my first serious attempt at photographing Bowerman's Nose in early 2015. It was January so Dartmoor wasn't at its best, and it was a very grey and flat day. However, I do like to practice my photography so just been able to walk around and look at different compositions was valuable.


I returned in May of 2015 in the hope of better conditions. On this trip the ground was looking spring fresh, and I was getting some nice light reflecting of the edge of Bowerman's Nose from the setting sun. Unfortunately the sky was a bit bland and I wasn't getting the golden light I was looking for. Close, but not quite there. However, this trip did show me the real potential of the location.
A week later I was back again and trying a similar composition. Again, while the image was pleasing, I just felt it lacked something. While I was there I also tried my first panorama - I think Lightroom has just been given the native capability to stitch panorama's so I thought I'd give it a go.
Bowerman's Nose - May 2015
Perseverance
By the time 2016 had rolled around I had committed to myself that I was going to get an image worthy of the splendid Bowerman's Nose. I think it's part of my nature. Once I decide that I need to do something, I'll work at it until I get it done. I was determined that in 2016 all my perseverance would pay off. Obviously with some elements of of my control this would not be easy.


In May 2016 I captured this image of Bowerman's Nose. It had interesting sky (helped by the long exposure), but it lacked the light I was looking for.
Then in June 2016 I tried again, and I have to say I thought I was going get the image that night, but again, there was just something missing that evening. The image I was looking for escaped me again, but I would try, try, try again!
Gotcha!
Then, just the other evening, with only a little time between the end of work and sunset, I did a quick check of forecast and decided that I would attempt Bowerman's Nose again. When I got there the conditions looked good so I literally bounded up the hill and got my tripod setup. Would I finally be lucky?
Bowerman's Nose - October 2016
As you can see, yes I did. Well, it is at least my best image from that location. No it's not perfect and there is always room for improvement, but it is my best and favourite image from there. I finally feel that my perseverance had paid off.
Goodbye Mr Bowerman?
So am I done with Bowerman's Nose? Now that I have the image I wanted will I ever go back? Of course I will! There is always room for improvement. There are many different compositions to be had, different lighting conditions, even snow! It's an amazing location, and being so close to home it's always going to be on my radar to go back to.
So do you have a favourite location that you like going to? Is there a location you keep visiting in the hope that you'll get something special there one day? Do you preserve or just move on? Let me know in the comments.

Remember to Look Around
It's all to easy to concentrate on the scene in front of you, but as I discovered there can be a lot going on just behind you.
Photographing An Old Friend
I don't know about you but I have a few places on my location map that are easy to get to and provide a variety of angles to shoot from. So when the weather forecast for last Tuesday was a bit 50/50 for a good sunset I thought I'd go somewhere I know so that if it fails to be spectacular I won't have spent a significant amount of effort getting there.
How I saw the scene last year.
Heading down to my target location of Emsworthy Rocks just down from Haytor I was still confident that I was going to get a good shot. I decided to shoot the rocks and tree from a position that I hadn't used before. My plan was to have my back to the setting sun so that the tree and rocks would be bathed in golden light. There wasn't going to be much going on in the sky so I positioned the main elements higher up in the frame leaving some of the ground rock formations in the foreground.
Playing the Waiting Game
I went through all my normal checks for exposure and sharpness and then waited with the remote release for that magic moment where the colour would bath my subject in glorious golden light.
This is the scene I came to shoot but the light and sky just weren't what I wanted.
Well some time passed and I had shot a few frames but the scene just lacked a bit of punch. In my focus on the scene in front of me I'd failed to look to see what else was going on. It's all too easy to go out with a singular focus on what you want to achieve but this can sometimes mean you'll miss something a bit more special. I was convinced that my target scene would come good. However I casually turned 90 degrees to my right and was presented with a much more interesting scene. The light on the rocks was much more pleasing and the sky had a bit more interest about it.
Change of Plans
On the same spot as the last image but 90 degrees to the right.
I pondered if I should go to the hassle of changing my composition and moving my tripod (which had taken bit of setup to balance on the rock I was perched on). I knew I would regret it if I didn't at least try so I repositioned the tripod, got a Lee Filters ND 0.9 medium grad out and shot a few frames of this new scene.
I did go back to shooting a few frames of my original composition but I already knew that I'd grabbed the best shot I was going to get that night. So what did I learn from this particular adventure? Don't get too focused on one scene or shooting a particular direction. The landscape, particularly the wilds of Dartmoor, are wide open spaces and the light can look very different simply by looking a different direction from the same point. I was committed to getting the image in my head but I almost missed a much better one.
Have you had a similar experience? Have you looked round to find a much better shot or do you remain focused on what is in front of you? Let me know in the comments.