

Manfrotto Befree GT PRO Carbon Tripod Review
A good tripod provides should provide a stable platform for a landscape photographers camera. In this blog post I head to the Scottish Highlands to test out the Manfrotto Befree GT PRO Carbon Fibre tripod. Will it do the job I need it to?
Why I Have the Manfrotto Befree GT PRO Carbon Tripod
As I recently mentioned in my review of the Manfrotto PRO Light Backloader Backpack, tripods and camera bags are one of the photographic accessories you will likely replace the least often. A well-made, solid tripod should span the lifetime of more than one camera.
For most photographers the inclusion of one tripod in their kit bag is enough to cover most of their photographic needs. I on the other hand normally need access to a 2nd tripod. This might be a tripod that I carry in addition to my main tripod to allow me to create video content at the same time as taking photographs, or it might be a lightweight tripod I use when hillwalking in Scotland.
Unlike my primary tripod which has remained consistent for longer than I can remember, it's my secondary tripod that I've struggled to settle on. I've found it challenging to find something that is lightweight, versatile and stable. So when Manfrotto reached out to me and asked if I'd like to review their Manfrotto Befree GT PRO Carbon Tripod, I jumped at the chance.
In this blog post I'm going to tell you a little bit about this tripod, and I'll share my real-world experience of using it.
Before I go any further though, I must say that Manfrotto sent me this tripod free of charge in exchange for writing this review. However, they have not asked me to say anything and everything I write here are my own thoughts (good and bad). They will see this review for the first time when I publish it here.

The Manfrotto Befree GT PRO Carbon Tripod high up on the hills around Glencoe in Scotland.
Where To Buy the Manfrotto Befree GT PRO Carbon Tripod
If you'd like to buy the Manfrotto Befree GT PRO Carbon Tripod, it's available just about anywhere, including:
Please note that the Amazon and WEX links are affiliate links. I may receive a small commission if you purchase through those links, but it does not affect the price that you pay.
Features of the Manfrotto Befree GT PRO Carbon Tripod
In this review I'm going to talk about most of the features and specifications of the Manfrotto Befree GT PRO Carbon tripod, but if you want a full breakdown of everything this tripod has then check out all the specifications over on the Manfrotto website. This tripod is also part of the Manfrotto Befree collection so many of the same features in this tripod apply to the other tripods in the range. If you like the look of this tripod but it doesn't quite match your requirements, do check out the other tripods in the collection.
Tripod Legs
The tripod is made of carbon fibre and weighs approximately 1.55 kg (including the supplied head). Closed down the tripod length is 43 cm, extended it is 138cm and with the centre column extended it reaches a maximum height of 162 cm. Closed down the tripod is both small enough and light enough to carry by hand or it can be attached to your camera bag (or inside a checked bag if flying).

The Manfrotto Befree GT PRO Carbon Tripod attached to the Manfrotto PRO Light Backloader Backpack
Each leg comprises of 4 sections that can be extended or contracted using a twist lock style mechanism. The angle of the legs can also be independently adjusted.
Other features include:
The legs have rubber feet.
The tripod supports a maximum weight of 12kg.
There is a hook should you wish to hang something off it like a camera bag.
The tripod has a Manfrotto Easy Link connector allowing you to add accessories such as lights.
A tripod carrying case is supplied.


Tripod Head
My tripod came as a kit which means the box contained both the tripod legs and a Manfrotto Advanced 496 Aluminium Centre Ball Head. The ball head has three controls. There is an independent panoramic knob that allows the head to pan 360 degrees without adjusting the position of the camera on the ball head. The other two controls are for the ball mechanism itself. The first control allows you to adjust the position of the camera on the head, and the other control allows you to adjust the friction level of the head.
You mount your camera to the tripod head using the included Manfrotto quick release plate, the RC2.


Using the Manfrotto Befree GT PRO Carbon Tripod in the Real World
What Is the Real World?
For me, the main function of this tripod is for landscape photography and video content creation. So, it will either be my primary tripod for my landscape photography when I need something compact and lightweight, or my video tripod when I'm creating content for YouTube. As this review will mostly focus on my use of this tripod for landscape photography, I decided to put it to use on a recent trip to the highlands of Scotland. With cold, wet and windy weather, and plenty of hills and mountains to climb, it's a great real-world environment to test this tripod.
Carrying the Befree GT PRO

Closed down the Befree GT PRO tripod is easy to carry.
At just 43cm closed down, and a weight of 1.55kg the Befree GT Pro is easy to carry around. For the most part I had the tripod attached to the side of one of my camera bags. Once on my bag I barely noticed it was there. It's not heavy so I didn't feel it pulling the bag to one side, and it's shorter than my camera bags so it fits neatly on the side as well.
Moving about with the tripod in your hands is easy as well. With the legs still extended it's easy enough to walk short distances, and if I need to walk a bit further it's compact and light enough to carry by hand.
Extending and Closing Down the Befree GT PRO
If a tripod is difficult to extend or collapse and fold away, you are much less likely to use it. I didn't have any problems with the twist locks on this tripod. The locks were easy to twist and unlock, releasing the legs to be extended. I didn't experience any sticking, and I was able to use them with cold hands and with gloves on. I could extend all three legs to their maximum length in no time at all.
The centre column can also be extended, and this has a separate mechanism at the top of the tripod.


Equally, closing down the tripod was a simple affair. It takes slightly longer as you need to turn each twist lock separately, but it's hardly an arduous task. You then have the option of folding the closed legs up towards the tripod head to make it even more compact, but this also requires you to extend the centre column as well. For me, this small bit of extra effort isn't worth the few centimetres in height it saves. It is something I would consider doing if I was travelling with the tripod though.
Tripod Heads
I'm not a big fan of ball heads as I much prefer the precision nature of a geared head. However, ball heads are often smaller and lighter and therefore they are often a better choice if you are spending the day walking in the mountains. I was pleasantly surprised with the Manfrotto 496 head that is included in this kit. Yes, it lacks the total precision of a geared head, but thanks to the addition of the friction control knob it's possible to dial in just the right amount of friction for the weight of your camera and lens. This means it is a lot easier to control the movement of the head when you do release it. This doesn't make me a ball head convert, but it does make the choice of taking a ball head instead of a geared head a lot easier.
But the good thing about this tripod is that the head isn't fixed to the legs so you can remove it. This opens up a whole world of different tripod heads (with 3/8" mounting) that you can fit to the Befree GT Pro. For me, I was able to use my favourite geared head, or when I really wanted to keep the weight to a minimum, I have an even lighter weight Manfrotto ball head (though it lacks the friction control of the 496 head).
For video work, I can also mount my Manfrotto video head.
Load, Balance and Stability
The primary purpose of a tripod is to provide a stable platform for your camera. If it can't do this then there is little point in carrying it about with you. However, the stability of a tripod is greatly affected by factors such as camera system weight (body and lens), environmental conditions (wind), and the types of photographs you will be taking (e.g. long exposures).
All reviews are subjective, but tripod reviews are particularly so. What is a good tripod for me, might not be for another person. So, bear in mind if I think this tripod provides a good stable platform, that's subjective and based on how I use it. If you shoot wildlife with an 800mm lens, your milage may vary!
With all that said, I used this tripod for landscape photography which means I was using my Nikon Z8 with either a Nikkor Z 14-30 f/4 S lens or Nikkor Z 24-120mm f/4 S lens. This gives me a maximum system weight of approximately 1540g, plus maybe bit extra for filters. All well within the weight limit of 12kg for the tripod.

The Befree GT PRO with my Nikon Z8 and Nikkor 24-120mm f/4 S
In a horizontal orientation I experienced no issues with balance, even with my 24-120mm lens fully extended. With the camera in a vertical orientation, I still didn't experience any issues, though I do tend to be a bit more wary and may adjust the angle of one of the legs to provide additional balance. This is one of the reasons why I prefer my geared head as I can use my camera L-bracket to put the camera in a vertical orientation rather than using the ball head to do it.
For a lightweight tripod stability is good and I didn't experience any wobbles even when the wind was a bit breezier. I was also able to confidently capture some long exposure photographs. But this is a lightweight tripod, and it will have limits. I haven't found those limits yet, but there will be occasions where the wind is very strong and longer exposures will be challenging. In very windy conditions I would avoid extending the centre column to much (but this goes for any tripod with a centre column).
But based on my experience I would be confident with the stability of this tripod in most of the conditions I would be willing to be out in with my camera.

The ability to independently adjust the angle of the legs of the Befree GT Pro provides additional stability on uneven ground like this hillside.
Things I Would Change
No product is perfect, and the Befree GT Pro is no different. There are just a couple of minor things I would change:
Tripod spikes - I would like to have seen Manfrotto include spikes as well as rubber feet. While I believe you can buy a set of Manfrotto spikes, these are a proprietary fit and so you can't use standard 3rd party spikes. I'm a big fan of spikes as these can really improve the stability of a tripod.
Manfrotto 496 Head - Many of the Manfrotto heads require your camera to have an RC2 plate attached rather than the more universal arca-swiss style mounting (such as the one found on my L-bracket). It is possible to attach the RC2 plate to my L-Bracket, and then I attach it to the head, but I don't find this to be a versatile solution. Additionally, if you are shooting vertically, you really need to make sure the RC2 is tightly attached, or you may find the camera slipping on the plate (especially during long exposures).
Long Term Durability
The one thing I haven't been able to test is the long-term durability of the tripod. However, given it's manufactured by Manfrotto, and it comes with a 2+8-year warranty, I can't see any reason why it wouldn’t give me many years of happy use.
In Summary
I am very happy with my experience so far with the Manfrotto Befree GT Pro tripod. It's lightweight, compact, and sturdy. It's the perfect tripod if you are trying to keep your kit weight to a minimum and it easily attaches to my camera bags without becoming a burden. It's even the type of tripod I'd be happy to take out on family walks to capture those special group shots. Nothing bores the family more than waiting 10 minutes as you set up your tripod!
If your camera is mirrorless or generally lightweight, you'll find the maximum payload of 12kg more than enough even to make this your only tripod.
The tripod feels like a quality product and the legs extend and collapse easily making it a tripod you will want to use on a regular basis. The ball head is surprisingly nice to use, and proprietary plates aside, is a good addition to the legs.

The carbon fibre legs provide a stable platform for longer exposures.
As I said earlier in the review, there's no such thing as a perfect tripod and what's good for me, might not be good for you. It's always worth carefully considering how you will use any tripod and what camera you will be putting on it. But for me, Manfrotto Befree GT PRO is the perfect companion for me and my Nikon Z8 and those beautiful long walks in the Scottish Highlands.
I hoped you enjoyed this review of the Manfrotto Befree GT PRO backpack and if you have any questions, please leave me a comment below.

Manfrotto PRO Light Backloader Backpack Review
Nothing tests the protection of your camera bag quite like a British music festival! In my latest blog post I look at the Manfotto PRO Light Backloader bag to see how it performs while I photograph Devon's biggest festival.
Why I Have the Manfrotto PRO Light Backloader Backpack
Like tripods, camera bags are probably the one item of photography equipment you replace the least. A good camera bag should last you a long time.
However, all bags will eventually need replacing. Nothing lasts forever and unfortunately my previous bag had a zip failure and was no longer fit for purpose. While it's not the main bag I use for my landscape photography adventures, it did get used a lot. And I mean a lot! It was multi-purpose, serving as a camera bag and a general backpack. It went everywhere from my local beaches daytrips to holidays in Iceland. It had a hard life and when it died, it owed me nothing.
Back in the day when I bought that bag, camera backpack choices were more limited than they are today. If you do a Google search now for "camera backpacks" you are presented with a dizzying array of choices. However, with a music festival in my photography schedule rapidly approaching, I needed a new bag to carry and protect my camera gear.
As if by divine intervention, Manfrotto got in contact and asked if there was anything in their product range that I would like to review. Well, funnily enough there was! The Manfrotto PRO Light Backloader Backpack S looked like a good fit for me and it was from a reputable brand. A few days later I had one in my hands.
So, in this blog post I'm going to tell you a little bit about this backpack, the features that are relevant to me, how I plan to use the bag, and I'll share my real world experience of using it.
Before I go any further though, I must say that Manfrotto sent me this bag free of charge in exchange for writing this review. However, they have not asked me to say anything and everything I write here are my own thoughts (good and bad). They will see this review for the first time when I publish it here.
Where To Buy the Manfrotto PRO Light Backloader Backpack
If you'd like to buy the Manfrotto PRO Light Backloader S, it's available just about anywhere, including:
Please note that the Amazon and WEX links are affiliate links. I may receive a small commission if you purchase through those links, but it does not impact the price that you pay.
Features of the Manfrotto PRO Light Backloader Backpack
I'm not going cover all the specifications and features of the Manfrotto PRO Light Backloader S, only those that are relevant to how I will use the bag. If you want a full list of all the features, you can see the bag on Manfrotto's website here. This bag is also part of the Manfrotto PRO Light collection, so many of the same features in this bag apply to the other bags in the range. If you like the look of the bag but it doesn't quite match your requirements, do check out the other bags in the collection.
Exterior Dimensions
Let's start with the outside of the bag first. It weighs approximately 1.6kg and it measures 51 x 13.5 x 43 cm. This should mean that it will fit within most airlines cabin baggage/carry on limits. However, these restrictions can vary so please do check with your airline of choice.

External Materials and Protection
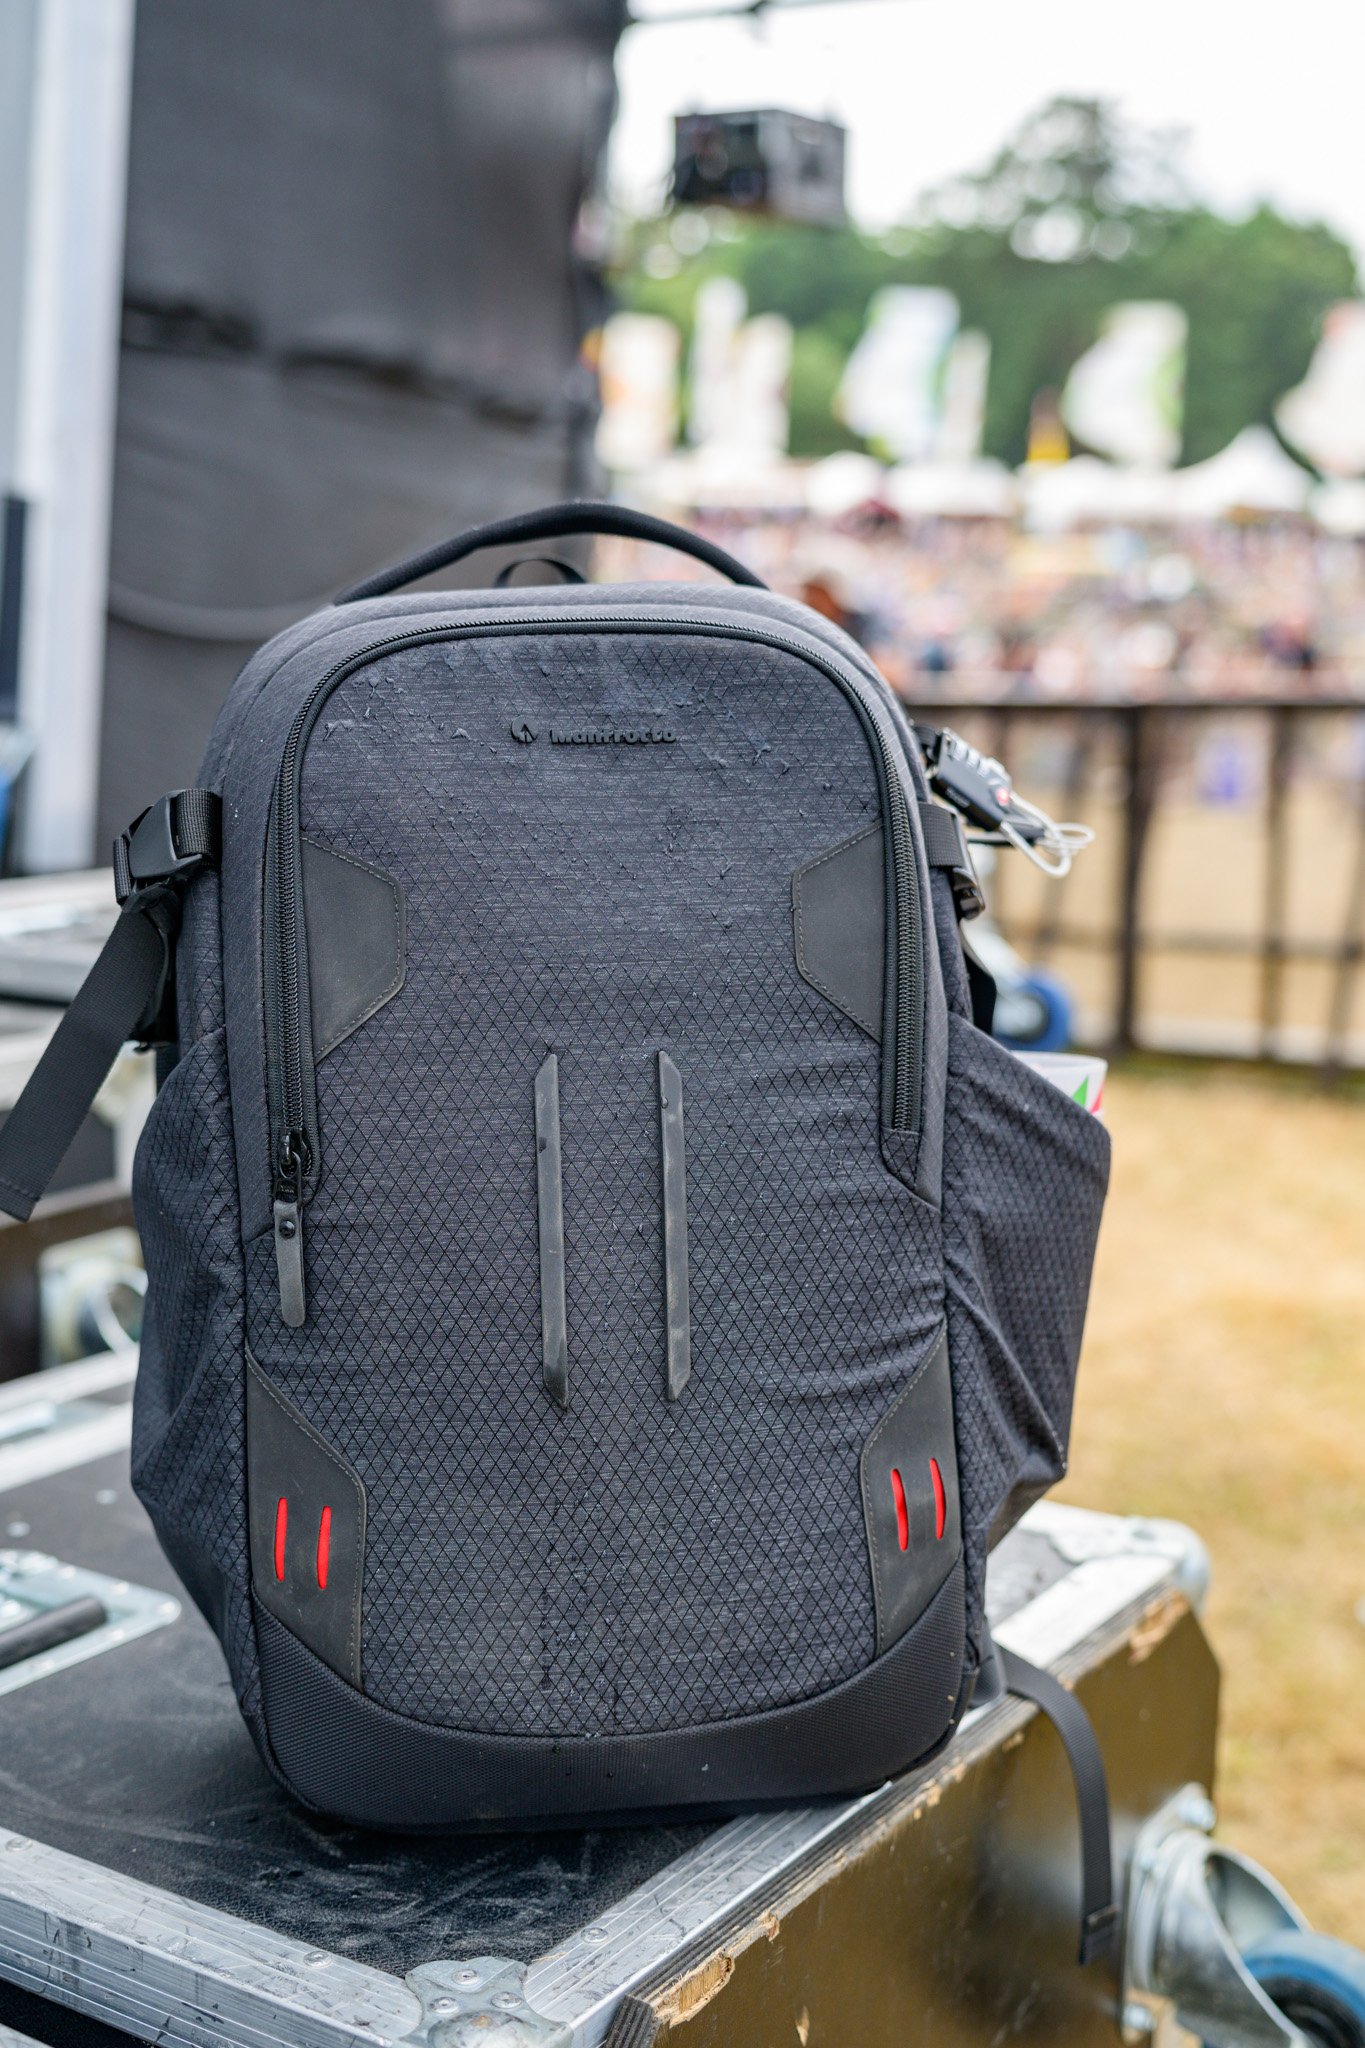
The backpack is made of water-repellent RipStop nylon/polyester fabric with that is reinforced in key areas. The material is not only water repellent, but it also looks good. Given the conditions this backpack is likely to find itself in (e.g. a muddy festival field), I'm glad the bag is all black in colour. It also helps the bag be a little more inconspicuous when I’m in crowds.
I'm very pleased to see that Manfrotto has also included a raincover with the bag. Anyone who's been to a UK music festival will know that rain is an ever present threat, so it's good to know the raincover is there when you want more than protection from rain or mud. Cleverly though, if you turn the raincover inside out so the silver side is on the outside, the cover will deflect direct sunshine and prevent overheating of the contents.
The bag aslo features a SAS-TEC bottom that provides extra absorbance which is very reassuring.


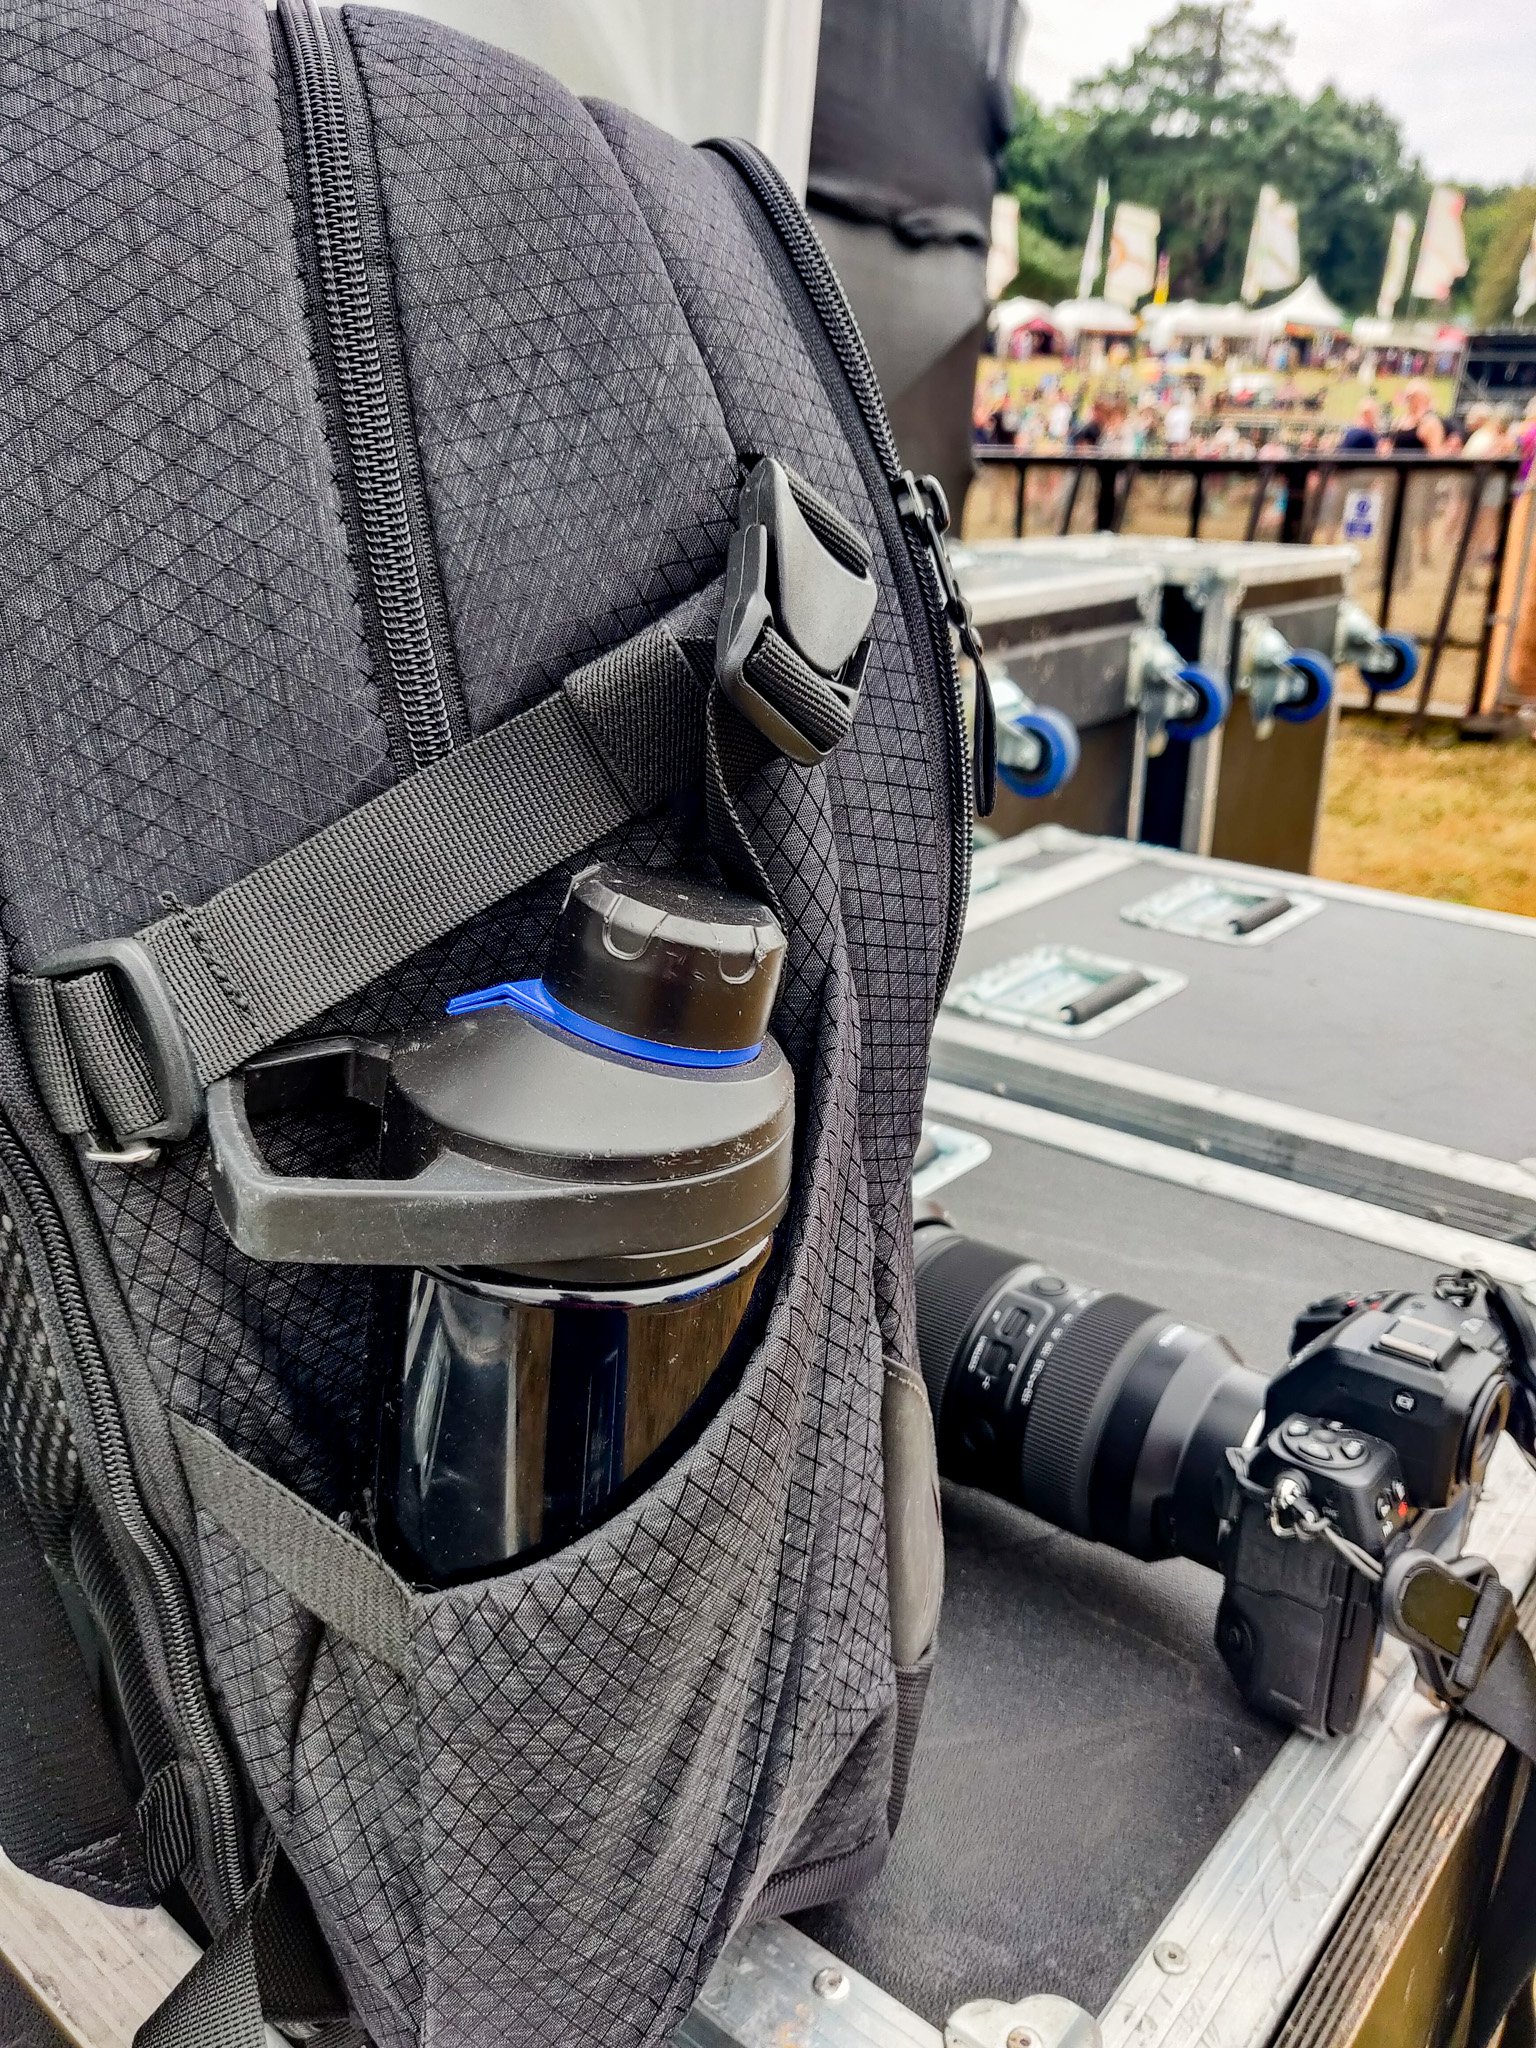
Exterior Side Pockets
There are two side pockets with compression straps should you want to mount a tripod. It's not often I'll use a tripod with this bag so I will more likely use these pockets for storing drinks such as a water bottle. The pockets are of a generous size as well.
Bag Carrying and Shoulder Straps
There are two well padded shoulder straps. While the position of these straps can’t be adjusted the can be pulled tight. Both shoulder straps will also allow you to attach something like a Peakdesign Capture Clip should you need to keep you camera at hand. The bag also has a mesh ventilated area at the bag to prevent your back getting too sweaty (on those rare warm festival days!)
There are pickup handles on both the top of the bag and the side. The latter being useful should you want to place the bag over luggage handle.


Zips
The zips are high quality YKK zippers but the really interesting thing here is that the zippers for the main compartments have metal loops. Why? This is so you can loop them into the integrated TSA approved padlock. While it won't stop someone walking off with your backpack, it will prevent someone sneakily opening your bag and removing the contents.
Exterior Compartments
There is a large compartment at the front of the bag. It's deep compartment so ideal for stashing clothing items but you'll also find two mesh pockets which you can use for smaller items.
There is also a top opening to the bag where you can directly access some of your camera gear, but if you change the interior layout of the main camera compartment, you can make this top opening a separate compartment from your camera gear. This makes it very handy for storing items that you want quick access to such as snacks or a rain jacket.


Rear Access (Camera) Compartment

The Manfrotto PRO Light Backloader Backpack S has plenty of room to store gear. I have changed to layout of the interior to give me space at the top of the bag for personal items.
The main compartment is accessed at the back of bag, has two zips, and is full of storage goodies. There's a laptop sleeve (up to 15" and well padded), and three mesh compartments (one of which is large and zipped).
But the main function of this area is for storing your camera gear. Manfrotto say it will hold 2 to 3 mirrorless bodies (without battery grips) plus multiple lenses. This far exceeds any of my requirements for cameras and lenses so it still leaves lots of room for camera accessories such as batteries and lens cloths. As I mentioned earlier, you can change the size of this compartment to make a separate compartment at the top of the bag.
Finally, the camera compartment can be adjusted to suit your combination of camera equipment thanks to the M-Guard dividers. The provide a lot of flexibility on how you use the available space and because they are made of high-density EVA foam the provide very high levels of shock absorption but yet they are slim enough not to consume valuable space.
Using the Manfrotto PRO Light Backloader Backpack in the Real World
What Is the Real World?

The Manfrotto PRO Light Backloader Backpack S also stood up well to the harsh environment of a wet Scottish island walk.
No, I’m not going to ask you to take the red pill or green pill, but I thought I’d let you know how I’ve been using this bag in the real world. Most of my real world experience with this bag has been at a multi-day music festival in the UK. Generally speaking, these aren’t the friendliest environments for camera gear. Even though I was there as Press and I had a pit pass, I still have to deal with bad weather, bringing my own supplies (food & drink), and accept that my bag will be subject to the odd knock!
While most of my experience with this bag has been in a festival environment, I have also been using it as a day bag for family adventures, and when I needed a more lightweight landscape gear setup. Needless to say, the bag has proved to be very capable and versatile.
What I Packed in the Bag
One of the key reasons I decided on the Manfrotto PRO Light Backloader Backpack S is that it allows you to change the amount of space you dedicate to camera gear and personal items. This is important to me as the amount of camera gear that I take with me is relatively small. Most of what I need for a festival is food, drink and protection from the elements! Here's what I take:
Camera Gear
Nikon Z8 - check out all my Z8 videos (including my review) here
Tamron 35-150mm F2-2.8 Di III VXD - this is a recent addition to my kit bag. With a fast aperture and good zoom range, it's ideal for festivals. If you want to see a review, let me know in the comments. (You purchase this lens from Amazon or Wex.
Nikon Z 14-30mm f/4 S - handy in case I need a super wide shot!
2 x Spare EN-EL15 batteries
Spare memory cards - 1 x CF Express Type B, 1 x xQD, 1 x SD
BLACKRAPID Camera Strap
Peakdesign Capture Clip
Lens clothes - you can never take too many of these!
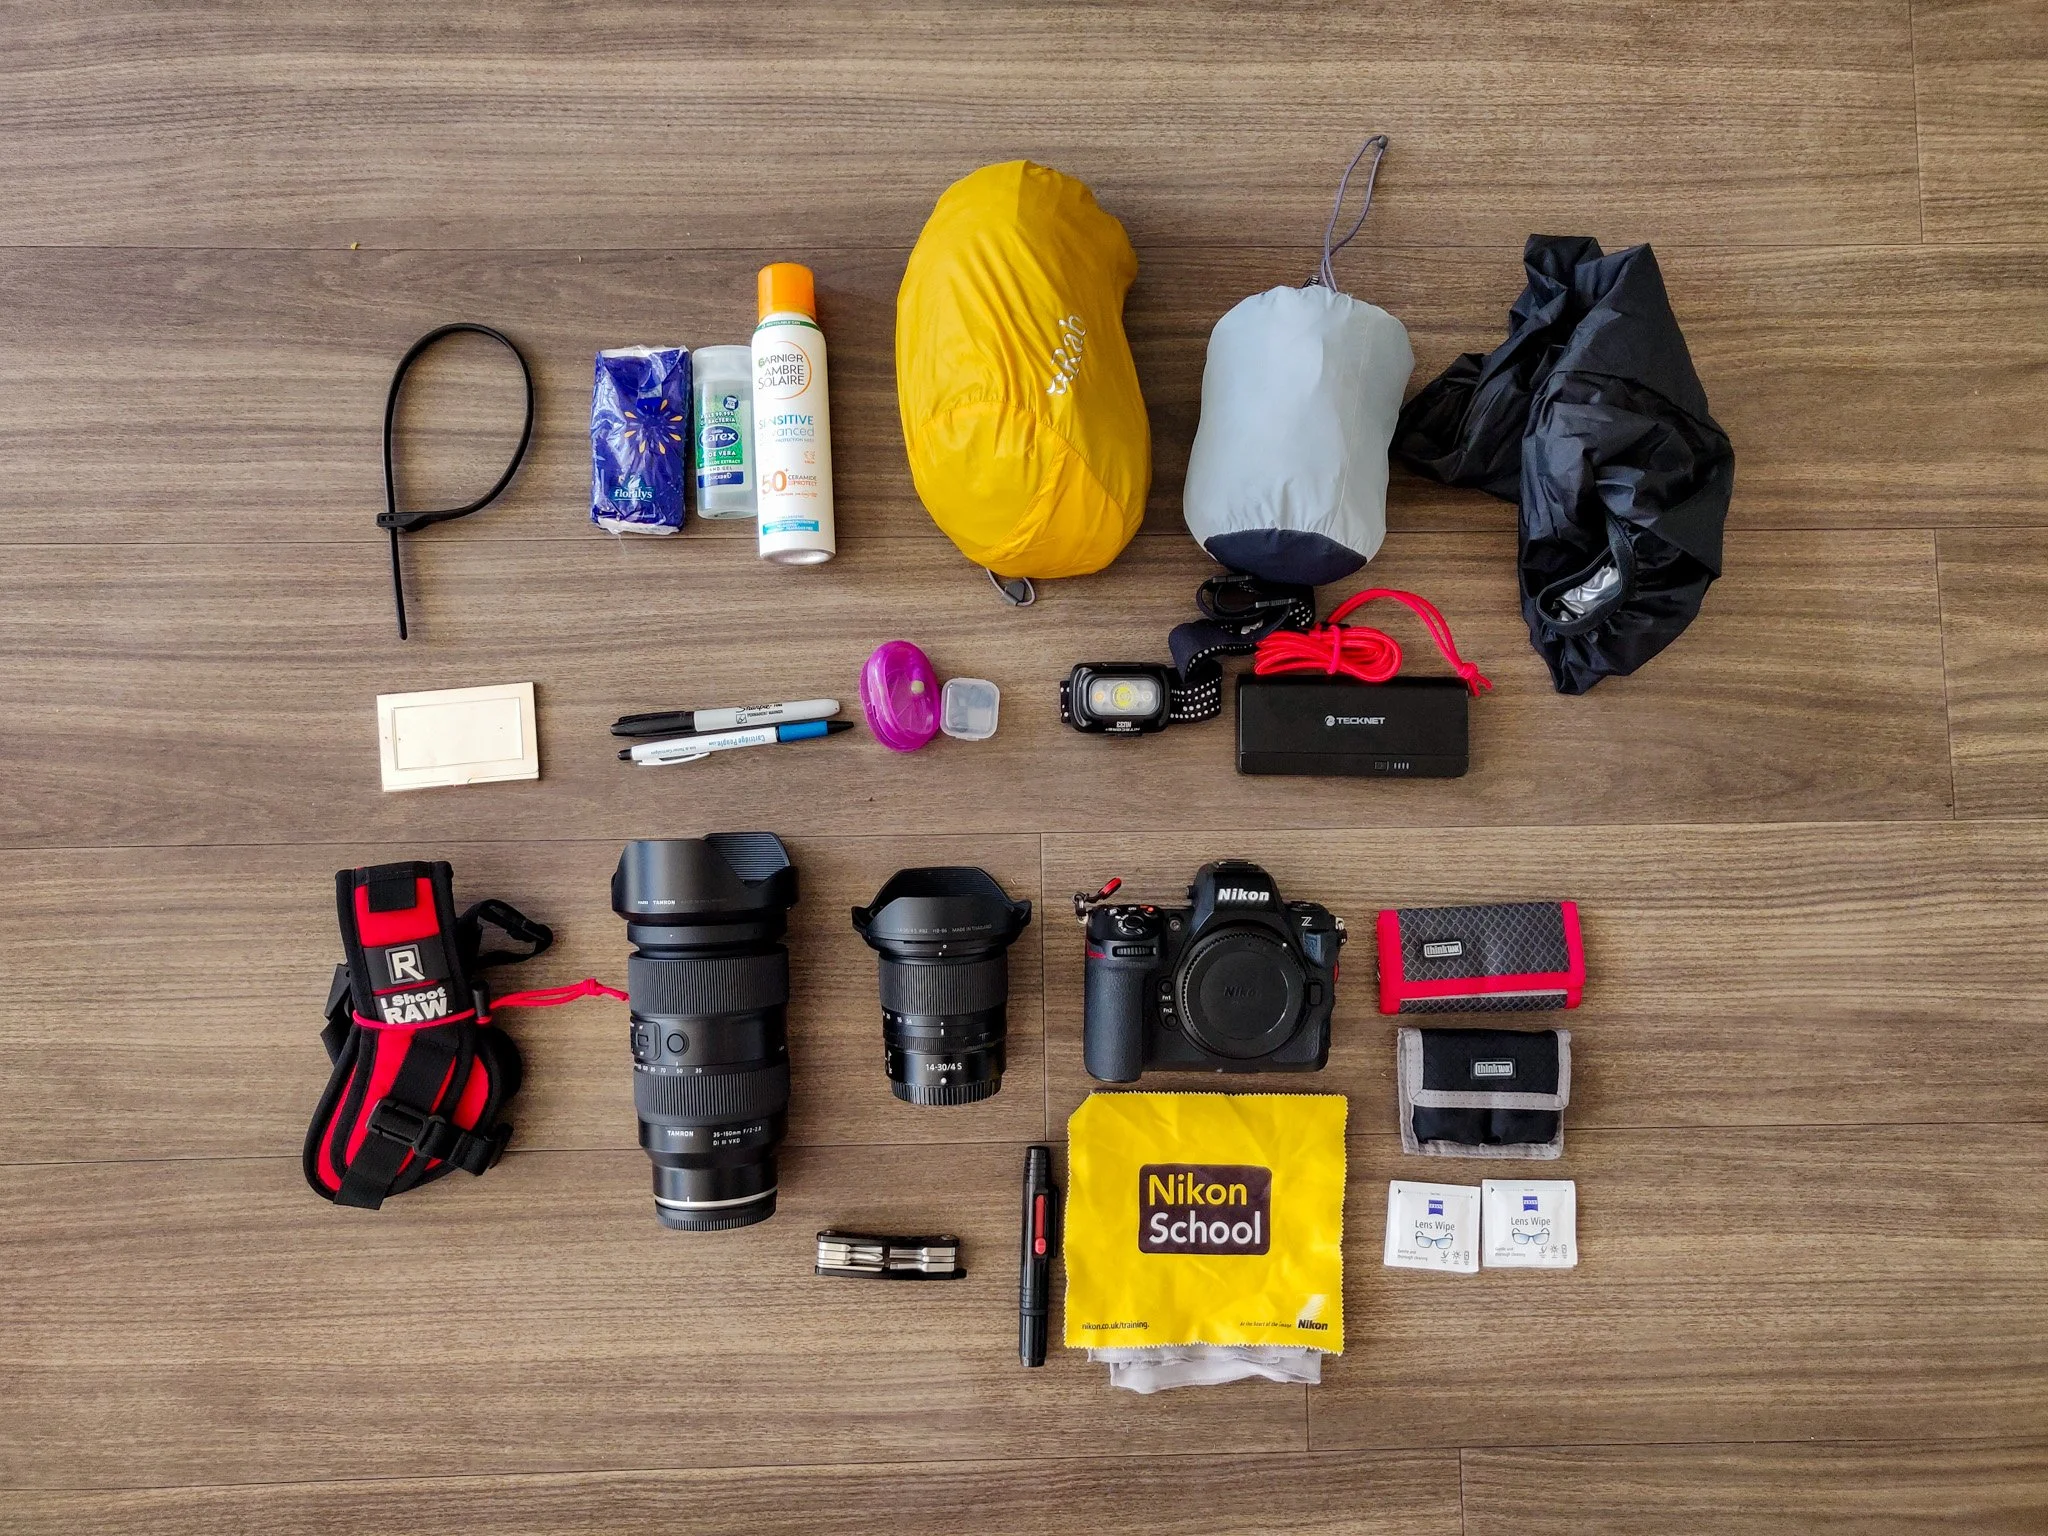


Other Essentials
USB Battery bank - just in case!
Sunblock
Business/contact cards
Ear Plugs
Hiplok Z LOK Armoured Security Tie - useful for securing the bag to a solid object
Water Bottle (750ml)
Snacks!
Waterproof Trousers
Waterproof Jacket
You'll notice that I don't take a laptop. For this particular festival I was able to return home each night and upload my photos to my computer. Any photos that I needed to publish immediately I would do on my phone using a combination of Nikon SnapBridge and Lightroom Mobile. However, the bag does have a laptop sleave so if I do need to take my laptop in future, there is still plenty of room.
With or without a laptop, the Manfrotto PRO Light Backloader Backpack S offers lots of space to carry everything I need. Plus the M-Guard dividers offer plenty of flexibility on how that space is used. I have no complaints around the capacity of the bag, and I particularly like the flexibility in how I size and format the main compartment.
Accessing and Securing Your Gear
There's no point in having a spacious bag that protects all your gear if you can't access it easily. As the name suggests, the Manfrotto PRO Light Backloader is a rear access style bag, so to get to the bulk of your camera gear, you need to take the bag off your shoulders. Depending on how you are using your camera bag you will see this is as a good thing or a bad thing. Fortunately, Manfrotto offer a range of bags so if you prefer a different style of gear access, there's likely to be a bag for you in the range.
For me though, the rear access is just what I want. When the camera is in the bag and I have the bag over both shoulders, no one can access the main compartment as it is against my back. As well as shooting from the pit, I will also be walking between stages and performances through busy crowds. It's good to know that anyone following me can't sneakily open the bag.
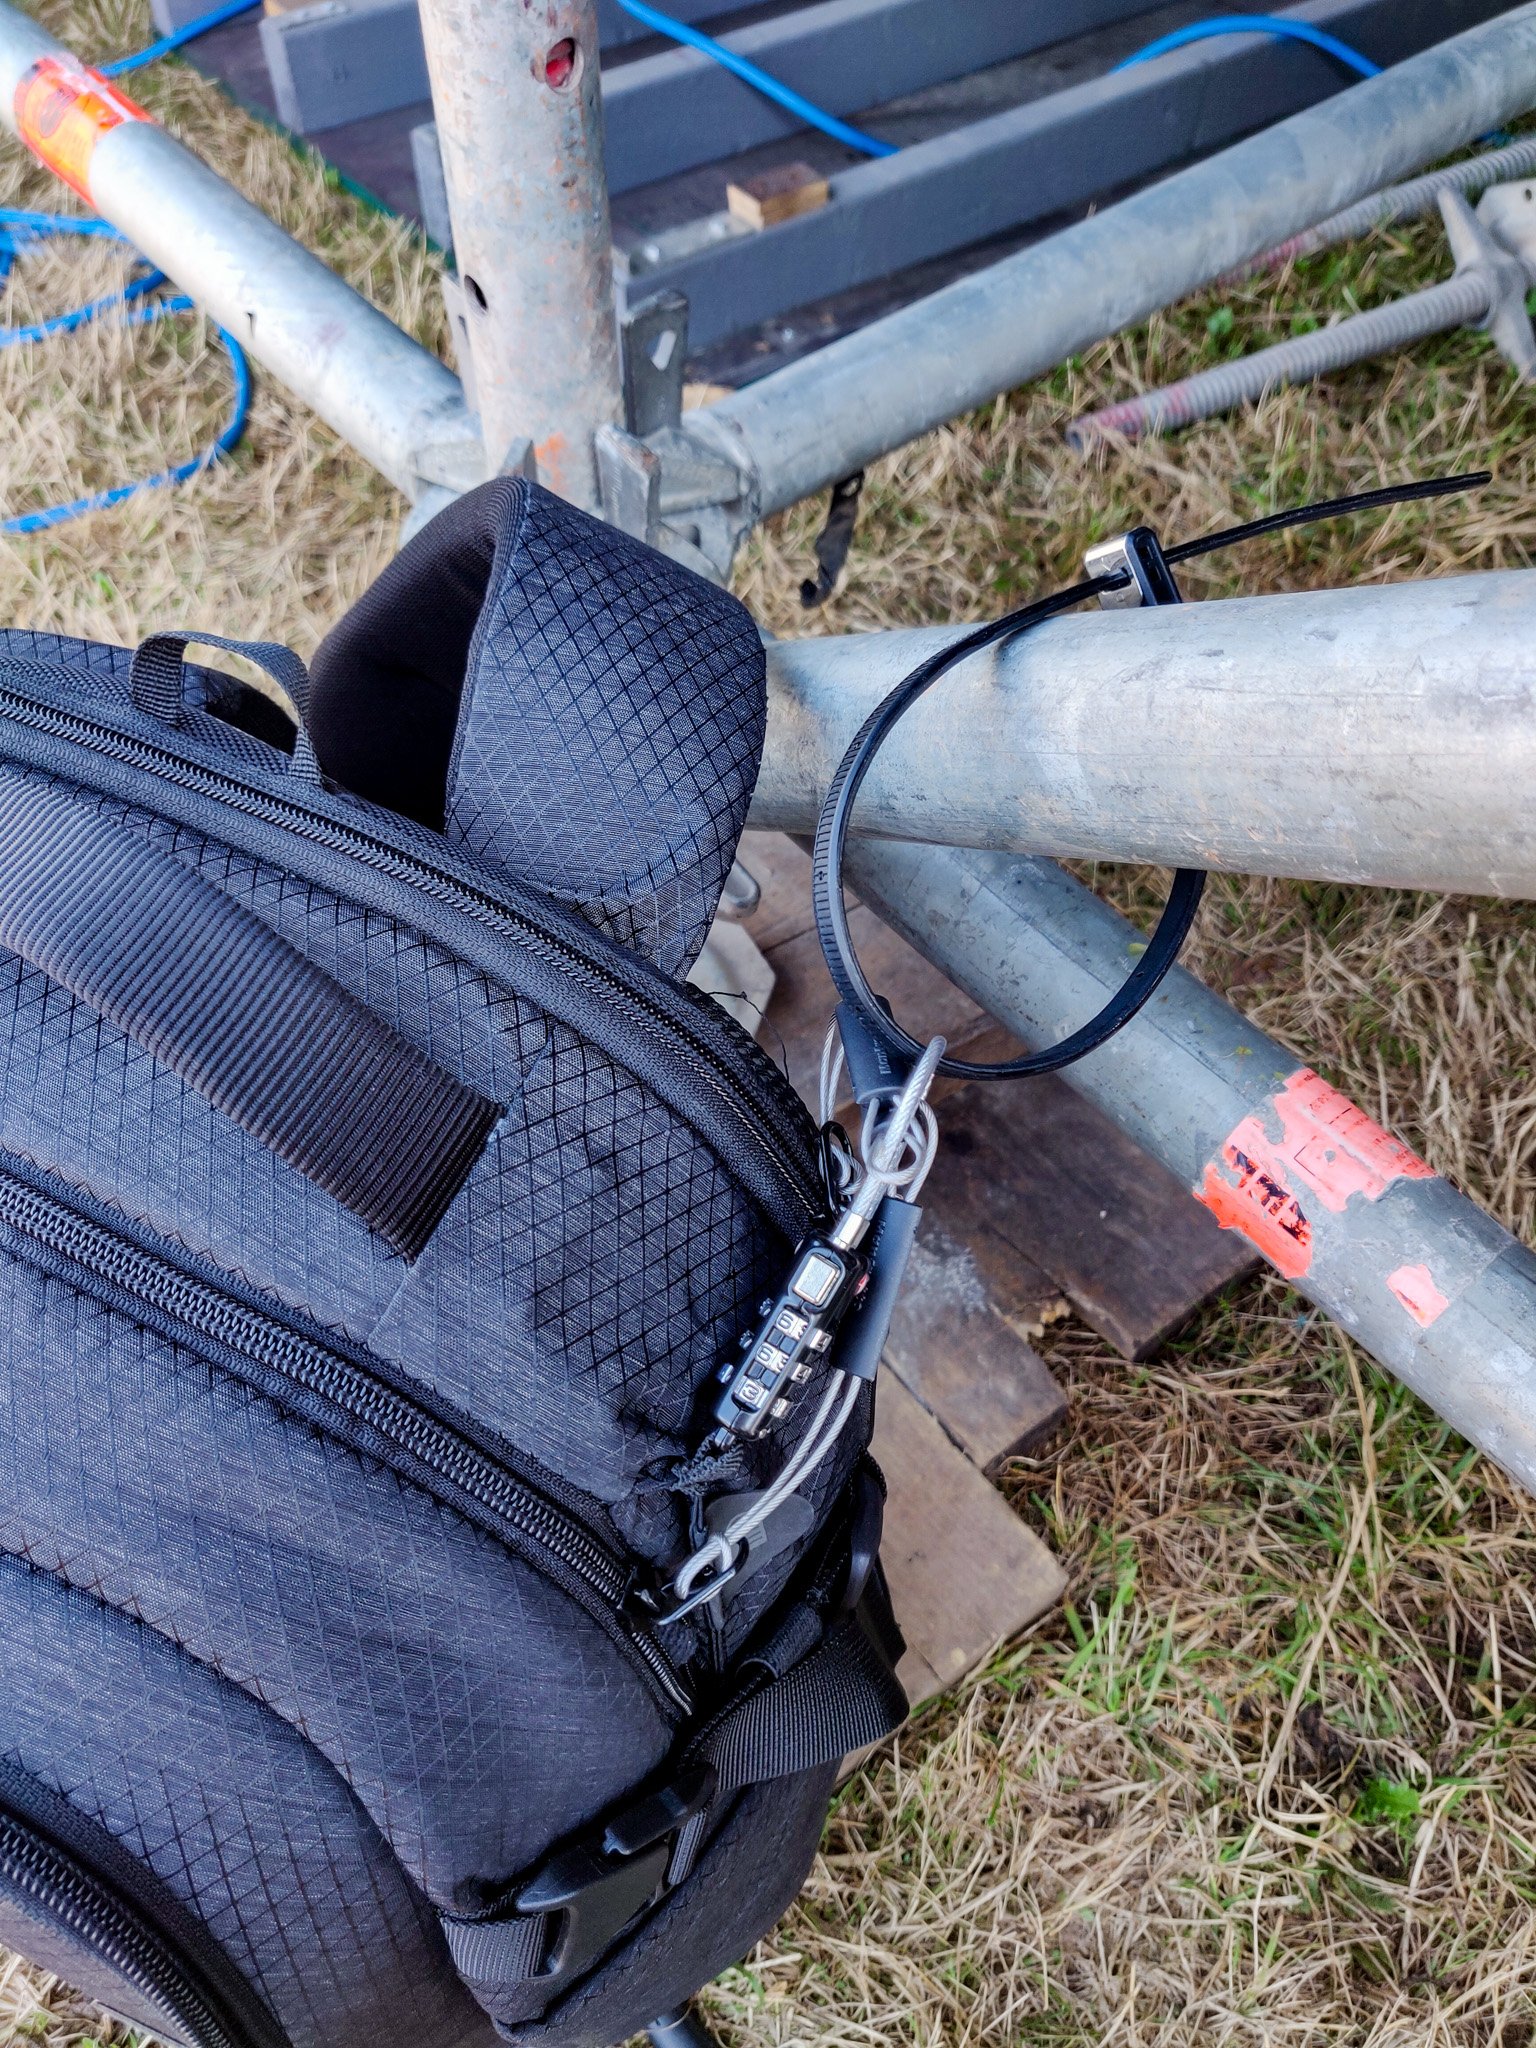
Securing the Manfrotto PRO Light Backloader Backpack S bag to the stage with the integrated TSA lock and a Hiplock Security Tie.
Sometimes the walk between stages leaves me tight for time so being able to access my gear efficiently is important. Getting the bag of my shoulders and onto the ground is a simple process. I also had no concerns putting the bag on the ground, even when the ground was wet and muddy. Thanks to the large metal loops on the rear compartments zips, finding them easy allowing me open the bag quickly. I could then quickly get at my camera and start taking photos.
In a busy pit area, it's either prohibited or at least bad etiquette to take your bag into the pit. This normally means leaving it at the side near the entrance of the pit. If I arrive with time to spare I will stow my bag under the stage. I will use one of my Hiplock Security Ties to attach the bag to something immovable like a bit of stage scaffolding. This combined with the integrated TSA lock on the bag gave me the reassurance that people can't access the critical areas of my bag, nor simply just walk off with it.
Overall, I found I had no issues accessing my camera quickly and easily, and with the backloading system and the integrated TSA lock my gear also felt secure.
Comfort
If you talk to anyone who has photographed a festival, they will tell you that it involves a lot of walking and waiting about. During that time you will inevitably have your backpack on. Even when you are carrying a modest amount of equipment, you’ll want that experience to be as comfortable as possible.
My initial concern with the Manfrotto PRO Light Backloader was that it didn't have a hip belt. A hip belt takes some of the load from your shoulders and distributes it to your hips. However, I'm carrying less gear and lighter gear these days so my worry about the lack of a hip belt in the end wasn't justified.
The shoulder straps are well padded and even after a full day of the bag being on my shoulders I wasn’t in any discomfort. The area of the bag that sits against your back is also well padded and ventilated. While it won't stop your back sweating in the heat, it is comfortable, and it does allow some air to flow.
The shoulder straps don't have a huge amount of adjustability. They can be adjusted so they are pulled tight, and with the sternum strap I was able to achieve a snug but comfortable fit. There's no way to adjust the position of the shoulder straps but that's not entirely unexpected with a bag this size.
he Manfrotto PRO Light Backloader Backpack S was comfortable enough to wear all day and into the night.
I would have preferred to see slightly wider shoulder straps with some storage pockets though. Being able to store items such as mobile phones, access/press passes, emergency snacks and festival maps would have been very useful.
That aside, I did find the bag comfortable to wear. There's no escaping the fact that carrying a bag full of equipment all day is a tiring experience, but at least with this bag it doesn't have be an uncomfortable one.
Durability and Protection
Music festivals are harsh environments even when they are rain and mud free. Any bag will get knocked as you walk through crowds, drinks get spilt as you walk by, and despite your best intentions, sometimes you won't always put your bag down as gently as you should. Some of these things are within your control and others you just can't help. It's the nature of carrying a bag at a festival.
You therefore want a bag that can protect all your precious gear against those bumps, spills and weather. I'm pleased to say that the Manfrotto PRO Light Backloader is a backpack that I can confidently say handles the harshness of a British music festival. My camera gear was well protected inside thanks to protection of the M-Guard dividers. The bag is also well padded on the outside, but the addition of high impact strips on the front and base of the bag meant I was a little less worried when I "dumped" my bag on the ground.

The Manfrotto PRO Light Backloader Backpack S material is water repellant.
The outer material is also well suited to outdoor environments. The RipStop fabric meant that I was less concerned on where I put my bag or it catching it on some fencing or in a narrow space (which I did a couple of times). While the material isn't waterproof (you need the included raincover for that), it is water repellent meaning I was comfortable enough getting it wet during most rain showers.
Even in the driest of music festivals, you can almost guarantee there will be mud somewhere, and normally where you put your bag! While keep the bag looking new isn't a top priority, it looks like keeping this bag looking smart is an easy enough job. Using a damp cloth I was able to wipe any mud off at the end of the day.
The Manfrotto PRO Light Backloader certainly gives me the confidence that my gear will be well protected but what about the durability of the bag. I've only had the bag for a few weeks so at the moment I can't comment on the long term durability of the bag. But from what I have experienced, the quality of materials, and that it is a Manfrotto bag, I have little concern that long-term this will last every bit as long as my last one.
In Summary
I'm very happy with how the Manfrotto PRO Light Backloader has performed over the time I have been using it. There are lots of things I like about it. The materials are excellent, it offers lots of flexible storage space, it protects my gear, it has some nifty security features, and it's comfortable to wear.
My only slight criticism is that I would have liked a hip belt and slightly wider shoulder straps with pockets but given the size of this bag it's not a total surprise these things aren't there. I would have also liked to have seen a mechanism to securely attach keys inside the bag.
But overall, I love this bag, and it will continue to get heavily used. It will be my go to bag for gigs and festivals, a bag for those lighter weight landscape photography adventures and it will also serve as a general use day pack.
I hoped you enjoyed this review of the Manfrotto PRO Light Backloader backpack and if you have any questions, please leave me a comment below.

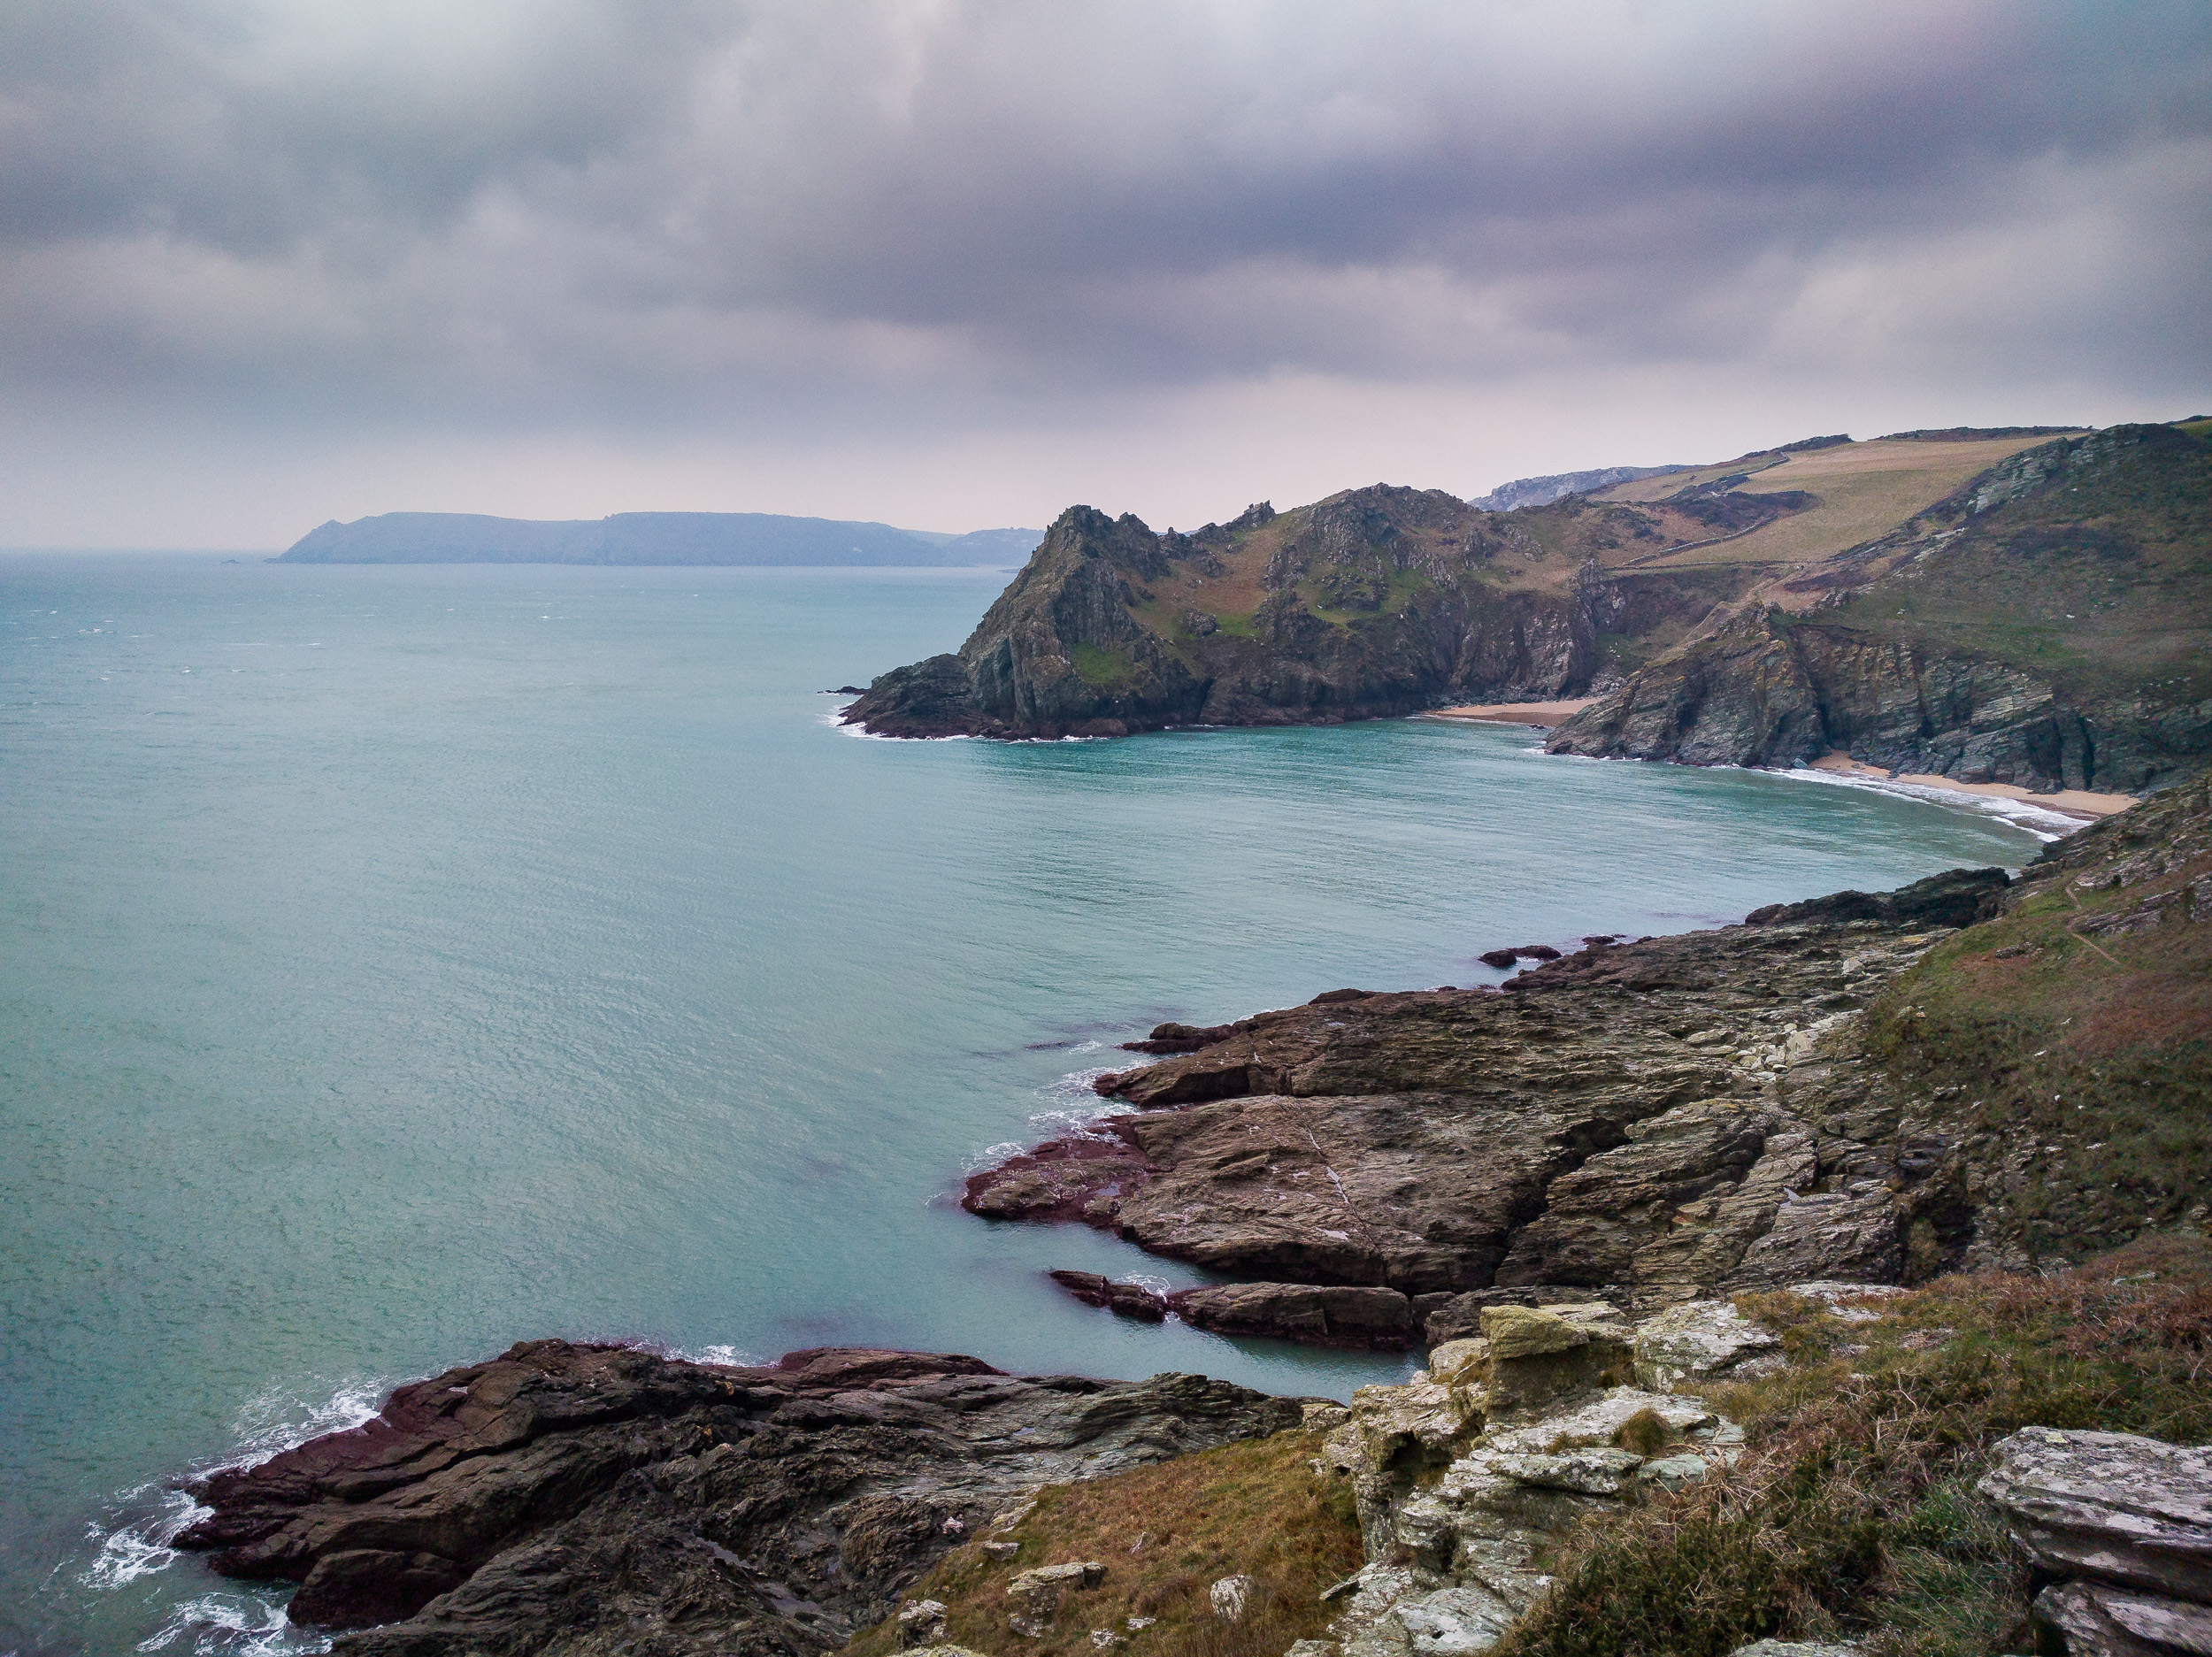
Prawle Point with a Point and Shoot
Can you shoot good seascape images with a compact camera? In my latest blog post and video I go out to explore the coastline around Prawle Point in south Devon to capture some seascape images. I also leave all my DSLR gear at home and decide to shoot only with a compact camera. Read more to see how I got on!
Packing Light and Exploration
I've photographed Start Point <insert link to previous blog post> on the south Devon coast a few times but I've never really ventured further west towards Prawle and Salcombe. My father-in-law had suggested a few times that this area of the coastline was worthy of investigation, so when a free Sunday morning came up I decided to do just that.
Summerleaze beach in Bude. The manual controls on the Sony RX100 M4 allowed me to create this long exposure.
After deciding that I would go to Prawle Point I also considered if I should pack all my DSLR gear and go for a sunrise shoot. I have to admit that going somewhere new and trying to find a composition for sunrise was exciting, but my head overruled my heart. The weather forecast was for high winds and 100% cloud coverage so I decided I would take a more leisurely approach and have breakfast first and go out after sunrise.
I already knew the conditions weren't going to be ideal for seascape photography but I didn't want to go out with no camera at all so I decided to go out with my light weight setup of my Sony RX100 M4 and Manfrotto BeFree carbon fibre tripod. The Sony RX100 M4 looks like a point & shoot camera, but this little compact camera can be a real powerhouse. It has lots of manual controls, and while it does have it's limitations, it is capable of capturing some wonderful images.
So with a new area to explore, and very lightweight setup, I decided to make a video to see if I could capture a good seascape image while out exploring Prawle Point. I was going to test the theory The Best Camera is the One That's with You. Check out the video below to see how I got on.
Results and Conclusions
As I said in the video I'm certainly not about to give up all my Nikon gear but that's not to say that I can't capture good images with a compact camera. Yes, I was off to a little bit of a head start with advanced capabilities of the Sony RX100 M4 but it is more about understanding your gear and having a good technique that allows you to get results.
Sony RX100 M4, 8.8mm (24mm @ 35mm equiv), 1/4 sec @ f/11, ISO 80, in-camera ND filter on. Processed and converted to black & white in Lightroom CC.
Sony RX100 M4, 8.8mm (24mm @ 35mm equiv), 1/4 sec @ f/11, ISO 80, in-camera ND filter on. Processed in Lightroom CC.
A reference shot facing east from Prawle Point lookout. Taken with my Nexus 6p phone.
While I'm not considering these images for my portfolio, given the weather conditions and the fact it was a new location for me I'm relatively happy with the results. While there is no doubt that my Nikon camera, lenses and Lee Filters provide me with a superior level of control and quality, I'm still confident I could capture good images with my Sony RX100 M4 if I needed to. It's also nice to travel light every now and again!
I'm also very much looking forward to exploring to the east of Prawle Point. The coastline seems more dramatic and there are a couple of very nice looking beaches. Once I've got some locations marked out I'll return with my Nikon and also shoot some video there with the drone.
So, do you prefer to go out with a light weight setup? How important is gear? Is good photography technique just as important as the camera? Let me know in the comments below.
A Technical Footnote
The video I shot at Prawle Point was also an opportunity to test out my new audio/video rig. Audio is a critical component of good video, and I've struggled to get good audio for my videos. The Sony RX100 M4 captures wonderful 4K video, but without a mic input, I've had to depend on onboard audio which isn't great. Now that I'm using an external audio recorder and a lavalier mic I can consistently capture high-quality audio. In fact, I wouldn't have been able to capture good audio at Prawle Point without my new rig as the wind was so strong.
If anyone is interested in the setup let me know in the comments and I'll either do a blog post of video on my personal setup. However, I do have to thank Ted Forbes and his YouTube channel The Art of Photography which originally showed me how I could use a Sony RX100 M4 and an external audio recorder in a single rig setup.
And thanks to Ted, I also learnt how to sync the audio as well.
Please do subscribe to The Art of Photography. It's a wonderful photography channel that discusses so many aspects of photography from technical side of things (as above), to the artistic side of photography.
And of course, don't forget to subscribe to my YouTube channel.
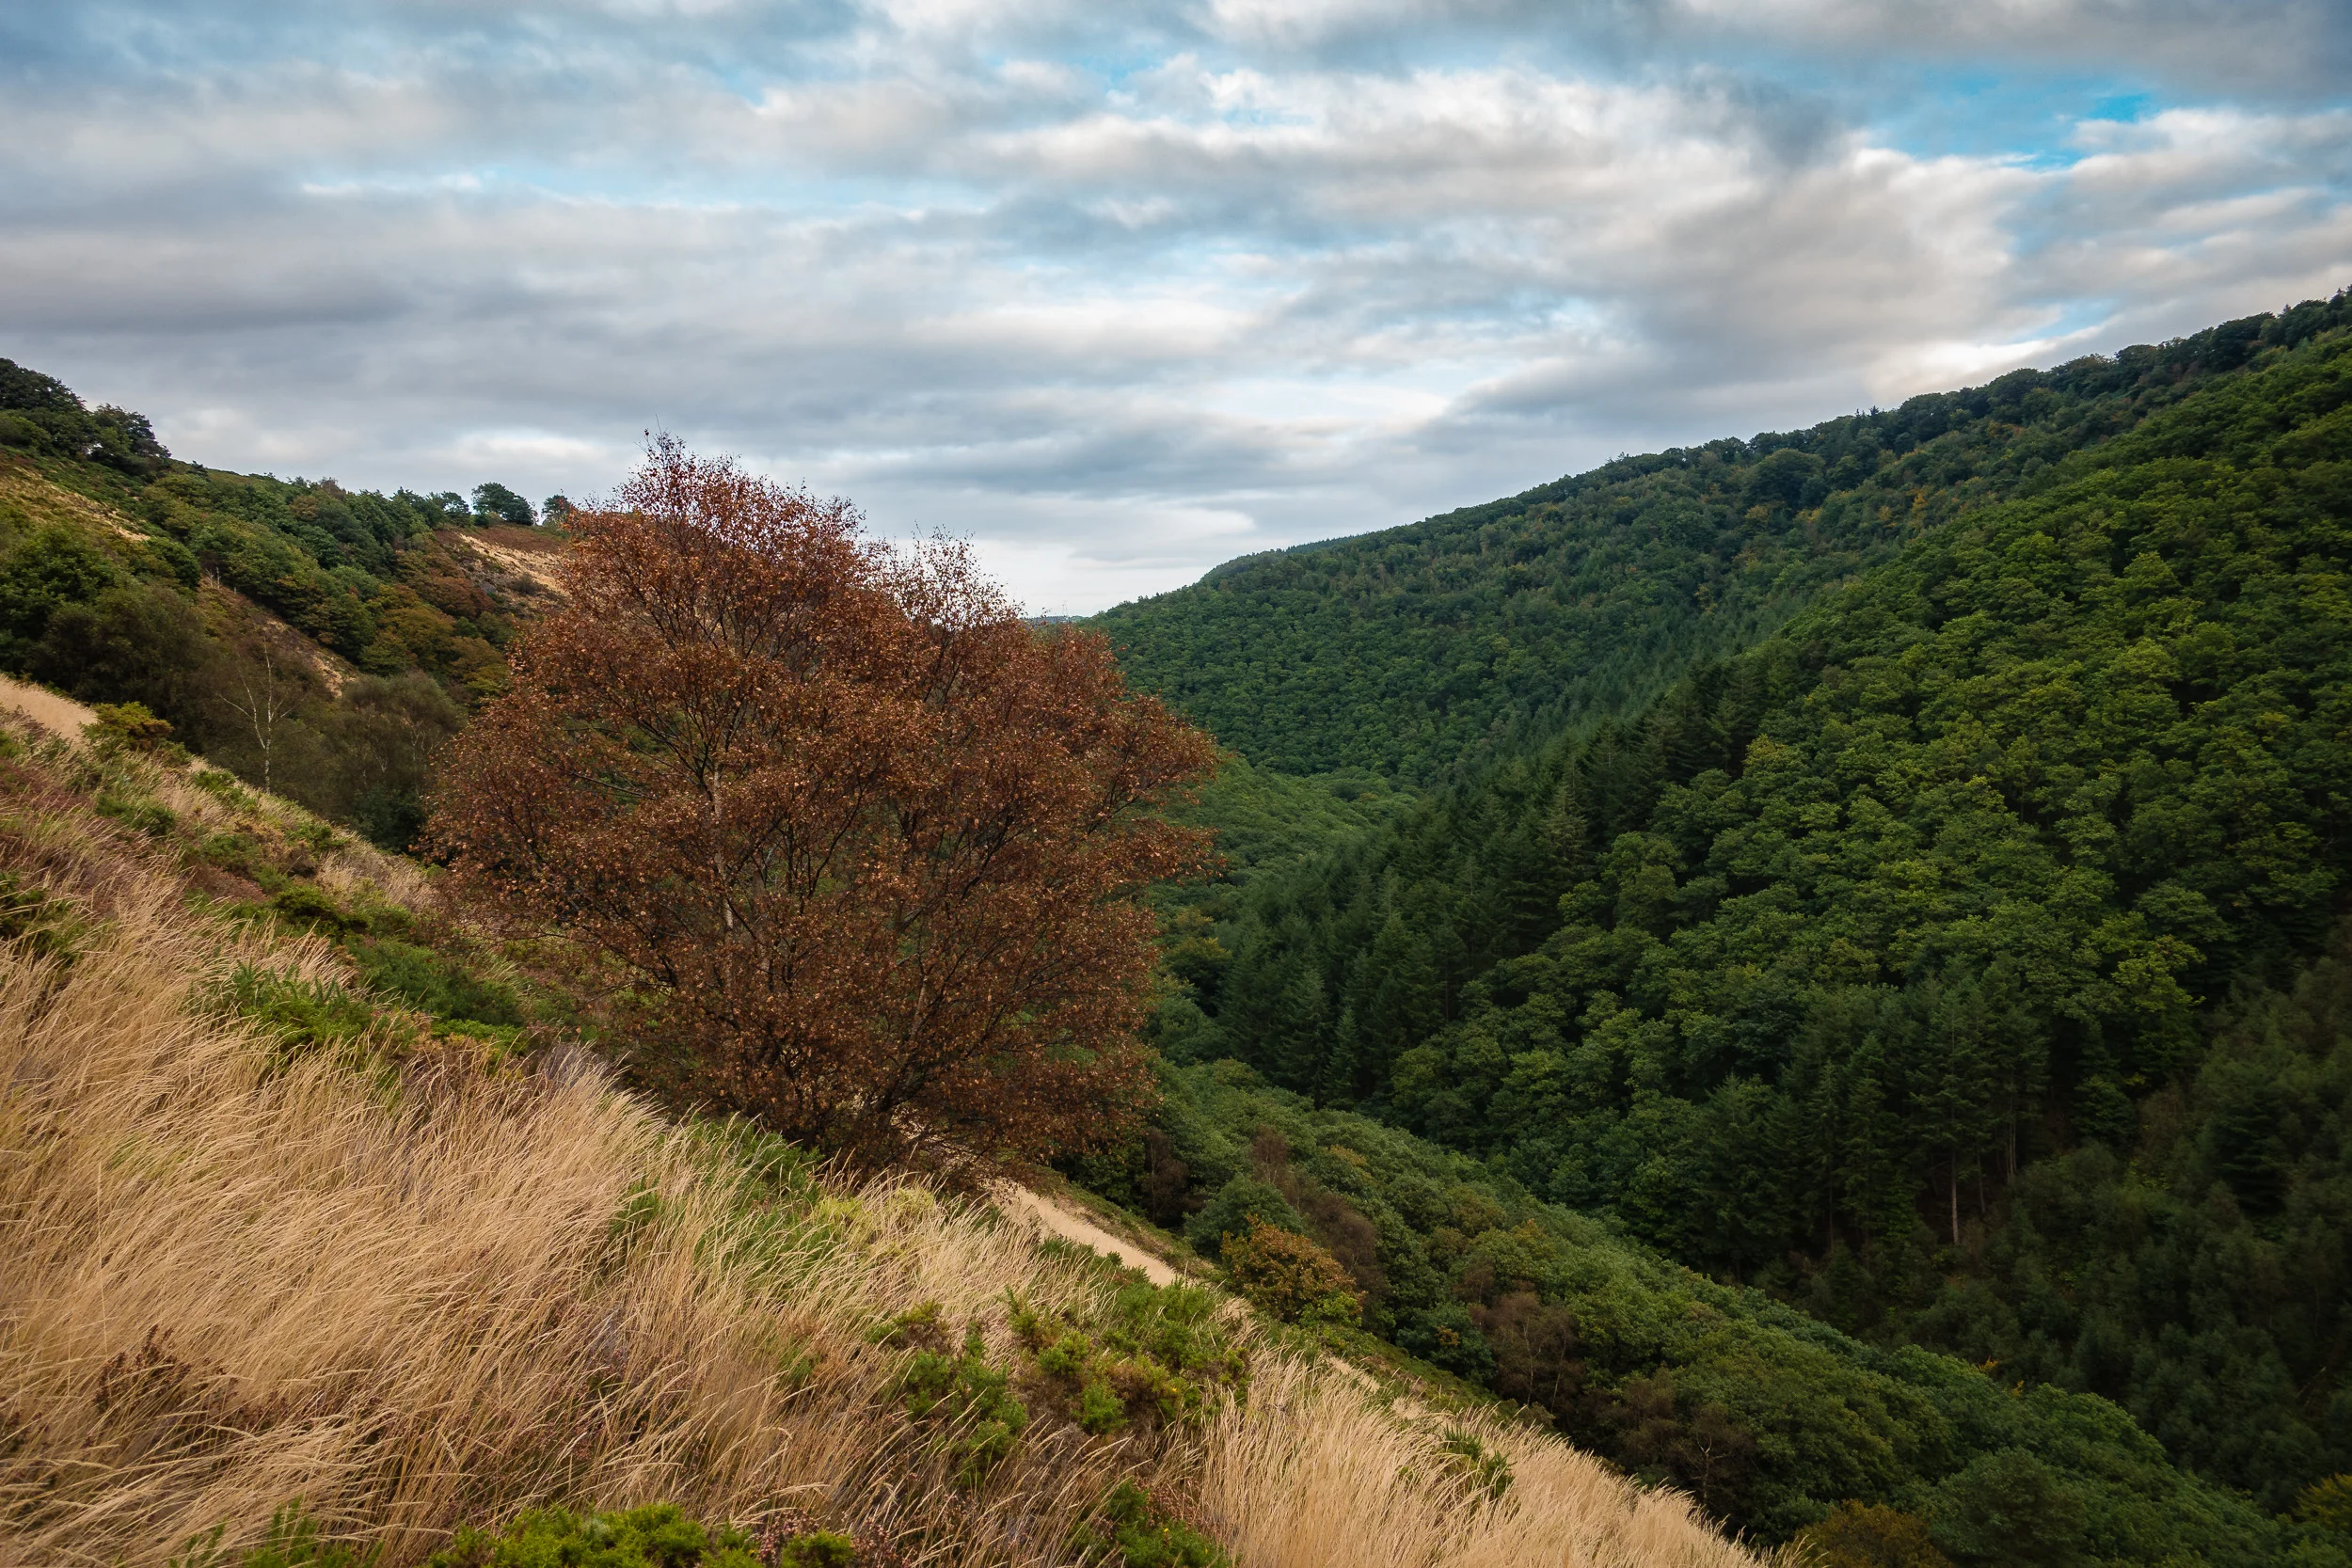
Location Scouting in the Teign Valley
In this video blog post I head out to Fingle Bridge and the Teign valley to scout out some locations for an autumn themed shoot.
The Importance of Scouting
The time I spend with the camera is precious. I have a full time job and a family that keeps me really busy so when I do get out I like to make the most of it. Sometimes I just go out to practice with my camera (see my blog post on practicing) or I'll go out to scout out a location. For me scouting out a location can be a really good use of time. For locations such as the upper Teign valley near Fingle Bridge in Devon, having a number of spots already picked out means that when the golden hour comes I'm only worrying about composition and not finding a good location.
In this short video I take you on a recent trip to the upper Teign Valley where I spend some time walking the path looking for locations that I can use for some autumnal shots that I want to take there. I'm travelling light with my Sony RX100M4 and a Manfrotto BeFree Carbon tripod but it allows me to quickly take shots from locations as I move along the valley.
Here's the video:
Mission Successful?
Here are the images that I took from the locations I scouted:


Now I'll be the first to admit that these aren't award winning images. The composition was setup up quickly and the light not exactly at its best but it does give me some really good ideas on where I want to shoot when I do go up there when the autumnal colours are in there full glory.
I also originally had this location down as a sunrise only location but because of this scouting exercise I'm fairly sure I could get images at either end of the day. So was it worth while? Well yes. Anytime with the camera is good but I feel more prepared to shoot this particular location now.
Do You Scout?
Do you spend time scouting out the locations you want to shoot? Or do you just turn up and see what takes your eye? Let me know in the comments.