

Is It Time to Ditch the Nikon D850?
In this blog post I ponder the idea of going to a mirrorless camera system.
Goodbye D850, Hello Mirrorless?
Some people consider the Nikon D850 the best DSLR there currently is. This might well be true, but cameras with a flapping mirror (DSLRs) are a dying bred. Mirrorless cameras have been on the rise for some time now and at some point I expect the DSLR to go the same way as the film camera.
There are many reasons why mirrorless cameras are better. They generally have better tech in them such as a wider spread of AF points and EVFs. While you could say that mirrorless cameras are technically superior, does that mean if you still own a DSLR that you should be looking to get rid of it as soon as possible and replace it with a mirrorless camera?
We all know that a camera doesn’t make a poor photographer great, but the correct choice of camera can make the process of capturing an image easier or more enjoyable. This is one of the reasons why I upgraded from my D750 to the D850. There was nothing wrong with my D750, it’s just that the D850 had some features that I wanted that ultimately improved my process of capturing images.
I’m now at the stage where I am seriously considering moving to a mirrorless system. Not because there is anything wrong with my D850, it’s just that some of that new mirrorless tech could improve my process of capturing images.
So is it time to ditch the Nikon D850? Let’s find out.
It’s a Matter of When Not If
For me, the move away from the Nikon D850 to the Nikon Z camera system is a matter of when not if. I’m not in a hurry though. After all, my current gear is hardly causing me issues. But, I do believe the Z system will offer me more. A better wide angle zoom in the 14-30 mm f/4, and that all important EVF. Unless I have a change in circumstances, I expect to have, at least in part, moved over the Z system in 2019.
If for some reason that doesn’t happen. I’ll still be capturing wonderful images with my trusty Nikon D850.
Are you considering changing from a DSLR to a mirrorless system? Do you already have a mirrorless camera? Do you have a Nikon Z camera? Let me know in the comments below.
Those Landscape Photographs from Dartmoor
If you want to take a closer look at those images I captured in video from Great Staple Tor, you can check them out below.
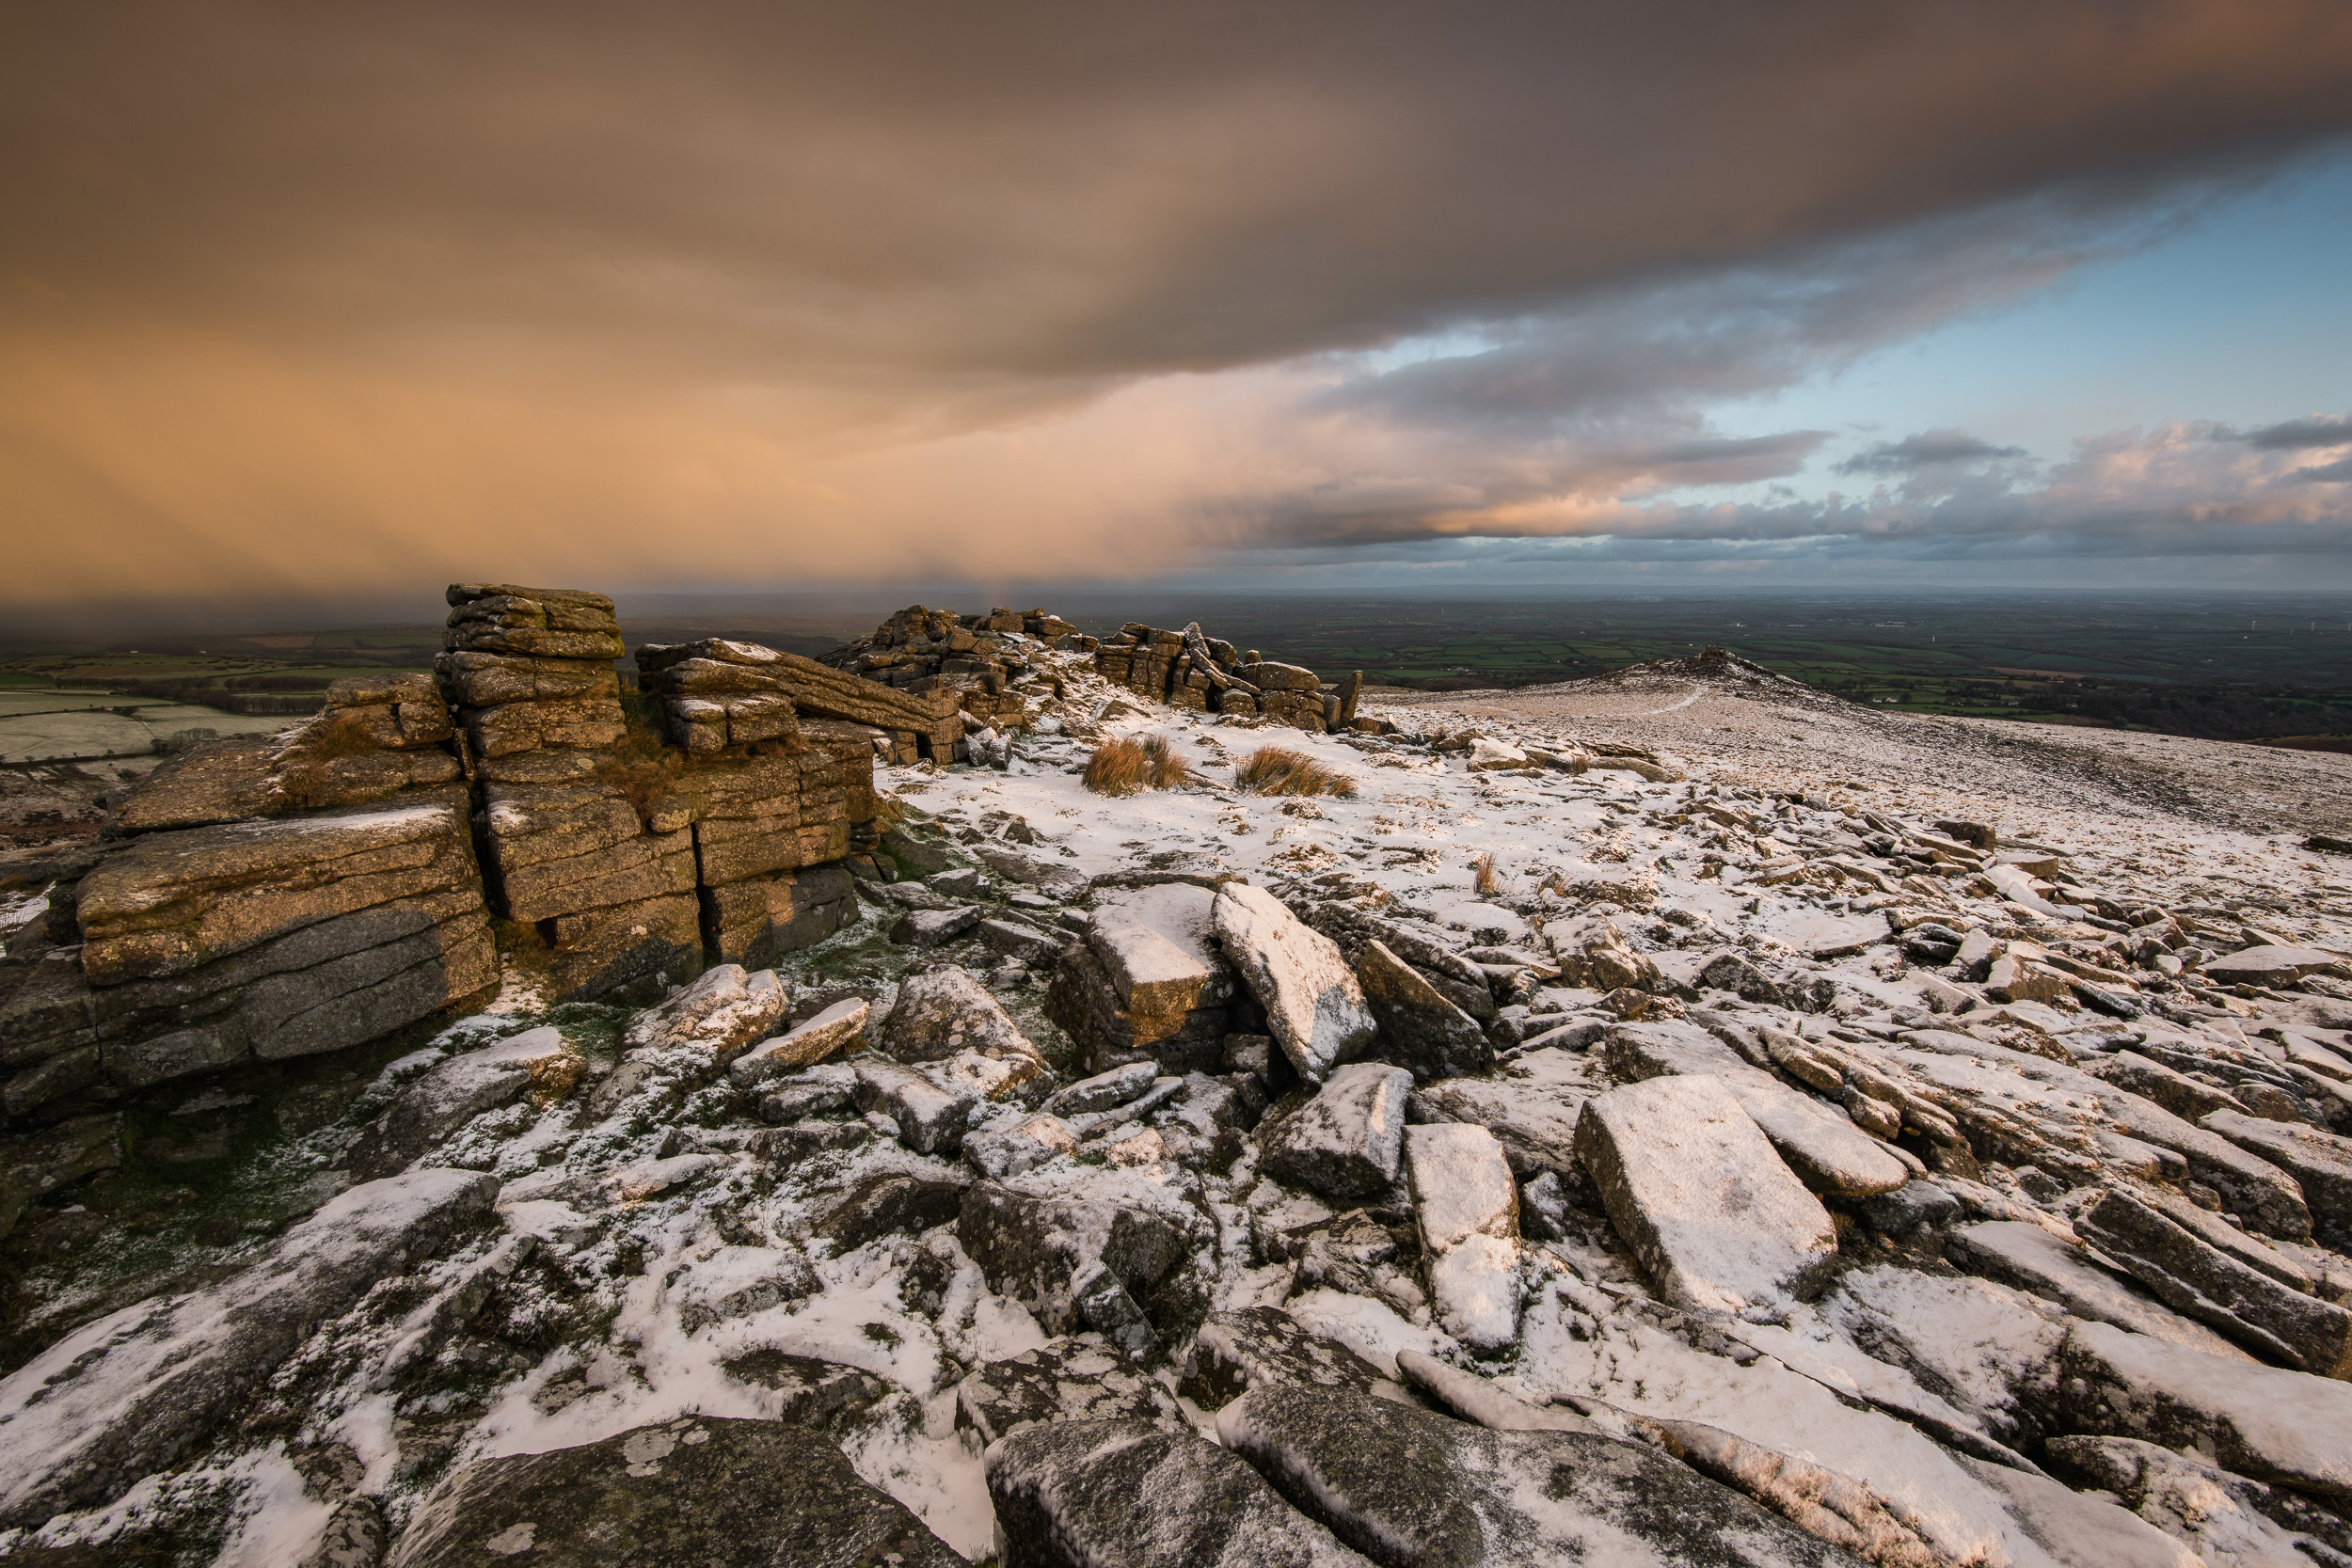
A Wintry Dawn on Great Staple Tor, Dartmoor, Devon - Nikon D850, Nikkor 16-35 mm f/4 at 25 mm, f/11, 1/4th sec at ISO 64.
Roos Tor and Great Mis Tor Panorama from Great Mis Tor, Dartmoor, Devon - Nikon D850, Nikkor 24-70 mm f/2.8 VR at 70 mm, f/11, 1/40th sec at ISO 64, 11 stitch panorama.
A Dusting of Snow on Great Staple Tor, Dartmoor, Devon - Nikon D850, Nikkor 16-35 mm f/4 at 21 mm, f/13, 1/6th sec at ISO 64.

Windy Wheal Coates
In the blog this week I head to a windy Wheal Coates tin mine on the coast of Cornwall. With the weather forecast being less than favourable, would I be able to capture an image? Read on to find out if my creativity beat the windy conditions.
A Return to Wheal Coates in Cornwall
It doesn't seem that long ago that I last photographed Wheal Coates tin mine on the coast of Cornwall. When I looked in my Lightroom catalogue to find my last photograph from Wheal Coates I was shocked to see that it had been nearly two years to the day since I had last visited this great Cornish coastal location. Where does all the time go?
It's not as if I had forgotten about it. There's a pin for it on my custom Google map but for some reason, I just haven't been back. It was time to go back that was for sure.
If you read my blog on a regular basis you may remember reading my recent post on Dartmoor. In that post, I tell you why I headed up onto the moor when the weather forecast said I should really be at home. My most recent visit to Wheal Coates was in a similar situation. Any sane photographer wouldn't have even considered the 4-hour round trip if they'd looked at the weather forecast. But there was a small gap in the clouds predicated and given that I had the evening free, I thought it was worth a punt.
Typically Cornish Weather
As I drove along the A30 from Devon to Cornwall, I really started to question if I had done the right thing. Unlike my trip to Dartmoor the previous week which only involved a small drive, the drive to Wheal Coates was significantly longer. The further I drove into Cornwall the worst the weather got. At one point my windscreen wipers were on full and I was driving through a low-level cloud.
However, I was still clinging onto that predicated break in the cloud. It is well known that you can get some amazing light from cloud breaks after a storm passes by, so I just kept thinking about how pleased I would be with myself if I got a really nice shot.
As I pulled into the National Trust car park for Wheal Coates I looked out to the sea where I could see broken cloud, bits of blue sky and even the sun. I though that maybe this could turn out to be an amazing evening of photography.
Windy Wheal Coates
As I wandered down from the car park and onto the slopes, I was pleased to see that there was still a lot of heather about. Unfortunately, I was probably about two weeks too late to get it at its best, but it was still a wonderful sight to see.
You would, of course, think that with so much heather on the slopes that picking a composition is easy. It can however be a little more tricky than just sticking your tripod on the ground and snapping away. The slopes are a complex mesh of paths, gorse, heather and unsightly dead vegetation. So it's worth taking a little time to wander about and finding a nice clump of heather that also doesn't have too many unwanted distractions around it.
While I was wandering about looking for my composition I noticed the wind was picking up. I looked out to sea to see a very large bank of cloud heading my way. Well, there goes my sunset I thought! So I quickly got set up and took my first composition of the evening:
A Splash of Colour on a Grey Day at Wheal Coates #2, Cornwall - Nikon D850, Nikkor 16-35 mm f/4 at 26 mm, 3 seconds at ISO 64, f/13, Lee Filters Circular Polariser and ND Grad.
As you see in the image above I had already lost much of the light and clear sky. The cloud appeared very quickly and anyone who photographs Cornwall a lot will tell you that even in the summer the weather can change rapidly.
While I would have loved some light from the setting sun on the slopes I decided that I would #EmbraceTheGrey and make the most of the moody skies. For the next shot, I headed a little further down the slopes and closer to one of the old mine buildings.
A Splash of Colour on a Grey Day at Wheal Coates #1, Cornwall - Nikon D850, Nikkor 16-35 mm f/4 at 20 mm, 2 seconds at ISO 64, f/13, Lee Filters Circular Polariser and ND Grad.
As I looked back out to sea all I could see was cloud and the light was fading fast. I decided that I'd probably had the best of the conditions and it was time to head home, happy that I'd managed to capture a couple of images.
I mentioned in my post from Godrevy a few weeks back that I was producing a video on photographing Cornwall for my YouTube channel. I'm pleased to say that I also did some filming for that video on my visit to Wheal Coates. So be sure to say tuned to the blog and make sure you are subscribed to my YouTube channel.
I do hope you enjoyed this blog. Which of the two images was your favourite? Have you photographed Wheal Coates before? Let me know in the comments below.

Creating Coastal, Long Exposure, Panoramic Images with the Nikon D850
Have you ever taken a coastal, long exposure, panoramic image before? Well, that's just what I did in my latest video. Sometimes you need to see a scene a little differently to get inspired in a big way.
Getting Inspired
Over the years I've visited Froward Point on the south Devon coast a few times. Despite many attempts I've never really captured an image from that location that I'd really been happy with. In fact, I'd just about given up on it as a location.
However, after being inspired by the work of another local photographer, I thought Froward Point might be worth another visit. This time though, I would leave most of my gear behind, travel light, and wander along the coast path a bit more. Rather than go back to the same spot I always end up going to, I would see what other viewpoints there might be.
Sure enough, as I walked along the coast path I got to see a view of rocks near Froward Point in a totally new way! My creative brain got all excited by the new compositions that I could make photographs from. For me, the scene instantly said that this coastal image would be a long exposure, and would be best suited to the panoramic format. I even thought it would work best on a grey and overcast day.
With a clear vision of what I wanted to photograph, I just needed to return at the right time when I had the weather conditions were right and the tide was high. Here is what happened when I did finally return:
As you'll have seen this video was a bit longer than normal, but I wanted to take you through my thought process, how I set up the camera, and how I eventually captured then printed the final image.
So have you ever captured a coastal, long exposure, panoramic image before? What photography techniques have you combined before? Let me know in the comments below.
The Photographs
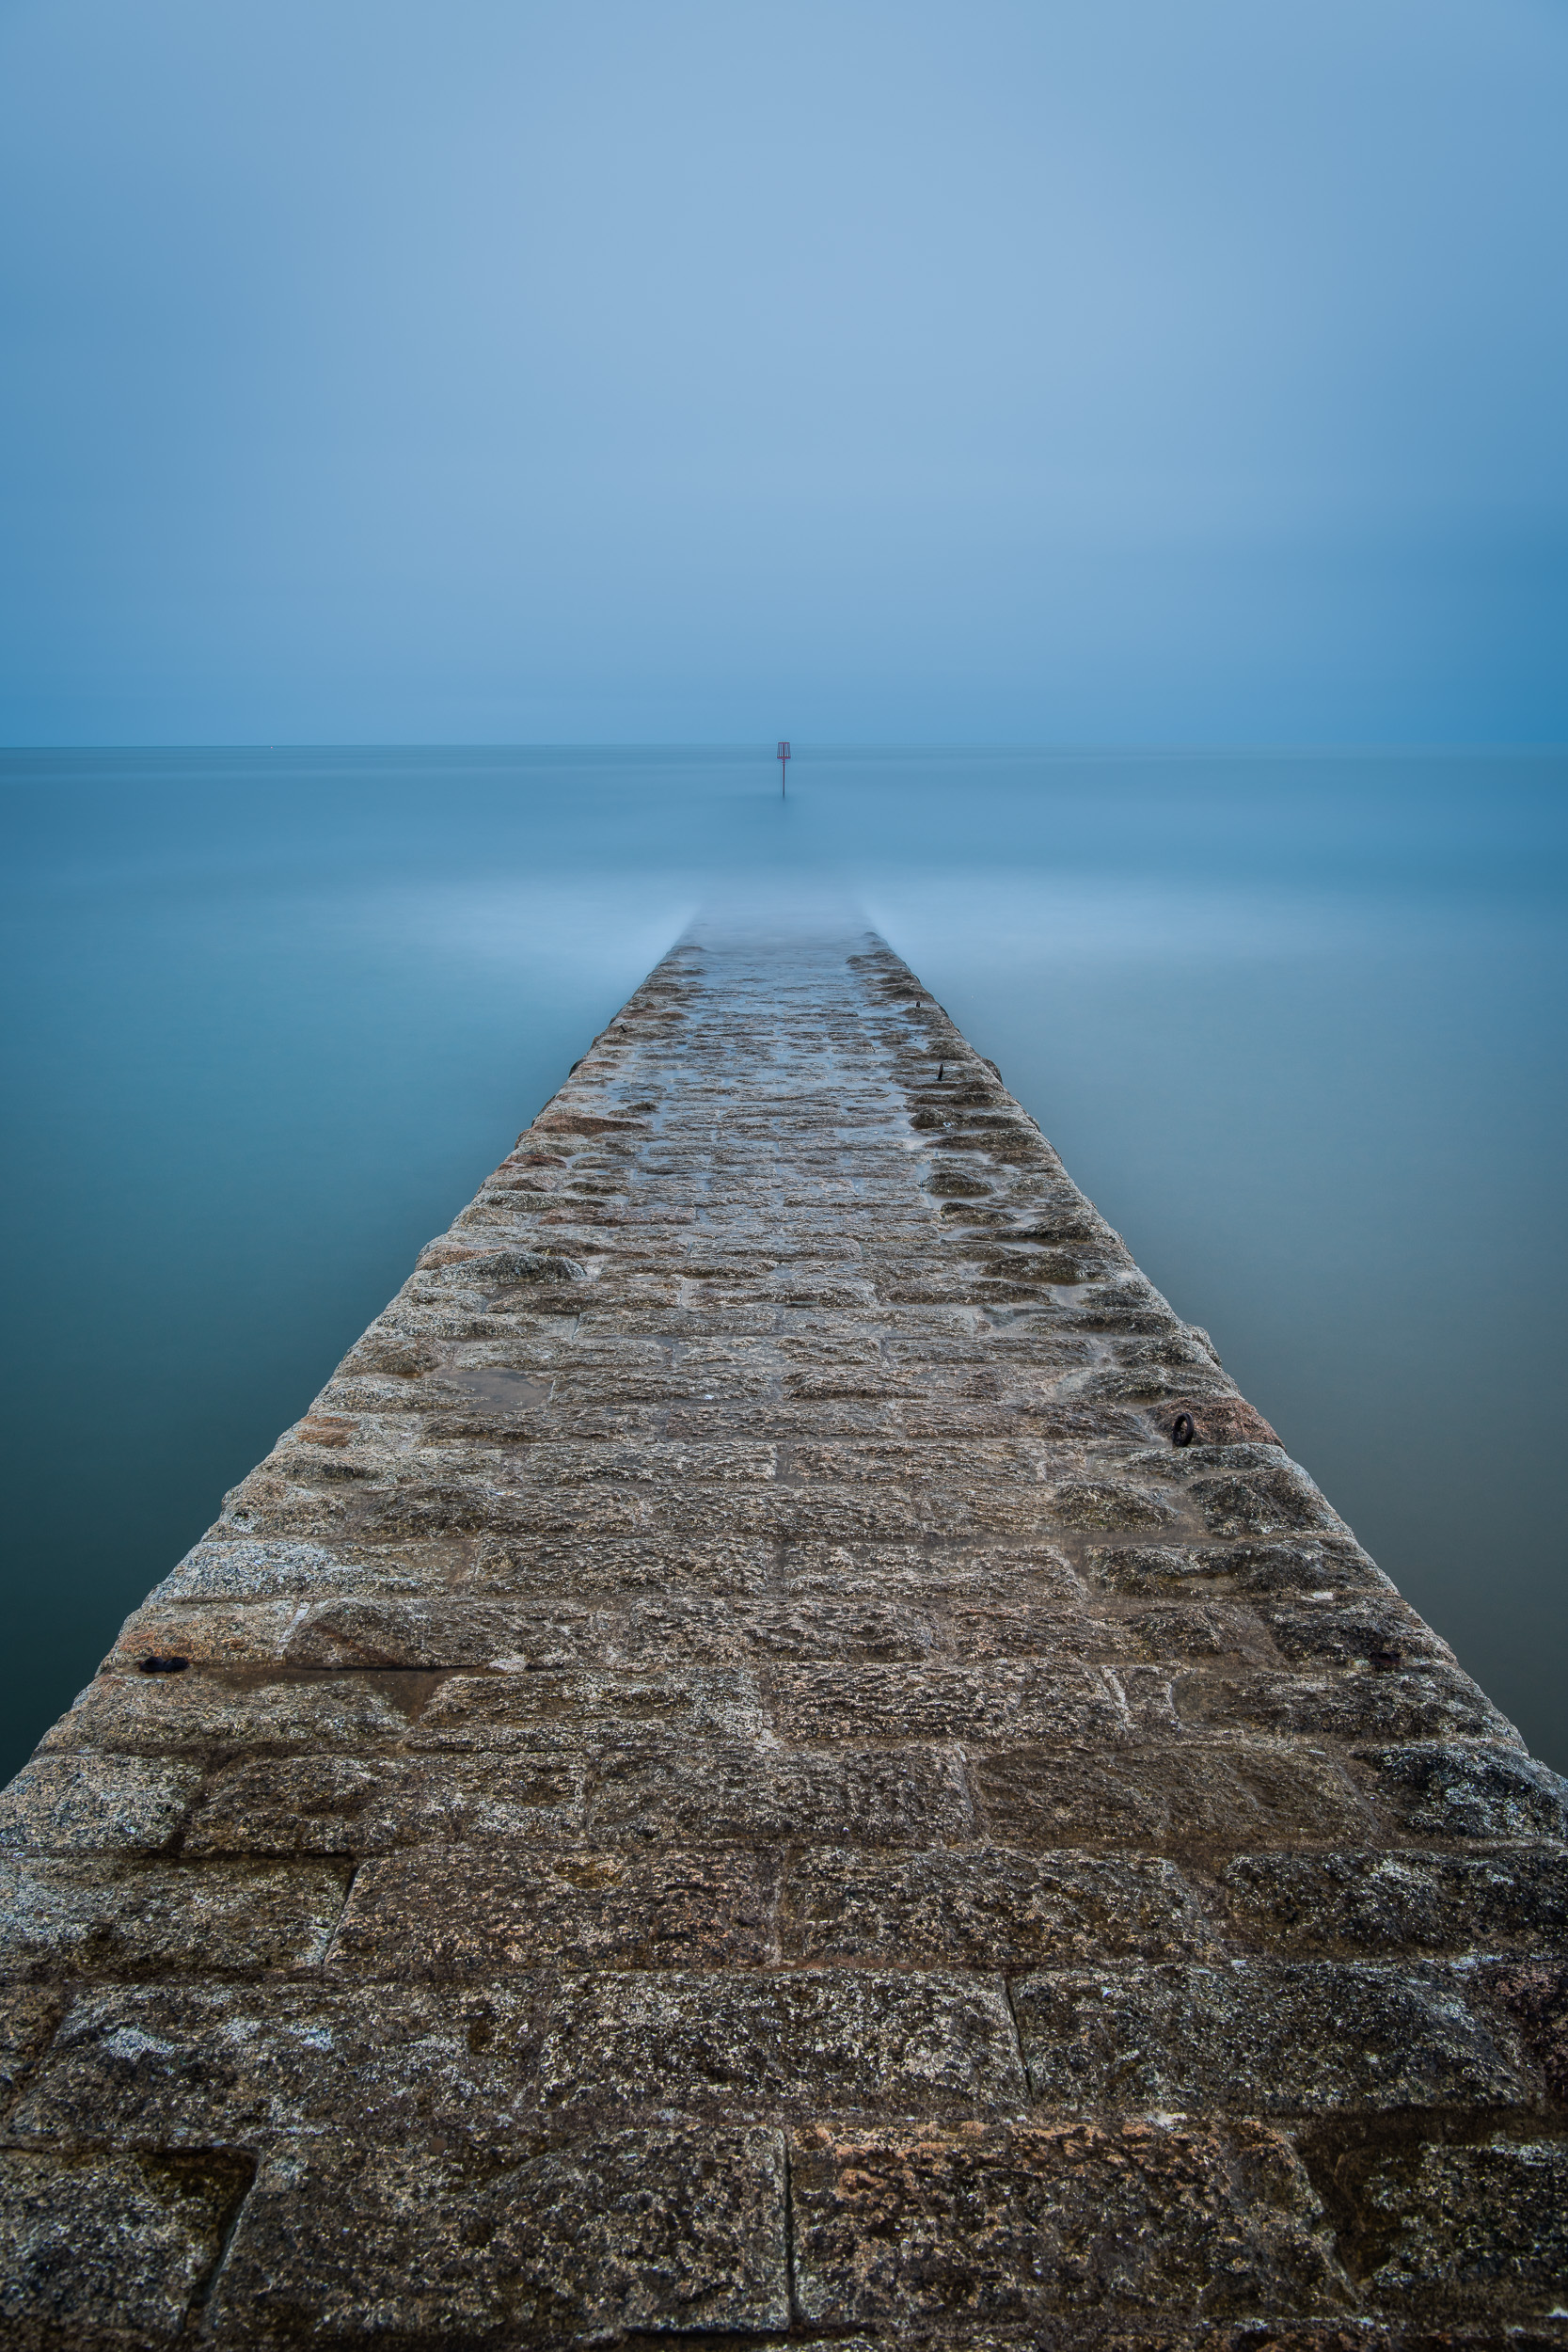
A Coastal Long Exposure Panorama - Froward Point, Devon: Nikon D850, Nikkor 70-200 mm f/2.8 at 70 mm, 20 secs at f/11, ISO 64, Lee Filters Circular Polariser. 5 Image stitch.
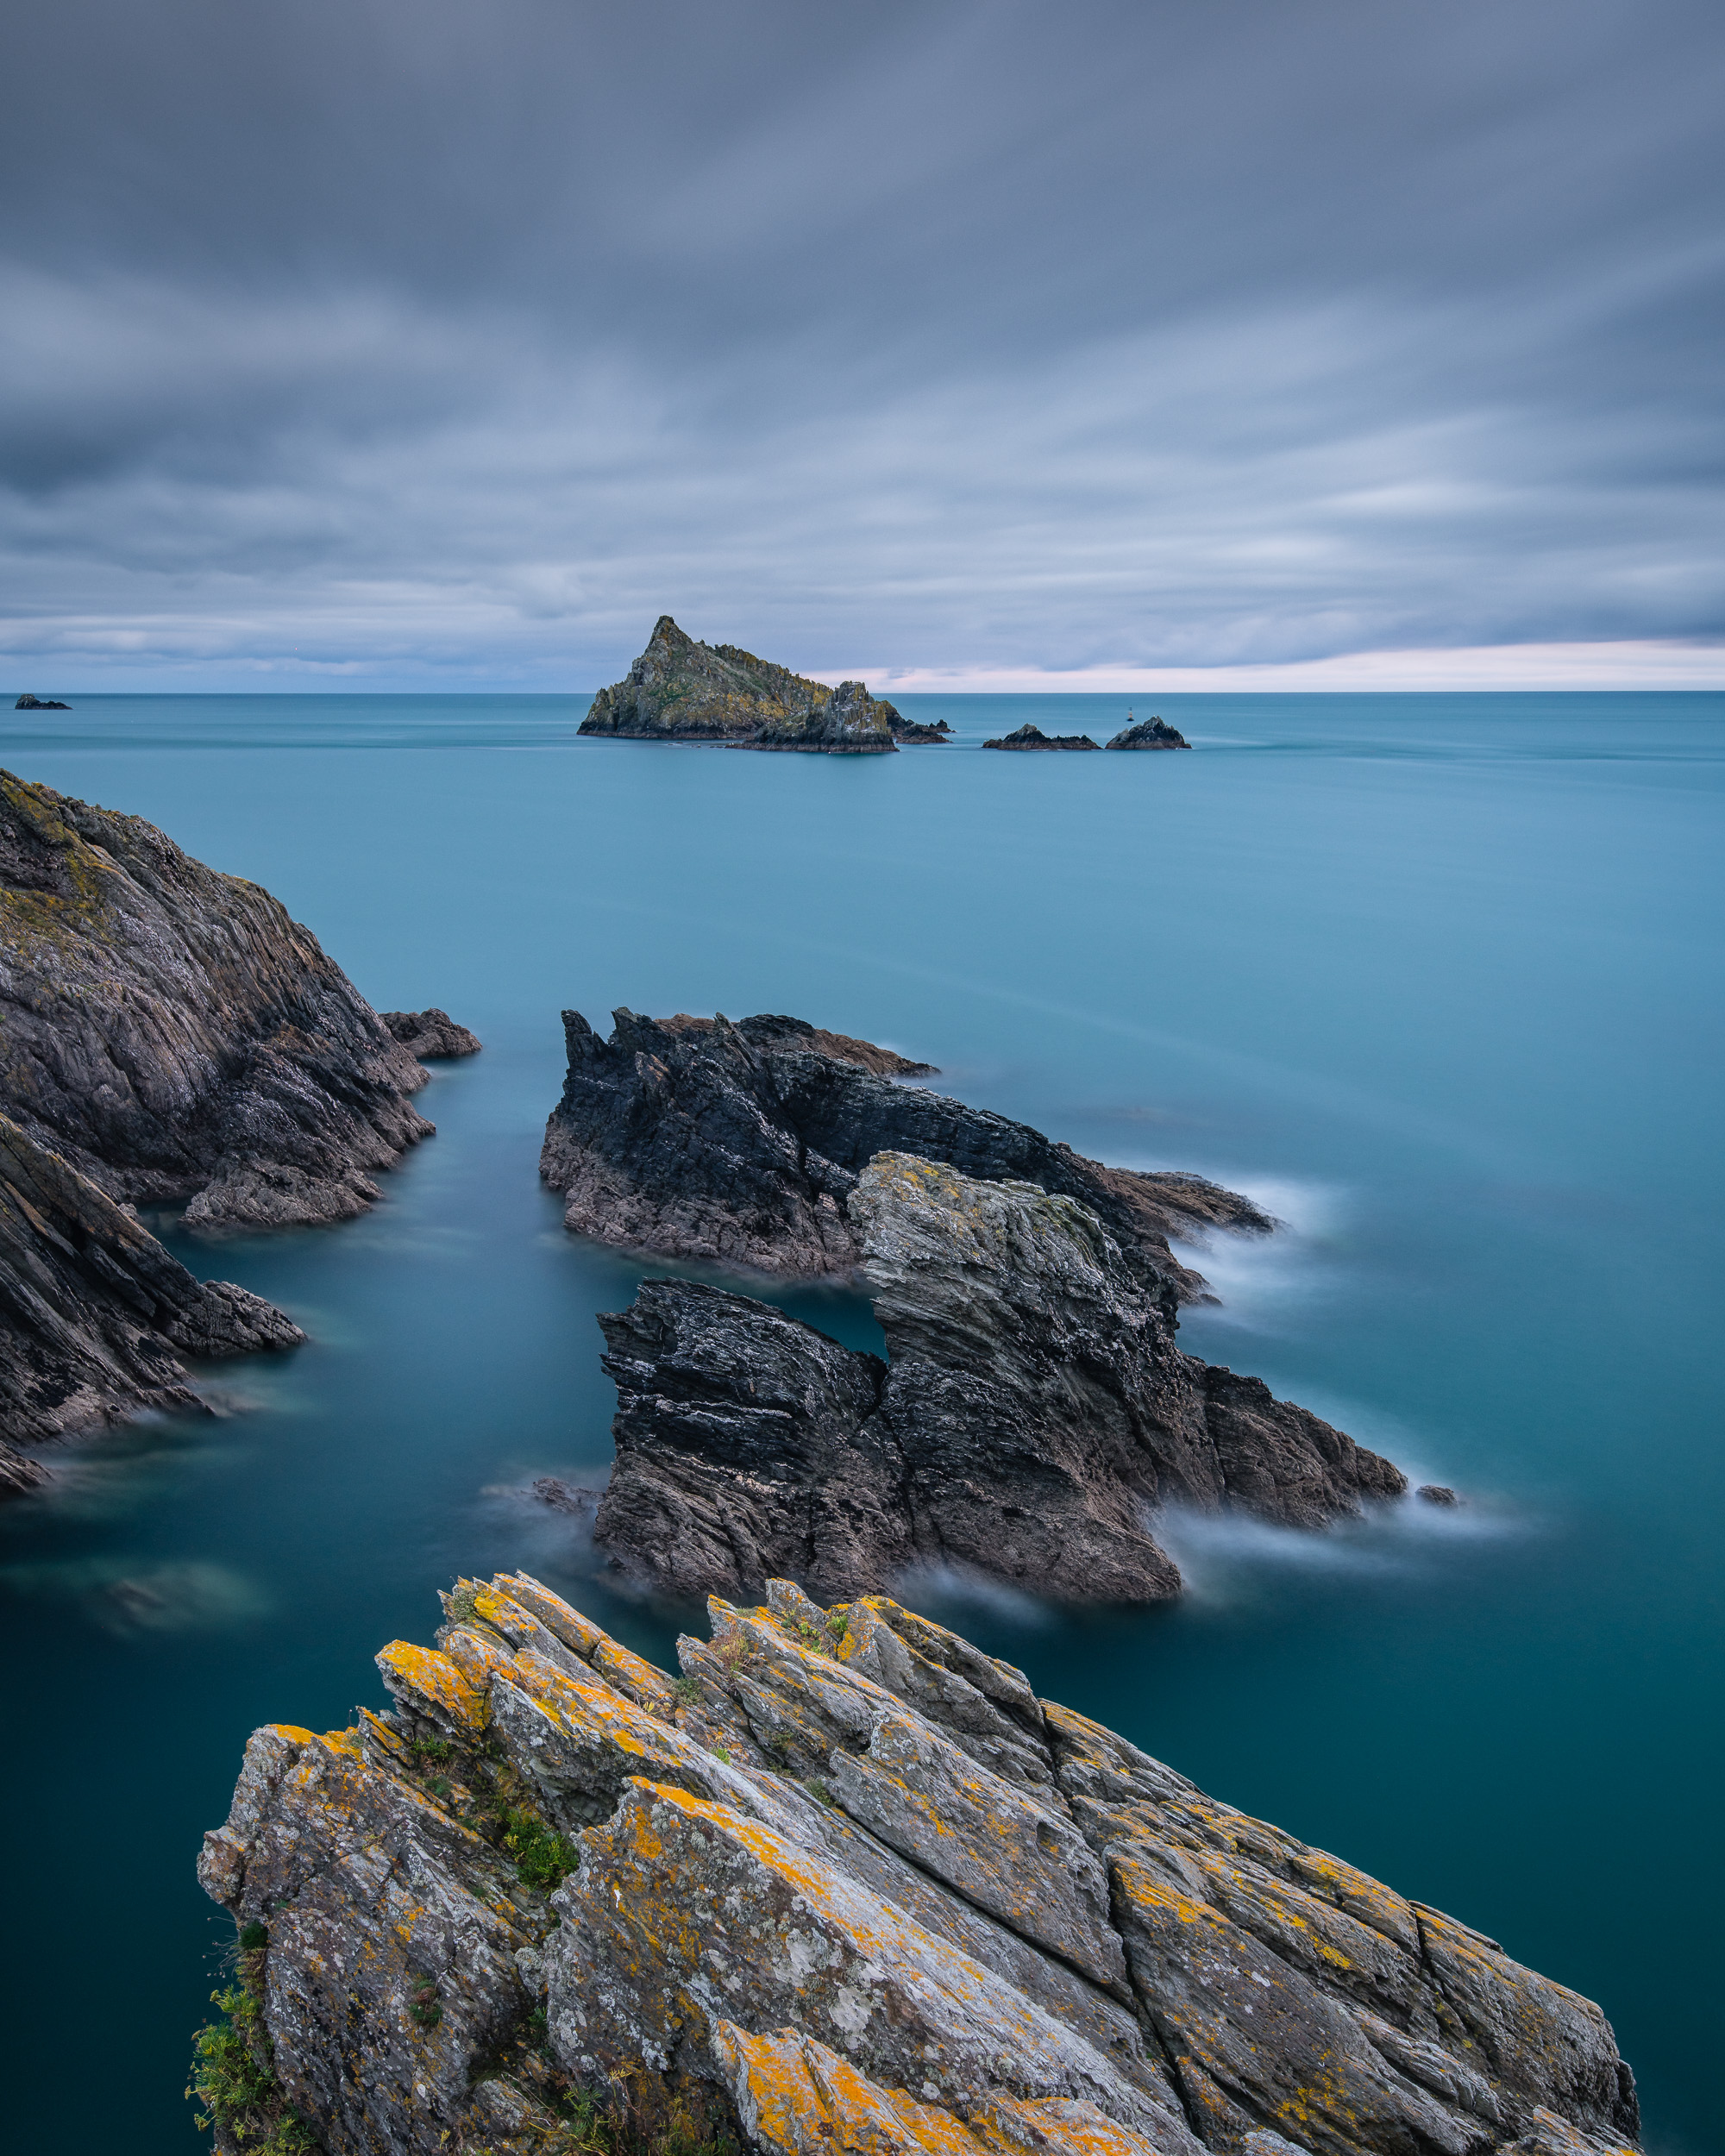
On an Island - Froward Point, Devon: Nikon D850, Nikkor 24-70 mm f/2.8 at 58 mm, 105 secs at f/6.3, ISO 64, Lee Filters Circular Polariser. 5 Image stitch.
Islands in the Blue - Froward Point, Devon: Nikon D850, Nikkor 24-70 mm f/2.8 at 29 mm, 40 secs at f/11, ISO 64, Lee Filters Circular Polariser.
Friends, Fun and Landscape Photography
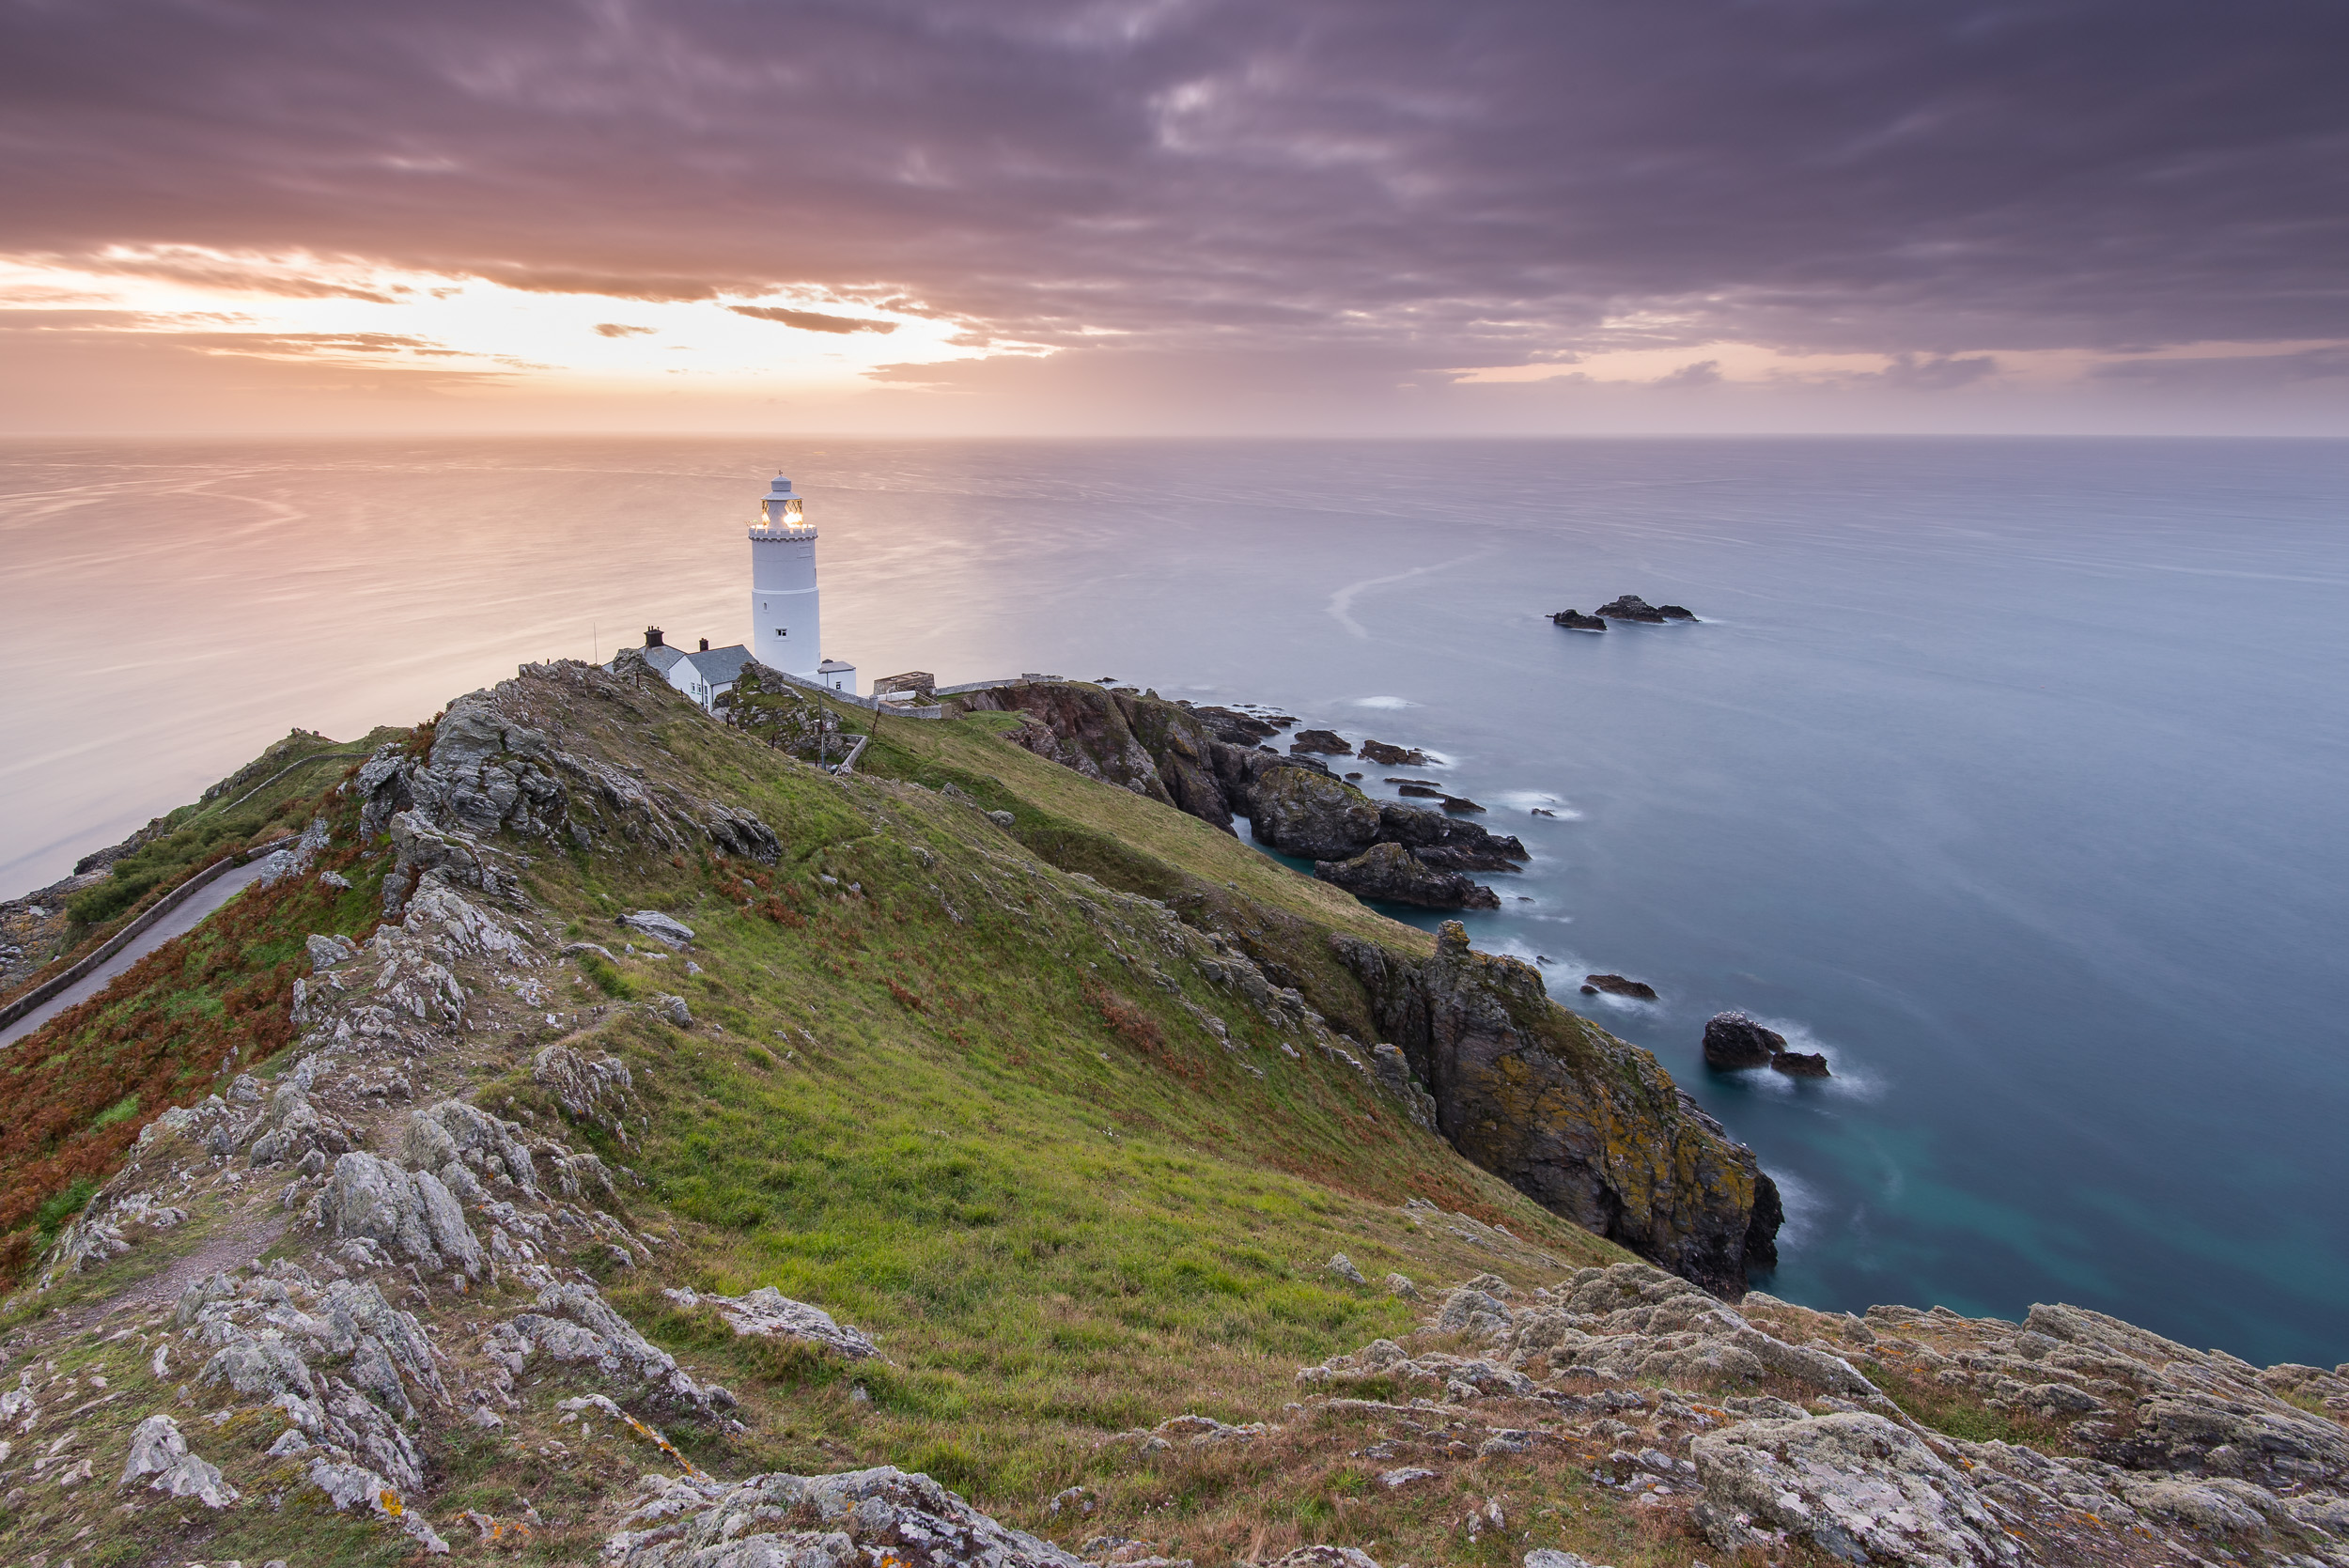
In the blog this week I share with you my latest video where I head out with a couple of landscape photography friends to capture sunrise photographs of Start Point lighthouse on the south Devon coast. Those 3am alarm calls don't seem so bad when you are having fun with friends!
A Solitary Pastime
For me, some of the things I love about landscape photography are the early starts and the solitude. This may sound like an odd thing to say but those unsociable hours mean that my photography generally doesn't interfere with my other commitments. Though I'm a very sociable person, there aren't many better things than watching the start of a new day with nothing but the sound of the breeze and the birds singing.
Don't get me wrong, if you see me one morning out taking photographs, come over and say hello. Many a trip out with the camera has been enhanced with a good old chat.
Photography Friends
One of the unexpected benefits of publishing videos on my YouTube channel is that I've made a few friends along the way. People that not only share my passion for landscape photography but people I can have a bit of a laugh with.
When two of my photography friends Gareth Danks and Chris Sale decided to visit me on my home turf I was delighted. I knew that even if the photography turned out to be challenging, the spirit of friendship and general attitude towards fun would make the whole experience more enjoyable.
You can see how we got on in my latest video:
We did a lot more larking about than was showed in the video, but hopefully, I've shown some of the collective spirit we had that morning. I'm not sure I would have driven all the way to Start Point at that time in the morning if it had been for Chris and Gareth!
If you have time, you should really check out their videos from our little adventure as well:
Is landscape photography something you prefer to do on your own? Do you have any friends that also share your passion? Let me know in the comment below.
Those Photographs
Here are the photographs that you saw in the video.
Sunset at The Daymark - Devon: Nikon D850, Nikkor 16-35 mm f/4 @ 20mm, 1/5th sec @ ISO 64, f/13, Lee Filters Circular Polariser.
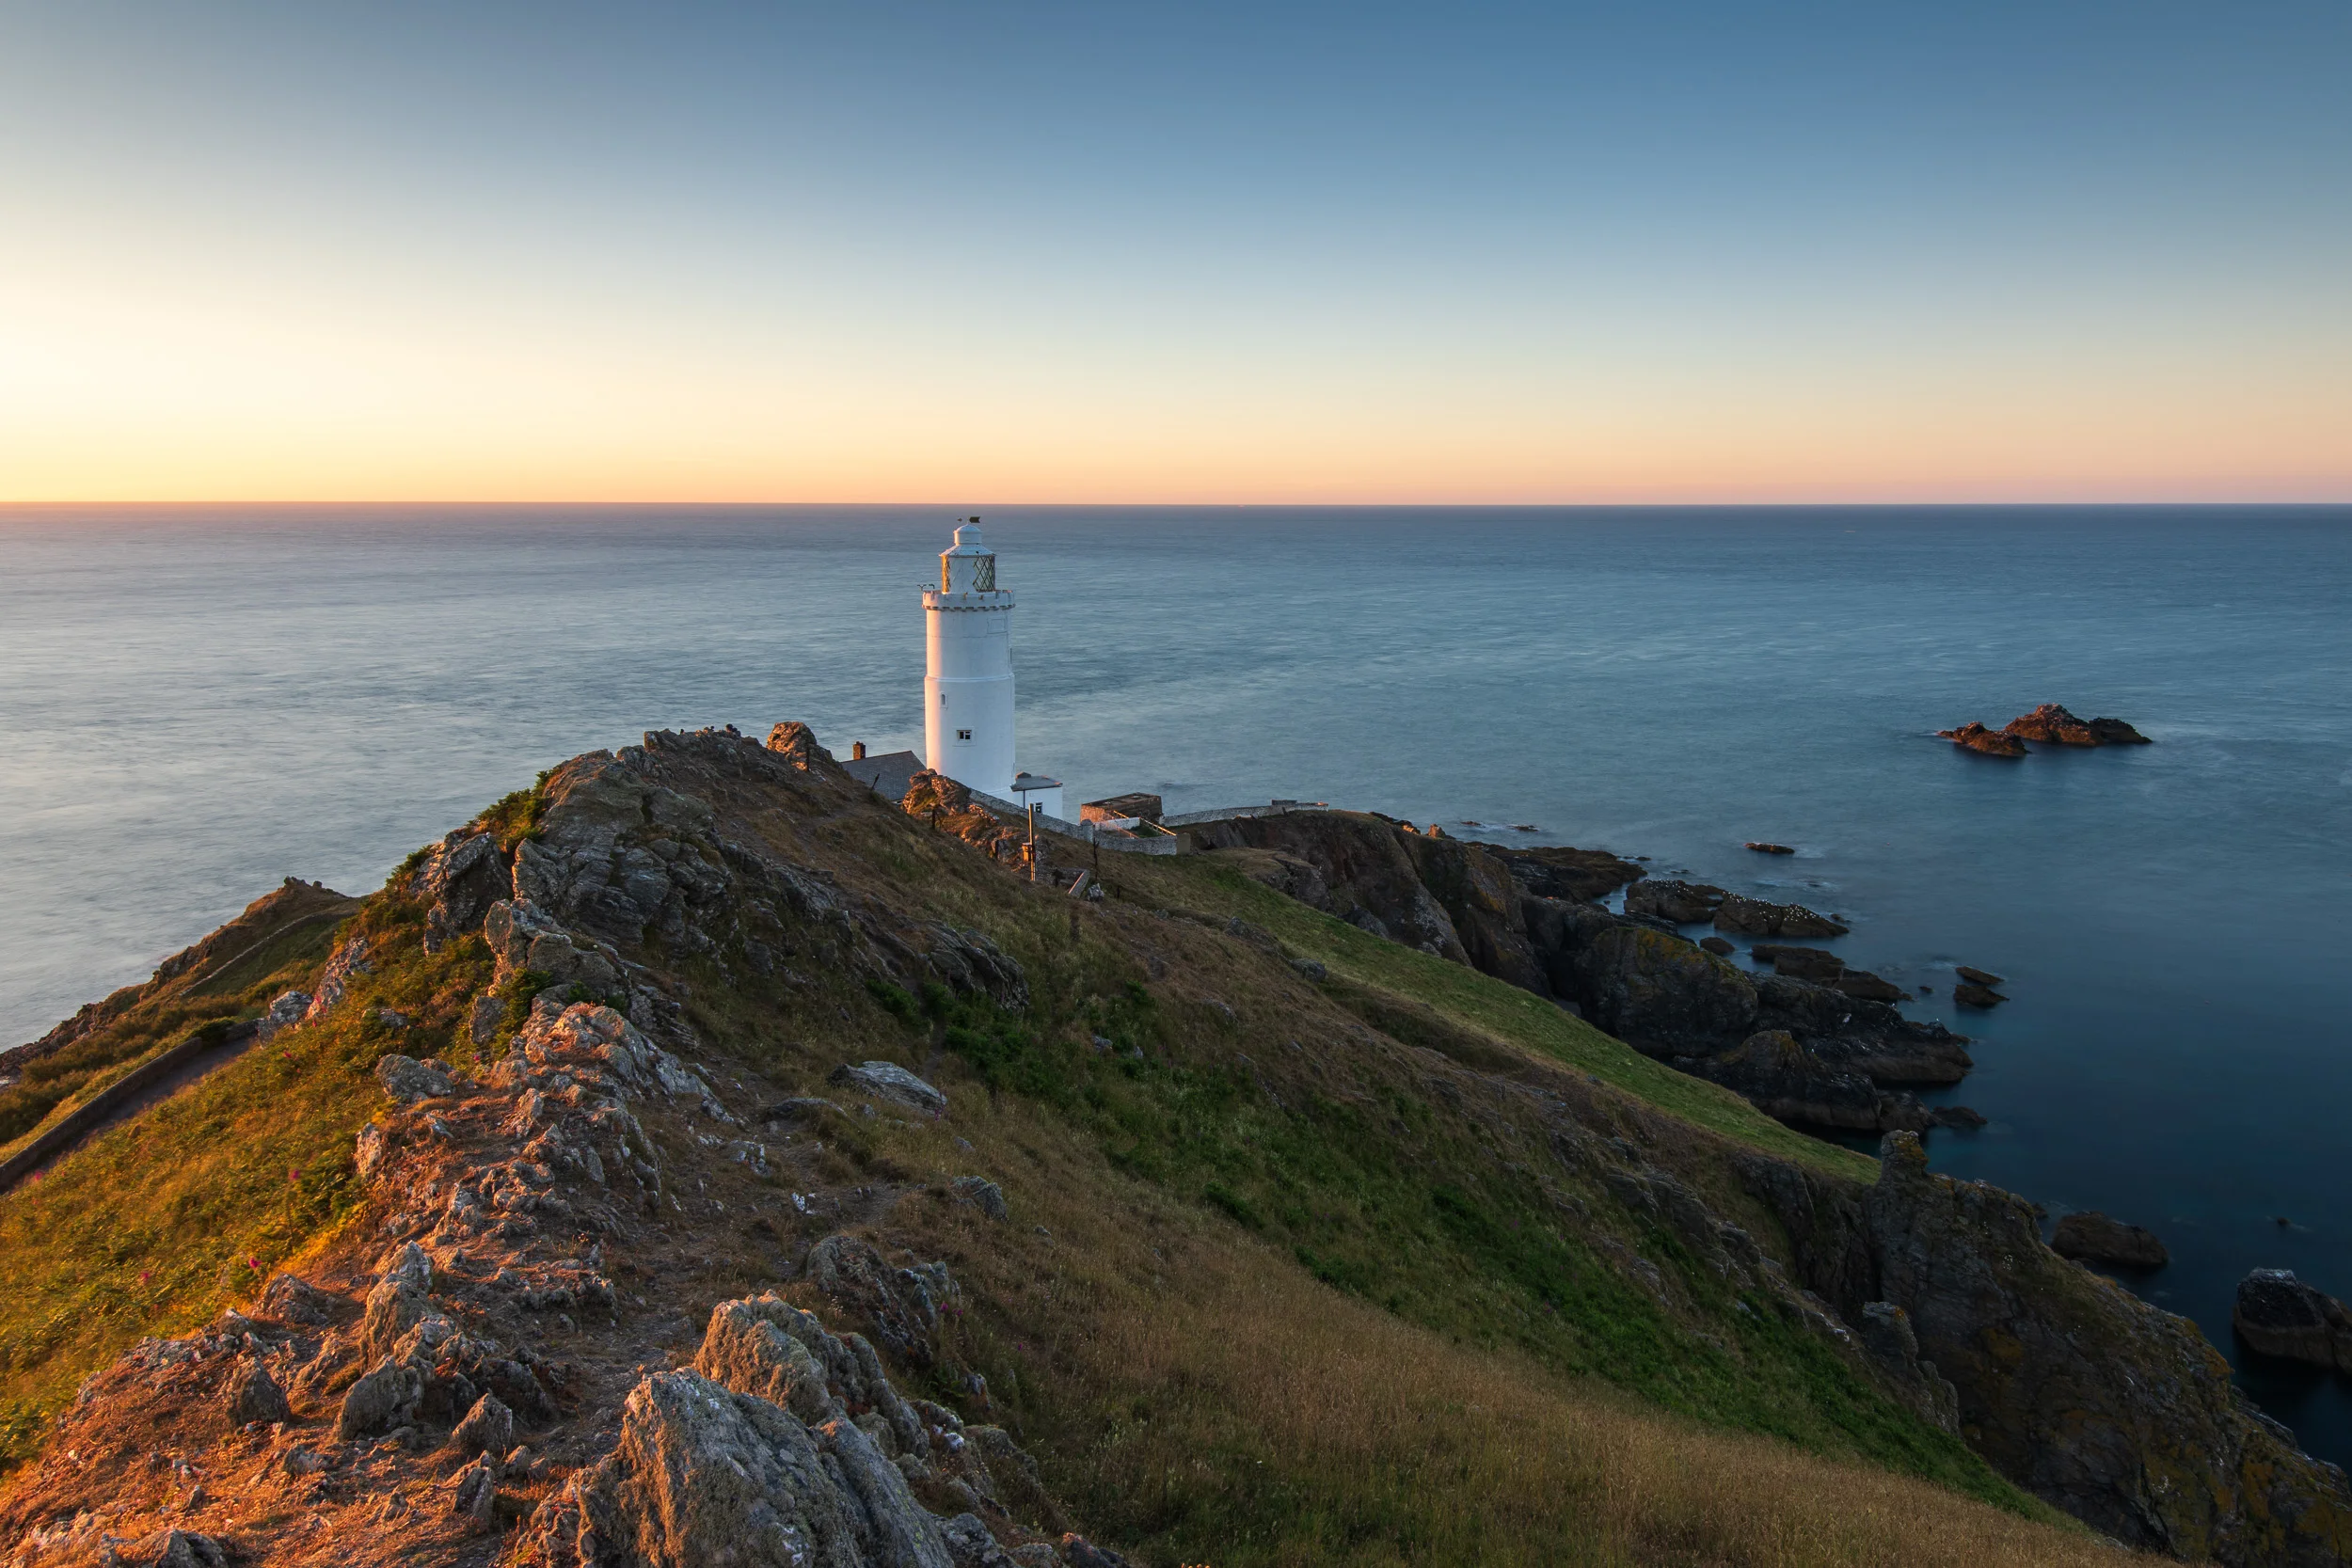
Dawn Light on Start Point Lighthouse - Devon: Nikon D850, Nikkor 16-35 mm f/4 @ 19 mm, 10 secs @ ISO 64, f/13, Lee Filters 6 Stop IRND.

Focus Shift / Stacking with the Nikon D850: Capture and Processing
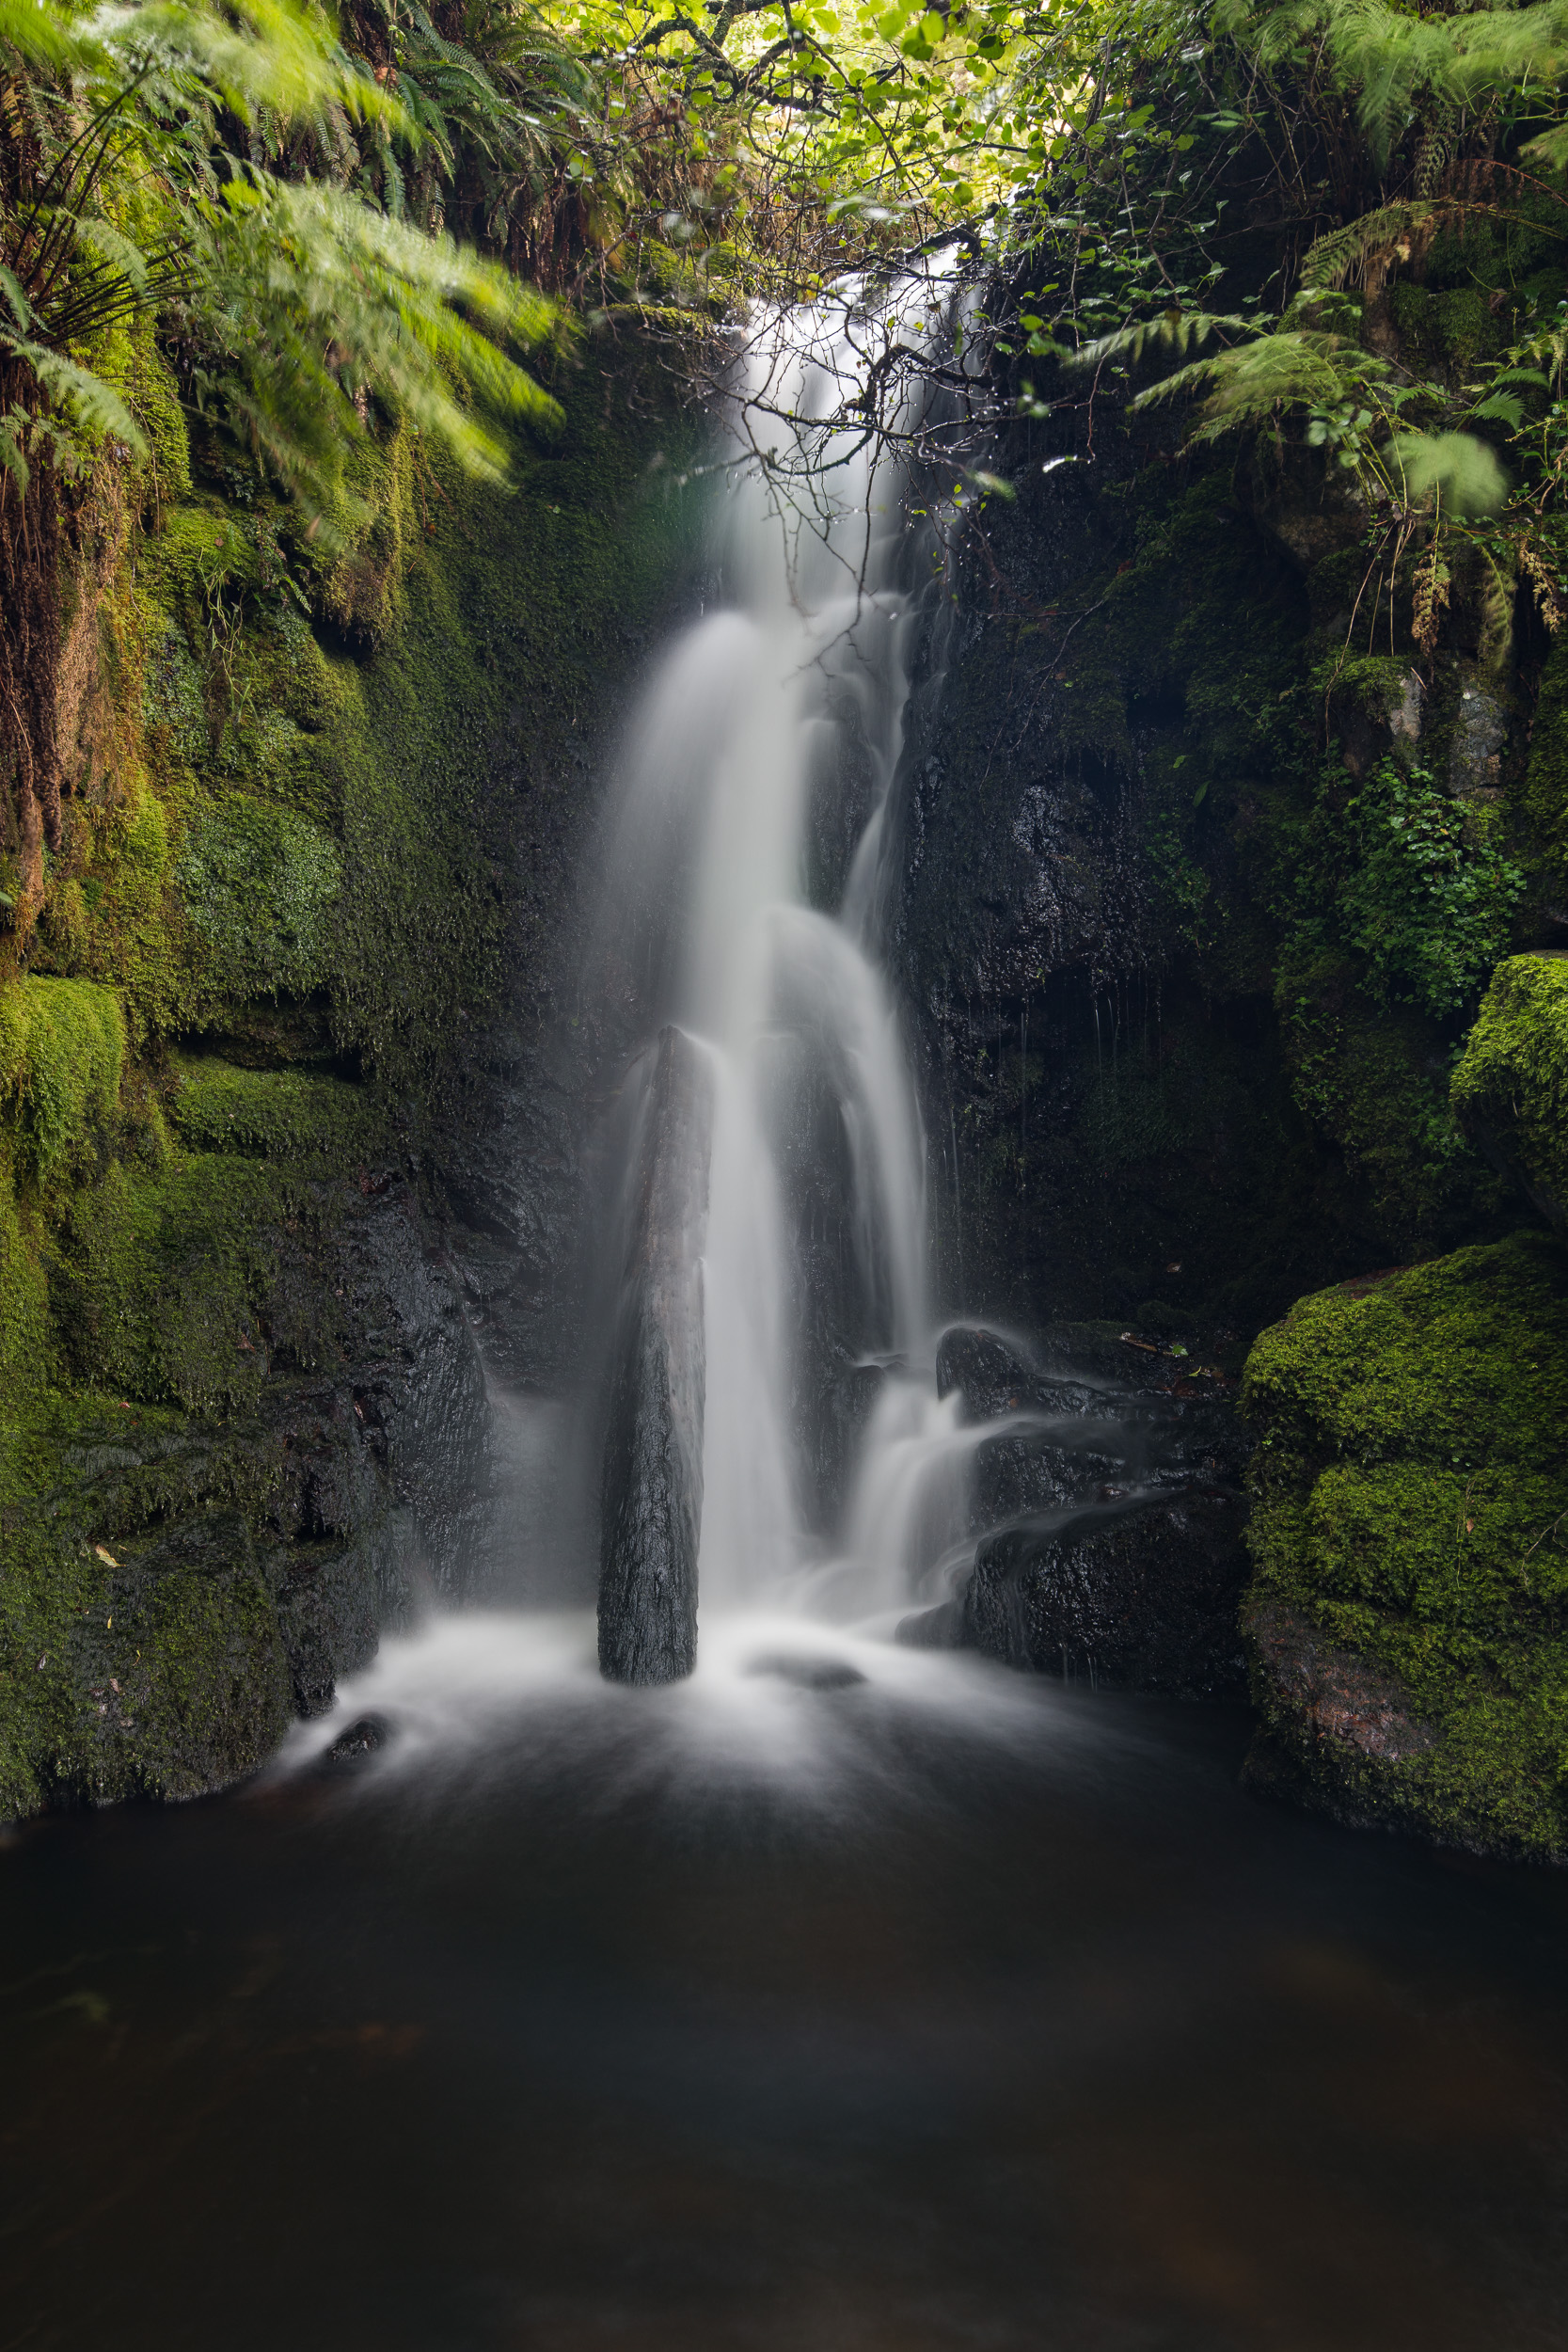
In the blog this week, I finally put the Nikon D850 Focus Shift feature to work by heading out to Dartmoor National park to capture a focus stacked landscape photograph of the waterfalls at Venford.
Using a New Feature of the D850
I love using my Nikon D850. It is without a doubt the best camera I've ever used. I even made a video on the 8 Things I Love About the D850. However, there was one feature that until recently I had never used. That feature was Focus Shift Shooting.
Focus Shift Shooting was a feature introduced with the D850 that allowed the camera to automatically take a series of photographs at different focus points throughout the scene. The idea is that you take those images, each with a different point of focus, and then "stacked" them in Photoshop, to create one super sharp image.
While the idea of focus stacking is hardly a new one, having a camera do the hard work for you is relatively new. Even the amount of work in post processing is much reduced now with Photoshop generally doing an excellent job of merging the photographs automatically.
Using Focus Shift in the Field
With the process of creating a focus stacked photograph becoming easier and easier I thought it was about time, I gave it a look. After all, even if I don't use focus stacking all the time, having another skill in your photographic toolbox can never be a bad thing.
So if you want to learn how I focus stack my images (and you don't necessarily need to own a D850 to do it), then check out my video below:
I hope you enjoyed that brief tutorial. Like I said, you don't have to own a D850 to create a focus stacked image. The D850 just automates the process of capturing the images. I was also a bit hesitant at first on trying out focus stacking. It all seemed a bit like hard work, but as it turns out it's not that difficult and the results are great. It's not needed for every photo, but you'll be glad you learnt the skill should you need it.
So, do you focus stack your images? Do you have a slightly different technique? Let me know in the comments below.
Those Focus Stacked Photographs
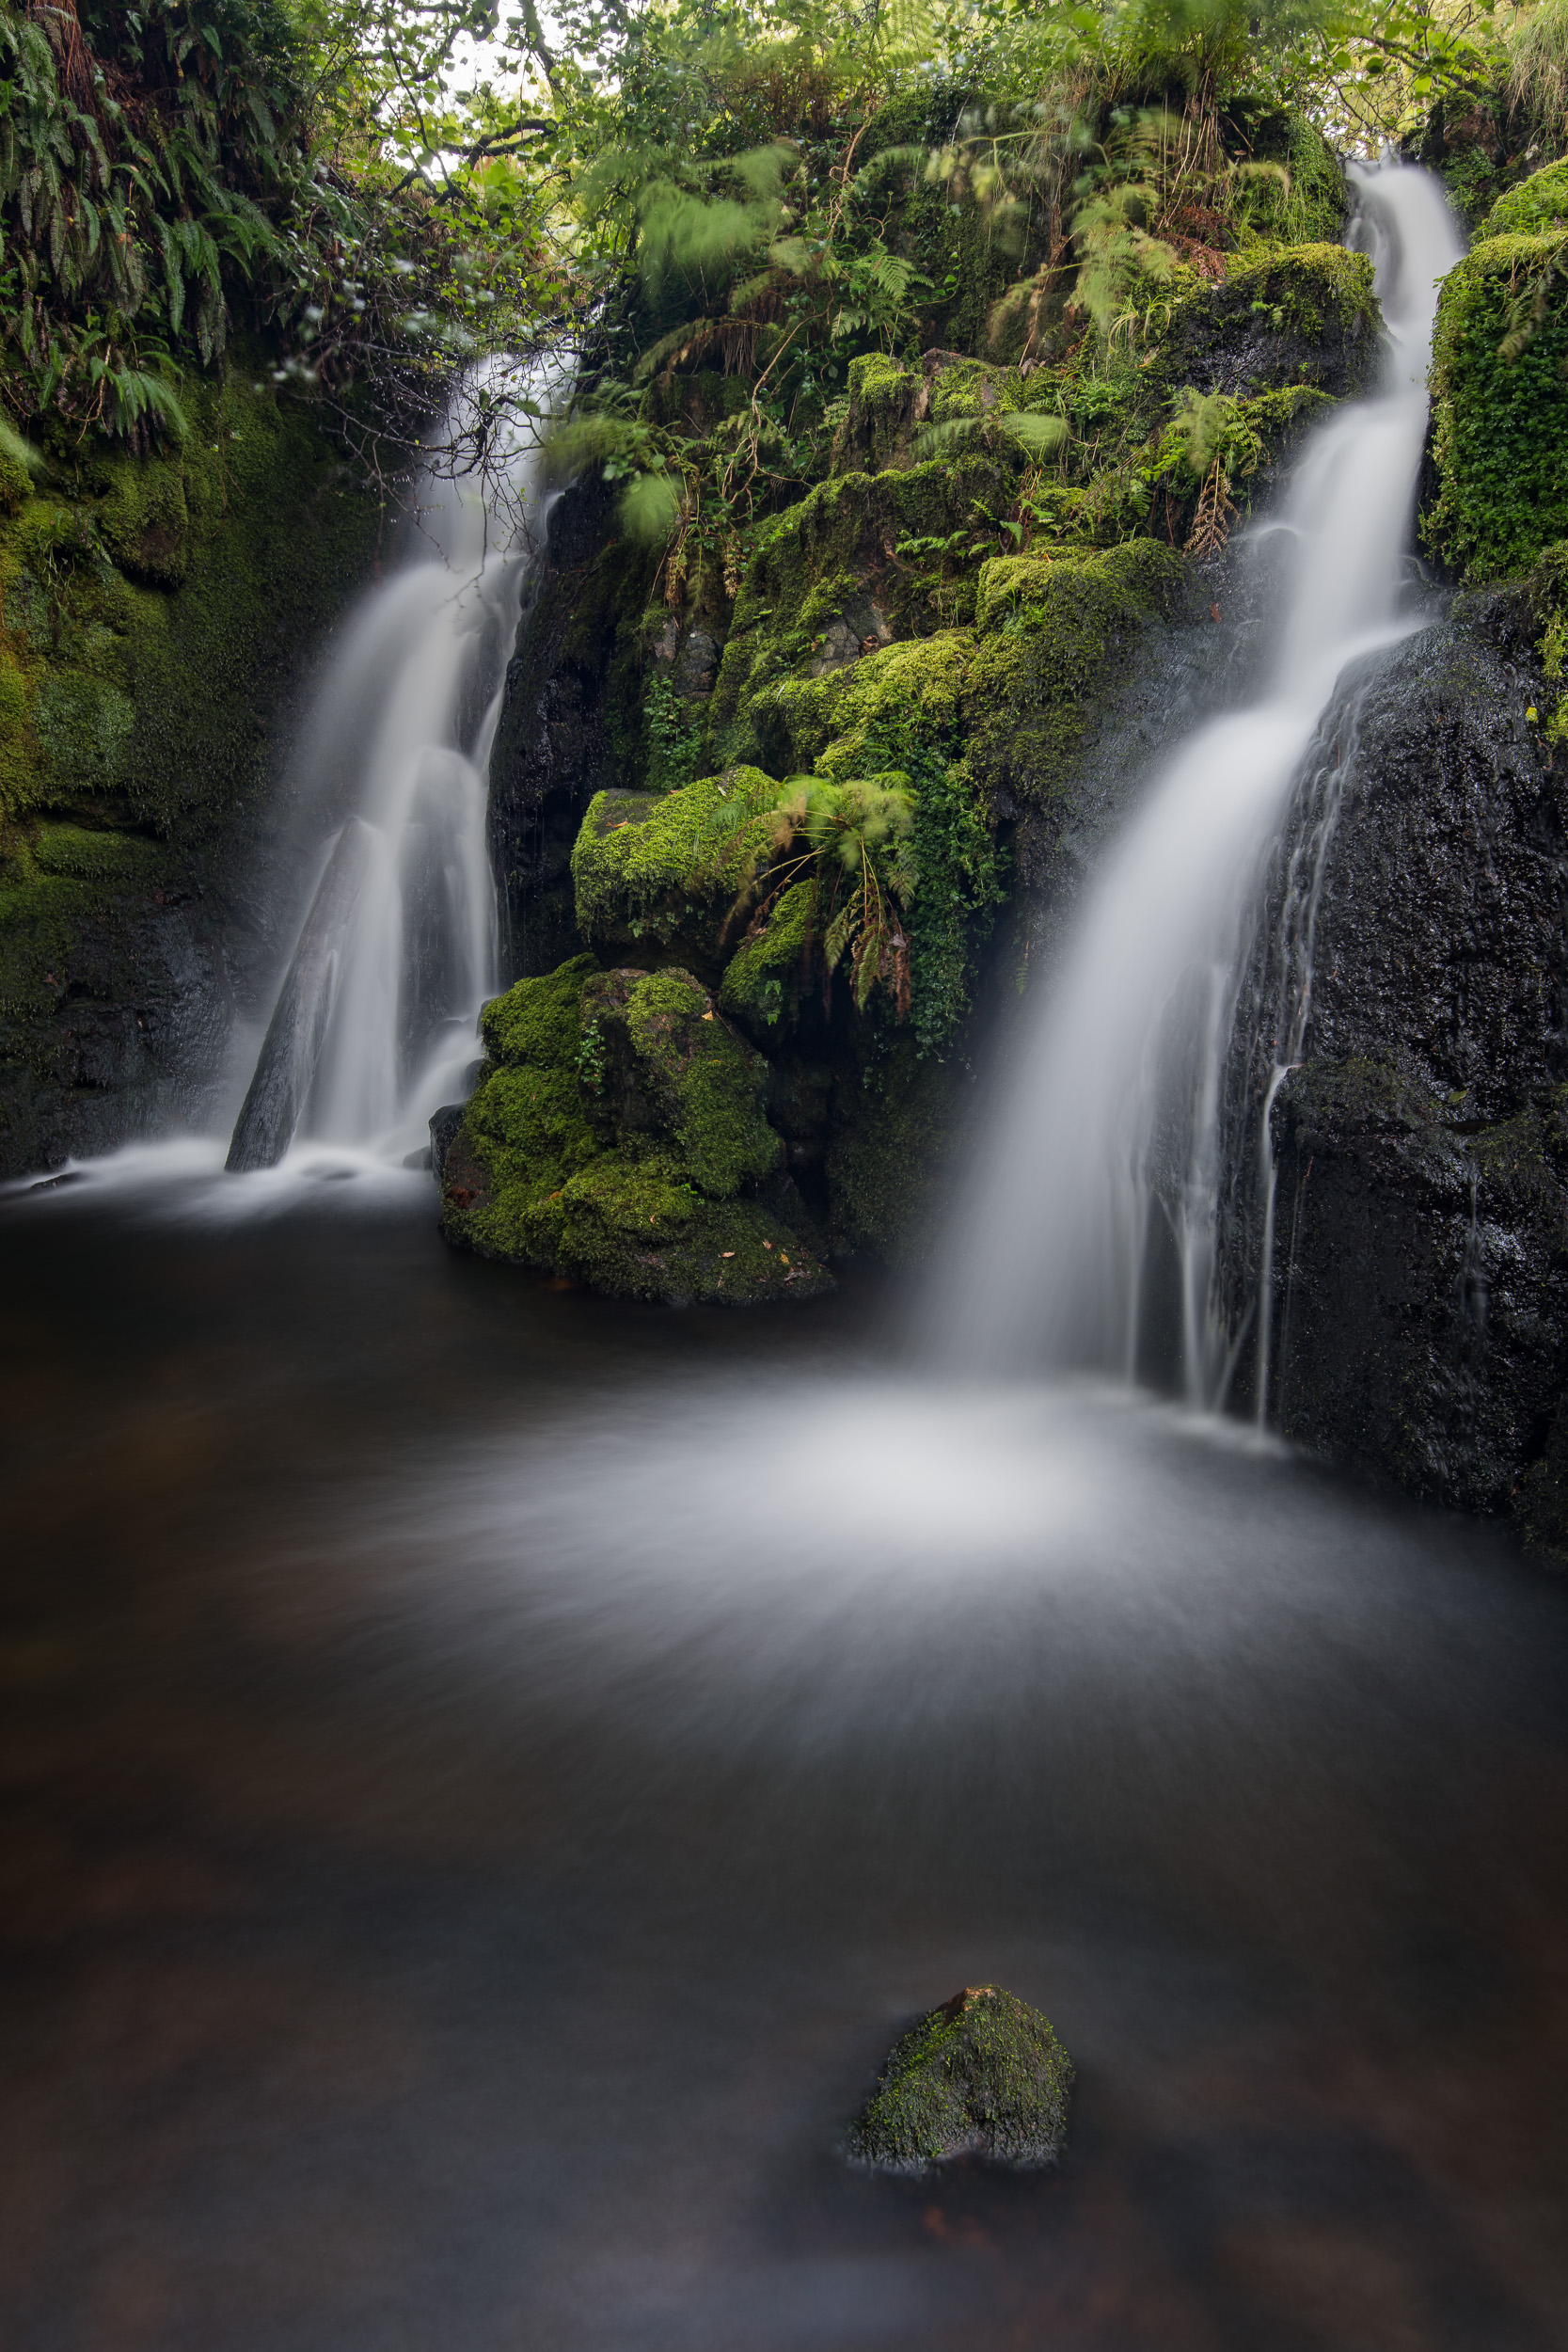
Venford Falls - Dartmoor, Devon: Nikon D850, Nikkor 16-35 mm f/4 at 24 mm, 2.5 secs at f/8, ISO 64, Lee Filters Circular Polariser.
Life on the Edge - Bedruthan Steps, Cornwall: Nikon D850, Nikkor 16-35 mm f/4 at 26 mm, 1/15th sec at f/5.6, ISO 64, Lee Filters Circular Polariser.

8 Things I Love About the Nikon D850
In my latest blog and video, I tell you what the 7 things are that I love most about the Nikon D850 and share with you some of my favourite photographs that I've taken with this amazing full frame DSLR over the last 6 months.
A 6 Month Review of the Nikon D850
It was 6 months ago to the day when I received my much anticipated Nikon D850. I was one of the lucky ones as demand for Nikon's latest DSLR was very high with most retailers selling out in advance of stock delivery.
Not one to keep the excitement buried though, I shared my initial impressions of the camera in the in the video: Nikon D850 Exposed - Unboxing, Capture, Process and Print. It wasn't long before the follow-up video On Location with the Nikon D850: Froward Point was also published.
Since then I've been putting the Nikon D850 to good use. With the exception of the photographs captured in the article Shoot, Print, Surprise!, the D850 has been with me on all my photographic adventures.
So now that I've had the camera 6 months I thought I'd create a quick video to tell you what my favourite features of this amazing DSLR are. Want to know what they are? Well, check out the video below.
As I said in the video, the Nikon D850 doesn't necessarily make me a better photographer (just read my article Shoot, Print, Surprise!), but it does make the process of capturing images a little easier. Now that I have it, I wouldn't be without it. Well, not until the next model is released anyway!
Which camera do you shoot with and what is your favourite feature? Let me know in the comments below.
My Favourite D850 Images... So Far...


Shoot, Print, Surprise!
In this blog I head to Dawlish Warren to shoot a video I'm calling Shoot, Print, Surprise! But what is the surprise? Well, you'll just have the watch the video to find out!
Back at Dawlish Warren
In my latest video, I headed to Dawlish Warren to shoot some dawn seascapes. For those of you who have been following my blog for a while now, you may well be wondering if that is the only location I've ever photographed! I admit it though, I do like going there to capture images.
There are two good reasons for this. Firstly, it's close to home for me. This means that during the winter months when my time is particularly short, it's nice and easy for me to get to. It also offers a variety of different compositions to suit different conditions. With 15 or so groynes of different styles, and long beach it works well with both high and low tides. So, you can virtually go there in any conditions and get an interesting image.
I've mapped out the 15 groynes in a custom google map. It's still a work in progress, but the custom map also has recent images of each groyne so you can see what they look like before you get there. You can view the map here, and you can see how to make your own map here.
Shoot, Print, Surprise!
So back to the topic of the video. Well, the title should give you a good idea of what the video is about. In the video, I head out to Dawlish Warren to capture some dawn seascape images and then I head home to print some of them off. But what is the surprise? Well, you'll just have to watch the video to find out!
Well, I do hope you enjoyed that video, and of course the surprise element. Did you enjoy the surprise? What are your thoughts on the surprise topic? Let me know in the comments below.
The Photographs
As always here are the photographs that were featured in the video.
Nikkor 16-35 mm f/4 @ 34 mm, f/11, 57 seconds at ISO 100, Lee Filters Circular Polariser, ND grad and 3 stop IRND.
Nikkor 16-35 mm f/4 @ 24 mm, f/11, 1.3 seconds at ISO 100, Lee Filters Circular Polariser, and ND grad.

Bad Weather Photography
In the blog this week I remember to "embrace the grey" and head out to Dawlish to get some photos in less than optimal conditions.
Time to Embrace the Grey
I once went on a Nikon School one day workshop with Jeremy Walker. I remember the weather not exactly being great but one thing stuck in my mind from that day. As Jeremy was laying out the plans for the day he already knew it was going to be an overcast day. His advice was to "embrace the grey".
I did just that with this photograph:
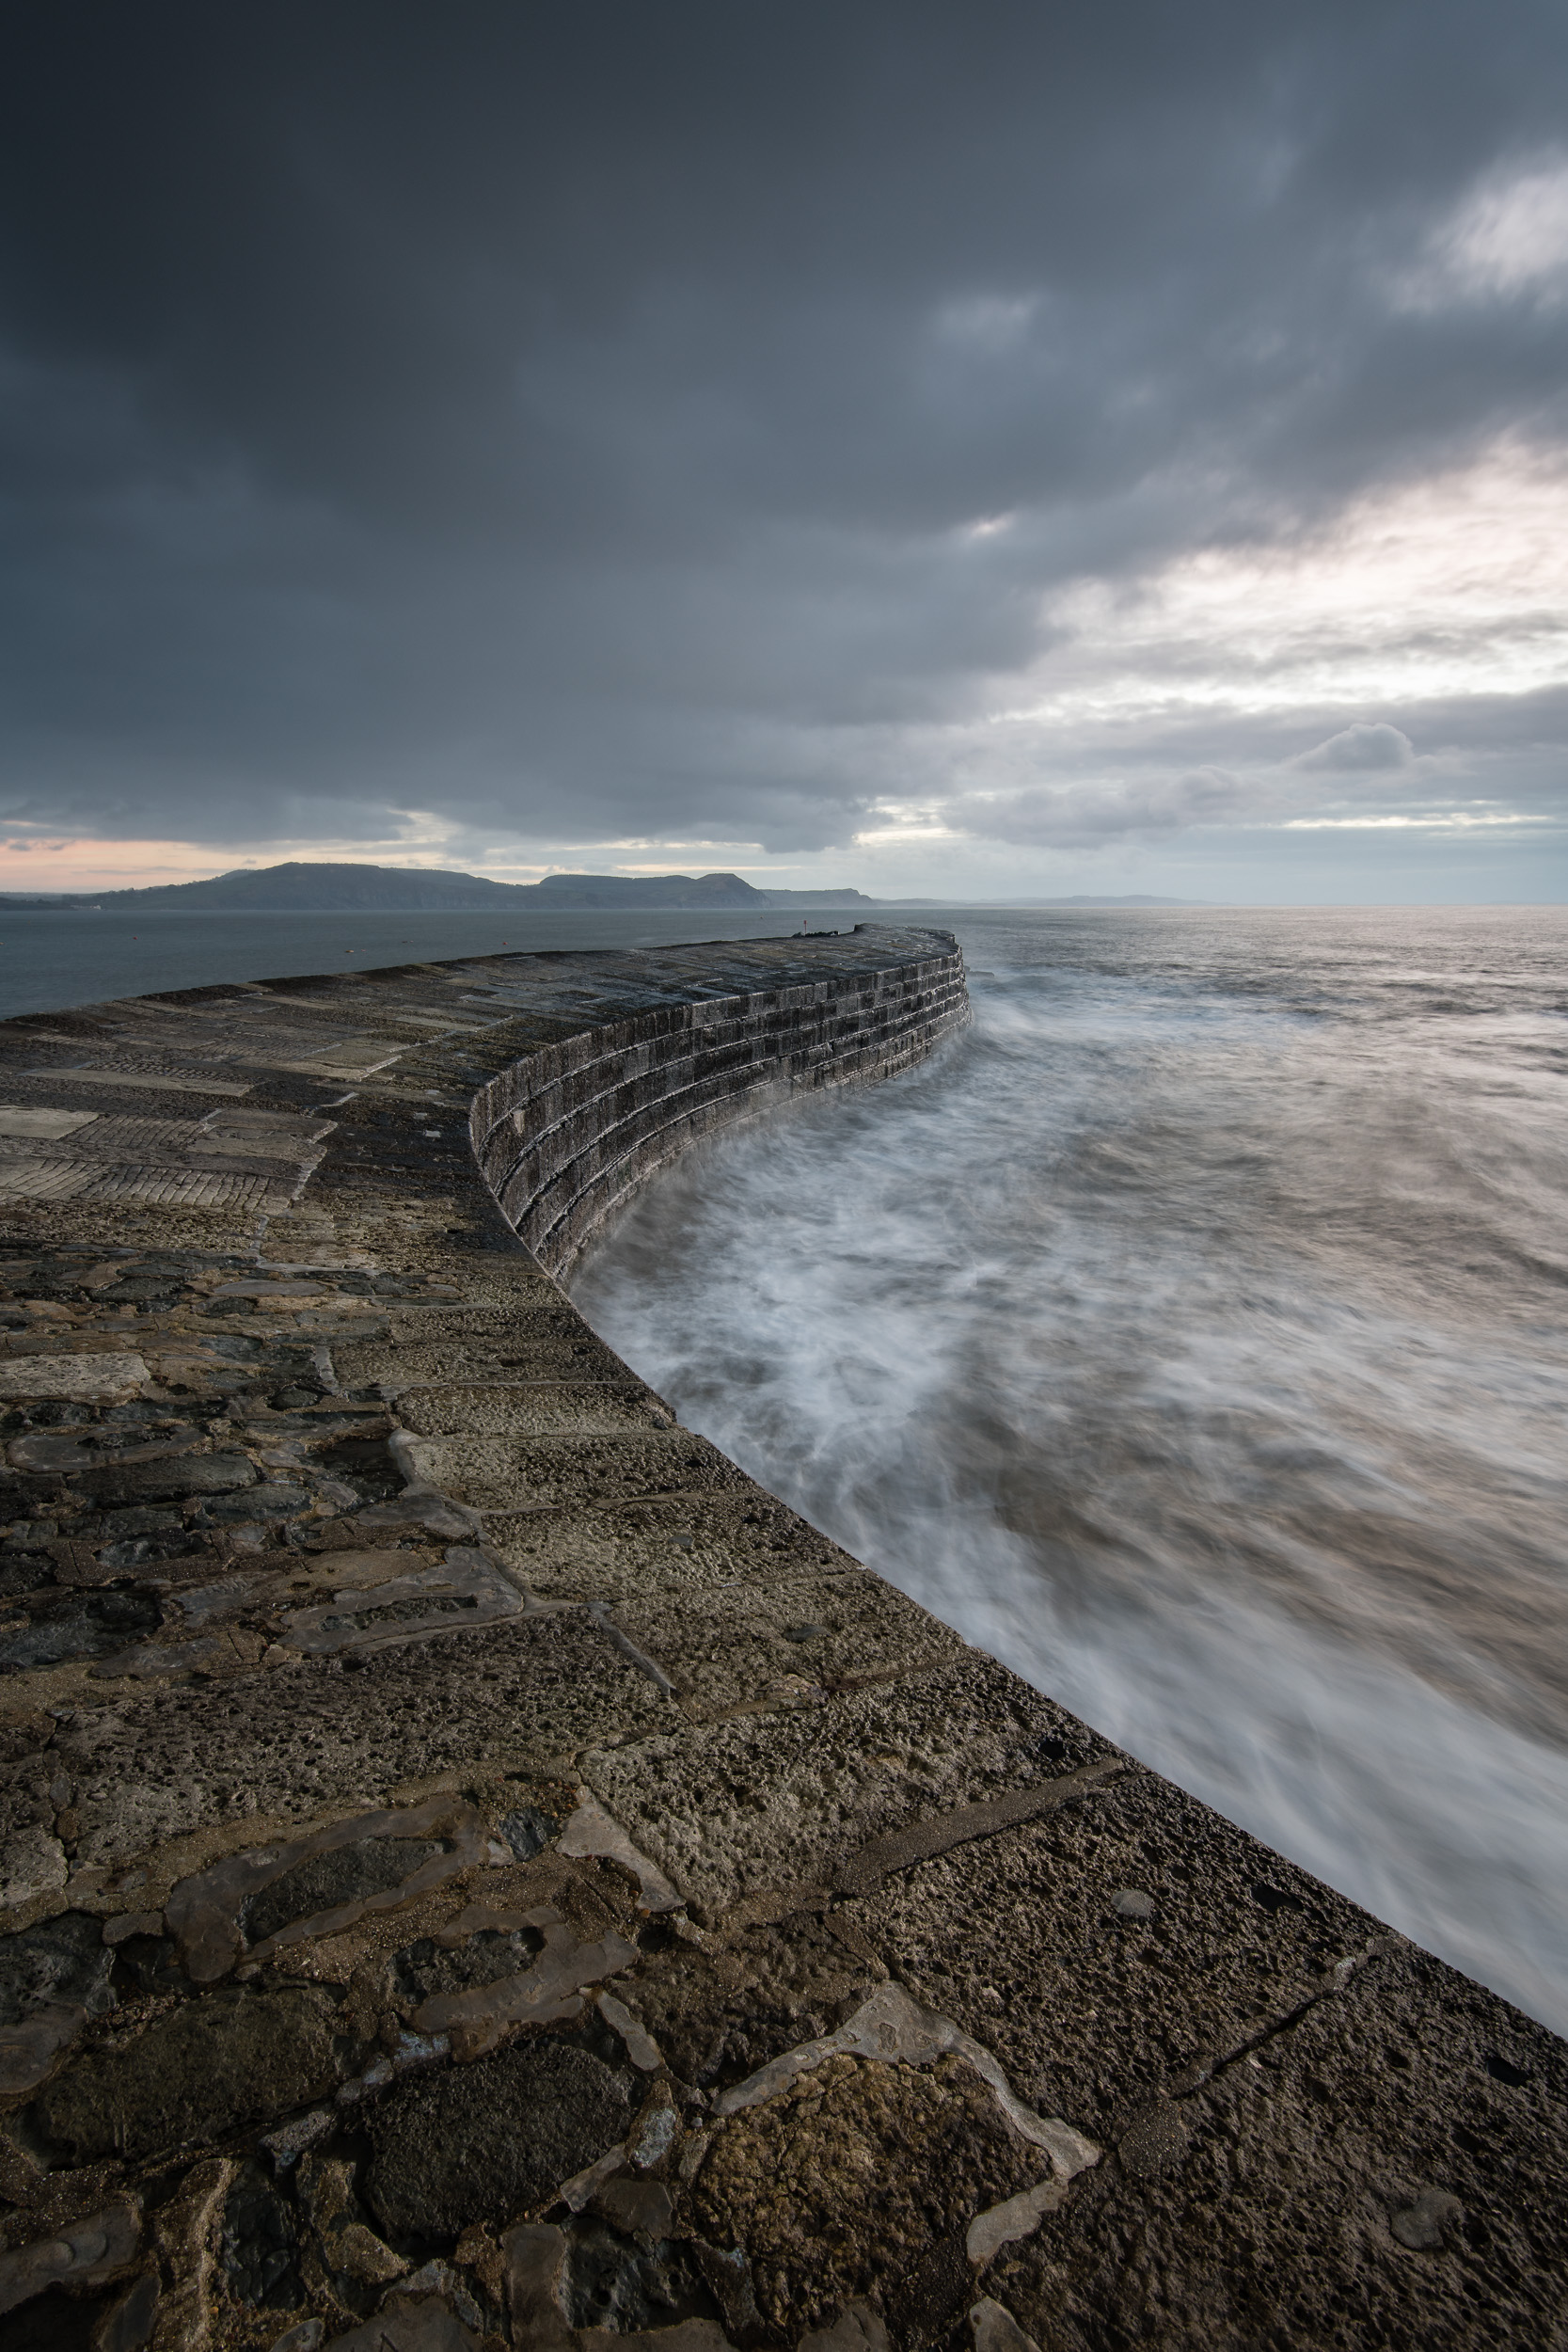
Banjo Pier, Swanage. Nikon D750, Nikkor 16-35mm f/4 at 28mm, f/11, 30 secs, ISO 100, Lee Filters Big Stopper.
Now I may have mentioned once or twice on the blog recently that the recent weather has been playing havoc with creativity. So when the weather forecast for the week was looking grim I decided enough was enough and I was going yet again embrace the grey!
I needed to find an appropriate location to make an image but when I remembered about the stone groynes at Dawlish my mind was set. So off I headed with a clear vision of what I wanted to capture.
Despite the weather. No hang on, because of the weather, I really enjoyed myself at Dawlish. It made me look at the location with different eyes.
Here's what I photographed:
Nikon D850, Nikkor 24-70mm f/2.8 VR at 31mm, ISO 64, 5 minutes at f/11, Lee Filters Circular Polariser and Big Stopper.
If you want to see how I went about capturing the image, here's a short video I shot while I was there...
So do you have a favourite bad weather location to take photographs? Is there really such thing as bad weather for photography? Let me know in the comments below.
PS.
On a little side note, I'm very happy to say that Adobe has now updated Lightroom to support the Nikon D850. This means I no longer have to convert the files to DNG format first. I can now import the NEF (raw) files straight from my memory card. I was so happy about this I posted a video on my YouTube channel.

Amazing Light at Brentor Church
In the blog this week I tell about how I was treated to a spectacular sunset at Brentor Church!
Finally, decent light!
For those of you who read my blog on a regular basis, you will know that I've not been the happiest of photographers recently. Despite being the very proud owner of a new Nikon D850, I've not been having much luck with the weather recently. This has played havoc with my creative adventures! However, this all changed a couple of weeks ago when I visited Brentor Church and I was treated to an epic sunset.
The night before I visited Brentor Church on Dartmoor, I also visited another Dartmoor location, Honeybag Tor. It was one of those evenings where you think your photographic mojo has completely deserted you. I found myself mumbling "why do I even bother" as I wandered back to the car.
I'm not one to stay down for too long though. The very next morning, armed with a cup of coffee I got back on the computer and started checking the weather forecast for that evening. Best thing to do when you've had a bad trip out with the camera is get back out there and try again. After all, I have talked about the value of practice and perseverance before on this blog. So I took on my own advice and got to planning a trip out with the camera.
I looked at the weather forecast, and even though it was forecast for nearly 80% cloud coverage, thanks to yr.no (a Norwegian weather service), I could see that most of that cloud would be high up. With virtually no lower cloud cover there would be a chance that just around sunset the golden light of the sun would illuminate the underside of that higher cloud.
After a recent visit to Brentor Church, I was keen to revisit this Dartmoor location. So with a good weather forecast, and a wonderful location picked, I set off with a positive, but cautious frame of mind.
What's It Called?
I normally like to share the details of where I've taken a photograph, so I normally try and include a map. While adding the map for Brentor Church below I noticed a couple of things.
The map above refers to Brent Tor, Brentnor, and St Michael's Church. So what is this location called? Well I did a little checking and to give the church its full name it's called The Church of St. Michael de Rupe (St. Michael of the Rock), which is located on Brent Tor, near the villages of Brentor, South Brentor, and North Brentor.
I believe the church is commonly known as Brentor Church. So looking at the Google Map above I can only assume that some of those location spots are user submitted and contain minor errors. Anyway, now we all know what it should be called and how to spell it!
Lost for Words
My plan for Brentor Church was not only to take photographs but to also shoot one of my 5 Minute Photography Adventure videos. However, as I was visiting the location on a Friday evening and the weather forecast was good, I knew there would be a good chance there would be other photographers there. The problem with that is that I just can't seem to present to the camera when someone else is watching! I'm just too self-conscious!
As suspected though, when I arrived, there were already a few photographers there. I told myself to just get on with it and get filming. But I didn't. To be honest, it was nice to keep the video gear in the bag and just chat to some fellow photographers. One of the photographers was from Wales and the other was a local photographer called Lee Smith (check out his work here). Both chaps were excellent company and we got to enjoy a very special sunset together.
Changing Light
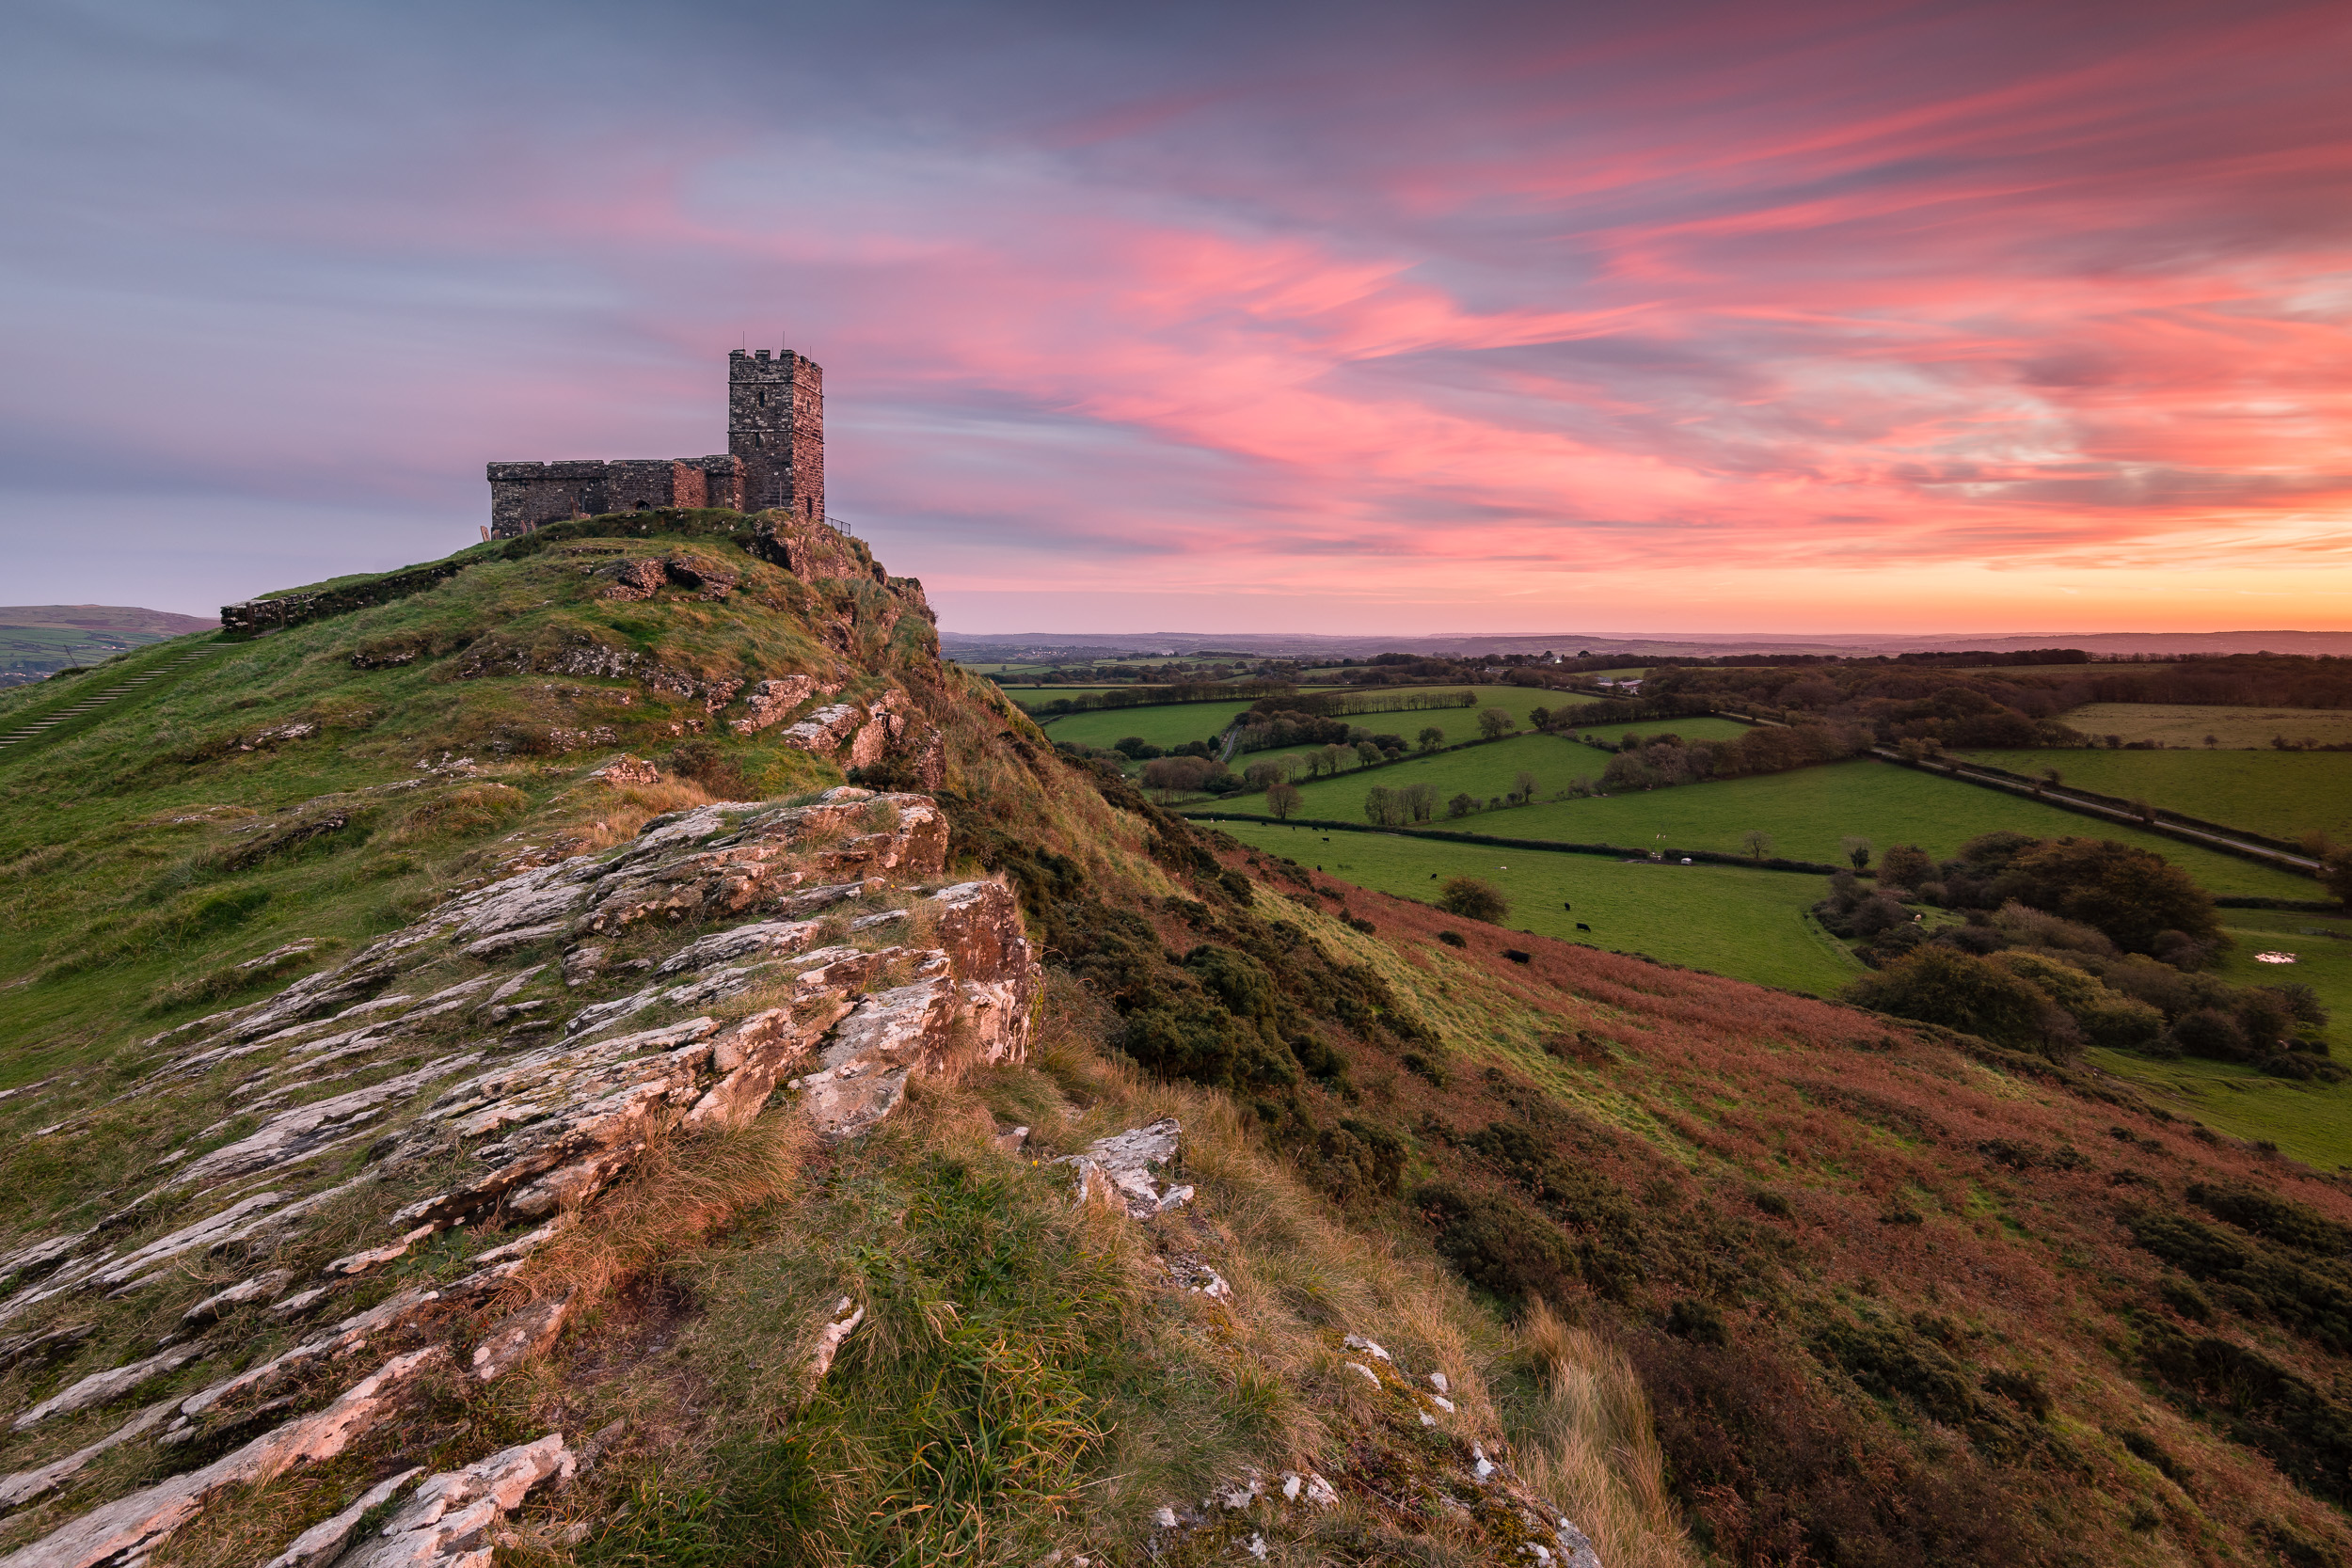
Brentor Church, like many locations, benefits greatly from good light. The ideal conditions would be to have a dramatic sky, and the side of the hill and church illuminated by some nice side lighting from a setting sun. The image below gives you a hint of what that might look like.
Nikon D850, Nikkor 16-35mm f/4 @ 18mm, ISO 100, 0.6 sec @ f/13, Lee Filters circular polariser and ND grad.
On the night that I was there, that side lighting didn't last too long. Unfortunately, the sunset behind some distant low cloud. However, in the next photo, you can just about see the sky and clouds starting to change colour.
Nikon D850, Nikkor 16-35mm f/4 @ 22mm, ISO 64, 210 sec @ f/13, Lee Filters circular polariser, Little Stopper and ND grad.
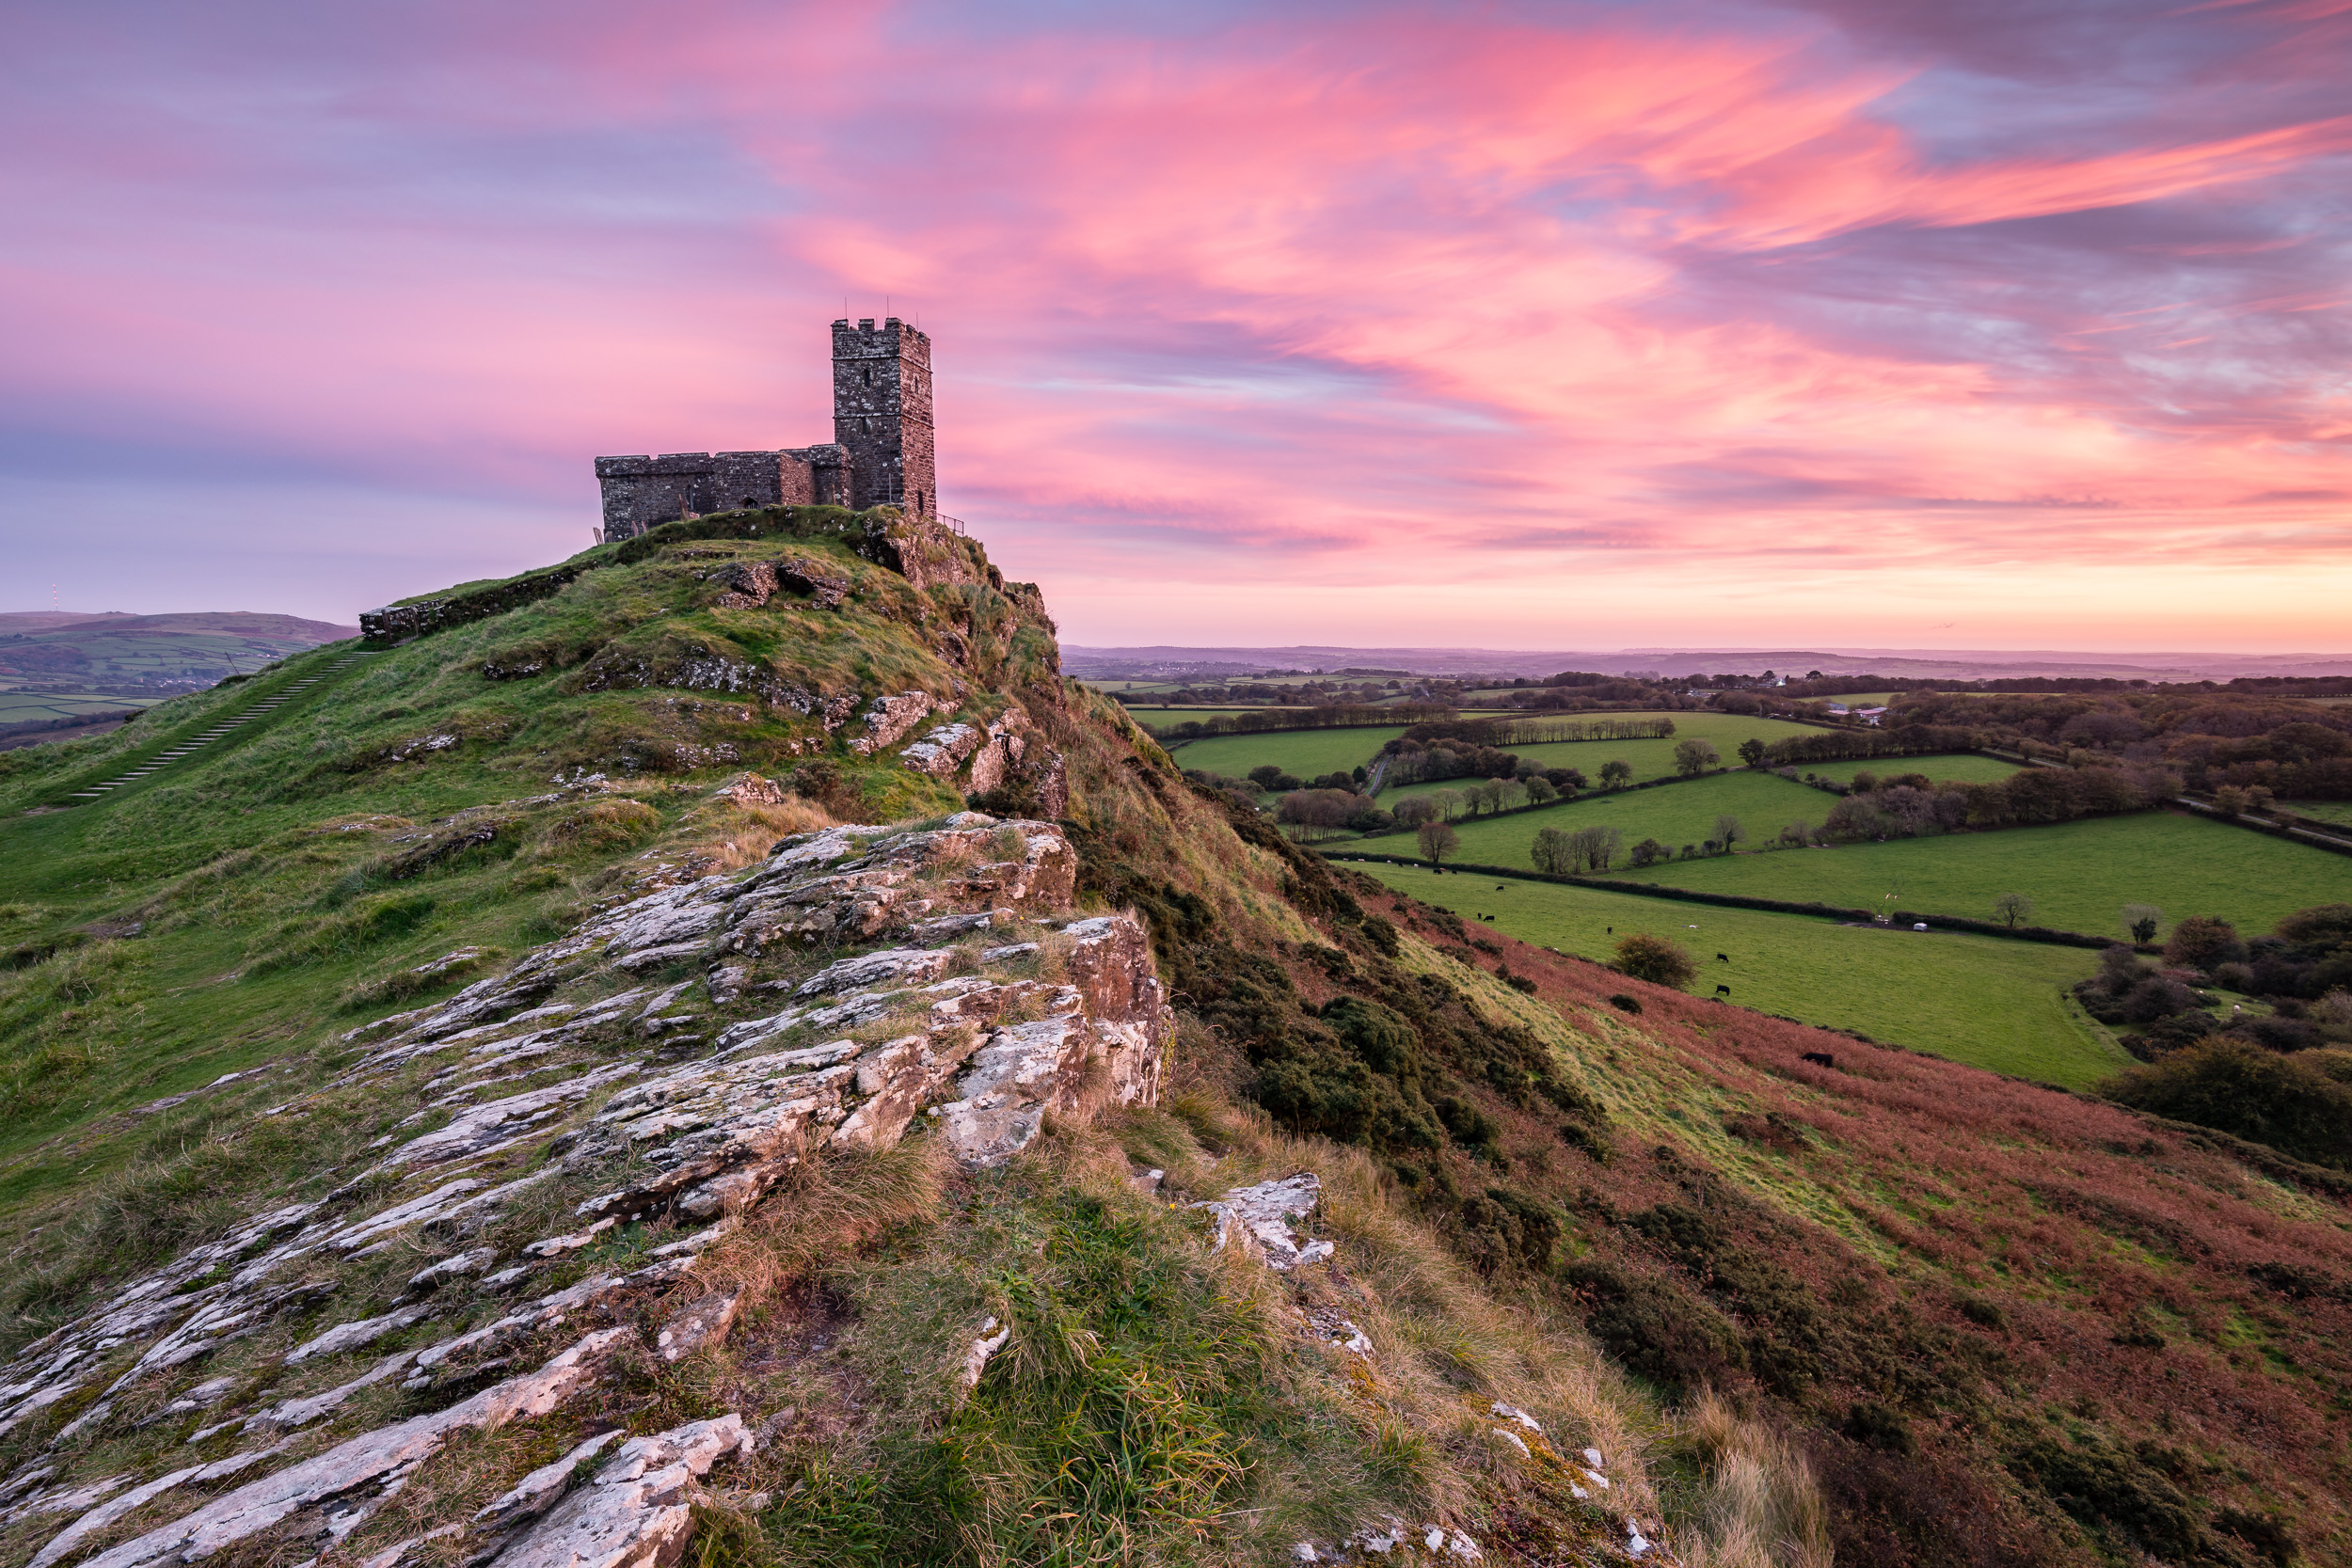
And then, just as the sunset, the sky lit up in spectacular fashion! All of a sudden the sky was full of pinks and blues. This allowed me to capture my favourite image of the night.
Nikon D850, Nikkor 16-35mm f/4 @ 18mm, ISO 100, 5 sec @ f/13, Lee Filters circular polariser and ND grad.
The amazing sky can't have lasted much more than 5 minutes and you can see from the following two photographs how quickly the sky can change in a few minutes. I was glad I was up there early and had everything set up and ready to shoot before the action started.

It was a wonderful evening of photography. Not only did I get some images that I was very happy with but I had a great time chatting with some fellow photographers. I will get that video of Brentor Church done one day. Not that I need an excuse to visit this great location again.
So have you shot Brentor Church before? What was the best sunset you've photographed? Let me know in the comments below.

On Location with the Nikon D850: Froward Point
In the blog this week I share with you my latest video on the Nikon D850. Watch I as I go on location to shoot some seascape images at Froward Point in Devon. I take you through my workflow on how I setup the camera and how I'm using some of the features of the D850. I then head home where I process, print and review the image.
Getting to Know the Nikon D850
Since getting my Nikon D850 I haven't been out to take photographs with it as much as I hoped I would. The bad weather at the moment always seems to know when I have time to go out with the camera. However, I was treated to an epic sunset up on Dartmoor the other day. I got some wonderful images and I'll be sharing them on my blog in the near future.
The Nikon D850 is performing very well and is delivering me some wonderful raw files full of dynamic range. I just wish I didn't have to convert them to DNG first....c'mon Adobe, update Lightroom, please! LR issues aside this is a great camera and so I wanted to do a follow up to my Nikon D850 Initial Impressions video. This video is my most popular video on YouTube to date and there seemed to be a real desire from people to know more about some of the capabilities of this camera.
So in this video, I take the Nikon D850 out to photograph seascape images at Froward Point in Devon. This time I take a closer look at my workflow and how I put some of the features of the Nikon D850 to work.
Froward Point
I've talked about Froward Point a couple of times on the blog and in my videos, but in case you don't know where it is, here it is on the map:
So onto the image itself. Unfortunately, I didn't get the light I was after but I'm still reasonably happy with the image I took.
Nikon D850, Nikkor 16-35mm f/4 @ 29mm, ISO 64, 180 secs at f/10. Lee Filters circular polariser and 3 stop medium edge ND grad.
While the image might not be one that goes in the portfolio it was, as always, good to get out with the camera. I'm still familiarising myself with the D850 so time with the camera at the moment is even more important. Overall though I only have positive things to say about the D850 and I'm looking forward to shooting even more with it.
So have you been to Froward Point? What new feature in the D850 interests you? Let me know in the comments below.
Trebarwith Strand
In this blog post, I tell you about my recent visit to Trebarwith Strand, how it paid off to get there early and my experience with the Nikon D850.
Trebarwith Strand
I've photographed many different locations in Cornwall. It truly is a wonderful part of the UK and has so much to offer the landscape photographer. Some of my favourite spots include Boscastle and Trevose Head which are amazing coastal locations.
Opportunities to get out and take photographs seem to be rare at the moment, so when the weather looked good for the north Cornish coast I went looking for a spot that I hadn't shot before or hadn't been there for a while. Checking my trusty custom Google map I remembered that I hadn't been to Trebarwith Strand for over 3 years. I checked the tides and my luck was going to be in! What a great location to put my new Nikon D850 to the test.
Getting There Early
On my last visit to Trebarwith Strand, I noticed how busy the location can get, especially at high tide. For me, the best composition is standing on the rocky ledge and using it as a leading line out to Gull Rock. Problem is that the ledge doesn't fit many photographers so if I wanted to get the shot I was after I would need to get there early. (It was just as well I did because by the time sunset came there were at least 6 other photographers there!)
It's not a long drive so I managed to get there with plenty of time to spare. So I set up and waited. And waited. There wasn't much to do but enjoy the Cornish coast. With no mobile phone signal, I had nothing else to entertain me apart from my own thoughts.
It was actually a rather relaxing time. I stood there and listened to the waves crash around me. I made subtle changes to my tripod position, checked my composition and made sure I had the camera setup. There would be no excuses for not being prepared when all the action started!
Getting to Know the D850
Having said goodbye to the D750 the week before I was now trying to get know the D850. Most of the controls were familiar but there were some subtle differences and some new features that I was still learning how to use. Most of these changes I talk about in my recent D850 video and blog post. Overall the camera was living up to my expectations and I was having fun using it.
As sunset approached I started taking some test shots. I was shooting into the sun but my foreground was some very dark, wet rock. I thought this would be a good test of the dynamic range of the camera.
Sunset Action
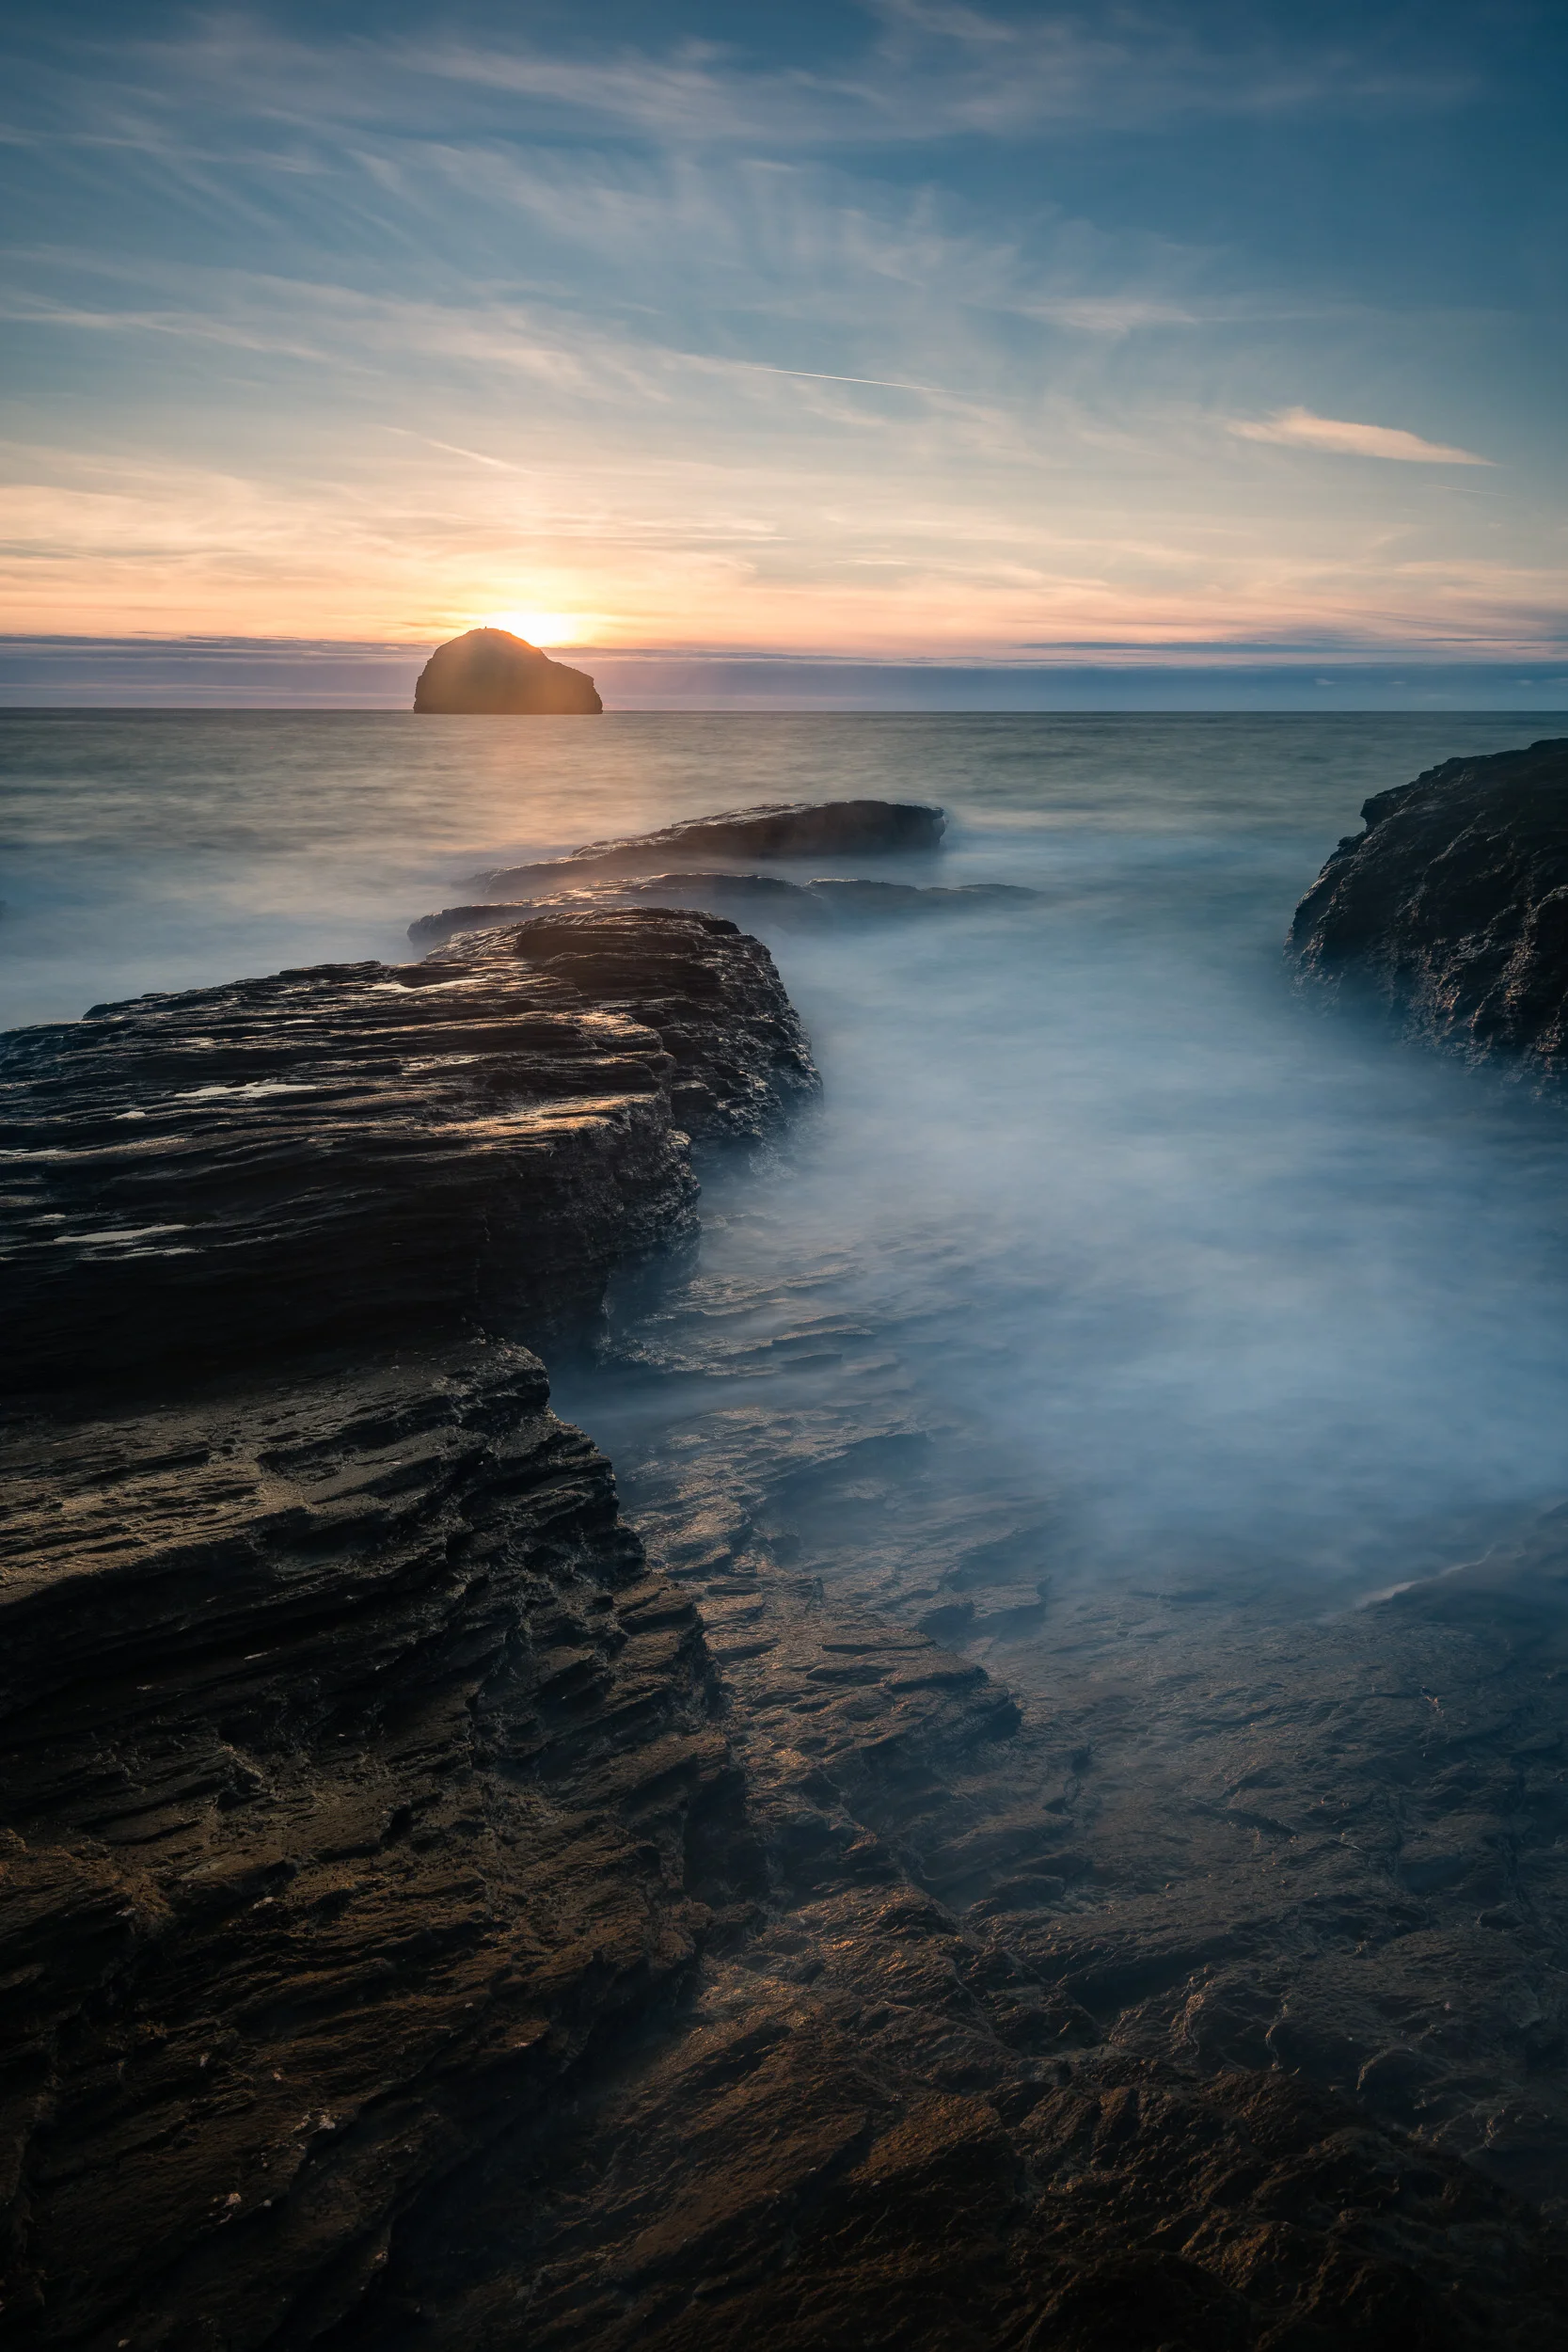
As the sun started getting close to the horizon I could see a bank of cloud out to sea that would surely kill the sunset early. So rather than waiting right to the end, I started shooting while the sun was still quite strong in the sky. It was a balance between an overpowering sun and loosing the reflected light from the rocks.
Nikon D850, Nikkor 16-35mm f/4 @ 26mm, f/13, ISO 64, 20 seconds, Lee Filters Big Stopper and ND Grad.
As you can see the camera did an admirable job of balancing the highlights and the shadows. The level of detail that was recorded in the shadows was impressive and post-processing was relatively straightforward.
Though I didn't get the sunset I was after I was still very happy to get out with the camera and to spend some time outdoors. I may have been standing on that rocky ledge for a long time but I enjoyed the experience, and for me, that is half the fun of photography. Just being outside and enjoying the outdoors.
Do you have a favourite location that requires you to get there early? Do you enjoy the experience of being outside almost as much as the photography? Let me know in the comments below.

Nikon D850 Exposed - Unboxing, Capture, Process and Print
In this special blog post and video, I take a look at the new Nikon D850. I unbox it and take it out to Dartmoor to capture some images. Back home I process and print the images and give you my first impressions of the camera.
A Little Camera History
My first full frame camera was the Nikon D600 which was released in September 2012. As many people know this camera had a few problems with oil leaking onto the sensor. Despite a number of product recalls the product was eventually replaced by the D610 in October 2013. I was lucky though as Nikon replaced my D600 with a new D610 under warranty.
In July 2014 Nikon announced the Nikon D810 and this was followed up by the release of the D750 in September of the same year. After only a short time with the D610 I decided that I was going to upgrade again. I looked at both cameras but at the time I felt I couldn't justify the cost of the D810, nor would I probably benefit from what it offered.
The D750, on the other hand, had a few of killer features. It had the flippy out LCD screen, high ISO capabilities, and WiFi built in. While the latter two would only really benefit my music photography, the flippy out LCD would be great for my landscape work. So I sold my (almost new) Nikon D610 and purchased the D750.
It's Finally Here
The D750 continued to be my main camera for the next three years until the D850 appeared on my doorstep the other day. I had been considering an upgrade for around a year but there was nothing really to upgrade to. The Nikon D810 was still a great camera, but I would miss some of those great D750 features.
I wasn't going to change camera systems either. Sure the Sony mirrorless technology is very attractive, and the new Fuji mirrorless medium format camera is a landscape photographers dream, However, the transition to either system would be costly and neither was that well suited to my music photography.
So when I saw the D850 announcement and looked at the specification list it ticked all my boxes. When pre-orders became available I was ordering within minutes! This was going to be a significant investment for me but I feel I'm at a point in my photography journey that I can justify the upgrade. Thanks to part-ex with WEX I can offset some of the cost by trading in my D750.
Using the D850
So now that I have the D850, what is it like? To document my experience from unboxing to capturing my first landscape image, processing it and finally printing it I have created this video.
I would have like to have used the camera for the first time in better circumstances but the weather was just proving too problematic. Venford Falls was a good option but looking at the images a lot of foliage is being blown about by the wind. The falls really look their best in spring time when everything is green, fresh and lush.
However, even with the challenging conditions, the camera was able to produce images with great tones, colour, and contrast.
A metered exposure of 30 seconds gives great results.
This image is the same as the previous image but at 8 seconds this image was deliberately underexposed. However, there was no apparent loss in quality when the darker areas of the image were recovered.
I really liked the handling of the camera it made the capturing of images just a little easier than it is in the D750.
More to Learn, More to Shoot
I've only had the D850 for a few days so there is so much more to learn about this camera. There will be the enhanced features over the D750 as well as some new capabilities that I can learn about. I guess it will take a while before I really start leveraging what the D850 has to offer, but it's going to be fun learning.
So will the D850 make me a better photographer? Of course not! Only by practising the craft of photography will I become a better photographer. The D850 is a tool and it will help me capture my images, but it can't improve my creative eye. As David duChemin says, "Gear is good, but vision is better".
So have you bought or considered the new Nikon D850? Have you recently replaced your camera? Have you changed camera systems before? Let me know in the comments below.

Beautiful Boscastle
In the blog this week I tell you about my most recent trip to Boscastle, show you the images I took, and share a few tips should you decide to visit this picturesque Cornish coastal village.In the blog this week I tell you about my most recent trip to Boscastle, show you the images I took, and share a few tips should you decide to visit this picturesque Cornish coastal village.
Classic Cornwall
Even if you aren't a photographer there is a lot to love about Boscastle. This picturesque little village in Cornwall is always busy with tourists enjoying the village, wondering along the harbour and ascending the surrounding hills for some fantastic views of the coastline. It has everything you would typically look for in a Cornish fishing village.
The things that make this village a popular tourist spot also make it popular for photographers. From happy mobile phone shooters to those who take their photography a little more seriously there is something for everyone to shoot.
The Photographers View
For me though, I go to shoot the harbour. The entrance of the harbour has dramatic cliffs on either side and the beautiful turquoise water snakes its way into the village to meet the River Valency. There are paths on both sides allowing you to walk the length of the harbour, but for those who have a little more puff in their lungs, there are paths leading up the hills. This is where I like to shoot from.
On this visit to Boscastle, I decided to take the path on the north side of the harbour. The view up there really allows the photographer to make the most of the S-shaped harbour entrance. With the sun setting in a westerly direction I was hoping that the last of the light would illuminate the hillside on the opposite bank with nice evening light. The weather forecast was looking good and with an incoming tide, I was optimistic.
Subtle Changes
After a short ascent to the top of Penally Hill, I just had to stop for a little while and admire the view. It's all too easy to get to your location, unpack your gear, and get shooting, but sometimes you need to pause and take in the scene. Though I have photographed this scene a couple of times now, each visit has been unique and I wanted to walk about a little to see how I might shoot it differently this time. I was hoping to see some Thrift flowering but unfortunately, there wasn't any. Well, you can have everything, can you?
After taking in the view I decided on two compositions, one vertical, one landscape. Both would include the S-shaped harbour entrance and the foreground rocky ledges, but I would shoot the landscape picture closer to sunset and include Meachard island in the composition.
Nikon D750, Nikkor 16-35mm f/4 @ 20mm, f/13, 30 secs, ISO 100, Lee Filters Circular Polariser, Lee Filters 0.6 ND Grad, 4:5 crop.
Though the light isn't fantastic in the above image I do like the composition. To get it right I had to make a number of minor adjustments. If I was too low down, the flow of the harbour water is cut off at the bottom of the frame and if I went too far to the left the curvy pier gets lost behind the foreground rocks. Too far to the right and the headland (Penally Point) on the north side is cut out of the frame and you lose the S shape of the harbour.
I also had a to take into account the foreground rocks which play an important part of leading the viewer out into the rest of the image. Overall, I had to make a lot of small tripod changes to get things just right.
Nikon D750, Nikkor 16-35mm f/4 @ 19mm, f/13, 56 secs, ISO 100, Lee Filters Circular Polariser, Lee Filters 0.0 ND Grad, 4:5 crop.
It was a similar story for the landscape orientation image above but as you can see I then had to take into account the placement of Meachard island. These aren't necessarily difficult compositions to get but you do need to pay attention to where everything is in the frame in order to get the most out this view.
Unfortunately, as you can see by the images, I didn't get the light I was looking for but I never come away from Boscastle feeling like it was a wasted trip. It's a lovely location and even in less than optimal weather conditions you can still get good images. It also makes you work at your composition skills as you try to get all the most interesting elements into your frame.
So if this blog has inspired you to visit Boscastle, here are my three top tips for shooting the view from Penally Hill.
Take a Polariser - The waters of the harbour are a beautiful turquoise colour and using a polariser will help you take the glare of the water and emphasise those colours.
Explore the Hill - There are a number of compositions to be had up on Penally Hill. Try shooting up into the harbour and village as well.
Thrift - If you can time your visit, try and go there when the Thrift is flowering. There isn't a lot of it up there, but adding it when it is can really add something to a composition.
If you want to see how I went about shooting these images, check out my latest 5 Minute Photo Adventure video on Boscastle.
I'm going to try and get back to Boscastle again soon. I've been a few times but never managed to truly capture in the way that I would like. I have a number of compositions I like from Penally Hill but so far I have always missed out on some great light. As with Colmer's Hill and Bowerman's Nose, I will just have to persevere until I get an image that meets my vision!
So have you photographed Boscastle before? What viewpoints do you shoot there? Let me know in the comments below.

My Favourite / Top 5 / Best Landscape Photography Locations in Devon
In this special blog post and video I take you on a mini tour of my 5 favourite landscape photography locations in Devon.
A Personal Selection
As a landscape photographer living in Devon I am spoilt for choice when it comes to shooting locations. I have access to Dartmoor National Park, large areas of the South West Coast Path, and everything in between. I shouldn't really ever run out of places to shoot.
Even though I have all this variety I can't help but have a few favourite locations. So in this video I'm going to take you on a mini tour of my five favourite locations to shoot landscapes in Devon. I've chosen a mixture of coastal and inland locations as well as choosing to shoot at dawn and dusk. Some shoots were more successful than others but I'm hoping the video will give you some ideas and inspire you to visit and photograph those locations yourself.
So why not check out the video below and let me take you on a tour of Devon...
If you need a little more information on the locations I have visited or just want to see the images in a bit more detail then please do read on!
Dawlish Warren
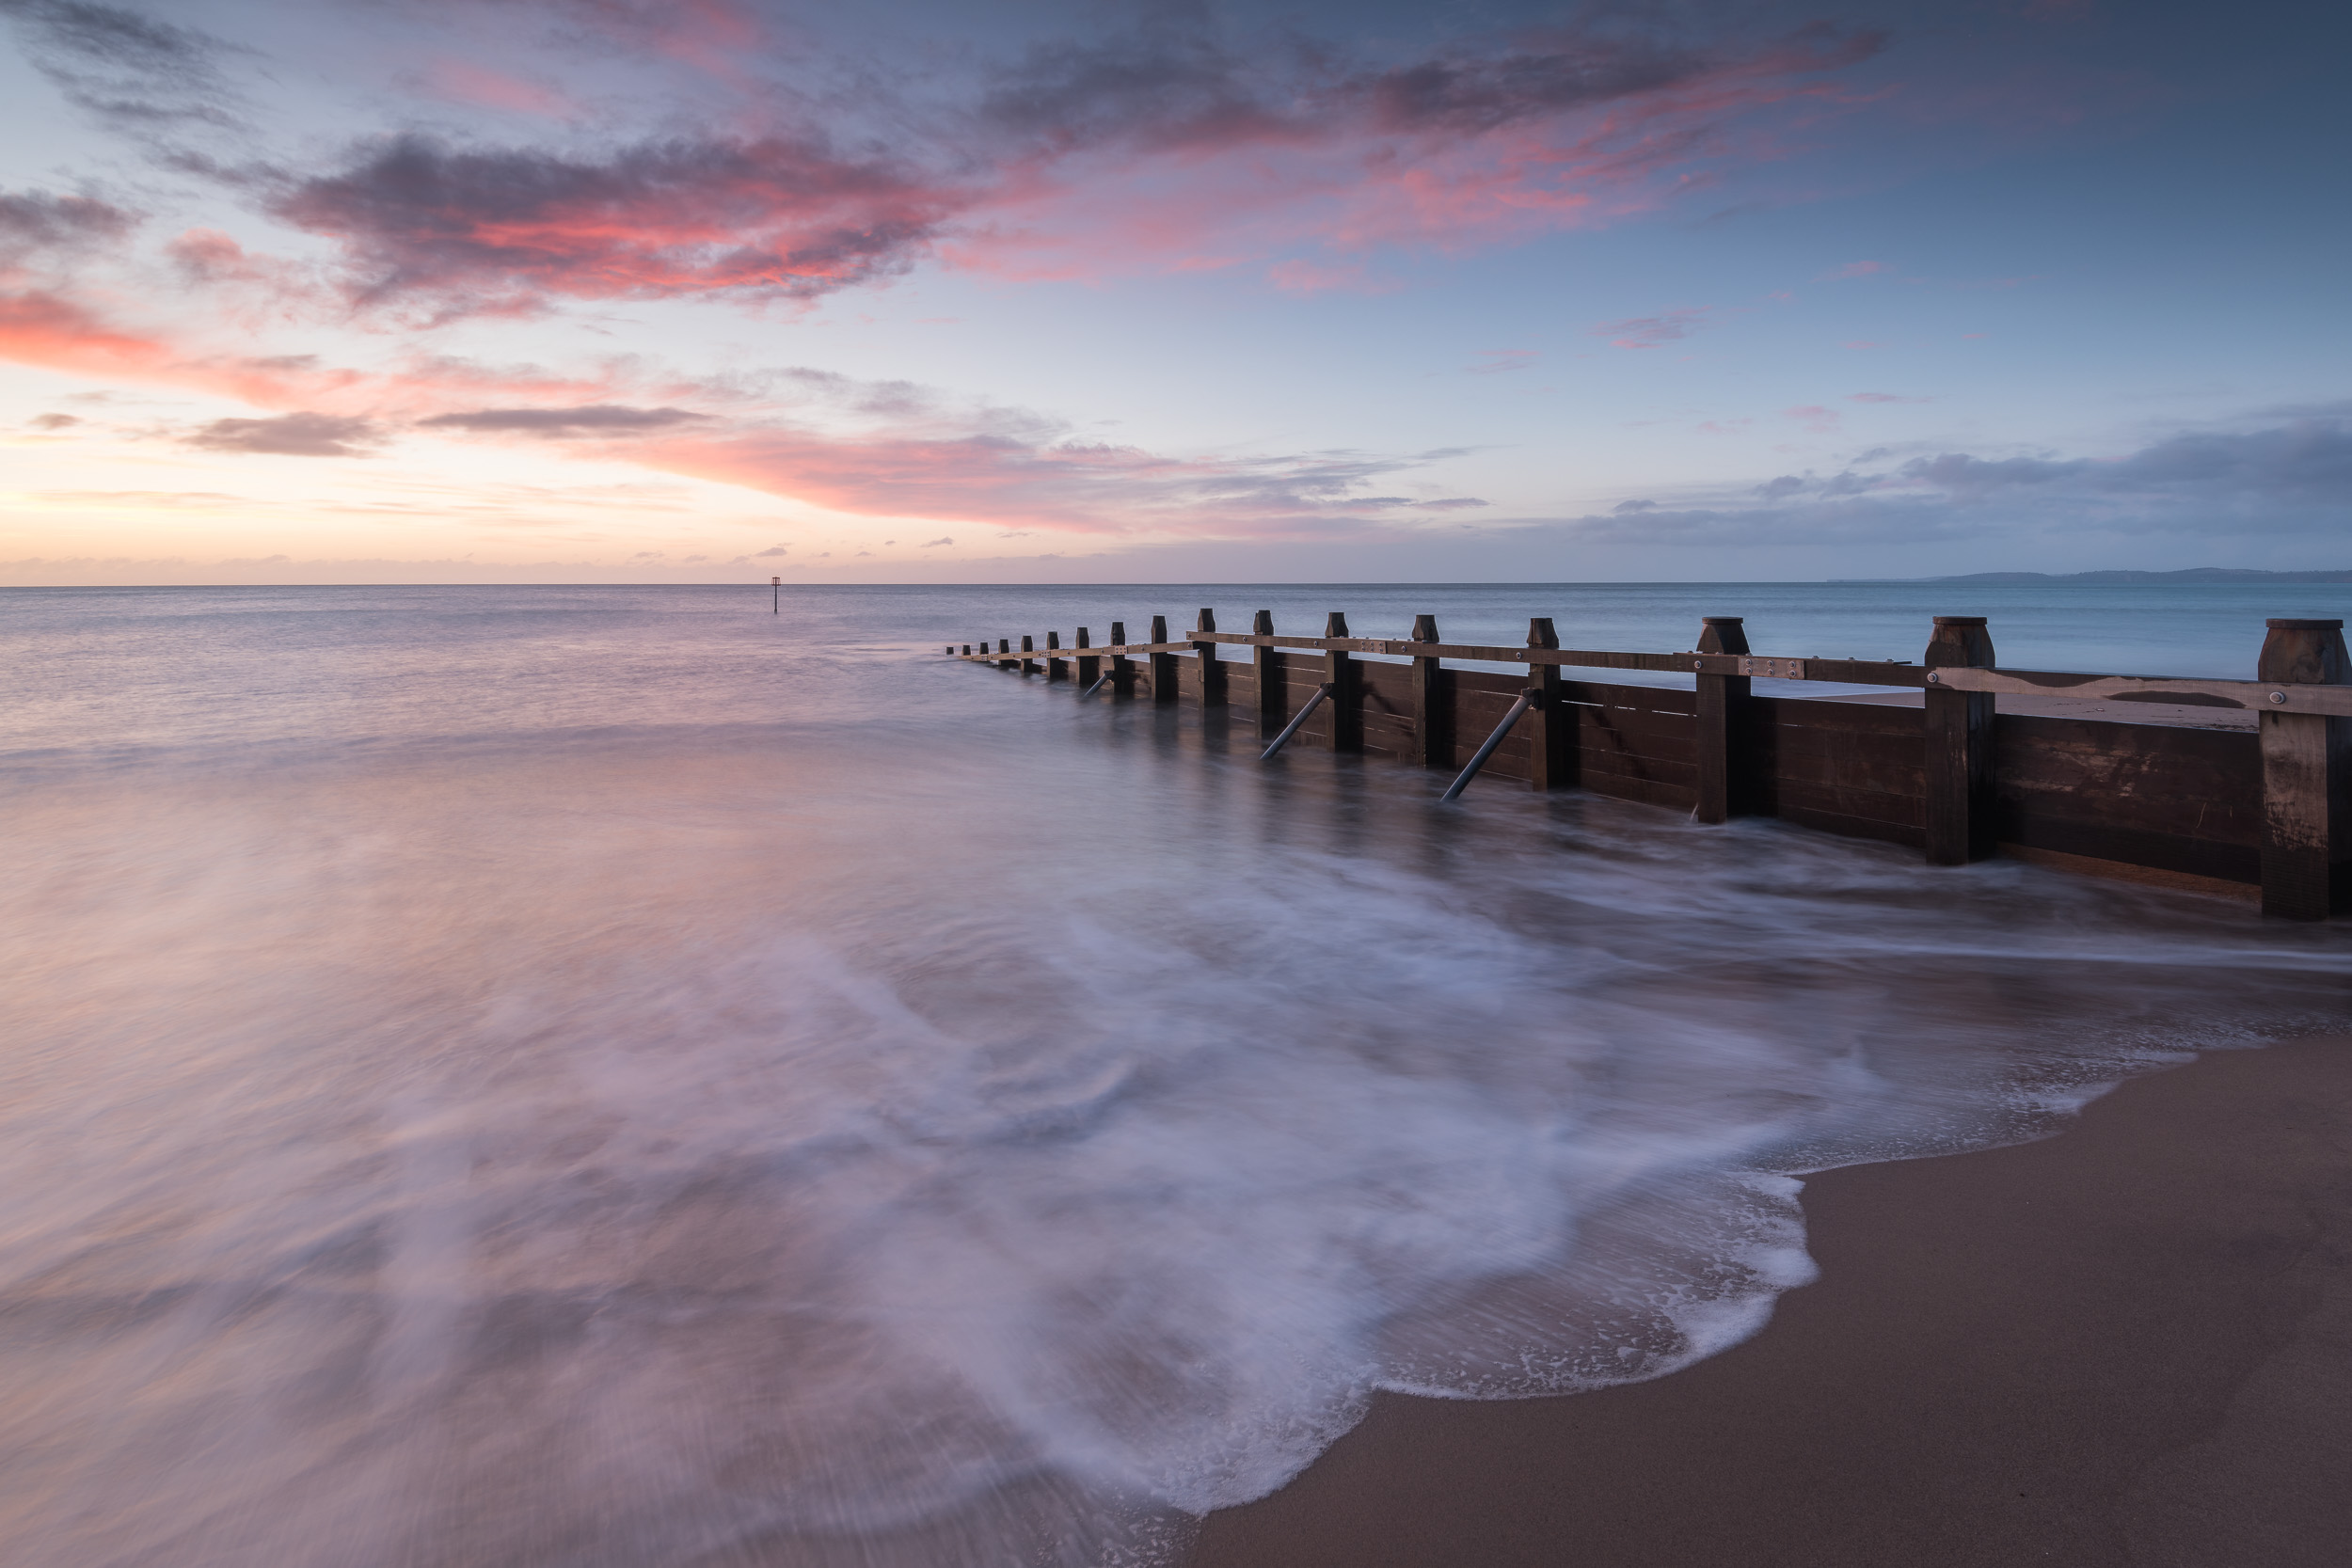
The groynes along the beach at Dawlish Warren offer some great lines for your composition. Long exposures often work well at this location as well, especially in poor light.
Don't forget to shoot the beach huts.
Venford Falls
Venford Falls as shot on the video. A polariser is very handy to control the reflections.
Spring is my favourite time to visit as all the moss is at its best.
Emsworthy
Both the rocks and the tree are great elements to include in your composition. This location is good to shoot at both dawn and dusk.
Turn 90 degrees and you'll find a few other compositions to shoot.
Froward Point
Shooting at sunset will typically provide the best light but what ever time you visit please be careful on the rocks!


If you've got good light shoot Daymark Tower as well.
Start Point
The classic Start Point composition. Shame about the weather!
Sometimes it pays to hang around a little longer. There is just a splash of colour in the sky in this image.


In Summary
Hopefully this video and blog post has given you a little inspiration to not only shoot these locations, but also the wider Devon. It really is a fantastic part of the country with huge variety in locations and conditions.
So what are you favourite locations either in Devon or further afield? Did you find this video useful or inspiring? Is there a location in Devon or the south west that you recommend I visit? As always let me know if the comments, and remember to like and share this post! See you next time.

Not All Shoots Are Successful Shoots
In this blog I discuss the challenges of shooting on a beach and I give my own image a critique.
The Best Laid Plans
As a photographer you always want to put your best images out there. If you practice enough your technique will improve and your style develop, hopefully resulting in a gradual but noticeable improvement to your images. While this is generally true, it doesn't necessarily mean that every trip out with the camera will result in an image that was better than the last one. When I started this blog one of my key goals was to discuss my success and my failures. As I said in my first blog post, landscape photography isn't all about 5 star images captured on epic international trips.
In this blog post I'm going to take you through one of my less successful trips out with the camera. I had it all planned out. I would finish work bang on time, drive to West Bay in Dorset, and photograph the sea and evening light as it gloriously reflected off sea and cliffs. Well, that was my vision anyway. I went through all my normal planning steps, weather, cloud, tide, bearing of sunset and it all looked good.
Challenging Conditions
I've visited West Bay a couple of times, but never to photograph it. The east beach there, recently made more famous by the TV series Broadchurch, is long and sandy with dramatic cliffs running as far as the eye can see. However, when I arrived the reality of actually shooting there became apparent.
Firstly was the tide. After checking the tide tables I knew it was coming in, but what you can't tell from the tables is how long of a reach those waves have. The waves weren't tall, but their reach up the beach was long. Now I don't mind getting my feet wet, but it becomes really difficult to frame your shot if your camera sinks a little with each wave. If I moved further away from the waves I lost a lot of the sea in the frame. Normally this would be less of an issue if the beach has a natural curve.
The other challenge was the weather. While it wasn't raining nor the wind as strong as I expected it to be, the light was very flat. The forecast had indicated lots of high cloud and no low cloud. This I hoped would give me a spectacular evening sky to add to my composition. However, there was a lot of low cloud and the chances of there being any evening light bouncing off the cliff seemed very unlikely.
Change of Plan
Spare time to do photography is at a premium for me. While I like to do some location scouting when I can, it's not always possible, and so sometimes I just have to wing it. So with the very real sense that I might have just wasted a 2 hour round trip in the car, I put my thinking hat on and tried to think of a different composition. This approach of looking around and not getting focused on one thing had worked well on a recent trip to Dartmoor, so I picked up my tripod and got walking.
It wasn't long before I had the idea of doing a long exposure of the beach, looking straight out to see, and including a few well-placed rocks or stones in the foreground. This composition would probably deliver better results. I would have better visibility of the waves and the quality of the light was less of a dependency.
An Ever Changing Beach
Though I had a new vision on what my photograph would be my challenges weren't over. I would find an interesting composition, setup, grab a frame, maybe two at the most, and then a wave would come in wash my composition away! Even some of the larger stones in my composition weren't big enough to resist the pull of the waves. So this left me with very little time to grab a frame for each composition I found along the beach. I had to make sure the camera was level, focused, and correctly exposed in very short time or I might not get another go at it.
After only a few compositions the light had faded and I decided to take my very sandy tripod and wet feet back home for a nice meal and glass of wine.
Critiquing My Own Image
I only took a handful of frames that evening but here is the image that I think turned out the best.
Nikon D750 with Nikon 16-35mm f/4, 1.3 secs, f11 at 20mm, Lee Filters Polariser and 3 Stop ND
Now I'll be the first to admit this isn't an image for my portfolio. Though I like the mood and style of the image it does have a number of issues. If I'd had more time at the location I might have worked out these issues but as I said at the start of the blog, not all shoots are successful shoots.
The main issues I have with the image are around the rocks I have used in the foreground. The rock in the lower right of the frame for me is just a little too close to the edge of frame. I would like to have had just a little bit more space as there is with the rock on the left.. Given a bit more time between waves, I might have setup my tripod in a slightly different location to give me that space.
While the image roughly follows the rule of thirds, it doesn't follow the rule of odds. Now, I know that these rules are more like guidelines, but quite often they do make sense and I do think following the rule of odds in this scene would have helped with the overall composition.
Rocks at Porth Nanven - Nikon D750, Nikon 16-34 f/4 at f/16, 1.6 secs at 20mm.
I learnt about the rule of odds in the book, The Art of Landscape Photography by Mark Bauer and Ross Hoddinott (it's a fantastic book and well worth picking up). In the book Ross and Mark discuss how having an odd number of objects helps create visual stability or symmetry.
In this image I took of Porth Naven a couple of years ago you can see how I've composed with three rocks in the foreground. The balance and implied triangle in this image is something I would have liked to have seen in my West Bay image.
Always Good to Be Out With The Camera
Despite the fact that my shoes are still drying off and I had to strip down my tripod to get rid of the sand, I still felt it was time well spent with the camera. I'm also not going to win any awards for the image, but that really isn't the point. I was outdoors with my camera on a beautiful beach taking images and for a person that spends most his time sitting at a desk it's just nice be outside. Yes, conditions were challenging but it's through these challenges that you learn to progress as a photographer.
Actually I'm going to change my mind, it was a successful shoot. Just successful in a different way.
So what do you think of the image? How would you have shot the scene? Have you got any tips for photographing beach scenes? Please let me know in the comments.

1 Location, 2 Cameras, 3 Photographers and Force 4 Wind
In this blog post I write about a recent trip to The Valley of the Rocks where I nervously flew my drone in strong winds and shared a cliff top perch with two other photographers to photograph Ragged Jack.
Last of the Midweek Shoots
Autumn is open us and though the amazing autumnal colours haven't reached their peak yet in Devon, the nights are closing in rapidly. During the spring and summer months my photography benefits greatly from the long evenings. Photography during the week becomes practical as I can grab my camera and head out straight after work and travel all over Devon and Cornwall and still make sunset.
Over the last few weeks though that window of opportunity has been shrinking and my ability to travel long distances before sunset reduced. So when I was looking at my location map and decided to go to The Valley of the Rocks, I knew this could be one of the last of my longer mid-week trips for a while.
1 Location, 2 Cameras
With my one location locked in for the evening I got to checking out the conditions and planning my shoot locations (see my blog post on Planning). On my last visit to The Valley of the Rocks I took some time to have a walk about to see if I was missing anything. (Check out my blog post on Location Scouting to read why I do this). Well, I was glad I did as I discovered a whole new aspect to The Valley of the Rocks and was inspired with some new ideas!
My plan was to not only take out the big guns (Nikon D750) but to also take out my DJI Phantom 3 4K so that I could get some aerial shots of the dramatic coastline and rock formations. I've recently been discovering the joys of drone photography and I thought this would be an ideal opportunity to do some more work in that area (see blog post on Drone Photography). My plan was to shoot with the drone while the light was good, and then switch to the DSLR for last night. So with my one location locked in and my two camera's packed I set of for the north coast of Devon.
Force 4 Wind


The drive to my location wasn't exactly inspiring as the rain continued to come down and as I reached some of the higher parts of the route the fast moving cloud got lower and lower. However, I had checked the weather forecast and it had promised to clear up around sunset so I was remaining optimistic. By the time I had got there things had much improved so with a sense of excitement I got to my first spot and got the drone out.
It was at this point that I did get a little nervous. If anyone has been to the north Devon coast will testify it can get a little windy. I've had to extend my planning routine recently to take into account flying the drone, particularly along the coast. I now check the coastal weather forecast to see how strong the wind will be. The drone does have a maximum horizontal speed and flying in wind speeds that exceed that could see my drone drift out to sea!
I had done a number of calculations and worked out that I could safely fly it in the predicated conditions of a force 4 wind. However, what is OK on paper may not actually be OK in real life. So while perched on a cliff side with a very long drop I cautiously started up the drone. Hovering at 1.5m I could see the drone working hard to stay in one place. Putting caution to the wind (excuse the pun), I decided to fly it away from the cliff side as I thought it might be a bit less blustery. Though the drone was still working hard, it had settled down a bit and my confidence grew. I still had a worry that it was going to get caught by a gust of wind and go out to see or crash into a cliff, but I was feeling bold (or daft) and managed to capture some dramatic images.


3 Photographers
After about 45 minutes with the drone I had got the images I had come for. Well, most of them anyway. There were a few shots of some rock arches that I wanted but I really wasn't brave enough to get them given the conditions! So with sunset approaching rapidly I headed off to a spot that I had noticed earlier with the plan of shooting Ragged Jack with my DSLR. As it was a Tuesday evening in late September I thought I might have the place to myself but as I turned the corner I found another photographer setting up on the cliff side.
The spot we had both picked to shot was relatively small but Steve (the other photographer), kindly let me share it and we got chatting. It was the normal stuff, gear, technique, processing, but all very enjoyable! Just as we got shooting another photographer turned up. So two became three and we all waited for that magical sunset moment….which to be honest never actually happened. I took a handful of frames trying different combinations of filters but sometimes the conditions just aren't quite right. The third photographer soon walked on and I continued to enjoy my chat with Steve. We both continued to take a few frames but soon we were packing up also.
Time Well Spent
Though my final image taken with my DSLR isn't one for the portfolio I still count my trip to The Valley of the Rocks as a success. Firstly I managed to capture some nice images of the location with the drone. I really like the extra dimension that the drone has brought to my photography. I try and take the same approach to composition with the drone as I do with the DSLR, but this doesn't always work so I'm still learning how to compose when shooting at 200 ft!
It's also good to just get out and practice the art of photography (see my blog post on Practicing). Sure the conditions didn't turn out to be perfect but just getting out with the camera is always a pleasure.
It is the unexpected that can also make these trips worthwhile. It was great to meet and chat to a fellow photographer. Landscape photography can be a solitary pastime, and while I greatly value the solitude, it's also great to meet people, especially other photographers.
So overall it was time well spent. Any time with the camera is time well spent! I might still squeeze in a couple of mid-week evening shoots but I'm already starting to plan out my dawn shoot locations for the next few months. During autumn and winter my opportunities for photography are limited to weekends and sunrise shoots minimise any impact to my family commitments. But do you know what, I kind of like those cold mornings perched on top of a tor on Dartmoor, freezing cold, drinking coffee, waiting for the sun to rise and bath the world in light.

The Benefits of Tuition and Mentoring
Tuition and mentoring has had a massive impact on my photography. Read more about this part of my photographic journey in this blog post.
In the beginning...
One of my early landscape images taken in Glen Coe in 2008.
I bought my first DSLR in 2006 when I purchased a Nikon D80. Previous to that I had a Minolta DiMAGE A1 so this was a big step up for me. It was at this point that I started to want to learn more about the craft of photography. So as many people do I went to my the nearest newsagent and picked up a photography magazine. And so started a journey of several years of reading a lot about photography.
The problem was I wasn't actually taking that many pictures. Sure I was inspired by what I was reading and saw, but despite having considerably more free time back then I didn't practice the craft of photography as much. (Read my blog post on Practicing the Craft of Photography). I also wasn't that focused on a specific genre of photography. Most photography magazines have a broad range of articles from portraits to macro so I would often spend time trying these things out. Don't get me wrong, I did go out with my camera, but looking back I don't think I was trying hard enough to really learn about photography.
Changing My Approach
This changed back in 2013, when I decided to go full frame and buy a Nikon D600. I promised myself that if I was going to invest all this money in a camera (and lenses!) I was for sure going to learn how to improve my photography. By this stage though I was fairly sure that my heart lay with landscape photography.
Some early lessons about composition with David Nightingale.
I decided that the best way to make progress was to actually go out and shoot more, and to engage the services of a professional for some 1-2-1 tuition. At the time I was following the work of Blackpool based photographer David Nightingale and so I booked a whole weekend of tuition and got to work on improving my photography. The weekend went well and it was a bit of an eye opener for me. Firstly, I actually didn't know as much about my camera as I thought. While I knew some of my composition skills were lacking, I thought I knew my camera well but this wasn't really the case! It all goes back to practicing the art of photography, something I hadn't been very good at!
Up till this point I had wondered if it were actually possible to teach someone about composition and how to make a beautiful photograph. As many of my previous photographs had been average at best, I was beginning to think that you couldn't really learn an art, you had to have a natural talent for it to start with. While many people do find creating art easy, for me I had to learn about it. Fortunately David reassured me that I could learn the art of photography. So for that reason alone that weekend was a success.
Making Progress
A year later I had kept to my promise of going out more with my camera. I was still bound by my work and family commitments but I was at least using my spare time to go out and shoot. In 2014 I went on a Dawn 2 Dusk Photography workshop on Dartmoor where not only did I have a lot of fun with some like minded photographers but I also learnt a considerable amount about landscape photography. On the workshop I also met Ross Hoddinott, one of the tutors. I had been looking for a local tutor to help with my learning journey and Ross seemed the ideal person.
Learning about timing and waiting for the light on a 1-2-1 with Ross.
A few months later I met Ross for a 1-2-1 session and in that one day I probably learnt more about composition that I had done since I purchased my first DSLR 2006. Not only did I become inspired from that session but I also became more confident with my photography. Since that first 1-2-1 session with Ross I have regularly met with Ross for further 1-2-1s and portfolio reviews and this has had a significant impact on my photography. Each session I learn something new. Sometimes it's a really small change in how I might compose an image, but it often has a big impact.
So this brings me to the point of this blog post. If you are struggling with your photography or you've reached a plateau then I can strongly recommend that you find a tutor or mentor to help with your photography. Find someone close to home or who's work you respect. Most photographers offer some kind of tuition on a 1-2-1 basis now. Or if that seems a little much as a first step try a photography workshop such as those offered by Dawn 2 Dusk Photography.
We spend so much money on gear (something I'm definitely guilty off) but the one thing that has had the biggest impact on my photography is the time I've spent with a professional photographer. No matter what stage you are at with your photography journey I believe a little mentoring and tuition can be very beneficial. Of course I still read photography magazines, Outdoor Photography being my personal favourite, but when it comes to developing as a photographer 1-2-1s for me are invaluable.
Do you have a photography mentor or favourite tutor? What do you think of 1-2-1 days with professional photographers? Let me know your thoughts.