
Friends, Failures and Being Frozen
In the blog this week I tell you about a trip to Brentor church with friends where the freezing weather resulted in a failed attempt at shooting a video on the D850!
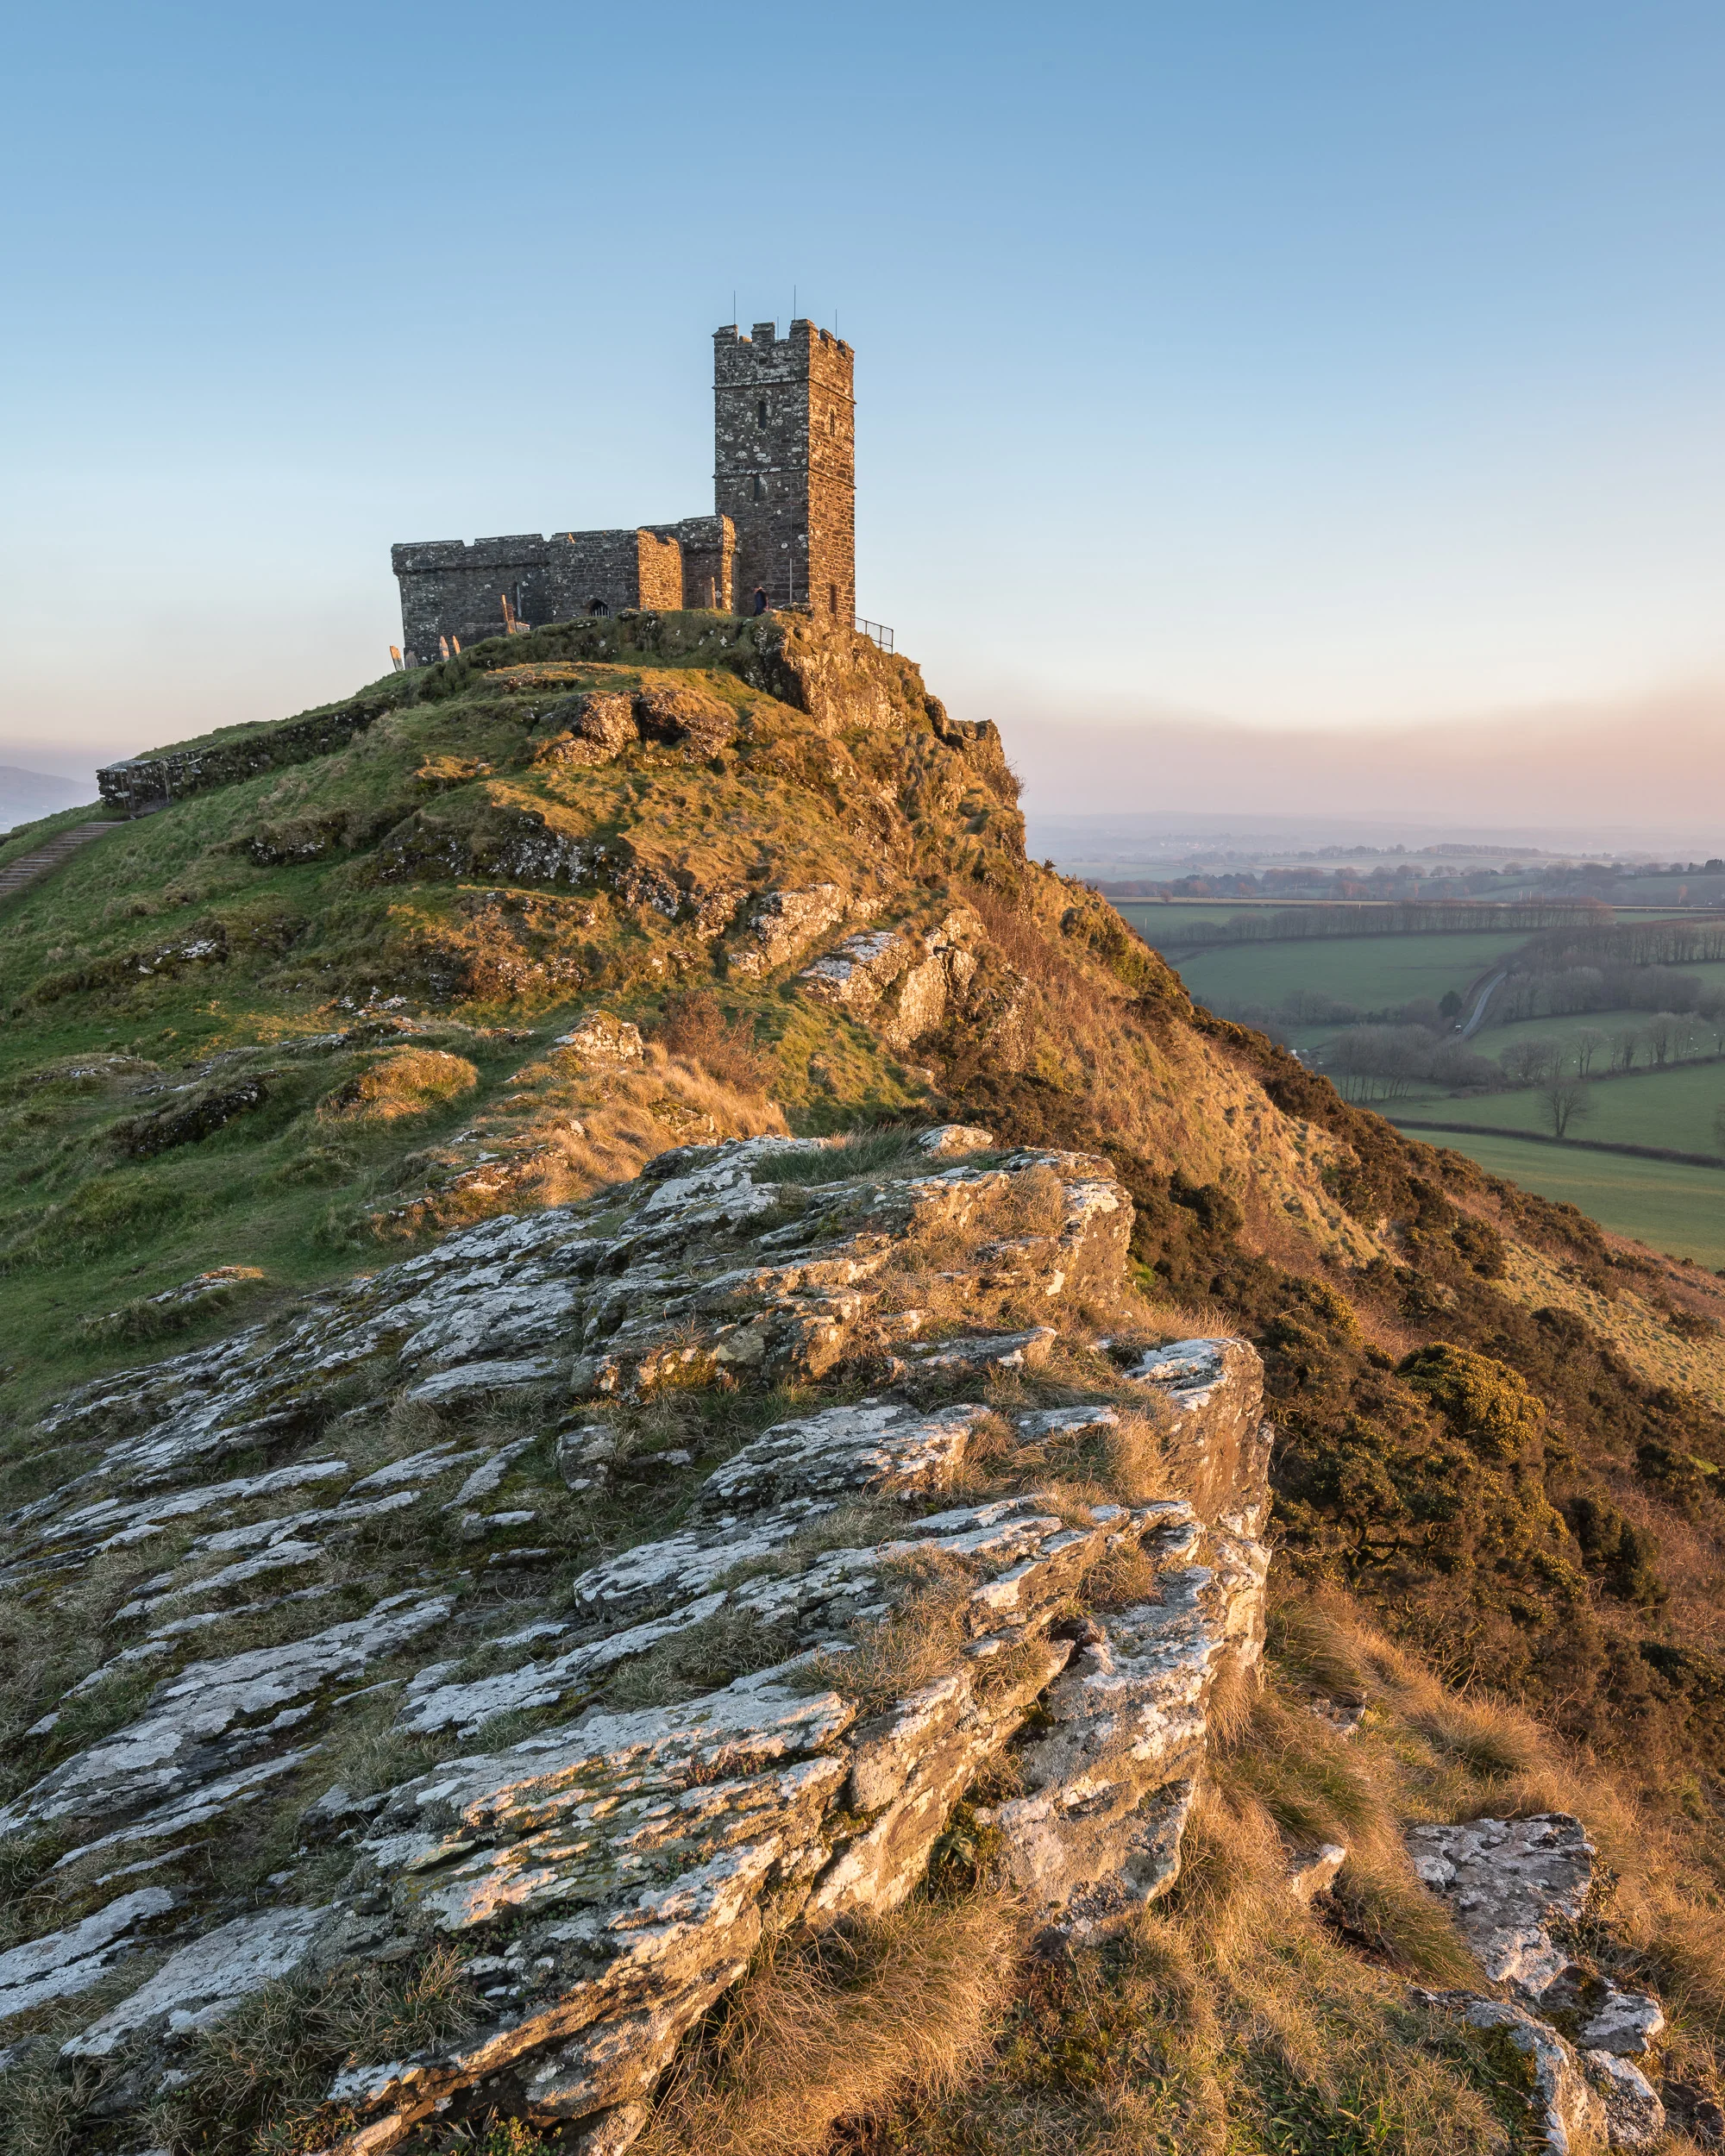
Let's Go Back To Brentor
It's rare that I have a Saturday afternoon available for photography so when one did present itself a few weeks ago, I wasn't going to let it slip by. Even if the weather conditions weren't necessarily going to be great. Though the setting sun was in a direction that would give me good light on the church, the skies were going to be very clear. However, one of the things I've learnt over the years is to take some weather forecasts with a pinch of salt. But would I get an epic sunrise like I did on my last visit to Brentor?
Most of my trips out with the camera are a bit last minute. This makes it difficult to make arrangements to meet up with fellow photographers. So when friend and fellow photographer Andy Hobbs said he could join me on my trip to Dartmoor I was delighted to have the company.
Things I love About the D850

It's me doing some filming. A rare behind the scenes shot taken by Andy.
One of my goals of going to Brentor Chruch was to shot my video called 8 Things I Love About the Nikon D850. If you click on that link you'll see I have indeed published that video but you'll also see it certainly isn't filmed at Brentor.
My plan for Brentor was fairly straightforward. I would arrive a couple of hours before sunset, do some filming, and then capture a great sunset. What could go wrong?
When we arrived we found we had the best spot to shoot Brentor to ourselves. This is rare, especially for a Saturday. However, the skies were very clear and while this makes it all look very lovely, it is a bit of a nightmare for photography and for video because of the high contrast of bright and shadow areas. Then there was the cold. Brentor is notorious for being windy and cold.

When my hands were warm I was happy to double check the audio. Thanks again to Andy for the BTS shot.
The filming started off OK, and it was really great having Andy there to help out, but sometimes you just can't find your mojo. Maybe it was the strong light from the sun or just the cold wind, but it just seemed to take me an age to get into my stride.
While I managed to get all the scenes shot for the video, I, unfortunately, skipped a few steps that I would normally take to ensure certain things have worked correctly. When I later got home and went to edit the video I noticed that some of the clips shot towards the end had no audio. What probably had happened is that as I got colder I probably didn't rigorously check things after and it appeared that I had disconnected the mic from the audio recorder.
This failure to check my recordings, something I normally always do, resulted in the entire video shoot being scrubbed. To be honest, I also don't think it was my best time behind the camera so in some respects I was happy to shoot it again in a few days time at a different location.
The Photographs
Shooting that video was only half the purpose of the trip. Of course, I wanted to get some good landscape photographs as well. Unfortunately, the sunset wasn't the best I'd seen at Brentor, but we still got some nice light.
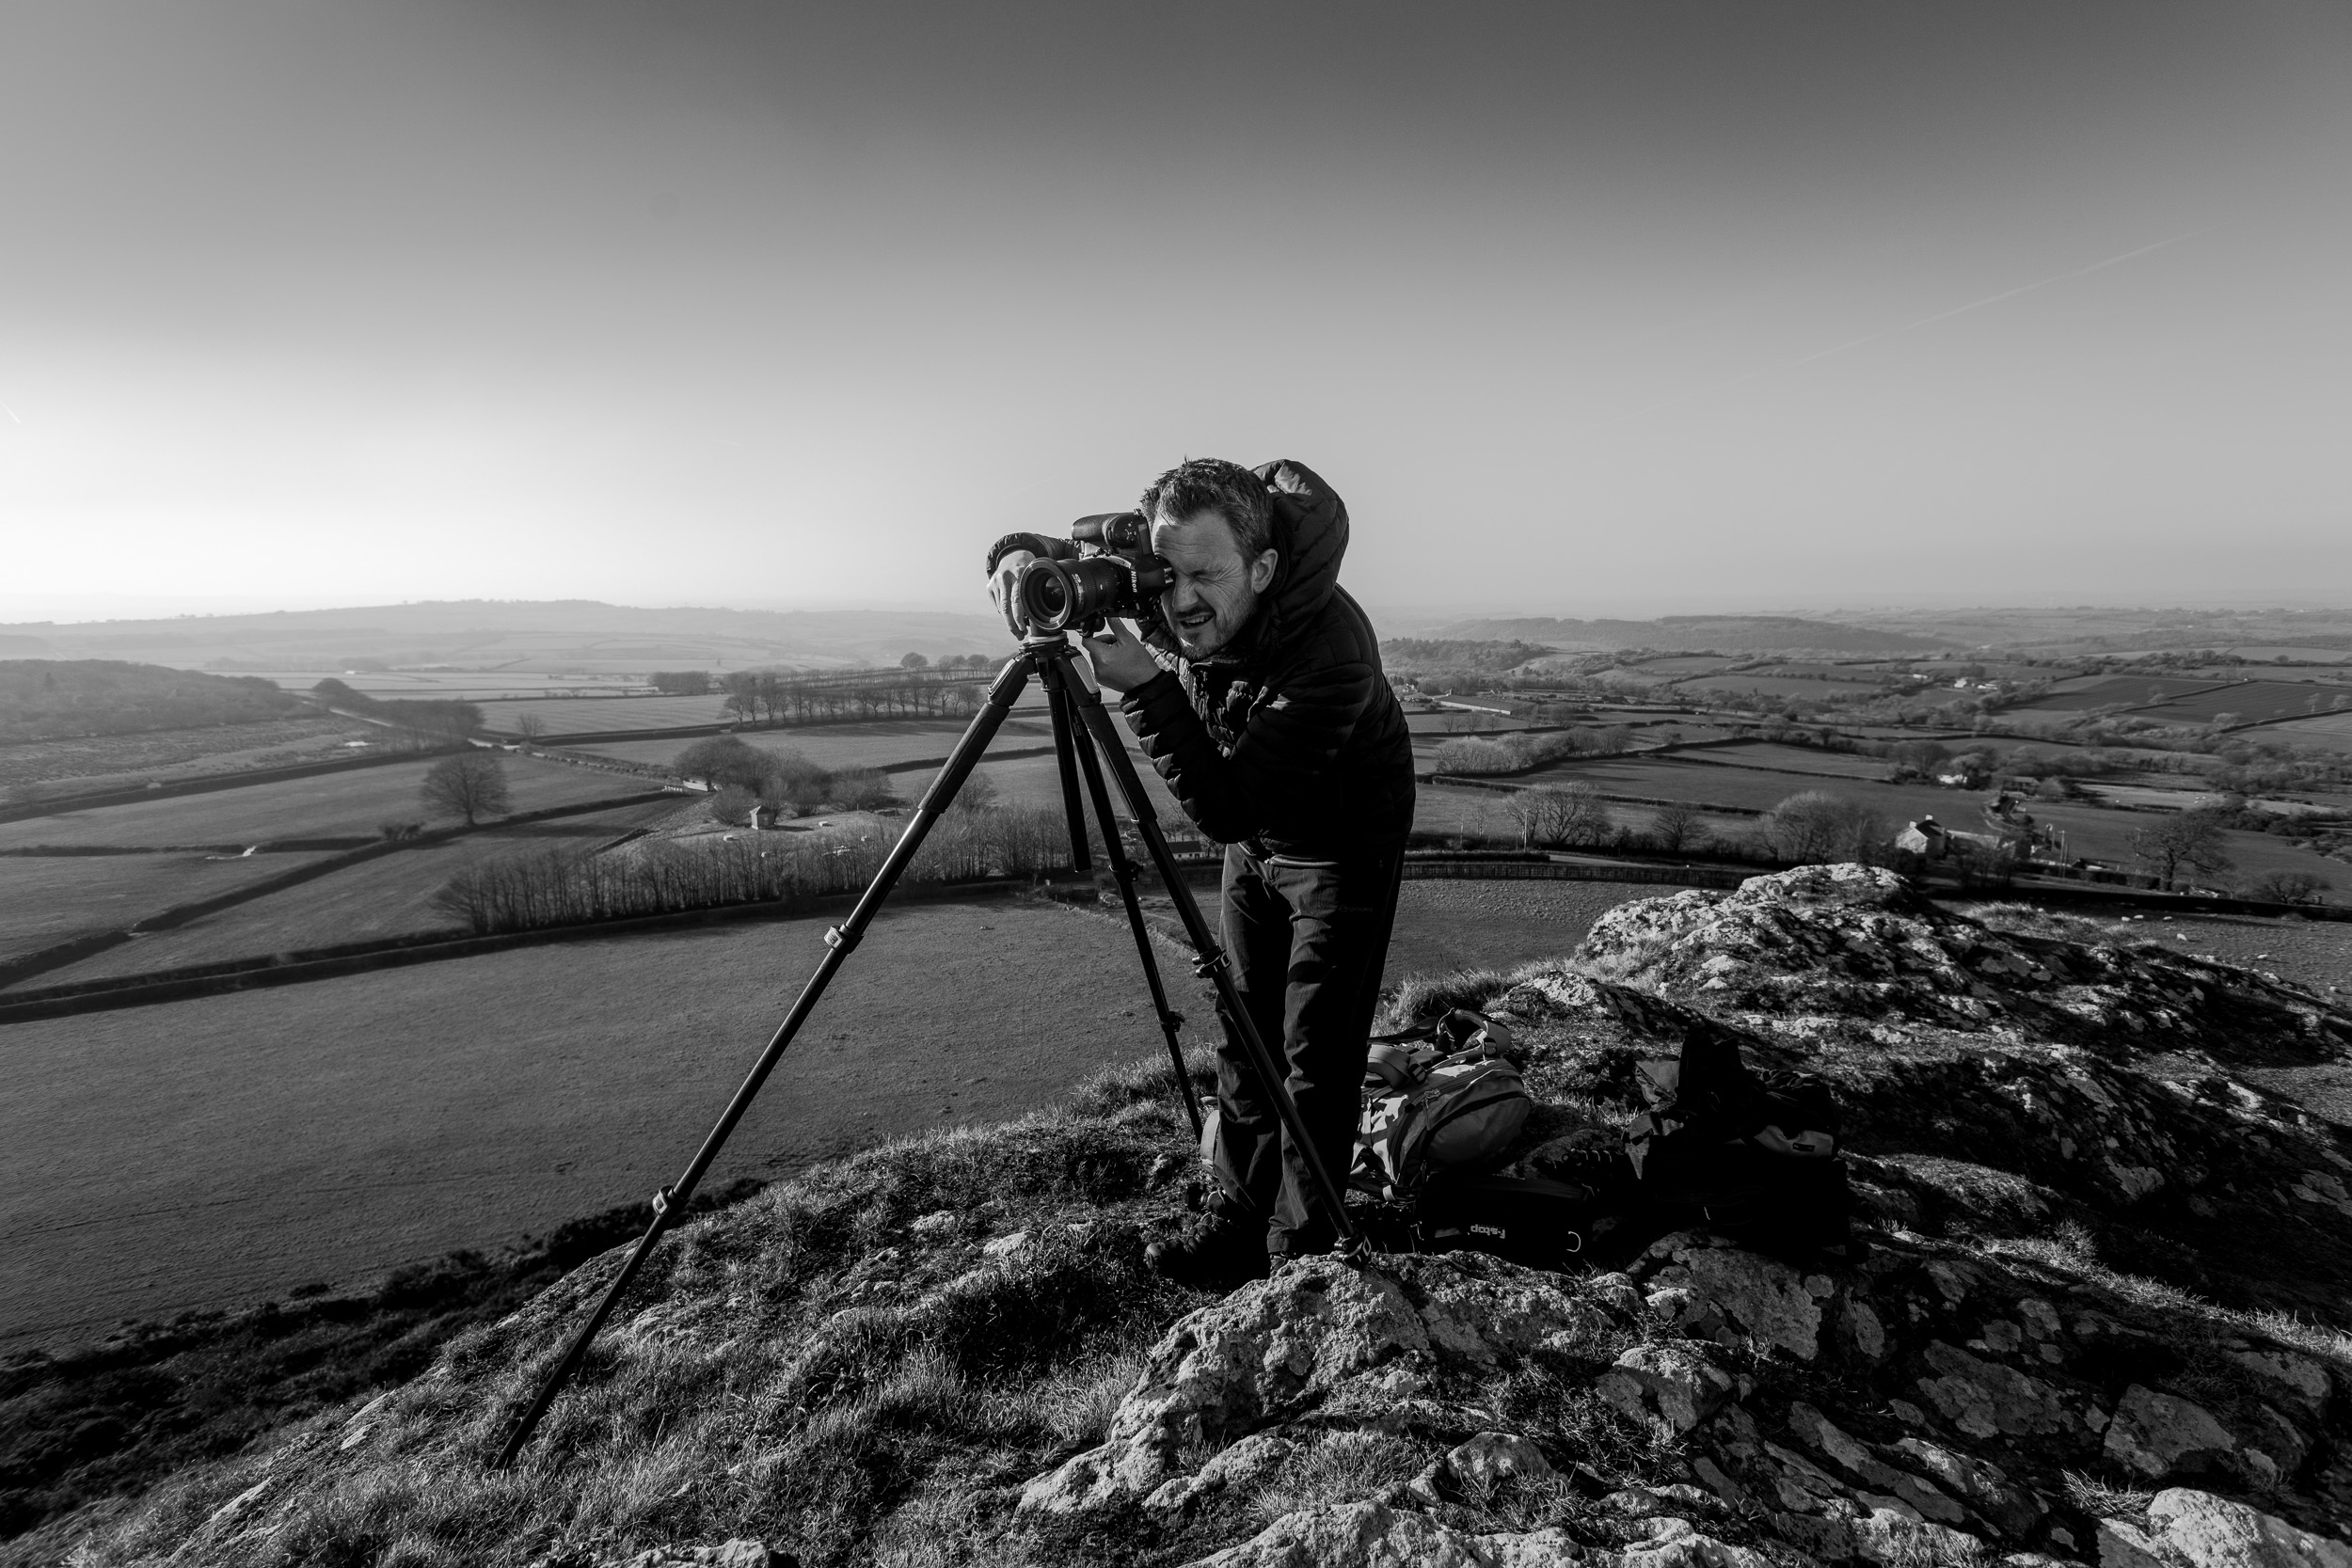
Filming was done, it was time to move onto capturing some still images. Thanks again to Andy for the BTS shot.
I took a couple of frames and I even tried out the focus shift feature of the D850 for the first time. I did a very rough focus stack in Photoshop, and while the image could do with a bit more finesse, it is clear the image has better sharpness from back to front than from the single frame.
Nikon D850, Nikkor 16-35mm f/4 at 23mm, ISO 64, 1/13th sec at f/13 - single image
Nikon D850, Nikkor 16-35mm f/4 at 21mm, ISO 64, 1/6th sec at f/4.6 - focus stacked
Despite the failed video and the lack of interest in the sky for the pictures, it was still time well spent out with the camera. It was great chatting with Andy and we had a great laugh. There might even be some funny video outtakes that I might publish one day!
So have you ever had things go wrong on a shoot? What's your worst disaster? Let me know in the comments below.

Amazing Light at Brentor Church
In the blog this week I tell about how I was treated to a spectacular sunset at Brentor Church!
Finally, decent light!
For those of you who read my blog on a regular basis, you will know that I've not been the happiest of photographers recently. Despite being the very proud owner of a new Nikon D850, I've not been having much luck with the weather recently. This has played havoc with my creative adventures! However, this all changed a couple of weeks ago when I visited Brentor Church and I was treated to an epic sunset.
The night before I visited Brentor Church on Dartmoor, I also visited another Dartmoor location, Honeybag Tor. It was one of those evenings where you think your photographic mojo has completely deserted you. I found myself mumbling "why do I even bother" as I wandered back to the car.
I'm not one to stay down for too long though. The very next morning, armed with a cup of coffee I got back on the computer and started checking the weather forecast for that evening. Best thing to do when you've had a bad trip out with the camera is get back out there and try again. After all, I have talked about the value of practice and perseverance before on this blog. So I took on my own advice and got to planning a trip out with the camera.
I looked at the weather forecast, and even though it was forecast for nearly 80% cloud coverage, thanks to yr.no (a Norwegian weather service), I could see that most of that cloud would be high up. With virtually no lower cloud cover there would be a chance that just around sunset the golden light of the sun would illuminate the underside of that higher cloud.
After a recent visit to Brentor Church, I was keen to revisit this Dartmoor location. So with a good weather forecast, and a wonderful location picked, I set off with a positive, but cautious frame of mind.
What's It Called?
I normally like to share the details of where I've taken a photograph, so I normally try and include a map. While adding the map for Brentor Church below I noticed a couple of things.
The map above refers to Brent Tor, Brentnor, and St Michael's Church. So what is this location called? Well I did a little checking and to give the church its full name it's called The Church of St. Michael de Rupe (St. Michael of the Rock), which is located on Brent Tor, near the villages of Brentor, South Brentor, and North Brentor.
I believe the church is commonly known as Brentor Church. So looking at the Google Map above I can only assume that some of those location spots are user submitted and contain minor errors. Anyway, now we all know what it should be called and how to spell it!
Lost for Words
My plan for Brentor Church was not only to take photographs but to also shoot one of my 5 Minute Photography Adventure videos. However, as I was visiting the location on a Friday evening and the weather forecast was good, I knew there would be a good chance there would be other photographers there. The problem with that is that I just can't seem to present to the camera when someone else is watching! I'm just too self-conscious!
As suspected though, when I arrived, there were already a few photographers there. I told myself to just get on with it and get filming. But I didn't. To be honest, it was nice to keep the video gear in the bag and just chat to some fellow photographers. One of the photographers was from Wales and the other was a local photographer called Lee Smith (check out his work here). Both chaps were excellent company and we got to enjoy a very special sunset together.
Changing Light
Brentor Church, like many locations, benefits greatly from good light. The ideal conditions would be to have a dramatic sky, and the side of the hill and church illuminated by some nice side lighting from a setting sun. The image below gives you a hint of what that might look like.
Nikon D850, Nikkor 16-35mm f/4 @ 18mm, ISO 100, 0.6 sec @ f/13, Lee Filters circular polariser and ND grad.
On the night that I was there, that side lighting didn't last too long. Unfortunately, the sunset behind some distant low cloud. However, in the next photo, you can just about see the sky and clouds starting to change colour.
Nikon D850, Nikkor 16-35mm f/4 @ 22mm, ISO 64, 210 sec @ f/13, Lee Filters circular polariser, Little Stopper and ND grad.
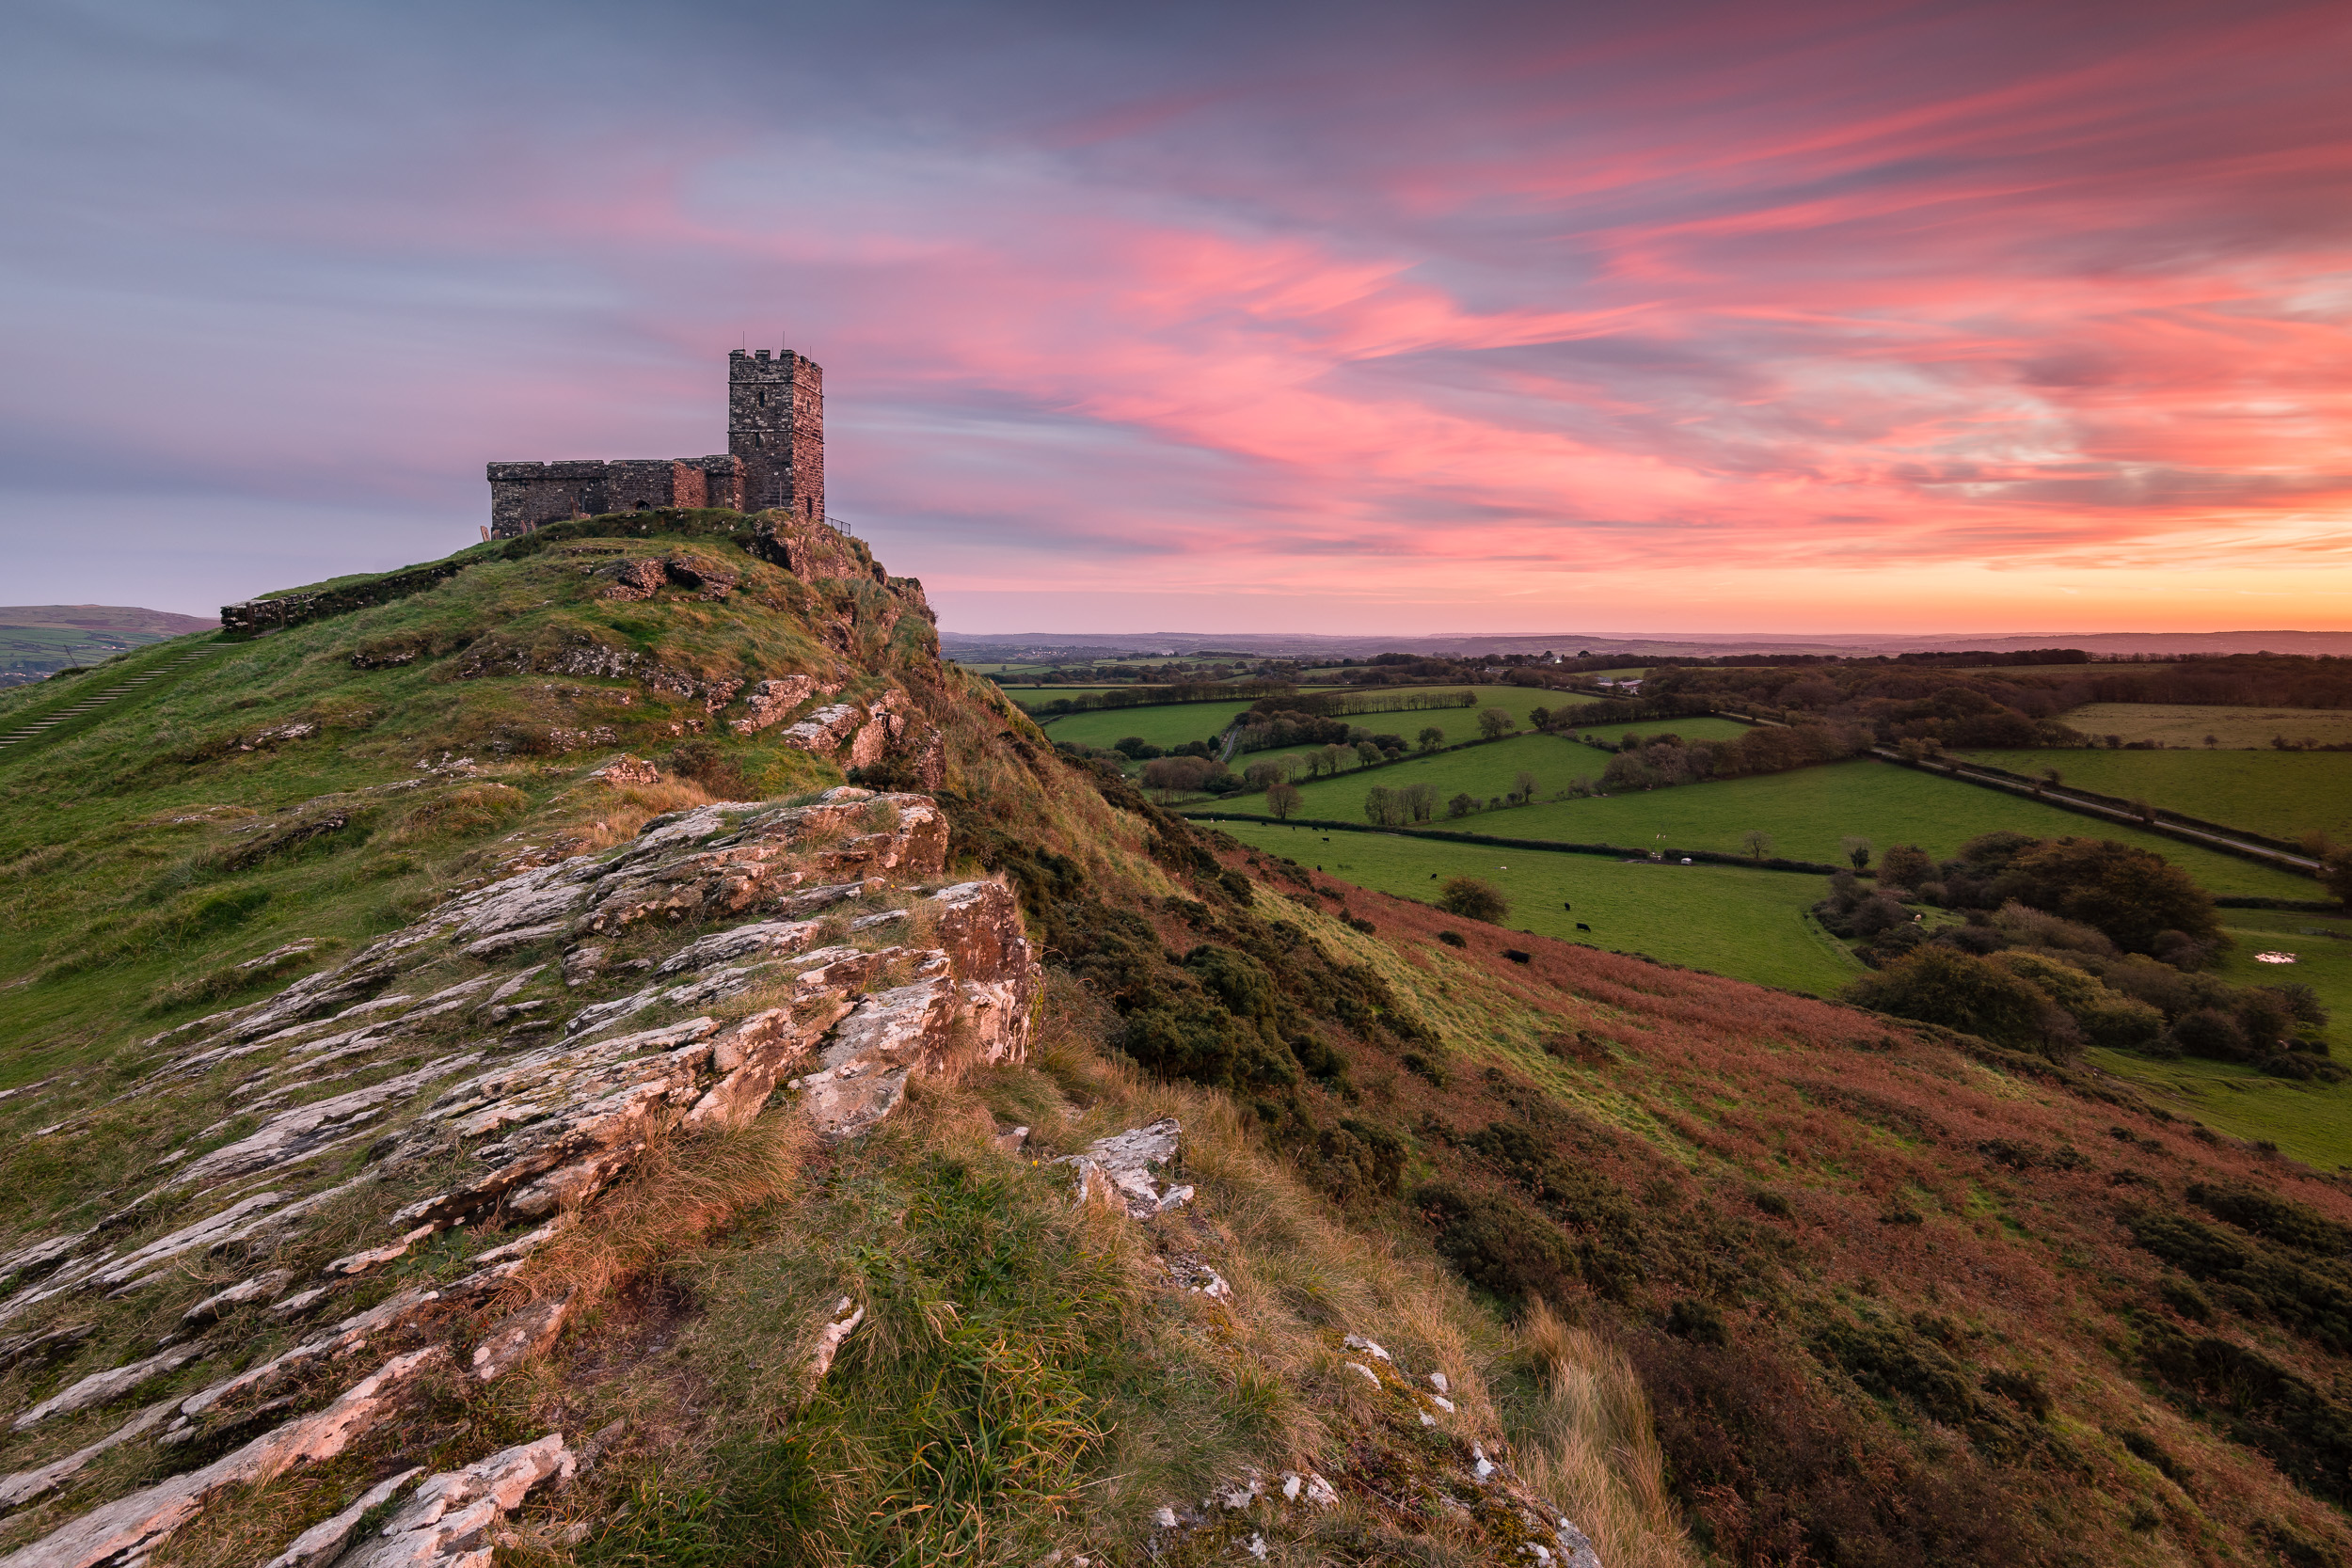
And then, just as the sunset, the sky lit up in spectacular fashion! All of a sudden the sky was full of pinks and blues. This allowed me to capture my favourite image of the night.
Nikon D850, Nikkor 16-35mm f/4 @ 18mm, ISO 100, 5 sec @ f/13, Lee Filters circular polariser and ND grad.
The amazing sky can't have lasted much more than 5 minutes and you can see from the following two photographs how quickly the sky can change in a few minutes. I was glad I was up there early and had everything set up and ready to shoot before the action started.

It was a wonderful evening of photography. Not only did I get some images that I was very happy with but I had a great time chatting with some fellow photographers. I will get that video of Brentor Church done one day. Not that I need an excuse to visit this great location again.
So have you shot Brentor Church before? What was the best sunset you've photographed? Let me know in the comments below.

My Top 5 Tips to Improving Your Landscape Photography
In this blog post I share with you my latest video in which I tell you what my top 5 tips are to improving your landscape photography.
Tips for Landscape Photographers
I've been shooting landscapes since I got my first DSLR back in 2006. However, it's probably only in the last few years that I've started to really progress as a landscape photographer.
In this vlog, I share with you the 5 things I think will help you improve your landscape photography. This is a personal list, and not even necessarily the only 5 things you should do. It's just 5 things that I did that had a direct impact on my landscape photography. Hopefully, some of them will work for you also!

In Summary
I explain the tips in the video, but for those of you who are currently unable to watch the video, the tips are:
Practice - Make sure you practice your photography. Practice lots!
Be Inspired - Have plenty of sources of inspiration!
Get Involved - Go on a workshop or enter for a magazine feature!
Get Sharing - Share your work or enter a competition!
Adventure - Get out there and go on a photography adventure!
And there is a bonus tip, but you'll just have to watch the video for that one!
So do you have any tips you want to share? What things did you do to improve your skills as a photographer? Which of my tips are you going to follow? Let me know in the comments below.

Glencoe Adventure - Part 1, The Workshop
In this first of two special Glencoe blog posts I'll share with you my images and stories from the Dawn 2 Dusk Glencoe workshop that I attended recently. It was a fantastic few days of photography. Though the weather was typically Scottish at times, the variable conditions resulted in some awesome images.
The Importance of Adventure
I have talked about the importance of practising the art of photography on this blog a number of times. For me, and I expect this is the same for many photographers, most of this practice will take place in your own back yard. Not literally of course, but most of the time you are out with a camera it will be in your local area. For me, this is Devon with the occasional visit across the border to Cornwall or Dorset.
While there are many benefits to shooting locally, such as time and familiarity, there is nothing quite like the challenge of pushing the boundaries of your photography by going on an adventure! Adventure means different things to different people, but for me, it's the excitement of travel, of meeting new people and of course photographing something new. All these elements can really push your photography in a way that you sometimes just can't get locally.
Though I have visited Glencoe a number of times and even grew up not far away, this will be my first time in the area as a dedicated photographer. So while the area might be familiar, the prospect of photographing it was exciting, to say the least. Well worth the 3 days off work (plus the weekend) and the 10 hours drive each way!
This week, in the first of two Glencoe blog posts, I will be sharing my memories, thoughts and photographs of the Dawn 2 Dusk Photography Glencoe photography workshop that I attended. Next week, in part 2, I will be sharing the images and video that I took with some of the extra time I had in Glencoe.
Why Workshops are Important
So why didn't I just spend all the time I had in Glencoe doing my own thing? Well, for me at least, workshops provide a number of unique benefits that I can't get by shooting on my own:
Practical and Artistic Development - Tuition is still a big part of my development as a landscape photographer and for the Glencoe workshop, I had access to two of the UK's leading landscape photographers, Ross Hoddinott and Adam Burton. Having access to this level of photographer not only helps with the artistic side of my photography but also with some of the more practical aspects of photography (read how later in the blog post).
Being Social - The life of a landscape photographer can be a solitary existence, especially if you favour early mornings like me. However, every now and again it's just good to be around like-minded individuals. Just by chatting during the day you can not only learn about how your photography looks to others, but also learn from their photography. At night, normally around the bar, it is a great chance to share those funny, odd, or disastrous trips out with the camera.
Local Knowledge - There is only so much planning and preparation you can do on the computer. In order to maximise time with the camera when you arrive at a new location, it's sometimes useful to have access to some local knowledge. For me, workshops provide me with an introduction to the photographic possibilities of an area and while I could do this myself I don't always have the extra time.
So now that we've talked about the importance of adventure and the value in workshops, let's get into the most important aspects of this adventure, the photographs!
Day 1: Castle Stalker
The 2.5-day workshop started with a briefing at our base of the Clachaig Inn just outside Glencoe village. Adam and Ross managed to suitably embarrass me by remembering my birthday with a chocolate cake and singing happy birthday! After the very sociable start of coffee and cake, we all headed down for a sunset shoot at Castle Stalker on Loch Linnhe.
Nikon D750, Nikkor 70-200mm f/2.8, @ 200mm, f/8, 1/60th second, ISO 100, Lee Filters ND Grad, 16:9 crop.
As you can see from the shot above, the descending sun illuminates the side of the castle rather nicely. I was hoping to get a similar shot to this with water surrounding the island, but as the tide came in the light became flat thanks to some heavy cloud where the sun was setting.
It was still a good start to the workshop and we all headed back to the hotel for some well-earned food and drinks.
Day 2: Lochan na Fola and Stob nan Cabar
As you might expect with a landscape photography workshop it was an early start to the 2nd day. Fortunately, the drive to our next location of Lochan na Fola wasn't far from our hotel so the alarm call wasn't too early.
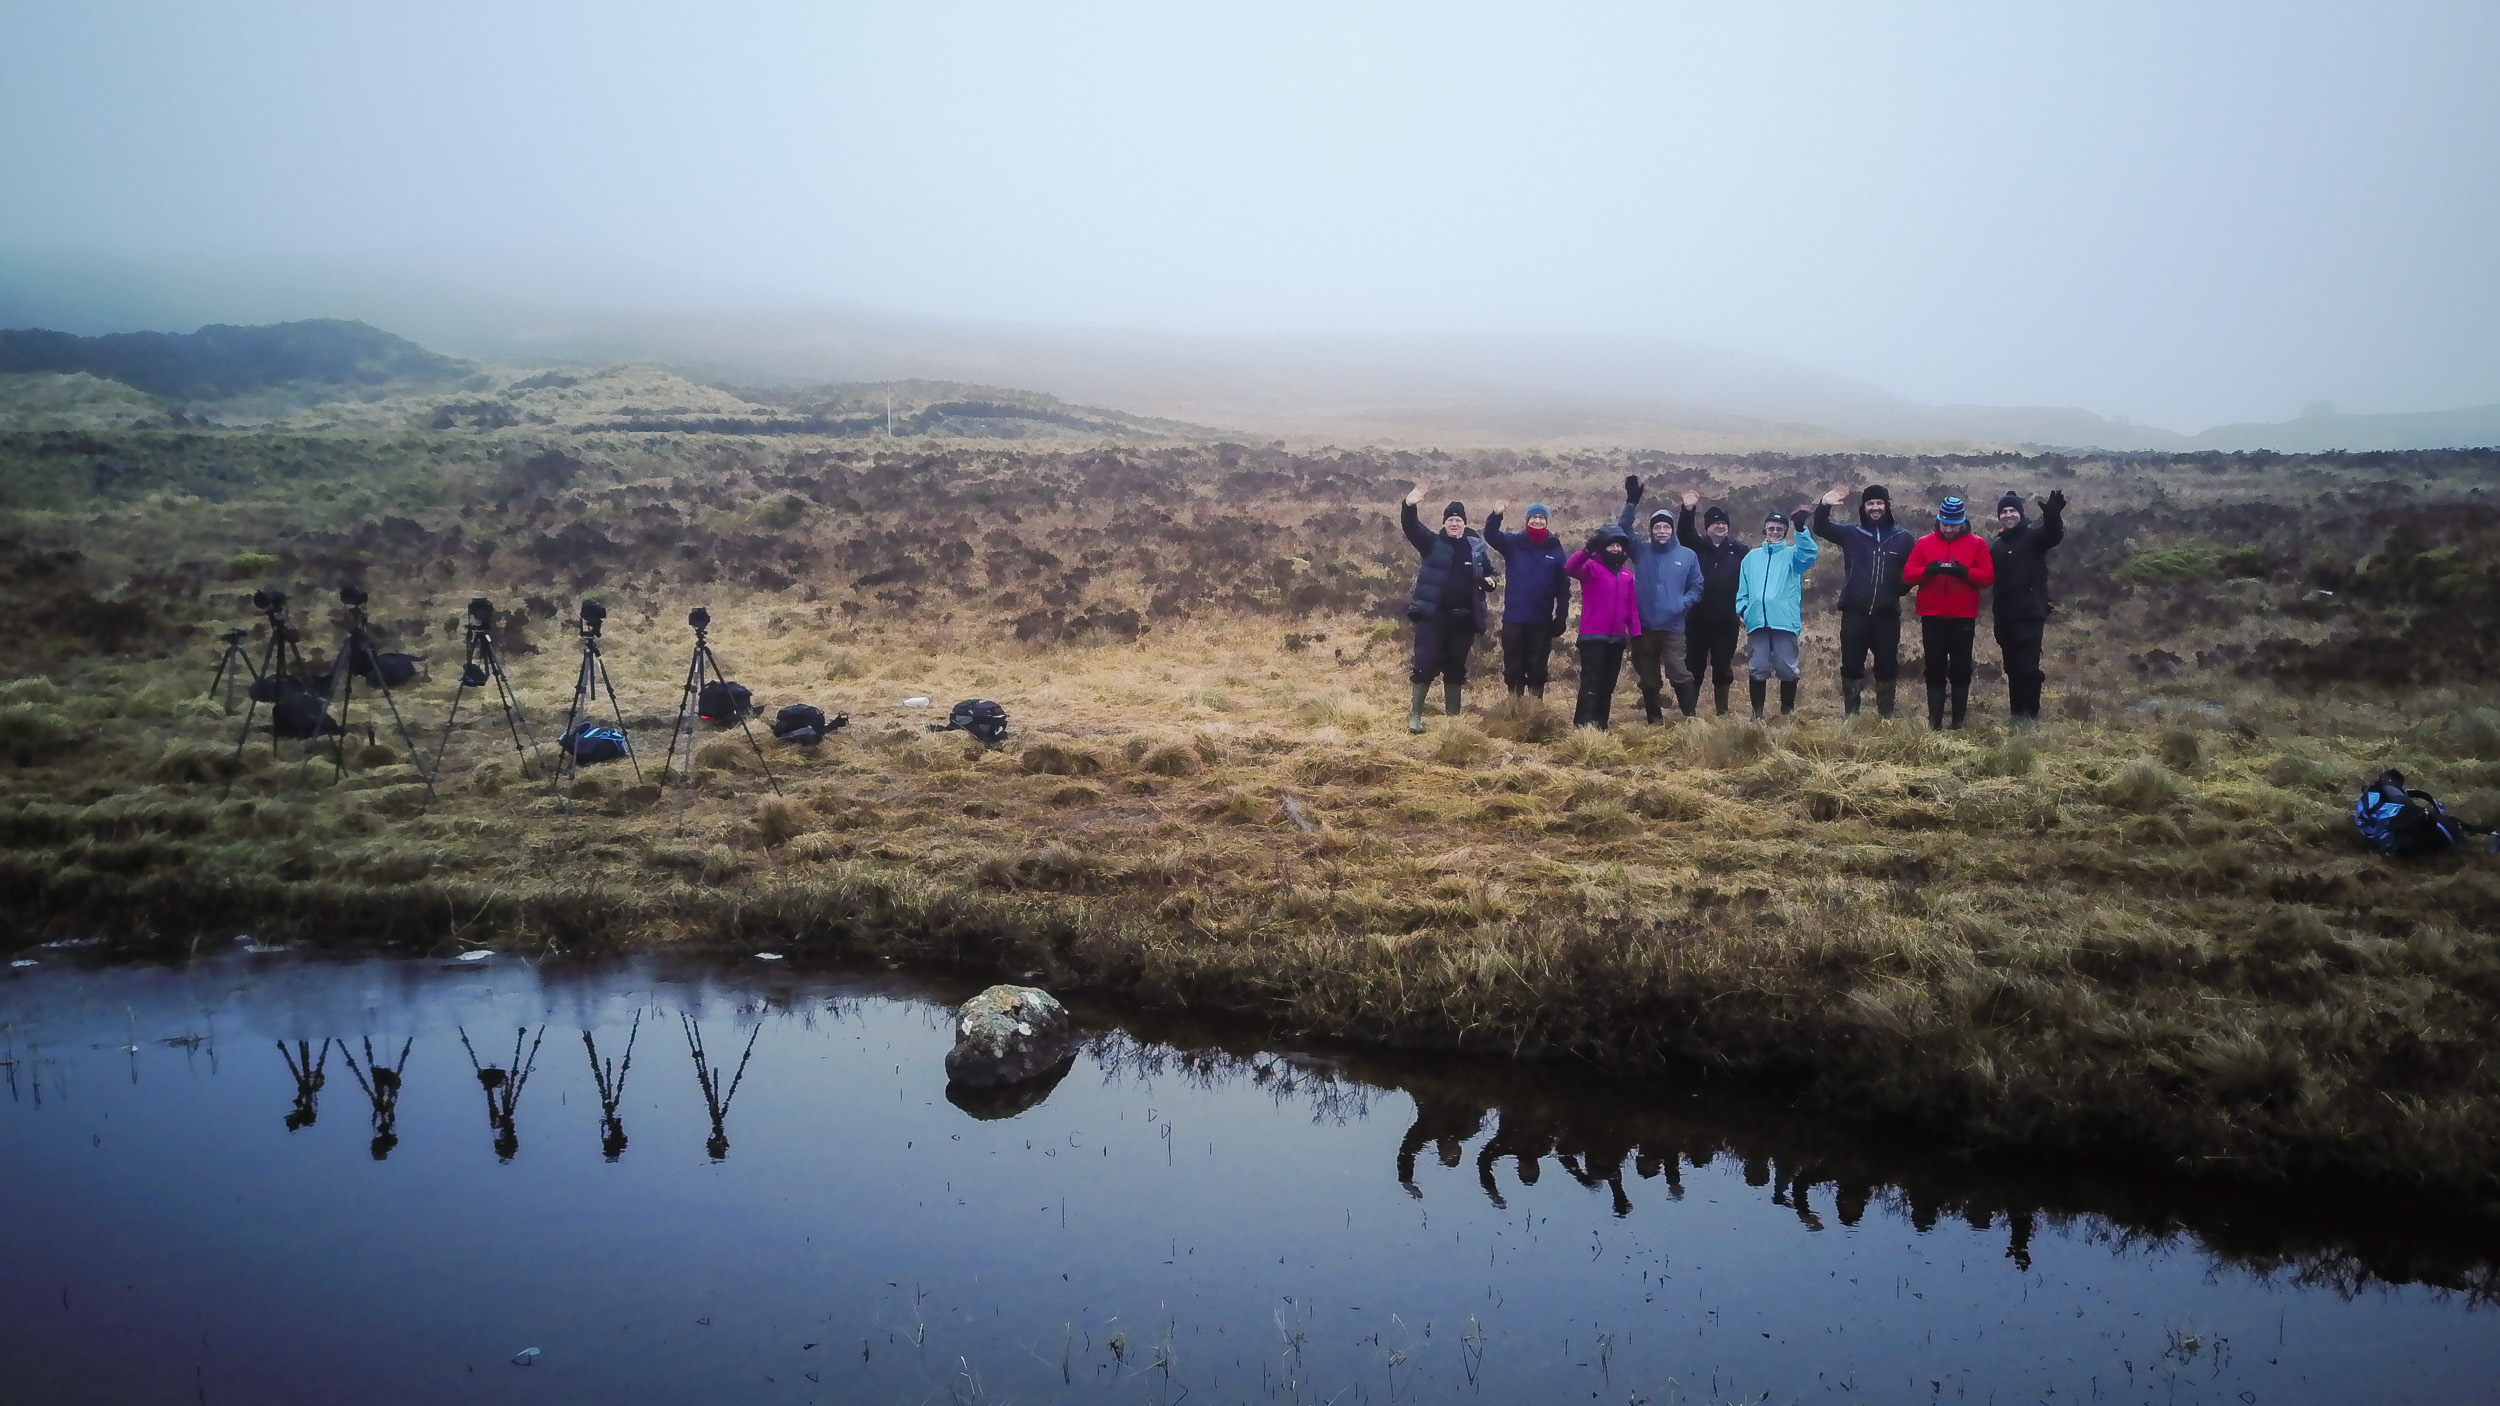
When we arrived at Lochan na Fola the water was beautifully still giving us some wonderful reflections of Stob nan Cabar. Just as we setup though some cloud rolled in blocking the view of the mountain. As we waited I decided to try out my new drone the DJI Mavic Pro. The arrival of the drone caused a bit of excitement amongst the group as I demonstrated some of its capabilities. While I couldn't get find a gap in the cloud to fly a little higher, I did get the chance to grab a quick group shot.
We didn't have to wait to long for the cloud to clear though and all of sudden it was battle stations as we were presented with some truly epic scenes!
Nikon D750, Nikkor 16-35mm f/4 @ 18mm, f/11, 1/20th second, ISO 100, Lee Filters Circular Polariser.
Nikon D750, Nikkor 16-35mm f/4 @ 26mm, f/11, 1/20th second, ISO 100, Lee Filters Circular Polariser.
I can't decide which of the two images above I like the most. Both of them greatly appeal to me with their near perfect reflections and frosty reeds in the chilly lochan. It would have been so easy just to go back to the hotel and have an early breakfast when the cloud came in, but everyone was glad they stuck it out.
Day 2: Lochan na h-Achlaise and Loch Ba
After a very successful morning and a big Scottish breakfast, we headed up to Lochan na h-Achlaise. Shooting around midday is always challenging though and coupled with the bright blue sky I did struggle a little bit to get some images.
However, by exploring along the shore line of Lochan na h-Achlaise I did find this interesting composition.
Nikon D750, Nikkor 24-70 f/2.8 @ 34mm, f/13, 30 seconds, ISO 100, Lee Filters Circular Polariser and Big Stopper.
Exploring just a little further I found this scene just off the road at Loch Ba. This is a more pleasing image thanks to the horseshoe arrangement of the foreground rocks and the reflection of the mountain in the water.
Nikon D750, Nikkor 24-70 f/2.8 @ 40mm, f/13, 2.5 seconds, ISO 100, Lee Filters Circular Polariser and Little Stopper.
I also had just enough time to try and capture a panorama of the area using my DJI Mavic Pro.
DJI Mavic Pro - 7 images stitched and processed in Lightroom.
Day 2: Blackrock Cottage
Blackrock Cottage is probably one of the most photographed locations on Glencoe, but it would have somehow seemed rude not to photograph it. After all, we were passing it on our way to get coffee from the cafe at the ski centre.
I rarely convert to black and white but in this case, the image seemed to work better without colour. The texture on the mountain (Buachaille Etive Mor) really stands out.
Nikon D750, Nikkor 24-70mm f/2.8 @ 62mm, f/11, 1/25th second, ISO 100.
Day 2: Glen Etive
Towards the end of day 2, we headed down the long and windy road of Glen Etive towards the head of Loch Etive. Here the stunning mountains reach right down into the sea loch and it's an ideal location for capturing the last light as it touches the tops of the mountains.
As I waited for the light I was still able to capture some striking images of the north east shore of Loch Etive.
Nikon D750, Nikkor 24-70mm f/2.8 @ 26mm, f/11, 198 seconds, ISO 100, Lee Filters Big Stopper, ND Grad and Circular Polariser.
As I've written on this blog before it's always important to see what is going on behind you. It appeared that the sun was shining on the mountains diretly behind me!
Nikon D750, Nikkor 70-200mm f/2.8 @ 150mm, f/8, 1/5th second, ISO 100, Lee Filters Big ND Grad.
In my hurry to get to the head of the loch to capture last night on the mountains I completely missed another great composition. It wasn't until I was heading back to the car that I found a few of my fellow photographers shooting this interesting scene.
Nikon D750, Nikkor 16-35mm f/4 @ 19mm, f/11, 20 seconds, ISO 100, Lee Filters Circular Polariser and ND Grad.
I had actually walked by this location in my hurry to get to the head of the loch. Perhaps I should have taken just a little more time to explore this area before settling into my chosen location.
Day 2 was certainly a busy one. Would day 3 be just as good?
Day 3: The Study
After the successes of day 2, the weather had a change of heart and went typically Scottish. Lots of low clouds, and lots of rain. Our initial plan was to do a pre-breakfast shoot of Buachaille Etive Mor. We would go down to the river Coupall to shoot the waterfalls with the mountain in the background. Only trouble was you couldn't see the mountain or anything really. Reluctantly we headed back for an early breakfast and discuss our next move.
With the weather forecast predicting a stop to the rain, our tutors suggested we shoot from The Study, a slightly elevated viewpoint with excellent views of the mountains (The Three Sisters). Sure enough, the rain stopped and we were back in business.
I don't often shoot panoramas but this viewpoint seemed like the ideal location to do so. Fortunately, Adam Burton was on hand to give me some excellent tuition on how to setup the tripod correctly and the best way to rotate the camera. Taking my new found knowledge I managed to capture this image of The Three Sisters.
Nikon D750, Nikkor 24-70mm f/2.8 @ 24mm, f/11, 1/100th second, 10 vertical images stiched and processed in Lightroom CC.
I then decided to opt for a much tighter composition giving me one of my favourite images from the workshop.
Nikon D750, Nikkor 70-200mm f/2.8 @ 90mm, f/11, 1/40th second, ISO 100, Lee Filters ND Grad.
Day 3: Stob Dearg and the River Coupall
There is no doubt that this location has been photographed a lot. However, that doesn't make it any less worth shooting. There are always new compositions to be had, different weather conditions to manage and personal style to put into an image.
The key element for this location is a visible Stob Dearg (Buachaille Etive Mor), something that was missing that afternoon. This made my decision a couple of days earlier not to photograph this very scene because "I'll be back in a couple of days", even more heartbreaking.
However, with probably an unjustified amount of optimism, I put on my wellington boots, got into the river and set up my shot. All I needed was for the cloud to clear from the mountain. So I waited, and waited, and waited. It came so very close to being completely clear, but as the sky darkened I knew it wasn't going to happen.
Though you can't see the whole of the mountain in this image, I still like the end result.
Nikon D750, Nikkor 16-35mm f/4 @ 19mm, f/13, 0.8 seconds, ISO 100, Lee Filters Circular Polariser and 0.3 ND Grad.
Though it had been a challenging day with the weather, it was still a successful day out with the camera.
Workshop Summary
At the start of this blog post, I mentioned the three things that I look for on a workshop; personal development as a photographer, social interaction, and local knowledge.
There is no doubt that my artistic eye has developed a little bit more and that I'm now better prepared to shoot panoramas. I also got to spend a couple of days with a great group of people who shared my passion for landscape photography. We all shared some great stories in the bar! And finally, thanks to some excellent planning and local knowledge, the weather and conditions rarely caused a problem with the flexible itinerary.
I've come away with some great images and some even better memories, so it was definitely worth a few days off work and a very long drive!
In Part 2...
In part 2 of my Glencoe Adventure blog post, I will tell you about the images I took during the spare 24 hrs I had before the workshop started, including a video of my very early and snowy ascent of Beinn a'Chrulaiste!

Landscape Photography from the Air
In this blog post I discuss how I try and integrate my passions for photography and flying.
The dream of flying
I was 24 years old when I first got on a plane for a work trip to London. It was a bit of an eye opening experience for me. Less than twelve months later though I was backpacking around Australia. One thing was for sure, I didn't have a fear of flying.
In 2004 I decided that I wanted to learn how to fly a plane for myself. So I joined my local flying club in Glasgow and so started a rather long, and expensive, journey to getting my Private Pilots License (PPL). I found the course challenging but some of my training flights took me over some of the most amazing scenery Scotland has to offer so it was also very rewarding.

Flying over the house where I grew up in the Highlands.
About the same time I started flying I also took up hill walking (I had so much more free time back then). As a result I was really beginning to build up an appreciation for the landscape around me. I was seeing it from so many different perspectives. With so much to see I also decided that I would take up landscape photography (I definitely had way more time back then).
A 3000 ft view
It wasn't until I moved to Devon that I completed my PPL training. Though Devon has a distinct lack of mountains it still offers some of the countries most dramatic landscapes. Though I was shooting landscape mostly on the ground, my flights over Devon and beyond opened my eyes to whole different view point.
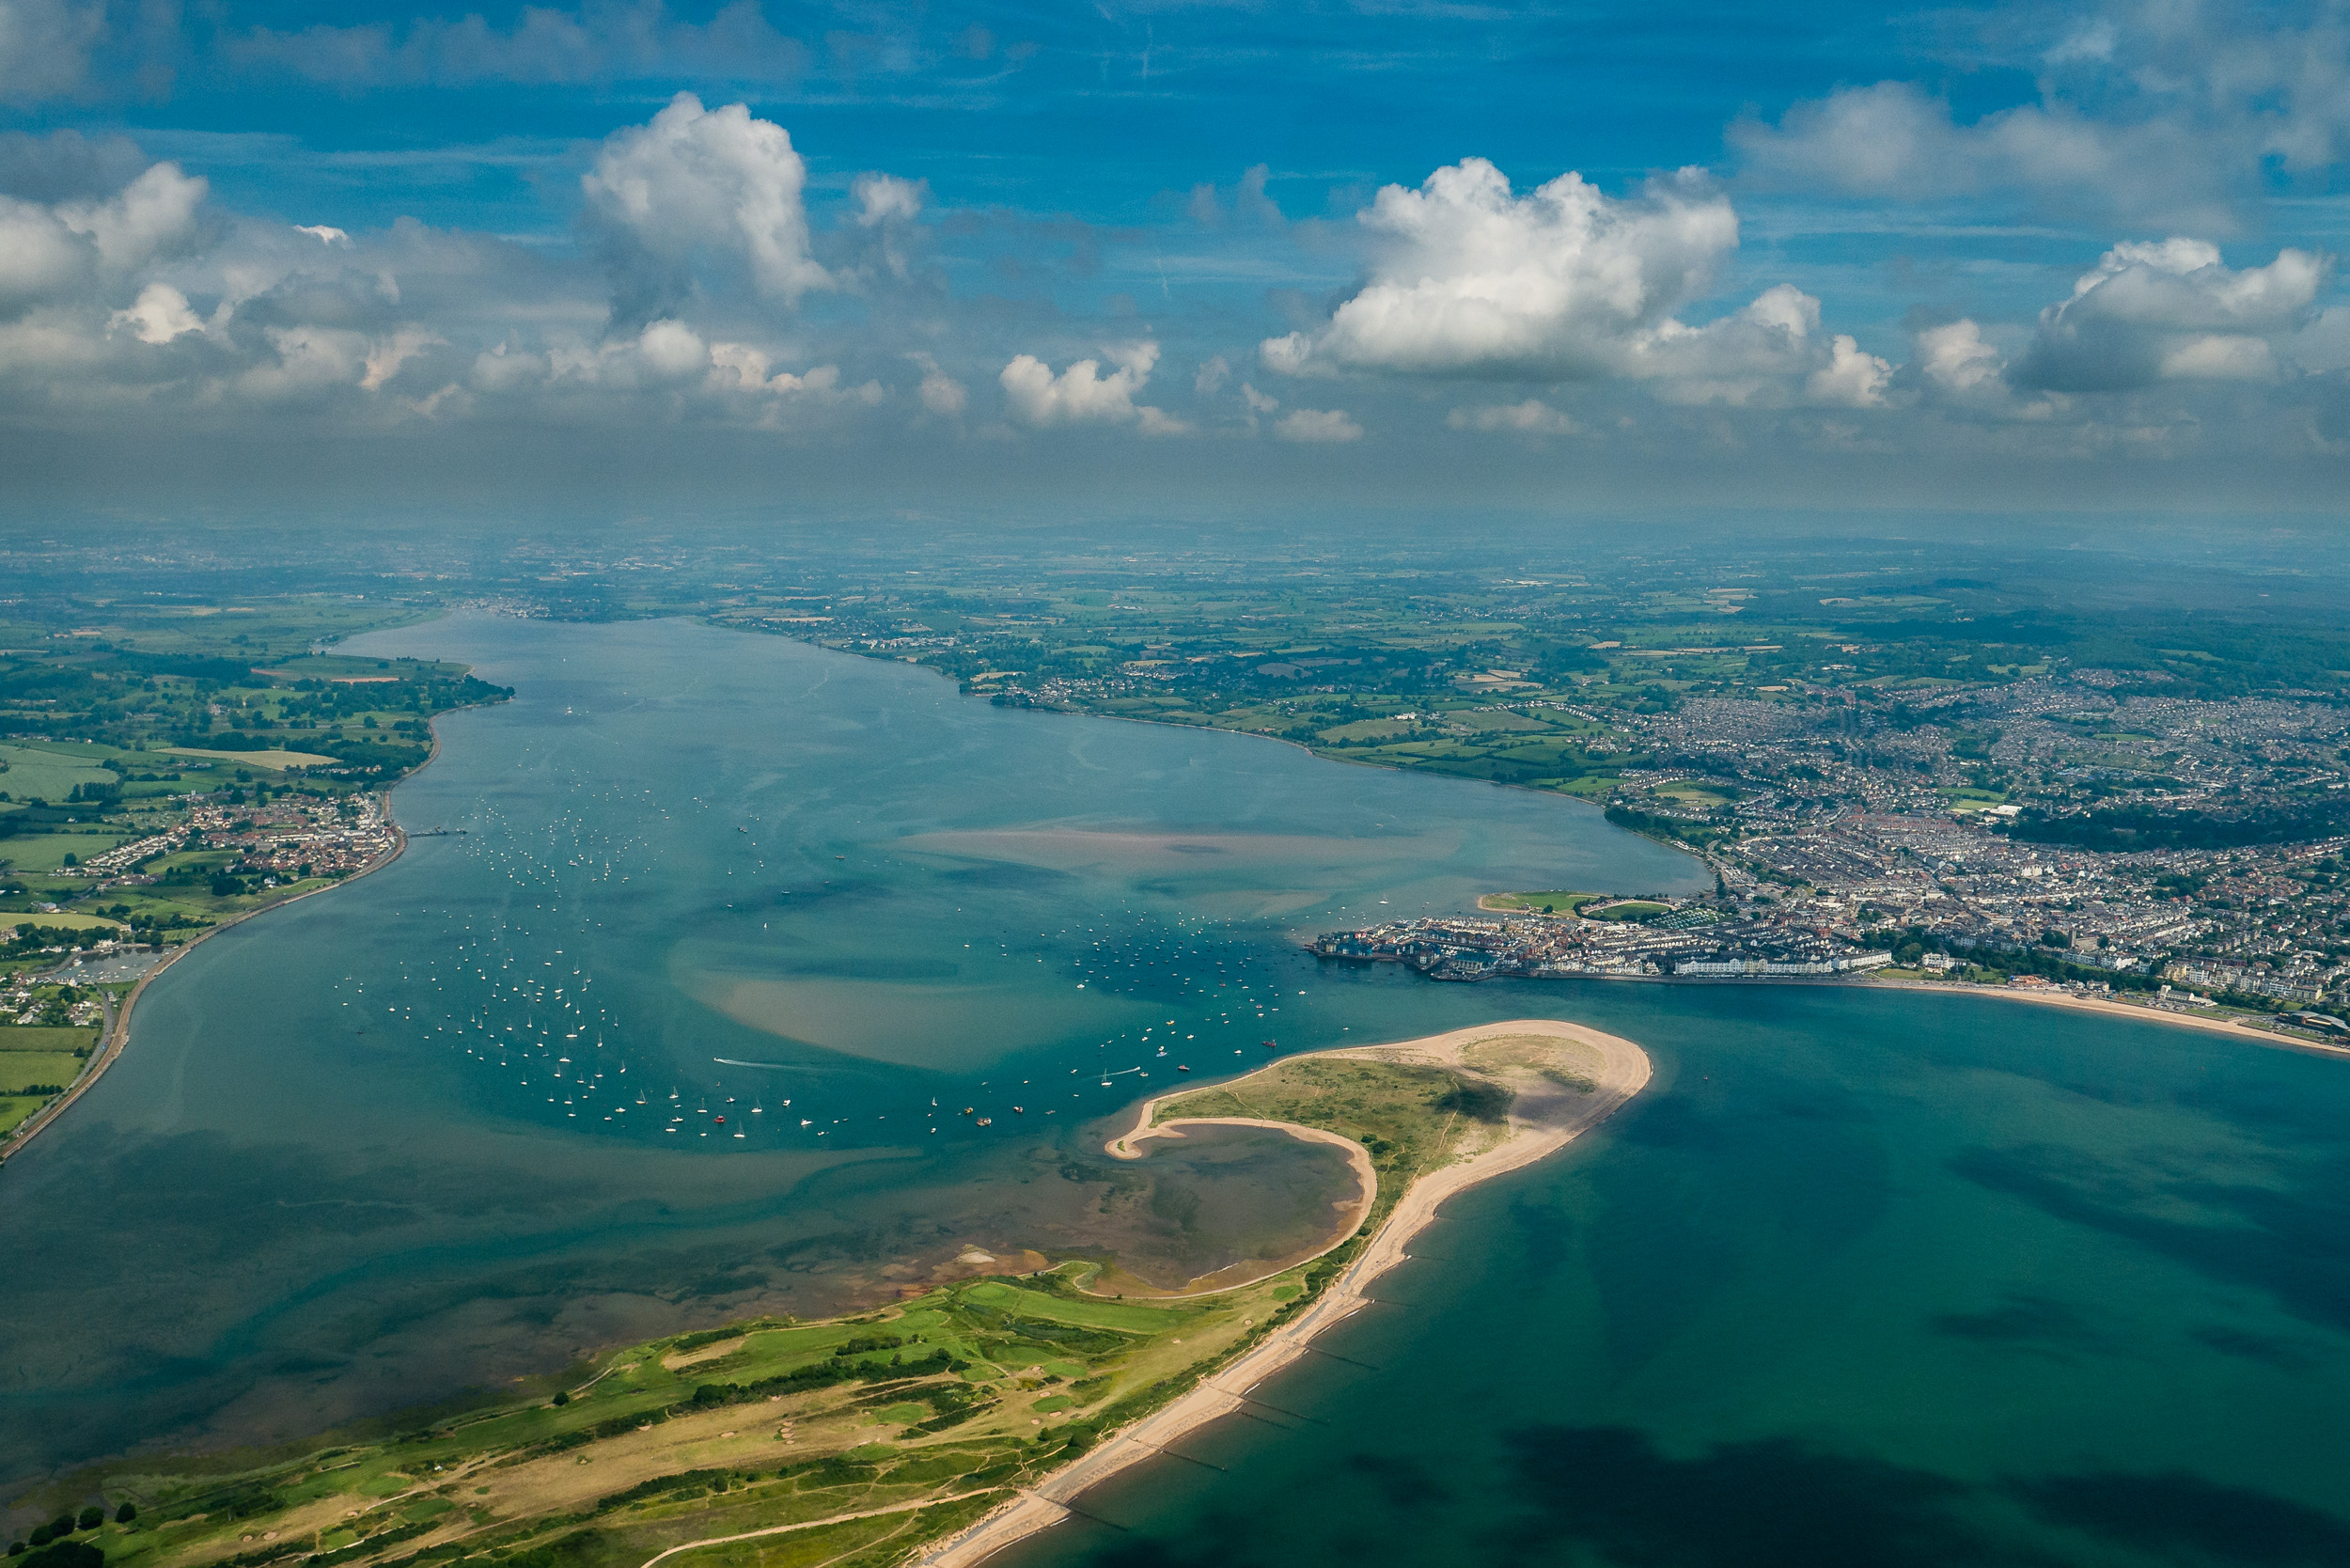
I've photographed the beach at Dawlish Warren a lot, but it's just as amazing from the sky.
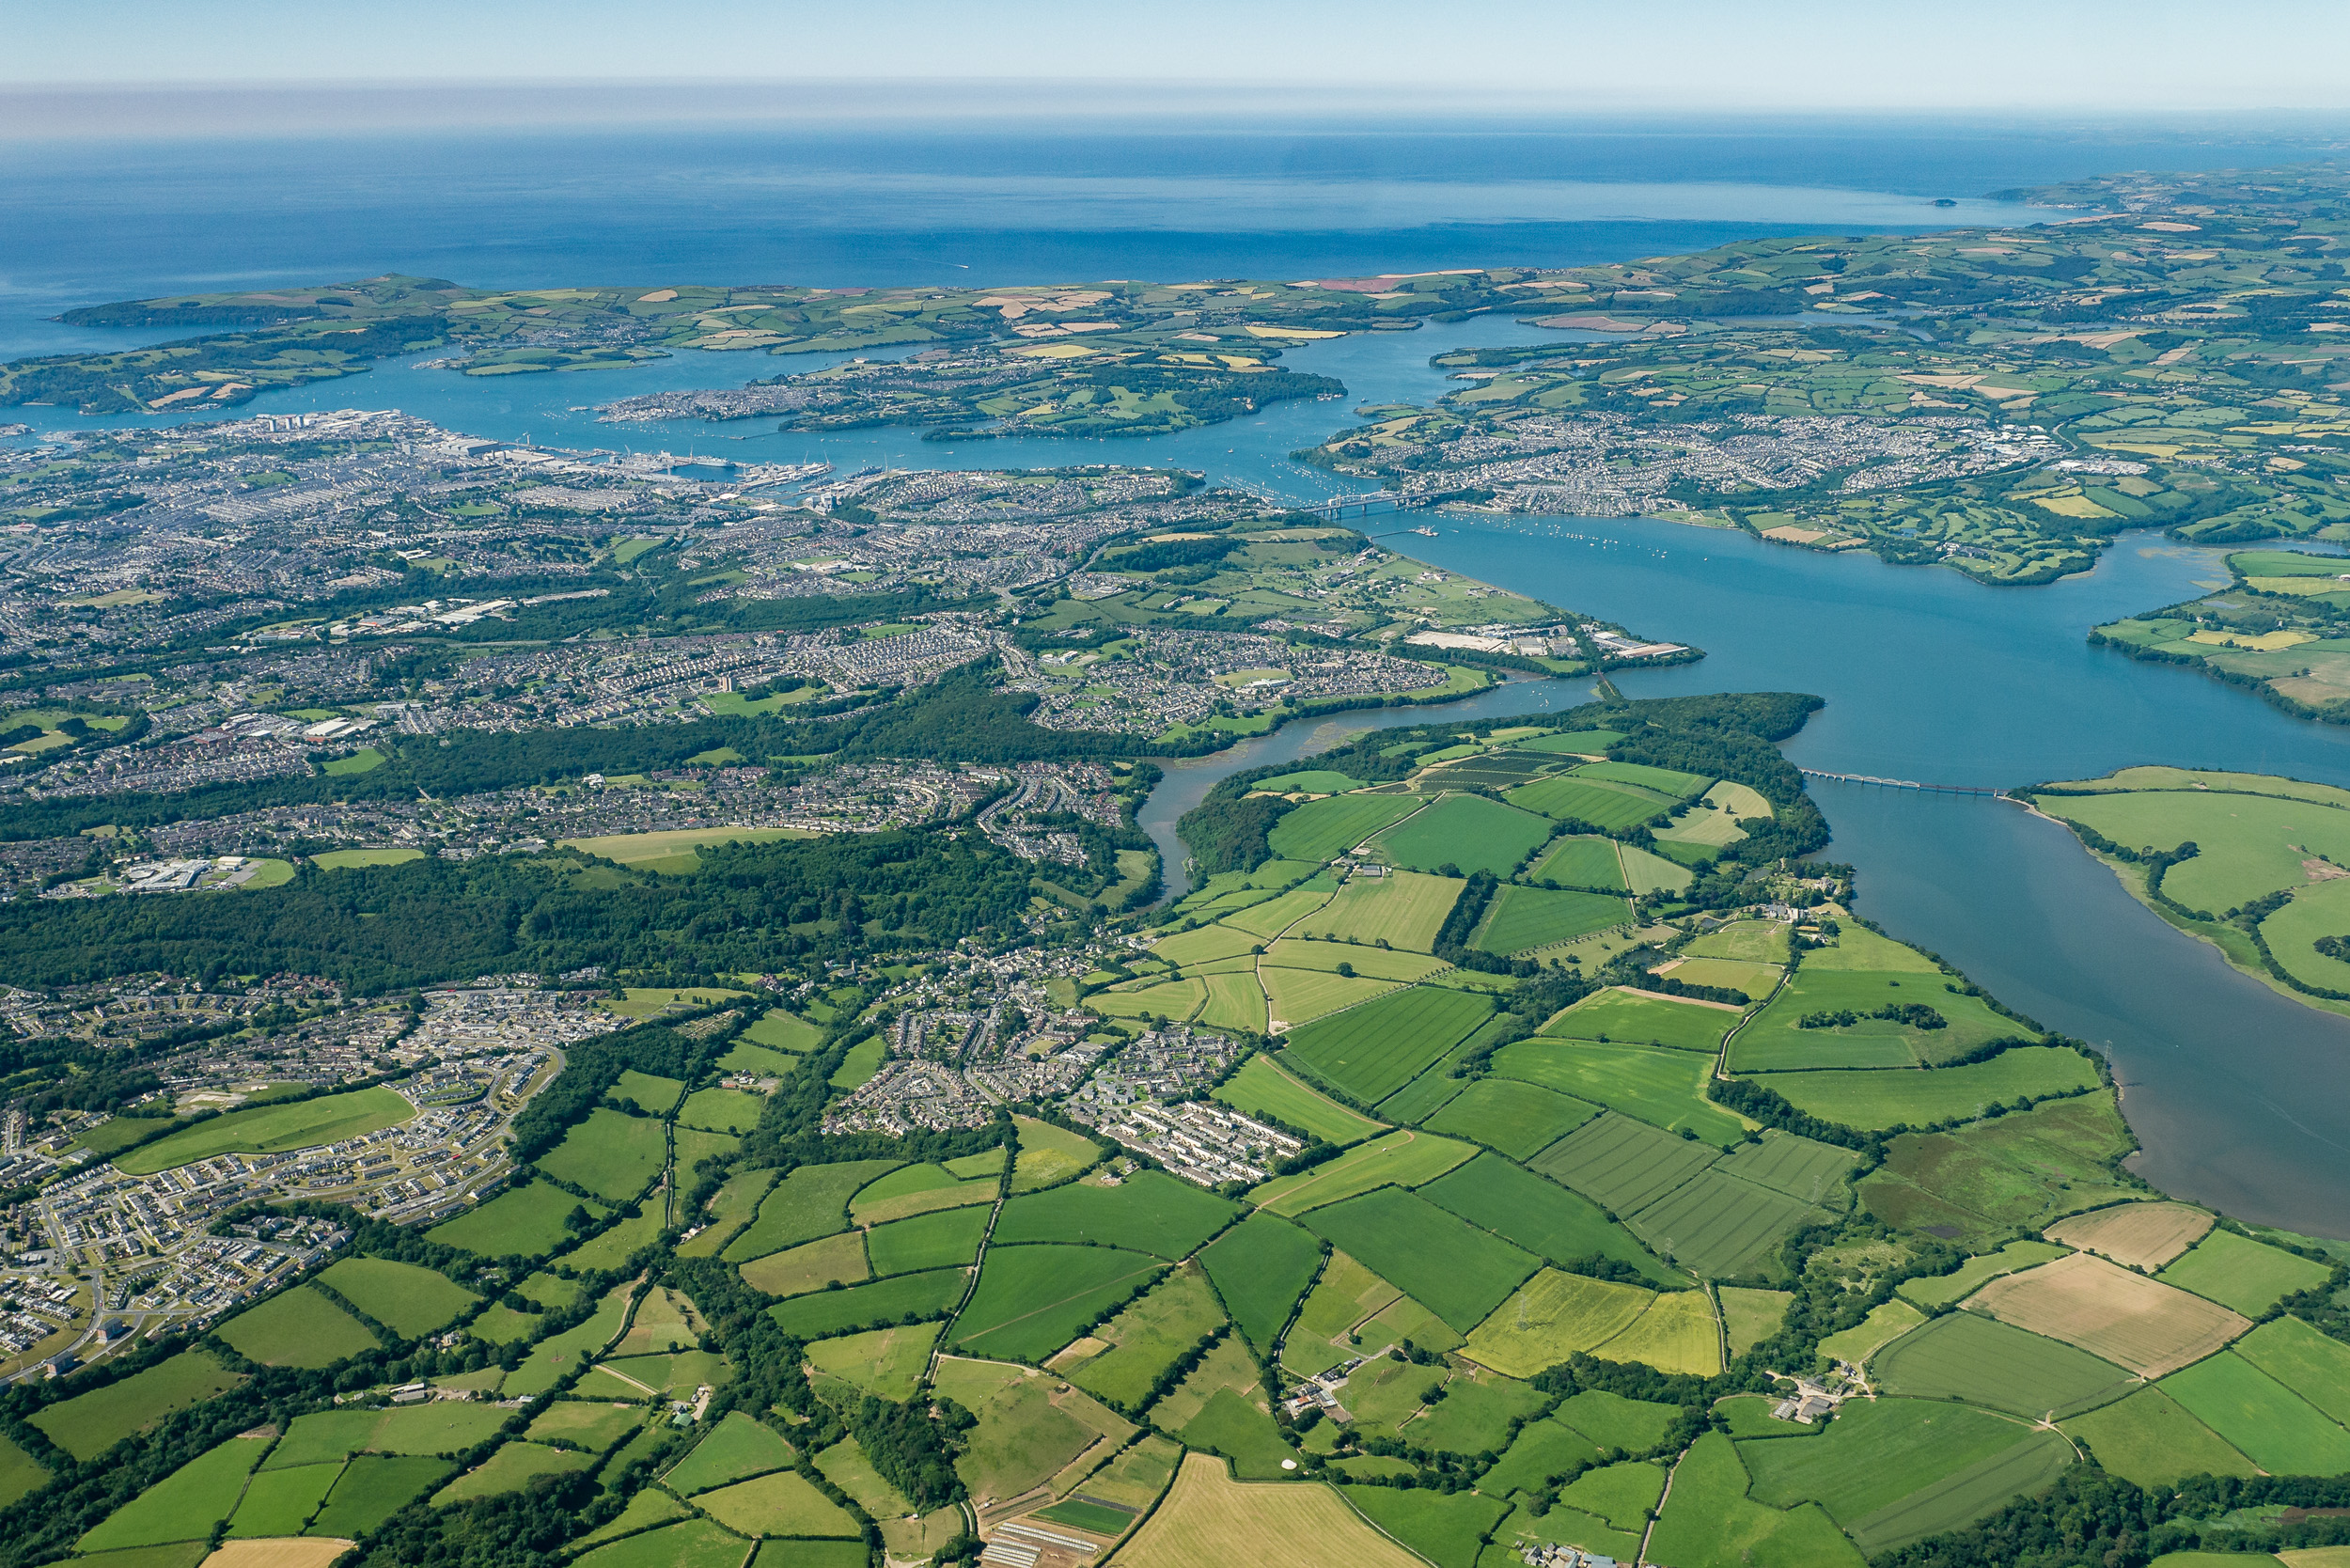
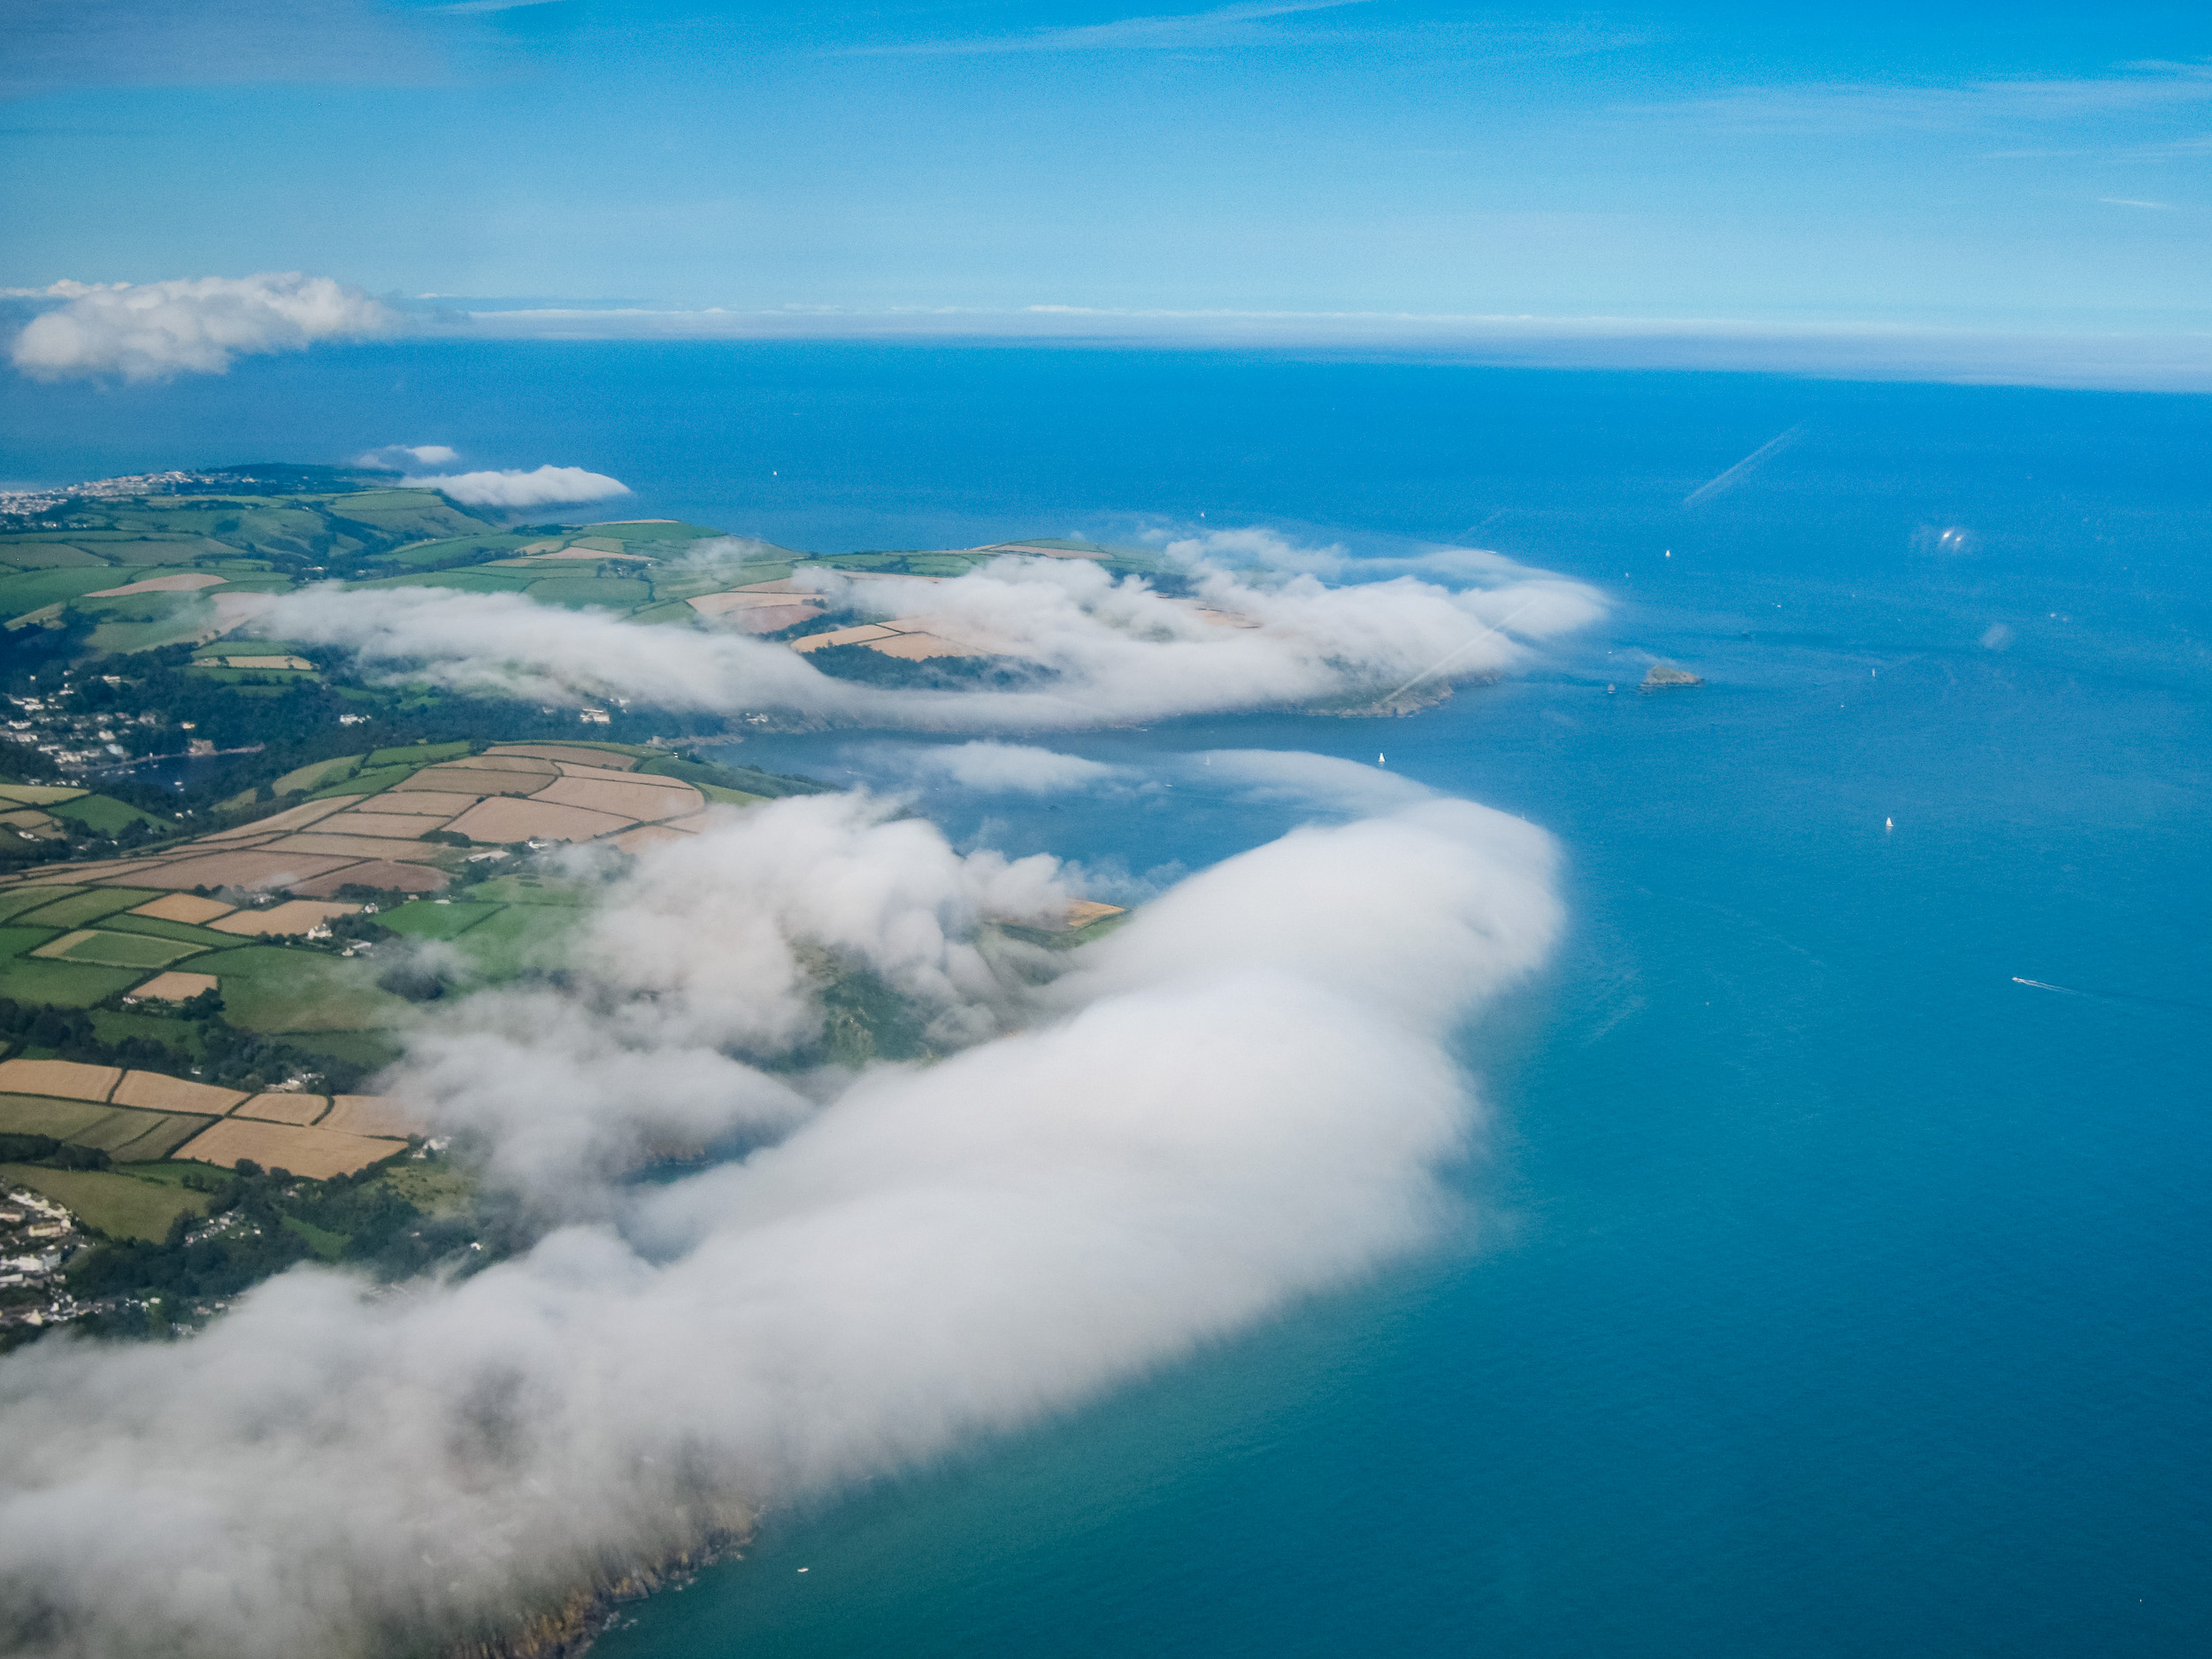
Weather plays a key role in how and where I fly, but even if it is less than perfect flying conditions I can fly around Devon at 3000 ft and see so much. At this altitude you can still make out towns and villages, you can see the lines that rivers take, and you can see miles and miles of coastline ahead.
Plymouth from 3000 ft.
In the air the landscape is familiar, yet looks very different, therefore my approach to image taking is slightly different. After all, I don't really have a foreground to consider, but I still need to consider other elements of the composition such as leading lines.
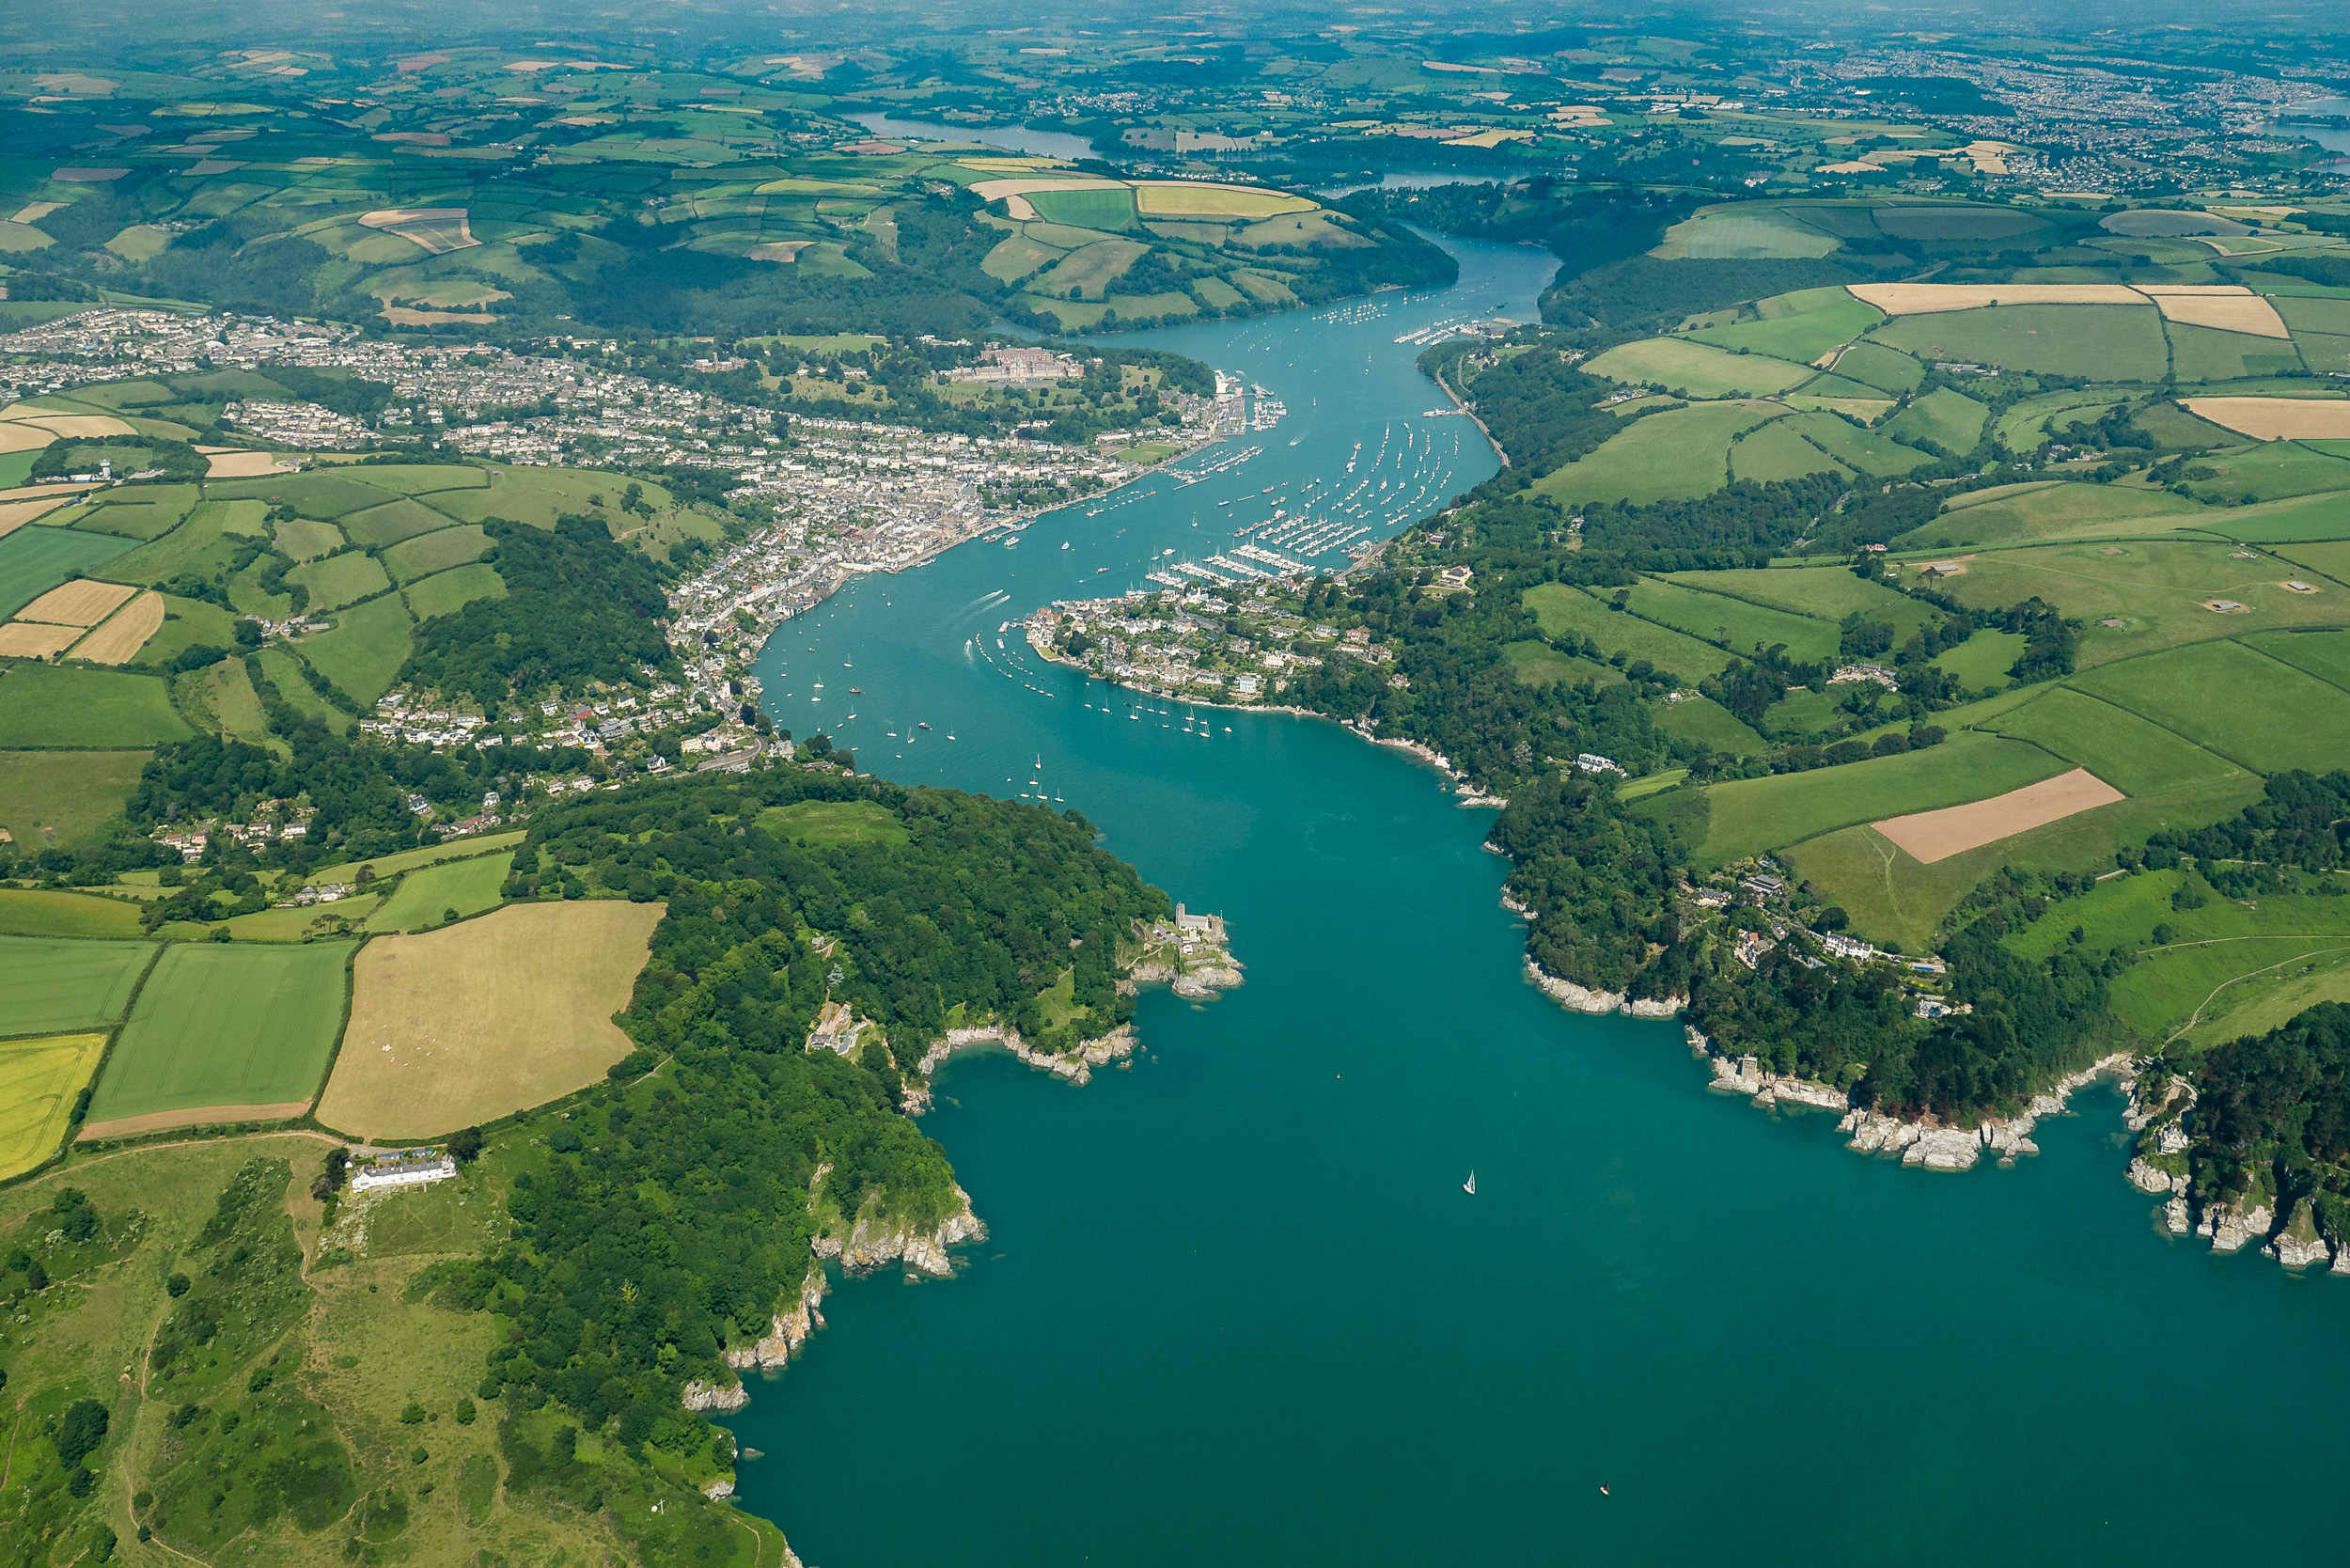
As on the ground, rivers can make excellent lead in lines.
It's not that easy though
So all this flying about taking pictures sounds easy doesn't it. Well not really. It's actually a bit challenging, but not necessarily in ways you might think.
Firstly, I'm when I'm in the right hand seat I'm the Pilot in Command which means I'm responsible for flying the plane. Activities with the camera have to take a back seat to flying, navigating and communication. So in order for me to get busy with the camera I normally have to go flying with another pilot. However this isn't too much of a problem as there are always pilots about at my local club who want to go flying!

There is a lot manage as Pilot in Command, so it's best to leave the image taking to when you're a passenger.
The next challenge is the plane itself. Unlike a helicopter which can hover and plane is constantly moving forward. The planes I fly normally have a ground speed of just over 100 mph so the scene is constantly changing. The effect isn't too bad at 3000 ft, but you still have to work at speed if you want get a particular image. There isn't much scope for fine tuning your composition.
Objects can pass quickly between the nose and the wing so I didn't have much time to compose this shot.
Visibility in a plane is also a challenge. Again, unlike helicopters where you can sometimes take the doors off, my doors (or to be more accurate, canopy) is firmly attached. While the aircraft I fly offers some excellent visibility for the pilot, the low wings and canopy screen don't always lend themselves to good photography.
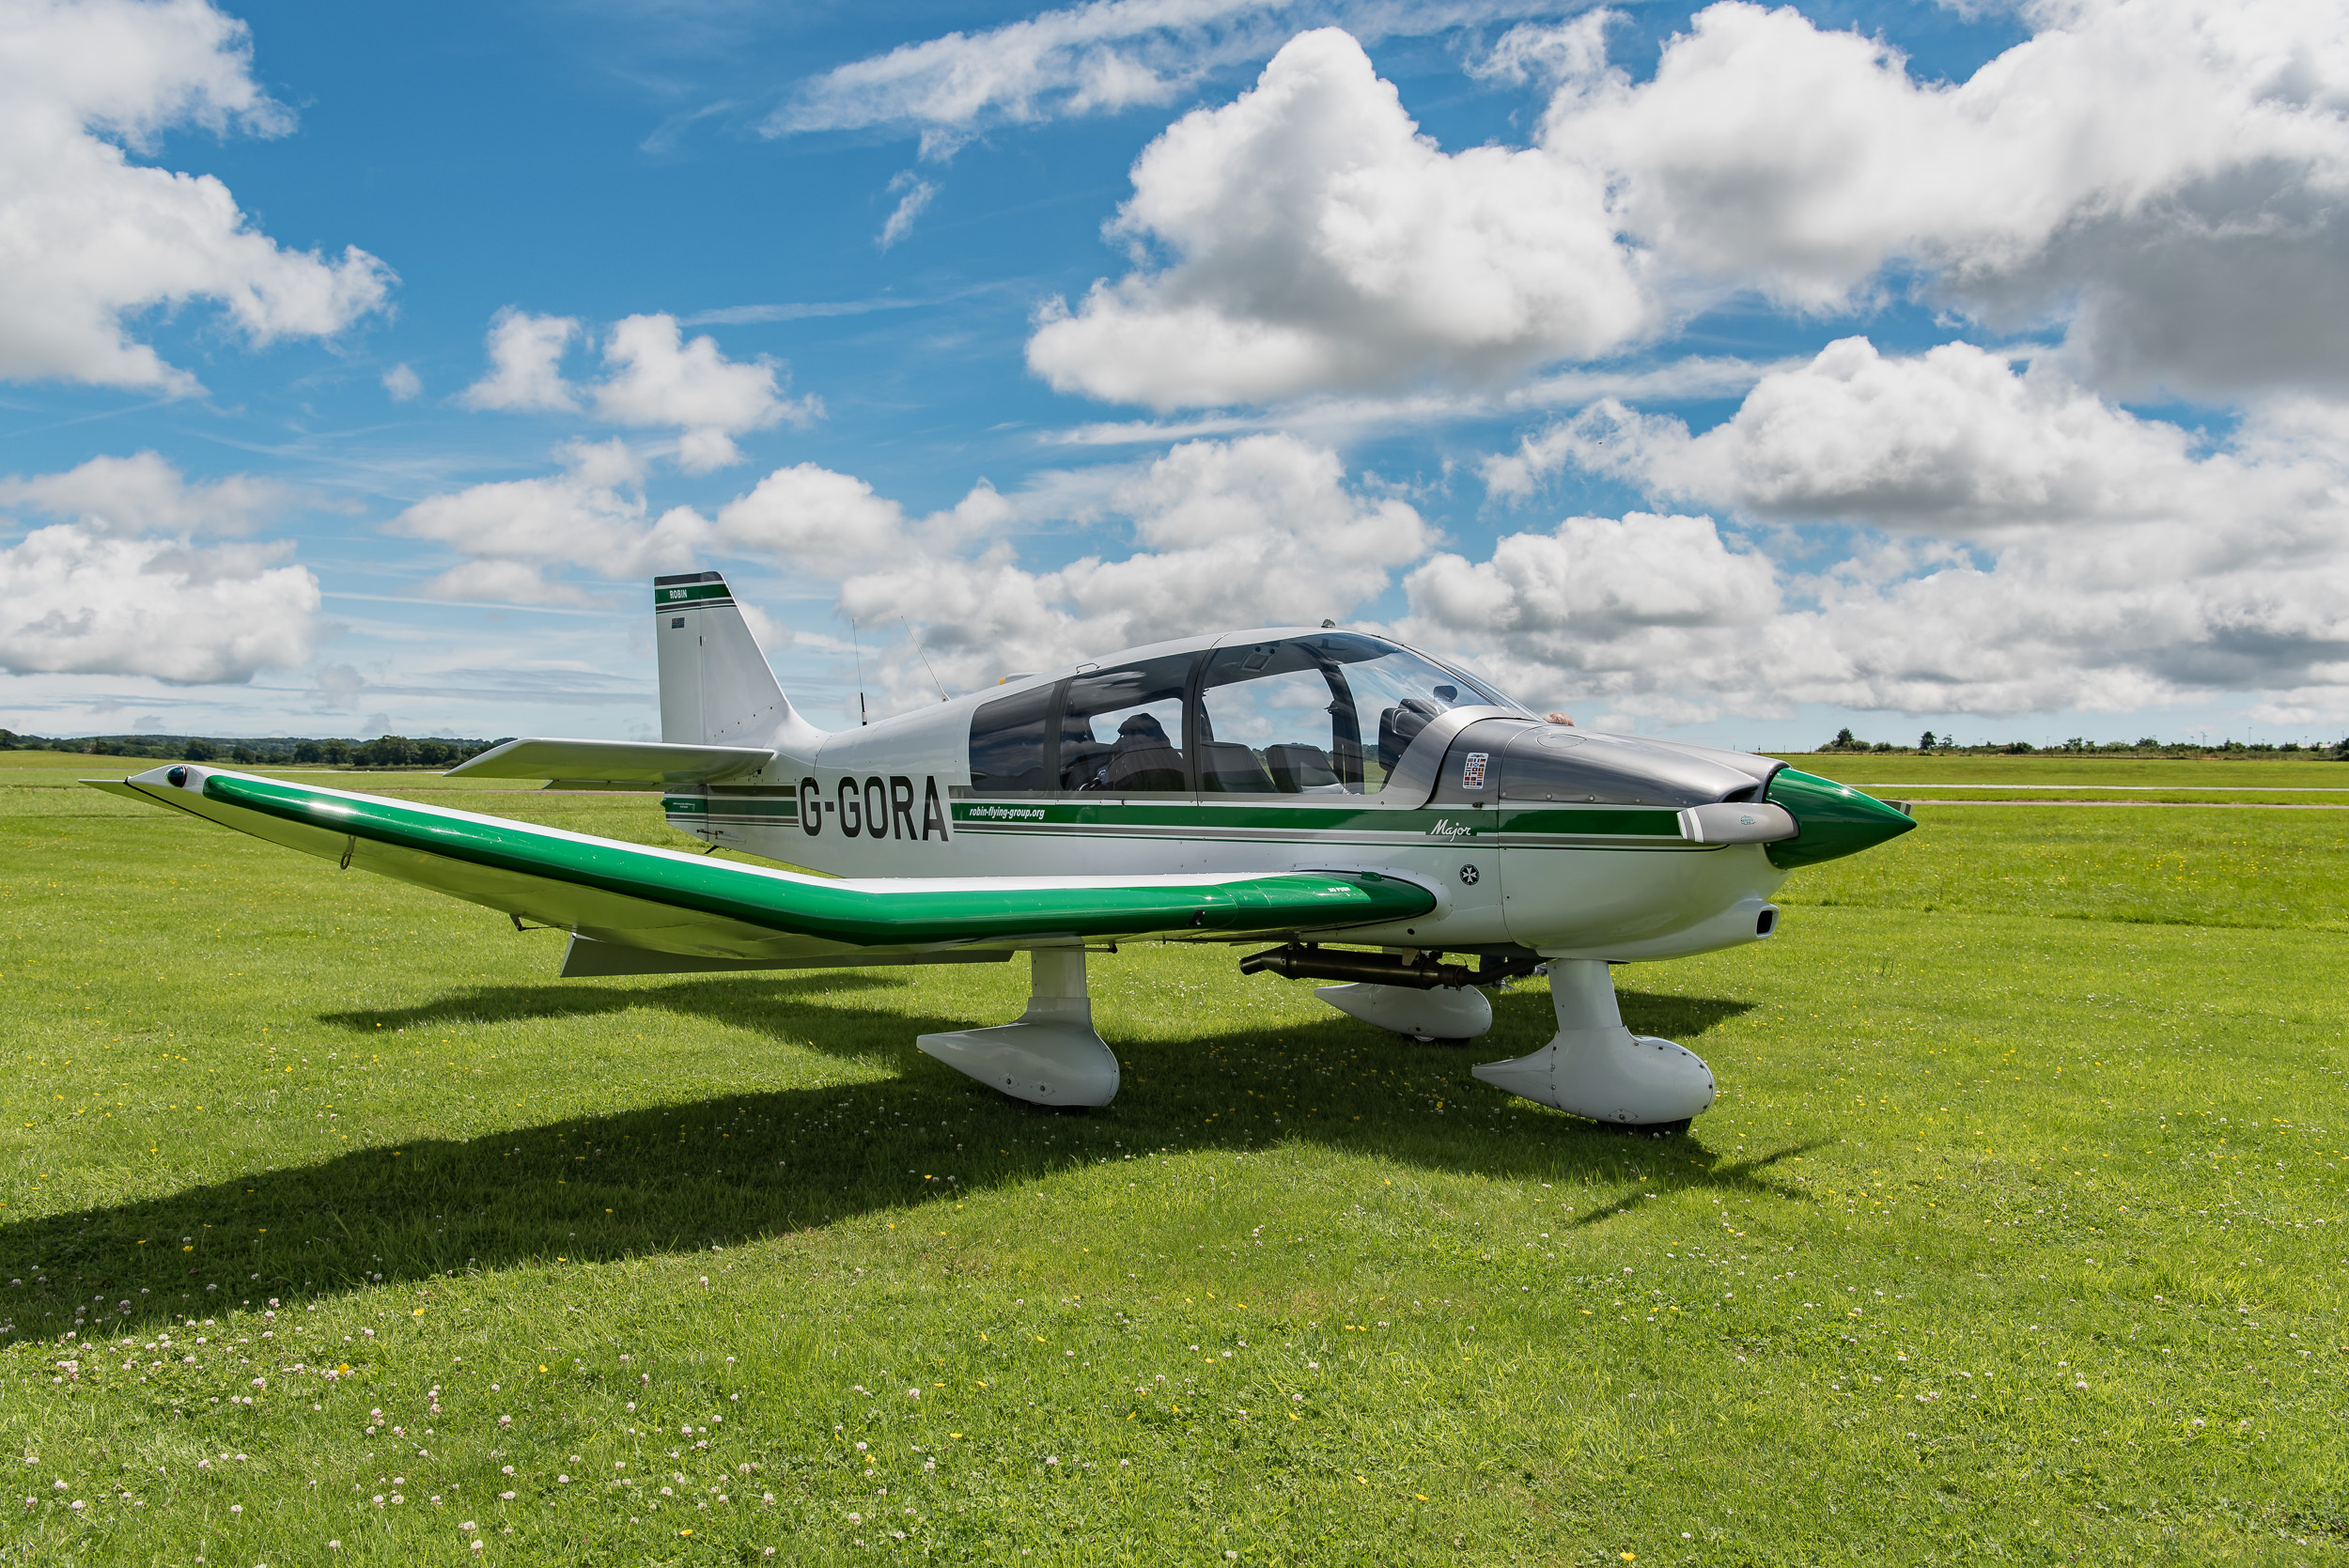
The Robin DR400, a wonderful aircraft to fly, but the low wings make photography challenging.
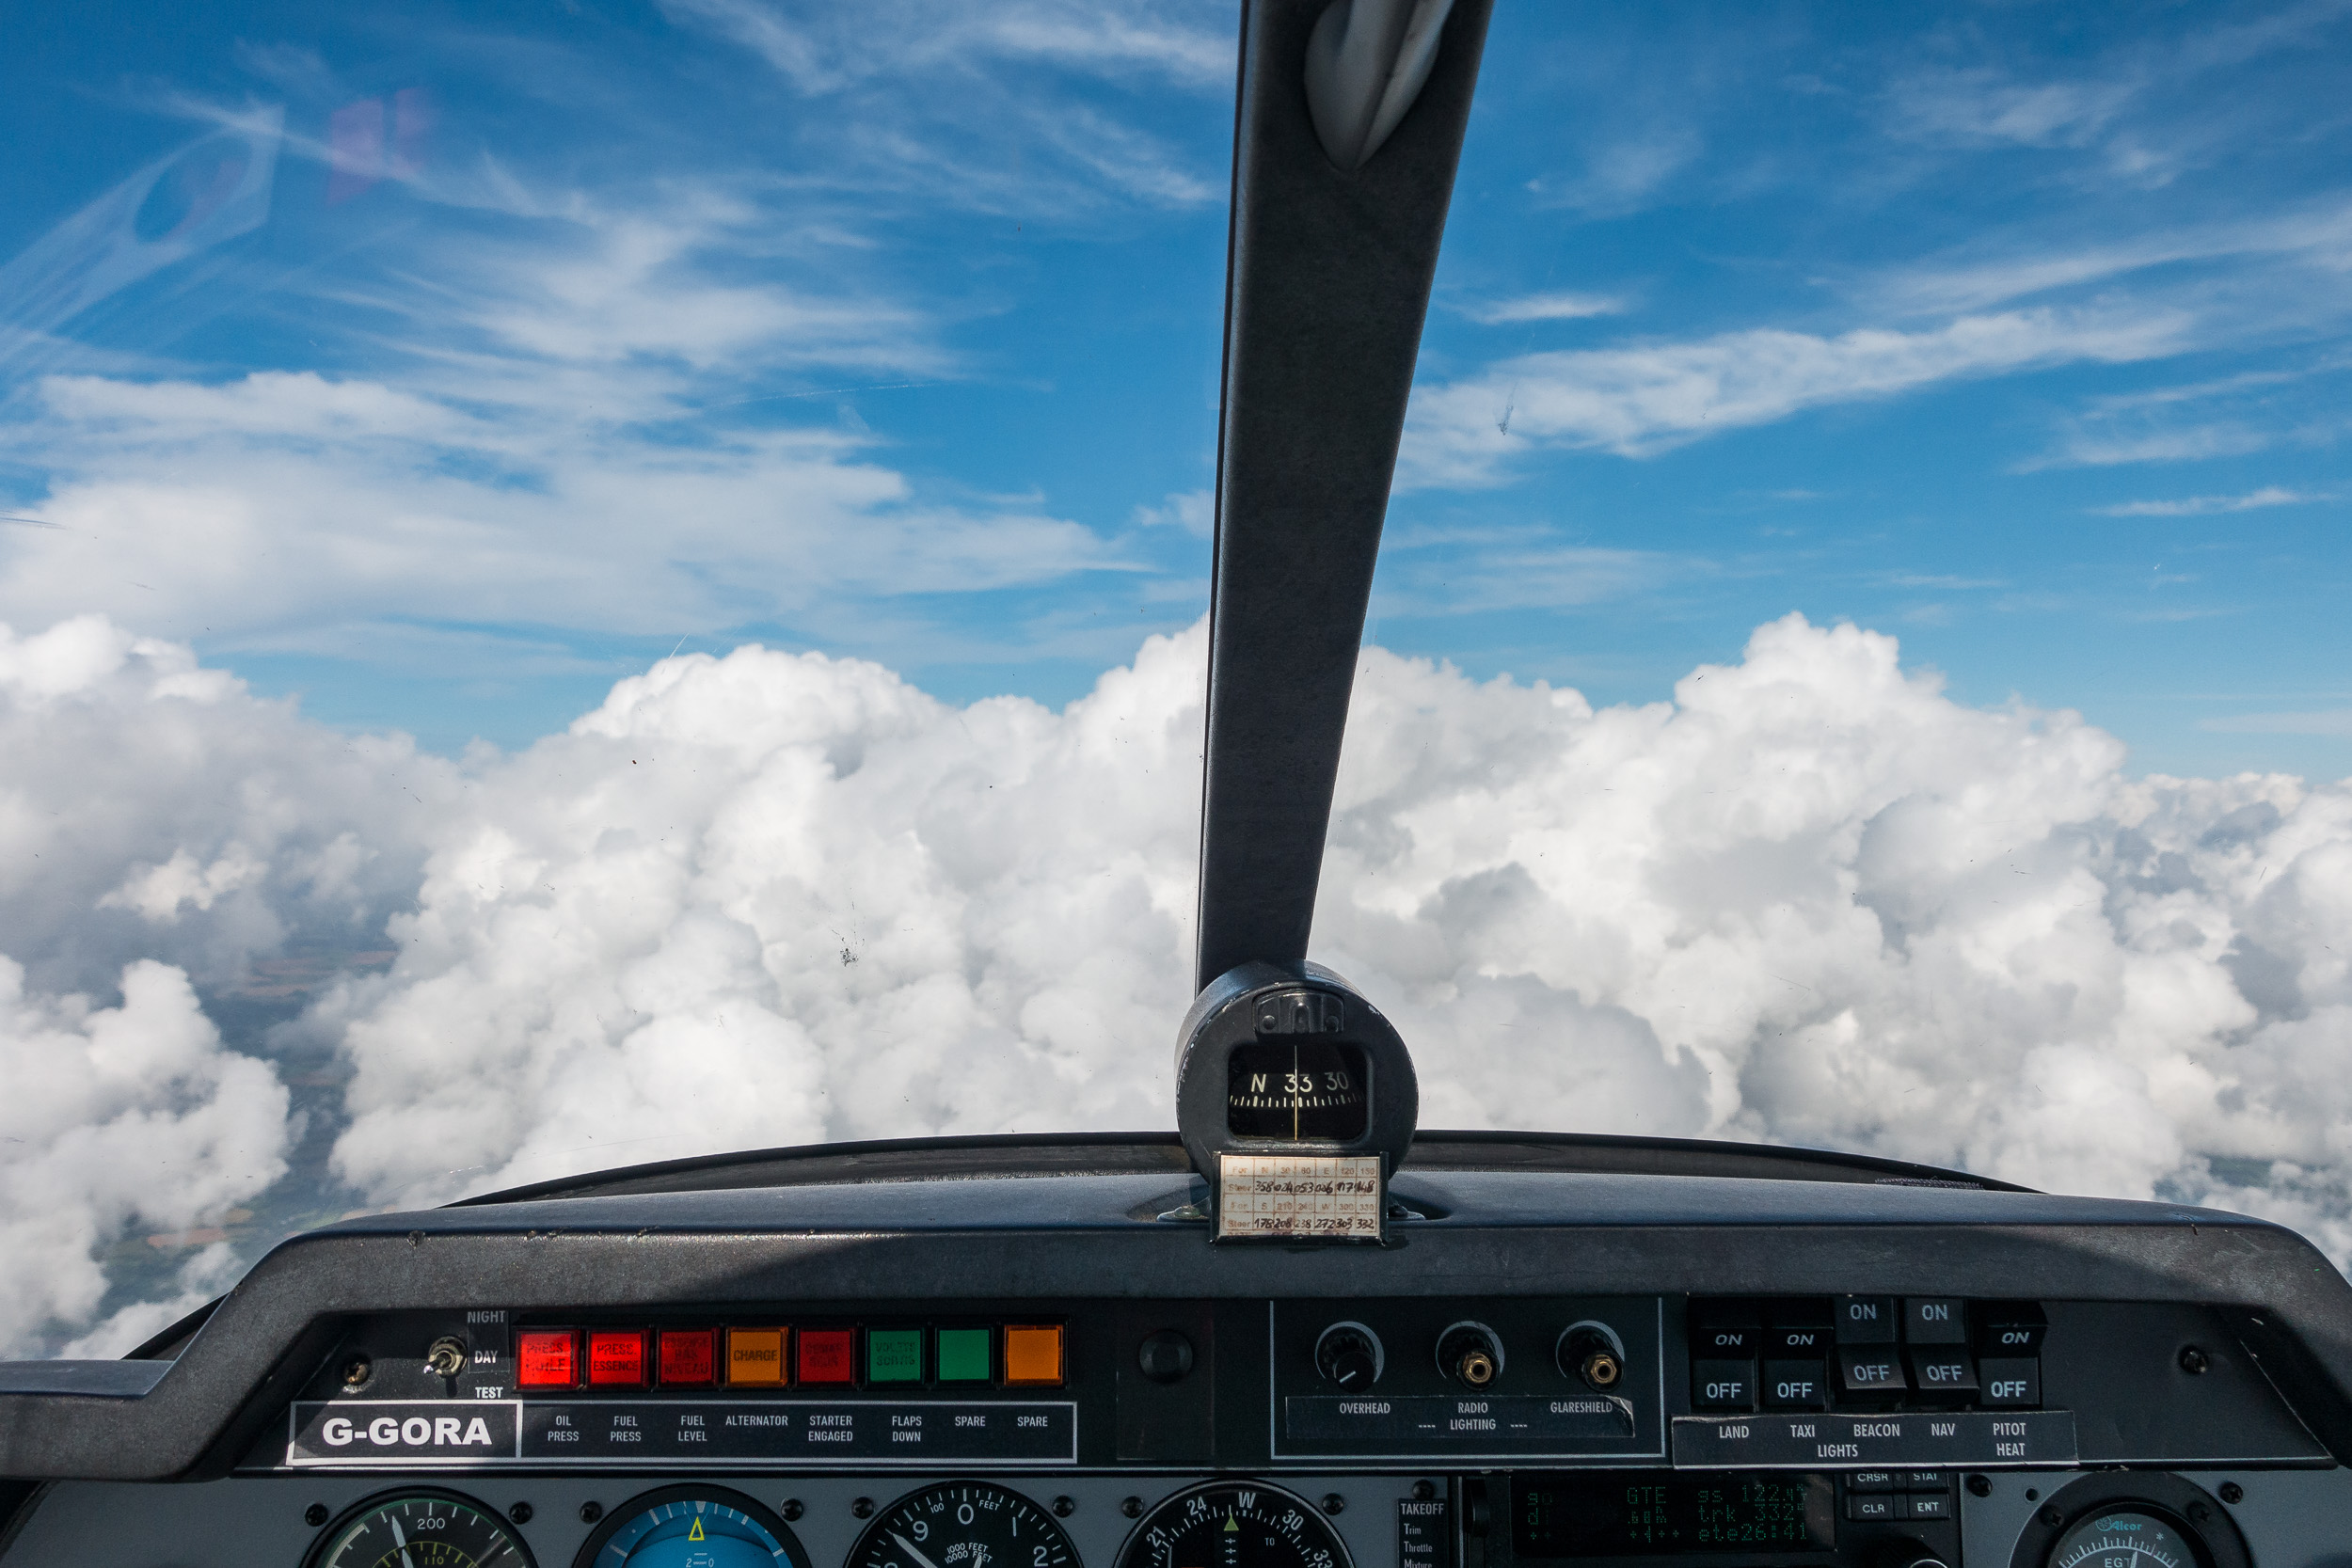
Between the nose and the wing there isn't much in the way of a clear view. Steeply banking the aircraft can improve things but the scene changes even more quickly then. All that aside though, it's the canopy that can be the most challenging thing to get over. Canopy's can cause a lot of reflections! I have flown aircraft where there has been small opening in the door which makes things a lot easier but with my current aircraft you have to battle the reflections.
Amazing cloud formations but the image suffers from canopy reflections on the right.
Given the right conditions
Saying all that though, if the weather conditions are good, and you can get the plane positioned well, shooting from a plane offers some fantastic views. Camera setup is actually relatively straightforward compared to how I would set it up on the ground. I'll set it for automatic focus, f/8, and a shutter speed of at around 1/500 sec. No need for filters, cable releases and tripods (obviously!). There is a certain sense of freedom and the whole process becomes very dynamic (as it is with my music related work).
There are some views you can only get from the air.
Photography everywhere
This is the wonderful thing about photography. You can integrate it into so many aspects of your life. I love flying. I love the adventure and the freedom. These are some of the qualities that I love about photography and so when I get to do both it's fantastic. Like photography though, flying is a skill and requires practice. However, as with many of my hobbies time, money and weather are all influencing factors on how much practice I get!
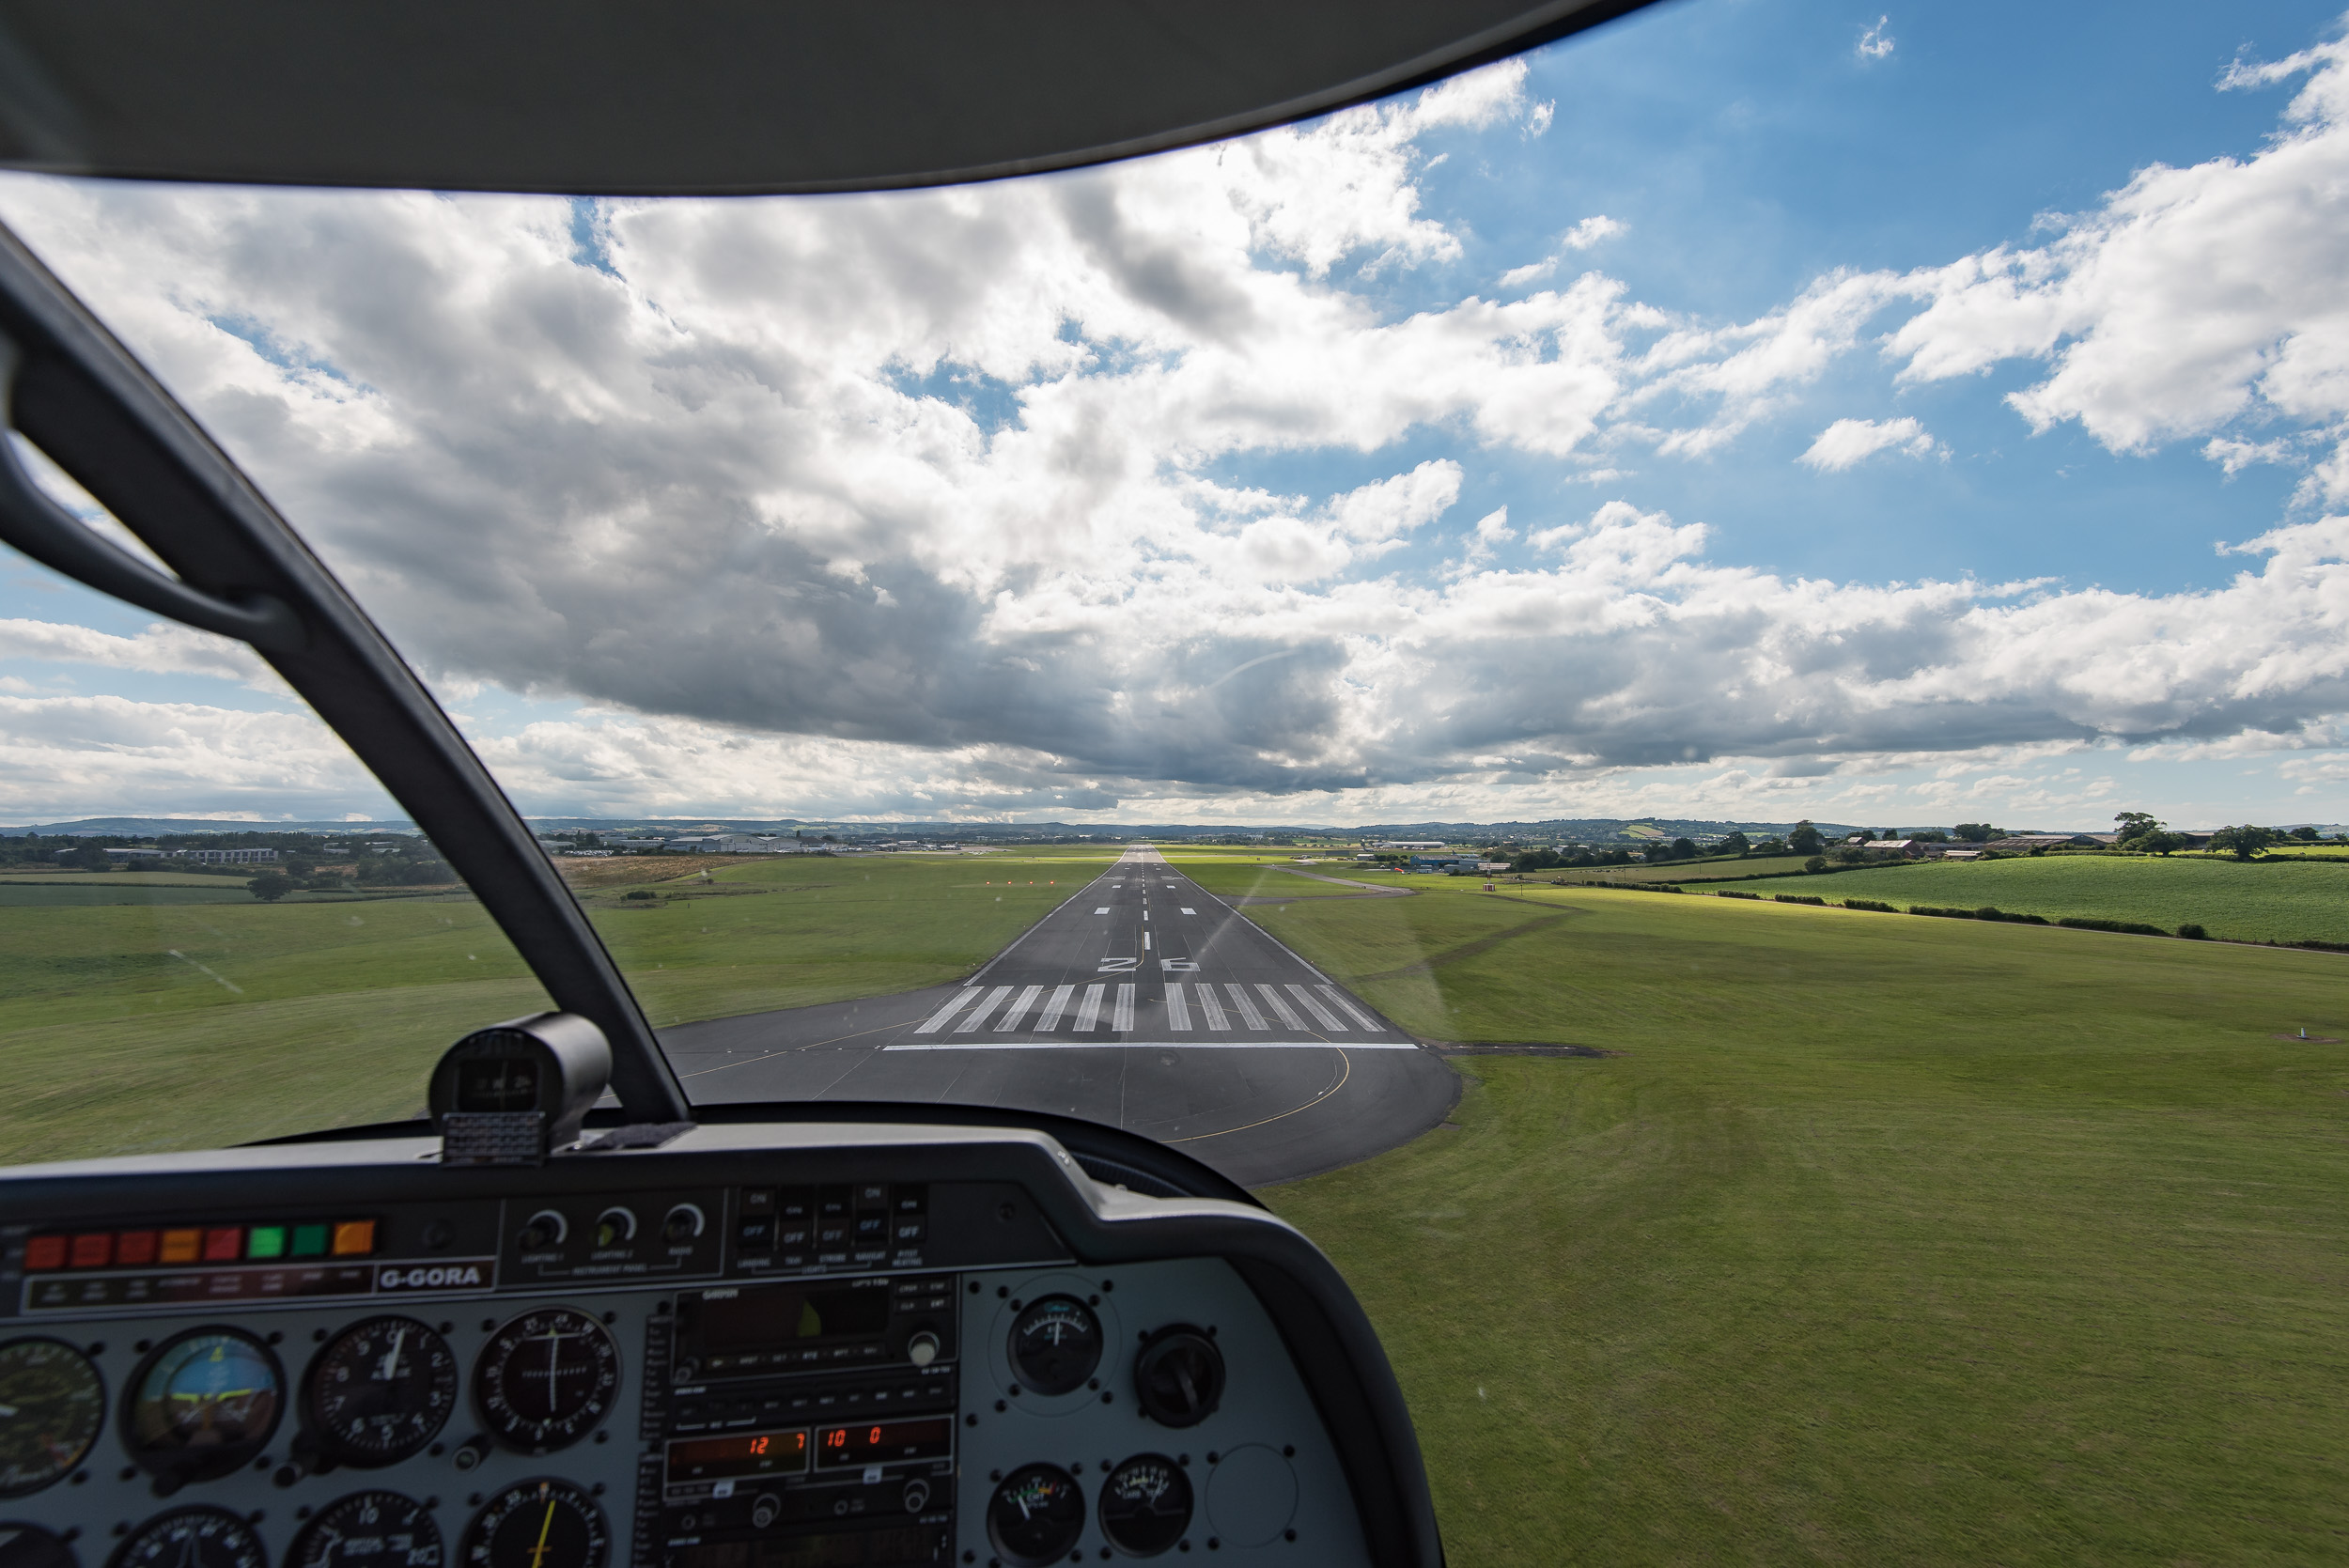
As with photography it's important to practice flying, particularly your landings!
Unfortunately flying has taken a little bit of back seat for me at the moment but I'm getting back to it in the New Year. Photography from the plane is gradually getting easier and I hope the New Year will bring more opportunities to capture some wonderful landscape images.
So do you integrate your photography with other hobbies? Have you tried to shoot from a small plane? Have you ever hung out the door of a helicopter with your camera? Let me know in the comments.
See you next time!
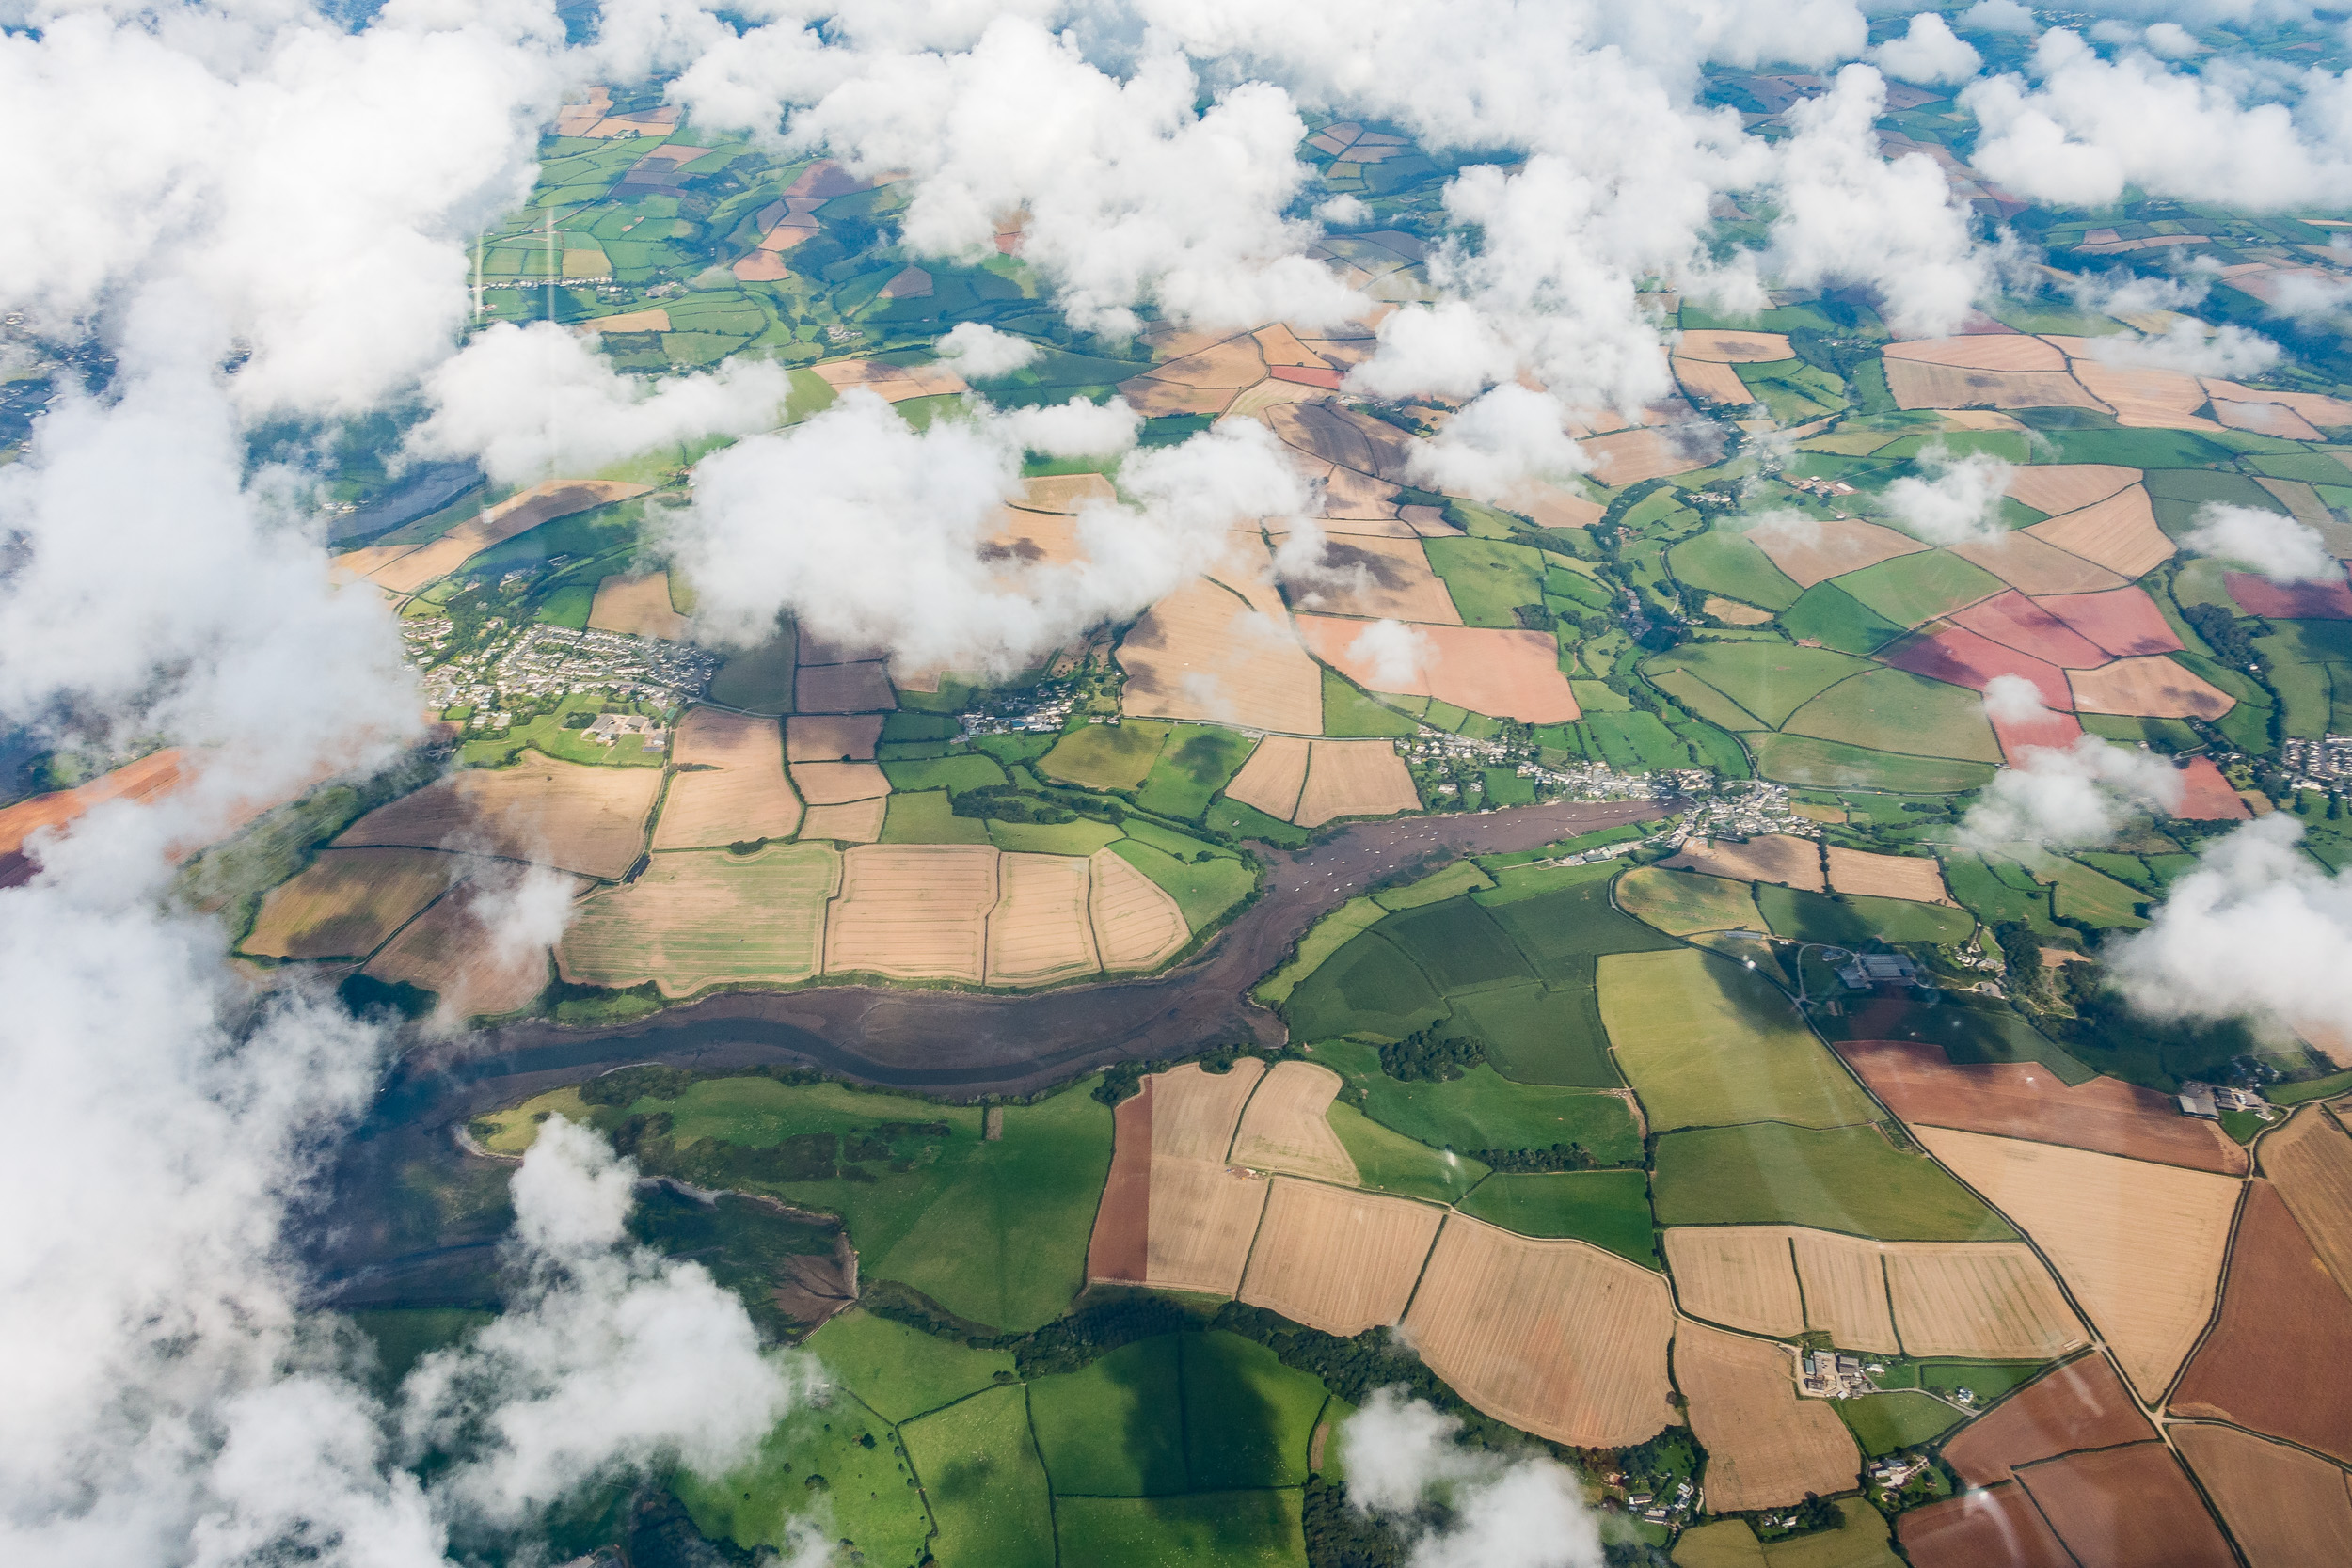
A unique view of the patchwork of fields in Devon.

Not All Shoots Are Successful Shoots
In this blog I discuss the challenges of shooting on a beach and I give my own image a critique.
The Best Laid Plans
As a photographer you always want to put your best images out there. If you practice enough your technique will improve and your style develop, hopefully resulting in a gradual but noticeable improvement to your images. While this is generally true, it doesn't necessarily mean that every trip out with the camera will result in an image that was better than the last one. When I started this blog one of my key goals was to discuss my success and my failures. As I said in my first blog post, landscape photography isn't all about 5 star images captured on epic international trips.
In this blog post I'm going to take you through one of my less successful trips out with the camera. I had it all planned out. I would finish work bang on time, drive to West Bay in Dorset, and photograph the sea and evening light as it gloriously reflected off sea and cliffs. Well, that was my vision anyway. I went through all my normal planning steps, weather, cloud, tide, bearing of sunset and it all looked good.
Challenging Conditions
I've visited West Bay a couple of times, but never to photograph it. The east beach there, recently made more famous by the TV series Broadchurch, is long and sandy with dramatic cliffs running as far as the eye can see. However, when I arrived the reality of actually shooting there became apparent.
Firstly was the tide. After checking the tide tables I knew it was coming in, but what you can't tell from the tables is how long of a reach those waves have. The waves weren't tall, but their reach up the beach was long. Now I don't mind getting my feet wet, but it becomes really difficult to frame your shot if your camera sinks a little with each wave. If I moved further away from the waves I lost a lot of the sea in the frame. Normally this would be less of an issue if the beach has a natural curve.
The other challenge was the weather. While it wasn't raining nor the wind as strong as I expected it to be, the light was very flat. The forecast had indicated lots of high cloud and no low cloud. This I hoped would give me a spectacular evening sky to add to my composition. However, there was a lot of low cloud and the chances of there being any evening light bouncing off the cliff seemed very unlikely.
Change of Plan
Spare time to do photography is at a premium for me. While I like to do some location scouting when I can, it's not always possible, and so sometimes I just have to wing it. So with the very real sense that I might have just wasted a 2 hour round trip in the car, I put my thinking hat on and tried to think of a different composition. This approach of looking around and not getting focused on one thing had worked well on a recent trip to Dartmoor, so I picked up my tripod and got walking.
It wasn't long before I had the idea of doing a long exposure of the beach, looking straight out to see, and including a few well-placed rocks or stones in the foreground. This composition would probably deliver better results. I would have better visibility of the waves and the quality of the light was less of a dependency.
An Ever Changing Beach
Though I had a new vision on what my photograph would be my challenges weren't over. I would find an interesting composition, setup, grab a frame, maybe two at the most, and then a wave would come in wash my composition away! Even some of the larger stones in my composition weren't big enough to resist the pull of the waves. So this left me with very little time to grab a frame for each composition I found along the beach. I had to make sure the camera was level, focused, and correctly exposed in very short time or I might not get another go at it.
After only a few compositions the light had faded and I decided to take my very sandy tripod and wet feet back home for a nice meal and glass of wine.
Critiquing My Own Image
I only took a handful of frames that evening but here is the image that I think turned out the best.
Nikon D750 with Nikon 16-35mm f/4, 1.3 secs, f11 at 20mm, Lee Filters Polariser and 3 Stop ND
Now I'll be the first to admit this isn't an image for my portfolio. Though I like the mood and style of the image it does have a number of issues. If I'd had more time at the location I might have worked out these issues but as I said at the start of the blog, not all shoots are successful shoots.
The main issues I have with the image are around the rocks I have used in the foreground. The rock in the lower right of the frame for me is just a little too close to the edge of frame. I would like to have had just a little bit more space as there is with the rock on the left.. Given a bit more time between waves, I might have setup my tripod in a slightly different location to give me that space.
While the image roughly follows the rule of thirds, it doesn't follow the rule of odds. Now, I know that these rules are more like guidelines, but quite often they do make sense and I do think following the rule of odds in this scene would have helped with the overall composition.
Rocks at Porth Nanven - Nikon D750, Nikon 16-34 f/4 at f/16, 1.6 secs at 20mm.
I learnt about the rule of odds in the book, The Art of Landscape Photography by Mark Bauer and Ross Hoddinott (it's a fantastic book and well worth picking up). In the book Ross and Mark discuss how having an odd number of objects helps create visual stability or symmetry.
In this image I took of Porth Naven a couple of years ago you can see how I've composed with three rocks in the foreground. The balance and implied triangle in this image is something I would have liked to have seen in my West Bay image.
Always Good to Be Out With The Camera
Despite the fact that my shoes are still drying off and I had to strip down my tripod to get rid of the sand, I still felt it was time well spent with the camera. I'm also not going to win any awards for the image, but that really isn't the point. I was outdoors with my camera on a beautiful beach taking images and for a person that spends most his time sitting at a desk it's just nice be outside. Yes, conditions were challenging but it's through these challenges that you learn to progress as a photographer.
Actually I'm going to change my mind, it was a successful shoot. Just successful in a different way.
So what do you think of the image? How would you have shot the scene? Have you got any tips for photographing beach scenes? Please let me know in the comments.

Practising The Craft of Photography
In this blog post I discuss the value of practicing photography, no matter the weather forecast.
Starting Out
When you first start out in photography it's very easy to think that you should be capturing an award winning photograph every time you go out with a camera. After all, you read lots of magazines and books on the subject and they are full of wonderful and inspiring images. So it must follow that these published photographers must always take a great image every time they go out with the camera.
This is a perception that I had for a long time and it often had a negative impact on my photography as I felt I should be capturing a quality image each and every time I went out. One day though I was watching a documentary about Colin Prior the renowned landscape photographer. In the film we saw some of the challenges he went through the get an image that would realise his vision. It did in fact take him several days camped up on a mountain range to finally get that image.
Learning A Lesson
From this I learnt that even the most seasoned of landscape photographers don't just go out there and take 5 star images on every shoot. There is also a lot of failure and patience. This was a valuable lesson and from this I decided to reevaluate how I approached a landscape shoot. I am lucky, or unlucky depending on how you look at it, in that I don't need to earn my living from photography. There is therefore little pressure for me to return home from a shoot with an image that I can sell. This means that I can almost put the photography bit to the side and just enjoy being outdoors. Returning with an wonderful image almost becomes a bonus or a by-product of my adventures.
Practise, Practise, Practise
This all leads me on to the real topic of this blog post and the concept of practising photography. Without the pressure (implied or real) of having to get an amazing image, I use my time outdoors to not only enjoy the landscape but to practise my craft. As with any skill it takes practice and repetition. If I only took my camera out when the conditions were absolutely perfect would I be able to capture an image when I really needed to? Would I remember how and where to focus? Would I remember to check my ISO settings?
The forecast conditions were never going to produce an award winning image, but having time with the camera was invaluable
When the moment comes, and it can be rare, I want to be prepared and know what I'm doing. So I practise. I go out, even when the conditions might not be perfect. I enjoy being outside and I enjoy setting up the camera, looking at compositions and taking pictures, even if the end result is an average image. At least I've practised my craft and I will be better prepared for that magic moment, which can come anytime, and sometimes when you least expect it.
John Free made an excellent video on practising street photography and I strongly suggest you watch it (as the lessons still apply to landscape photography).
And after that, well, get out with your camera and practise. Don't worry that's not an award winning image but be satisfied that you got outside and you still remember how to use your camera.
Do you practise your photography? Do you still come home from an unsuccessful shoot feeling satisfied? Let me know in the comments below.
Till next time….