

Windy Wheal Coates
In the blog this week I head to a windy Wheal Coates tin mine on the coast of Cornwall. With the weather forecast being less than favourable, would I be able to capture an image? Read on to find out if my creativity beat the windy conditions.
A Return to Wheal Coates in Cornwall
It doesn't seem that long ago that I last photographed Wheal Coates tin mine on the coast of Cornwall. When I looked in my Lightroom catalogue to find my last photograph from Wheal Coates I was shocked to see that it had been nearly two years to the day since I had last visited this great Cornish coastal location. Where does all the time go?
It's not as if I had forgotten about it. There's a pin for it on my custom Google map but for some reason, I just haven't been back. It was time to go back that was for sure.
If you read my blog on a regular basis you may remember reading my recent post on Dartmoor. In that post, I tell you why I headed up onto the moor when the weather forecast said I should really be at home. My most recent visit to Wheal Coates was in a similar situation. Any sane photographer wouldn't have even considered the 4-hour round trip if they'd looked at the weather forecast. But there was a small gap in the clouds predicated and given that I had the evening free, I thought it was worth a punt.
Typically Cornish Weather
As I drove along the A30 from Devon to Cornwall, I really started to question if I had done the right thing. Unlike my trip to Dartmoor the previous week which only involved a small drive, the drive to Wheal Coates was significantly longer. The further I drove into Cornwall the worst the weather got. At one point my windscreen wipers were on full and I was driving through a low-level cloud.
However, I was still clinging onto that predicated break in the cloud. It is well known that you can get some amazing light from cloud breaks after a storm passes by, so I just kept thinking about how pleased I would be with myself if I got a really nice shot.
As I pulled into the National Trust car park for Wheal Coates I looked out to the sea where I could see broken cloud, bits of blue sky and even the sun. I though that maybe this could turn out to be an amazing evening of photography.
Windy Wheal Coates
As I wandered down from the car park and onto the slopes, I was pleased to see that there was still a lot of heather about. Unfortunately, I was probably about two weeks too late to get it at its best, but it was still a wonderful sight to see.
You would, of course, think that with so much heather on the slopes that picking a composition is easy. It can however be a little more tricky than just sticking your tripod on the ground and snapping away. The slopes are a complex mesh of paths, gorse, heather and unsightly dead vegetation. So it's worth taking a little time to wander about and finding a nice clump of heather that also doesn't have too many unwanted distractions around it.
While I was wandering about looking for my composition I noticed the wind was picking up. I looked out to sea to see a very large bank of cloud heading my way. Well, there goes my sunset I thought! So I quickly got set up and took my first composition of the evening:
A Splash of Colour on a Grey Day at Wheal Coates #2, Cornwall - Nikon D850, Nikkor 16-35 mm f/4 at 26 mm, 3 seconds at ISO 64, f/13, Lee Filters Circular Polariser and ND Grad.
As you see in the image above I had already lost much of the light and clear sky. The cloud appeared very quickly and anyone who photographs Cornwall a lot will tell you that even in the summer the weather can change rapidly.
While I would have loved some light from the setting sun on the slopes I decided that I would #EmbraceTheGrey and make the most of the moody skies. For the next shot, I headed a little further down the slopes and closer to one of the old mine buildings.
A Splash of Colour on a Grey Day at Wheal Coates #1, Cornwall - Nikon D850, Nikkor 16-35 mm f/4 at 20 mm, 2 seconds at ISO 64, f/13, Lee Filters Circular Polariser and ND Grad.
As I looked back out to sea all I could see was cloud and the light was fading fast. I decided that I'd probably had the best of the conditions and it was time to head home, happy that I'd managed to capture a couple of images.
I mentioned in my post from Godrevy a few weeks back that I was producing a video on photographing Cornwall for my YouTube channel. I'm pleased to say that I also did some filming for that video on my visit to Wheal Coates. So be sure to say tuned to the blog and make sure you are subscribed to my YouTube channel.
I do hope you enjoyed this blog. Which of the two images was your favourite? Have you photographed Wheal Coates before? Let me know in the comments below.

Unexpected Creativity from a Dreary Dartmoor
Sometimes landscape photography can be hard and this was certainly true of my most recent visit to Dartmoor in Devon. However, even when you are feeling creatively challenged, inspiration can appear to come from nowhere. Read on to learn how I got inspired on that dull, grey evening on Dartmoor!
A Quick Happy Birthday
Just before I tell you about my Dartmoor adventure, I just want to announce that this post comes on the day that this very blog celebrates its 2nd birthday! Two years ago today I decided to start documenting my photographic adventures.
As with any creative process, the writing has sometimes been easy and sometimes it's been hard. However, most of all it has been fun and its really helped me with my photography. I wrote a lot about the benefits last year when I wrote a post about the blog's first birthday.
Over the last 24 months, I've written a new blog post every week, and I see no reason why this won't continue into the future. Thanks to all the support and comments I get from everyone on this blog, and other social media channels, I feel inspired and motivated to keep this blog going. So thanks to everyone who has and continues to show support of my work. It is very much appreciated.
And now….
Landscape Photography is Hard
I love landscape photography. I have a real passion for it and there are few things as good as heading out into the wilderness with the camera to capture some landscape photographs. Sometimes the process of capturing those photographs is hard. The weather can be challenging or you can simply lack the imagination or creative energy to produce a good photograph.
For me, there is an additional factor that makes landscape photography hard, and that is time. I think most photographers, pro or amateur, suffer at the hands of the old enemy of time. The amount of time I can commit to my art is limited and more often than not I have to go out when the conditions aren't ideal.
Devon's Dreary Dartmoor
My most recent to Dartmoor is a great example of when I decided to head out with the camera when really I should have stayed at home. The weather forecast for most of the south-west was overcast and rain showers. The trouble was that if I didn't out that evening, it was going to be several days before my next window of opportunity and I had a real need to scratch that creative itch.
I wanted to go and shoot somewhere on the Cornish coast but I saw little point in committing to 3 to 4 hours of driving with the predicted weather conditions. I thought the best thing to do was to keep in local and head up to Dartmoor. The weather forecast for Haytor was looking poor, but it did predict a small break in the clouds that might yield some nice results. To be honest, I think I was being rather optimistic but I grabbed my camera and went out anyway.
Finding Something Out of Nothing
As I drove up the hill from Bovey Tracey to Haytor, things did not look great. While the clouds were at least above the hills, it all looked rather uninspiring. I decided to drive a little further on and park up for Emsworthy Tor.
As I wasn't in a particular hurry I decided to make the walk to Emsworthy Tor at a slower pace. As I walked I made sure I took the time to look for compositions. Occasionally I would hold my eye up to the camera to see what an image would look like, but nothing seemed to capture my imagination.
When I reached Emsworthy Tor I just stood there and wondered why on earth I even bothered coming out. Don't get me wrong. I love Dartmoor. It can look spectacular in many different ways, and it's rare that I can't find something to appreciate. The view in front of me was indeed impressive but that doesn't mean it was going to translate into a good photograph.
It soon dawned on me that the viewpoint I wanted to photograph wasn't going to work in these conditions. As I sat there looking at the great expanse that is Dartmoor, I thought about going home. In the distance was a large dark cloud that was sure to bring a heavy shower. Perhaps it was time for an early exit and a glass of wine.
Just as I was about to pack up and go I had a moment of inspiration. As I looked east there was a small break in the cloud, and from the north was that stormy looking cloud. I know from previous experience that approaching storm clouds can look dramatic when shot with a wide angle lens. So I quickly got the camera out and shot this image:
Approaching Storm on Dartmoor, Devon - Nikon D850, Nikkor 16-35 mm f/4 at 16 mm, 0.5 seconds at ISO 64, f/11, Lee Filters ND Grad.
I had to work fast to get the image because the cloud was rolling in fast. While the image would have greatly benefited from some scattered light on the distant tors, it does show Dartmoor as it was that evening, and perhaps reflects my mood a little.
I then wanted to fine tune my composition a little. I like the rocky tors in the foreground of the first image, but I felt that they were a too close to the bottom of the frame. I also felt that the clouds were a more important element of the photograph, so I decided to point the camera up more to give me this composition.
Storm Clouds over Dartmoor, Devon - Nikon D850, Nikkor 16-35 mm f/4 at 18 mm, 0.6 seconds at ISO 64, f/11, Lee Filters ND Grad.
I'm not sure which image I prefer. The sky in the first image is more appealing as the dark cloud hasn't covered all of the skies yet, but I prefer the overall composition of the 2nd image. To be honest, I'm just really happy to have captured anything. I was sure I was going to go home empty-handed and a little unhappy (creatively speaking).
It was a challenging evening but aside from the pleasing images, I can always take away two positives. Firstly, it's always great to be outdoors. Even if I took no photographs, spending the evening on beautiful Dartmoor is rarely a bad thing. Secondly, it was good to be out with the camera. That time out with the camera gave me more photographic experience and practice that I can put to good use when I really need it. You can be in the most amazing location with the most amazing light, but if you don't how to use your camera properly or know how to read a scene, you might come away with nothing.
Have you ever been out with the camera on a seemingly pointless adventure? Which of my two images did you prefer? Let me know in the comments below.

Discovering Prawle Point and Gammon Head
In the blog this week I head out to Gammon Head and Prawle Point on the South West Coast Path in Devon to explore a new location and to try something I don’t do very often!
Exploring New Landscape Photography Locations
I have to admit that I think one of my weaknesses with my photography is allocating enough time to go out and find new locations. It's not that I've got any shortage of inspiration. My custom Google map is awash with locations not visited. It's just that I always seem to be short of time, so I think I tend to go to locations that I know to try and increase the chances of getting a good image.
Recently I have been trying to do a little more exploring as you might have seen in my Froward Point and My Photography is Not a Priority blog posts. However, sometimes the best way to find something new is to head out with someone. So when I met up with fellow local photographer Neil Burnell recently, I asked him to suggest a location that we could photograph. You may remember Neil's work from a recent episode of On My Bookshelf where I took a look at his rather excellent book, Seascapes. You can see that video here.
Great Gammon Head
Neil knows the south Devon coast extremely well and given the weather and tide conditions he suggested we try photographing around the Prawle Point area. I've visited Prawle Point a couple of times with the family so I knew of the coastline there, but I'd never taken the time to explore it properly so I was excited to see what I could discover.
Neil suggested I take a look at Gammon Head, so while he did some IR photography I took a walk along the South West Coast Path. My instinct was to get up high, but as I ascended Gammon Head, I noticed an interesting rocky outcrop (Ball Rock I believe) down on the waters edge. There was no path down to the waters edge, and while it wasn't very steep, the descent was made difficult due to the thick vegetation.
When I finally made it down there I realised how exposed and hidden this part of the coastline was. If I was to have an accident I would have no chance of been spotted by someone walking the main path and with no mobile phone signal, I wouldn't be able to call for help. I decided that if I visit this location again I wouldn't do so on my own.
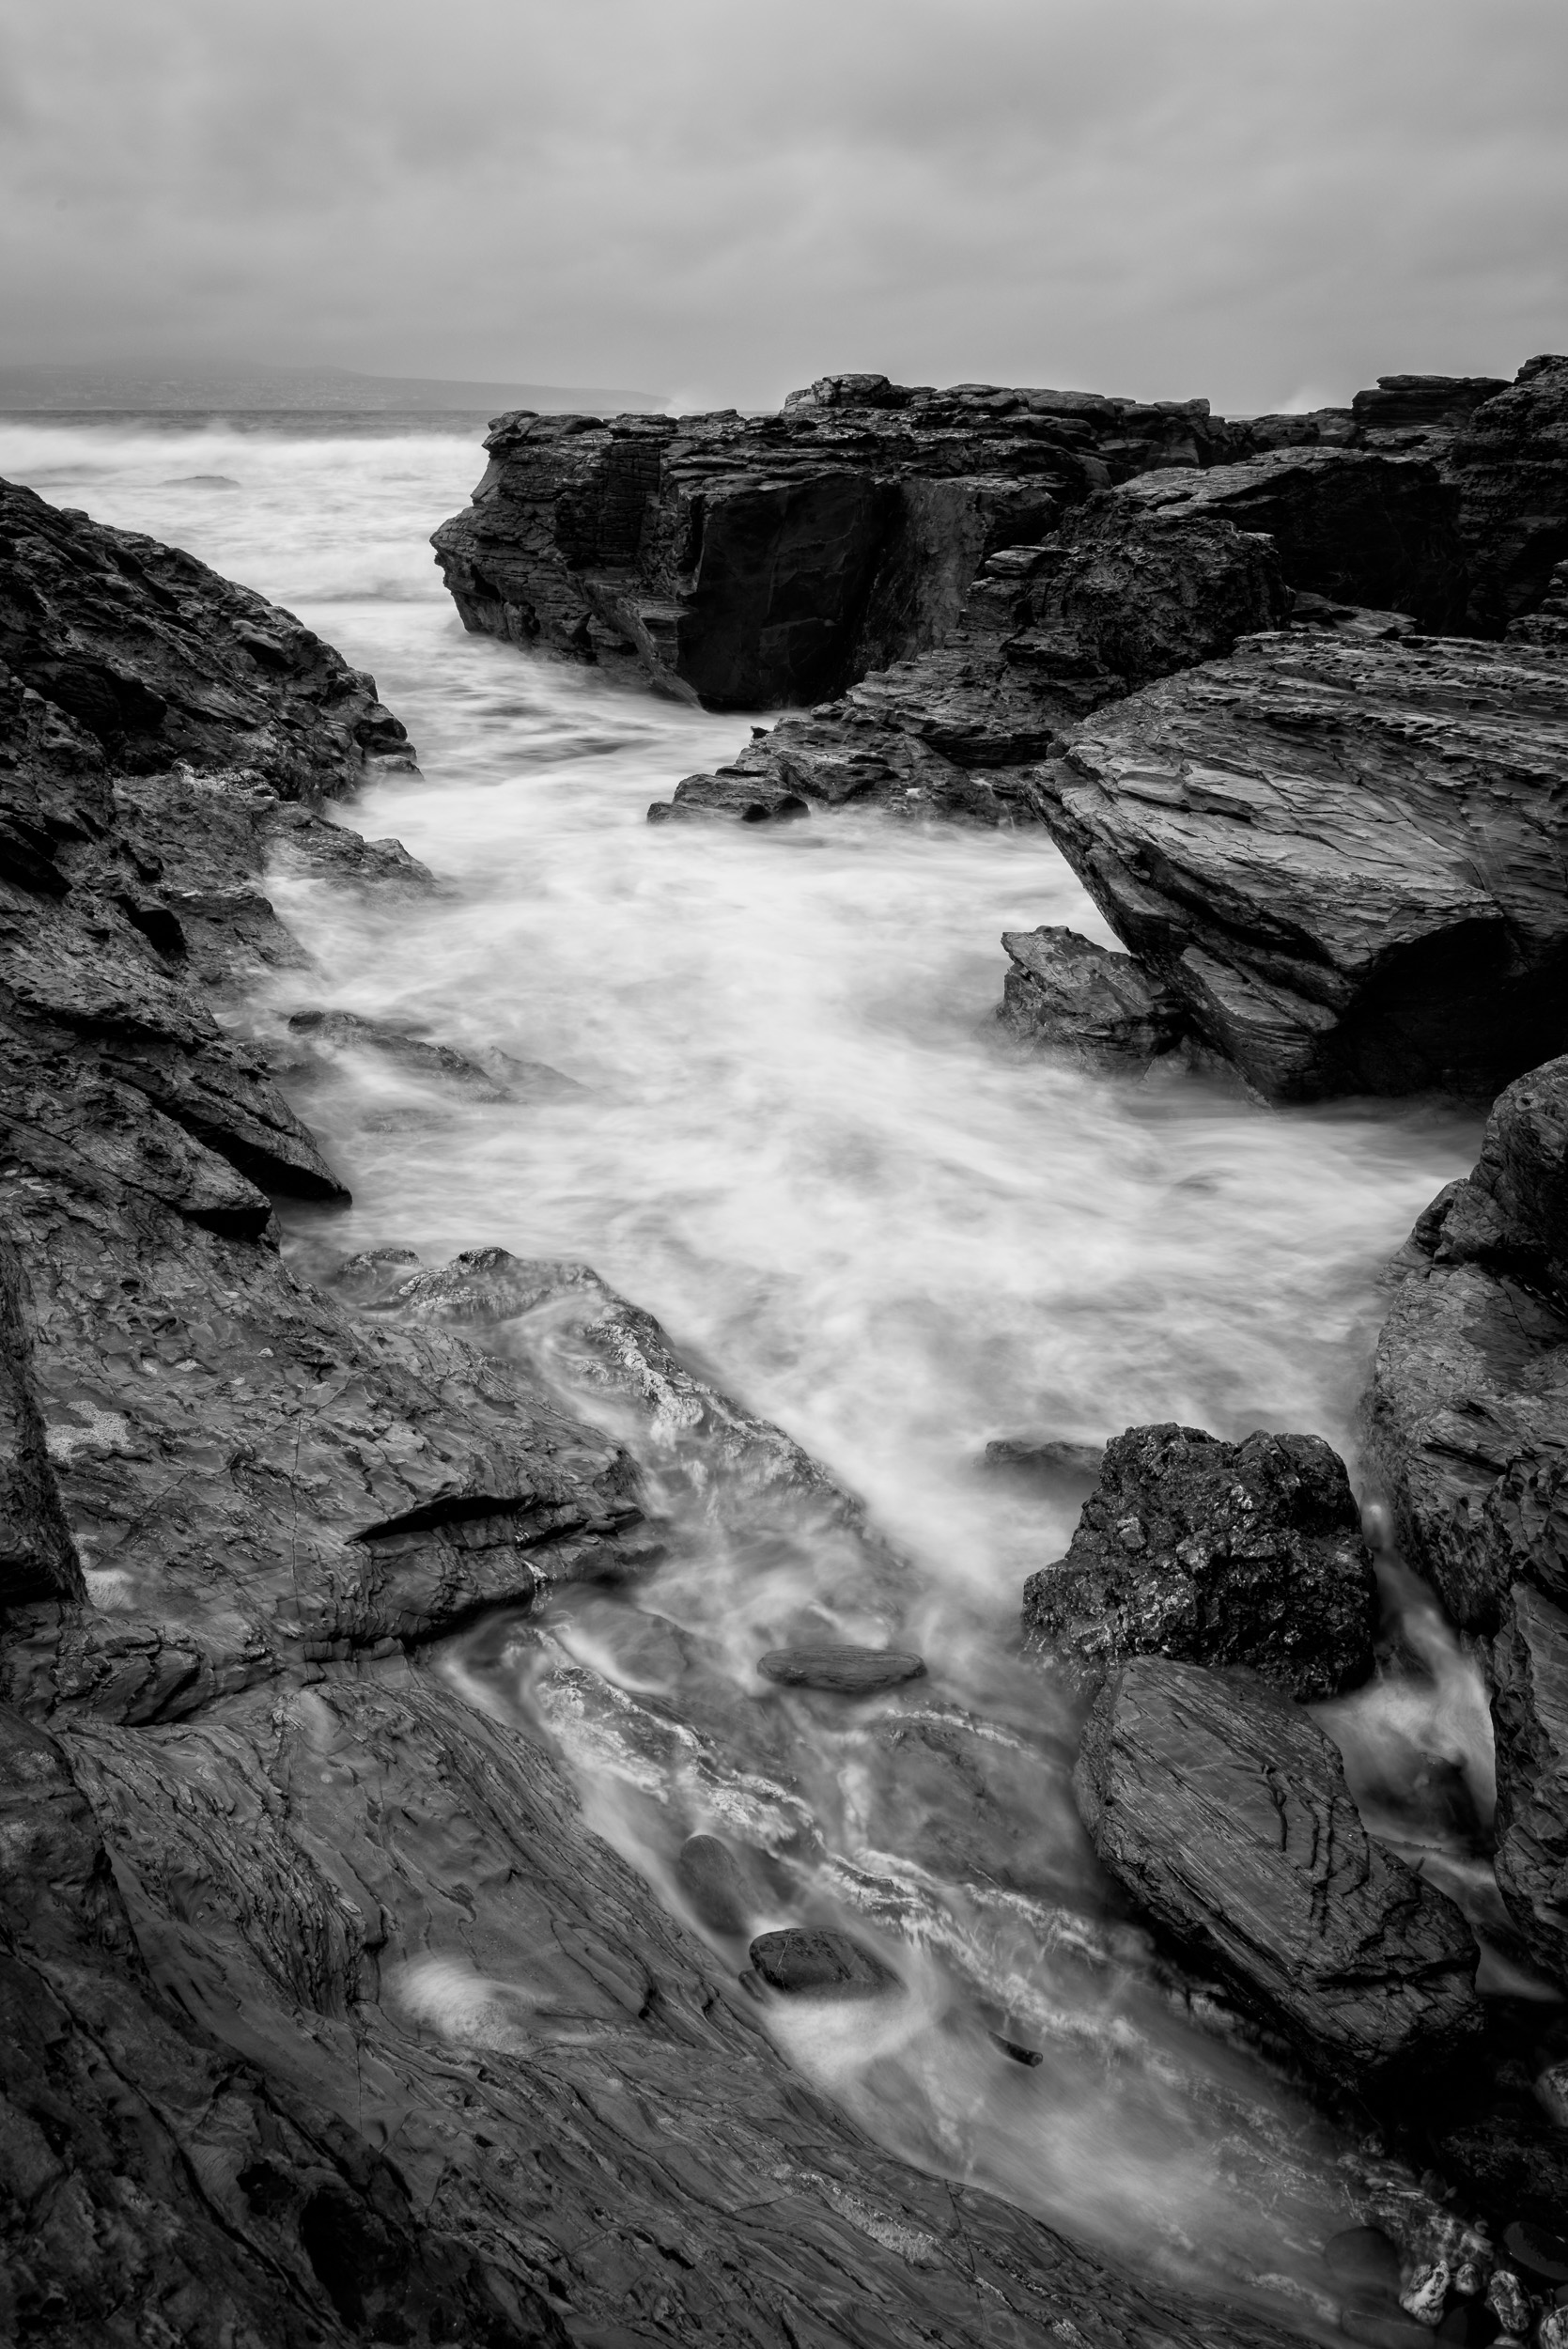
All that said, I was down there now and it was time to take some photographs. The light was fading fast by this point so I had to work fast.
My gut feeling for shots at these types of locations is to go with a long exposure, but as you can see below, an exposure of just 0.5 seconds can produce pleasing results. The wider view of the sea looks a bit messy, but I really like the texture of the water around the rocks.
The Rocks at Gammon Head #1, Devon - Nikon D850, Nikkor 16-35 mm f/4 at 24 mm, 0.5 seconds at ISO 64, f/13, Lee Filters Circular Polariser.
Below is the same image but with a 6 stop IR ND filter from Lee. This has given me a 30-second exposure which has resulted in the image I originally had in mind. However, I'm a bit torn between this image and the version before it. Which one do you prefer?
The Rocks at Gammon Head #2, Devon - Nikon D850, Nikkor 16-35 mm f/4 at 24 mm, 30 seconds at ISO 64, f/13, Lee Filters Circular Polariser and 6 Stop IR ND.
So while the first two images are pleasing enough, I wanted to fine-tune my composition. This is can be rather tricky when your down on a bit of coastline like this. Just stepping to right can mean a swim in the sea! I think I prefer the composition below as the furthest away rock now sits just above the horizon, rather than on it.
The Rocks at Gammon Head #3, Devon - Nikon D850, Nikkor 24-70 mm f/2.8 VR at 24 mm, 30 seconds at ISO 64, f/13, Lee Filters Circular Polariser and 6 Stop IR ND.
Ideally, I would have liked for that furthest away rock to not only have separation from the horizon but from the mass of rock to its left. But as I mentioned earlier, that would have meant walking on water!
For the final composition at Gammon Head, I headed down as close to the waters edge as I could and decided to take a vertical image.
The Rocks at Gammon Head #4, Devon - Nikon D850, Nikkor 24-70 mm f/2.8 VR at 27 mm, 30 seconds at ISO 64, f/13, Lee Filters Circular Polariser and 6 Stop IR ND.
I wouldn't normally publish so many similar images in the same blog post, but I wanted to share with you what I was doing and why. Hopefully, you found it interesting. Moving around a scene just a little can yield very different photographs.
Stars at Prawle Point
One of the other benefits of shooting with someone else is that you may find yourself photographing something a little different. As the sunset, the clouds started to clear so we decided to head up to the coastguard lookout at Prawle Point. Neil suggested this would make for an ideal location for some night sky photography.
I am in no way a night sky / astro photographer. I've done a bit of reading on the subject so I understand some of the basics around camera setup. I have even taken the odd night sky photograph, but nothing really serious. So capturing an image of this location in the dark was going to be a challenge. This challenge became even more obvious as I watched Neil set up his camera and take photographs like it was the middle of the day!
Anyway, I was having fun and I wasn't not going to let a thing like experience put me off having a go! So while the image below is not going to win any awards, I rather like it. I have to admit that there was a little luck involved in getting the shot. I couldn't really see very much, making focusing on anything difficult. I did have a head torch, but the beam wasn't strong enough to light the building, so I either guessed it or get Neil to use his head torch. Composition in the dark wasn't exactly easy either!
A Stary Night at Prawle Point Coastguard Lookout, Devon - Nikon D850, Nikkor 16-35 mm f/4 at 16 mm, 15 seconds at ISO 1600, f/14.
Every year I promise myself that this will be the year that I get into astrophotography. I find the night sky fascinating, and now that I've got a little extra motivation, maybe this is the time I follow through on my promise.
I really enjoyed my time at Prawle Point and Gammon Head. It was really good to explore somewhere new and to try out something a little different. I was glad I didn't just head out to somewhere I knew and played it safe!
So which of my Gammon Head shots do you prefer? Do you do any astrophotography? How much time to do you spend just exploring new locations? Let me know in the comments below.

Landscape Photography at Godrevy Point and Lighthouse
In the blog this week I head to Godrevy Point in Cornwall to capture some seascape photographs. As I discovered, there is more to photograph than just lighthouse.
Cornwall's Spectacular Coastline
The coastline of Cornwall is without a doubt one of Britain's best natural features. The seemingly endless coastline features everything from golden sandy beaches to rugged cliffs that get battered by the never-ending power of the sea.
As a landscape photographer, Cornwall has to be one of the top locations in Britain for seascape photography. I'm lucky enough to live near Cornwall, so during the summer months when the days are longer I will often find myself crossing the border from Devon for a spot of photography.
Discovering to Godrevy
One of my favourite locations in Cornwall is Trevose Head. It's a cracking location with rugged cliffs, big crashing waves and a lighthouse. However, further down the coast is Godrevy Point, a very similar bit of coastline that also has a lighthouse.
I first discovered Godrevy Point when I was taken there by professional photographer Ross Hoddinott. I was there with my father-in-law to do a feature called "Photo Challenge" for the magazine Digital SLR Photography. Ross had us "competing" against each other in a series of challenges. We visited St Michael's Mount in the morning (somewhere else I must return to), and then later in the day we went to Godrevy point.
It was a fantastic day and a lot of fun. If you want to see the article, it was in the December 2014 issue of Digital SLR Photography, so if you have a copy kicking about check it out! I captured some images that even today I'm very happy with (see below).

Since that initial visit, Godrevy Point has been on my locations map. However, as it's 2 hours from home, I've always favoured going to Trevose Head which is a little closer.
Returning to Godrevy
This week I finally decided to return to Godrevy Point. The weather forecast and tides were favourable, and I had enough time to drive there and still have time to take photographs before the sun would set.
As it had been nearly fours years since my last visit the first thing I did was have a little walkabout. There are all the cliff top locations to look at, as well as locations down on the beach and the rocky ledges. As I knew the tide was going out, I felt OK about going down onto the ledges. I still had to keep a very close eye on the waves though. It's always best to watch the water for a few minutes before moving onto your next spot as the strength and reach of waves can vary.
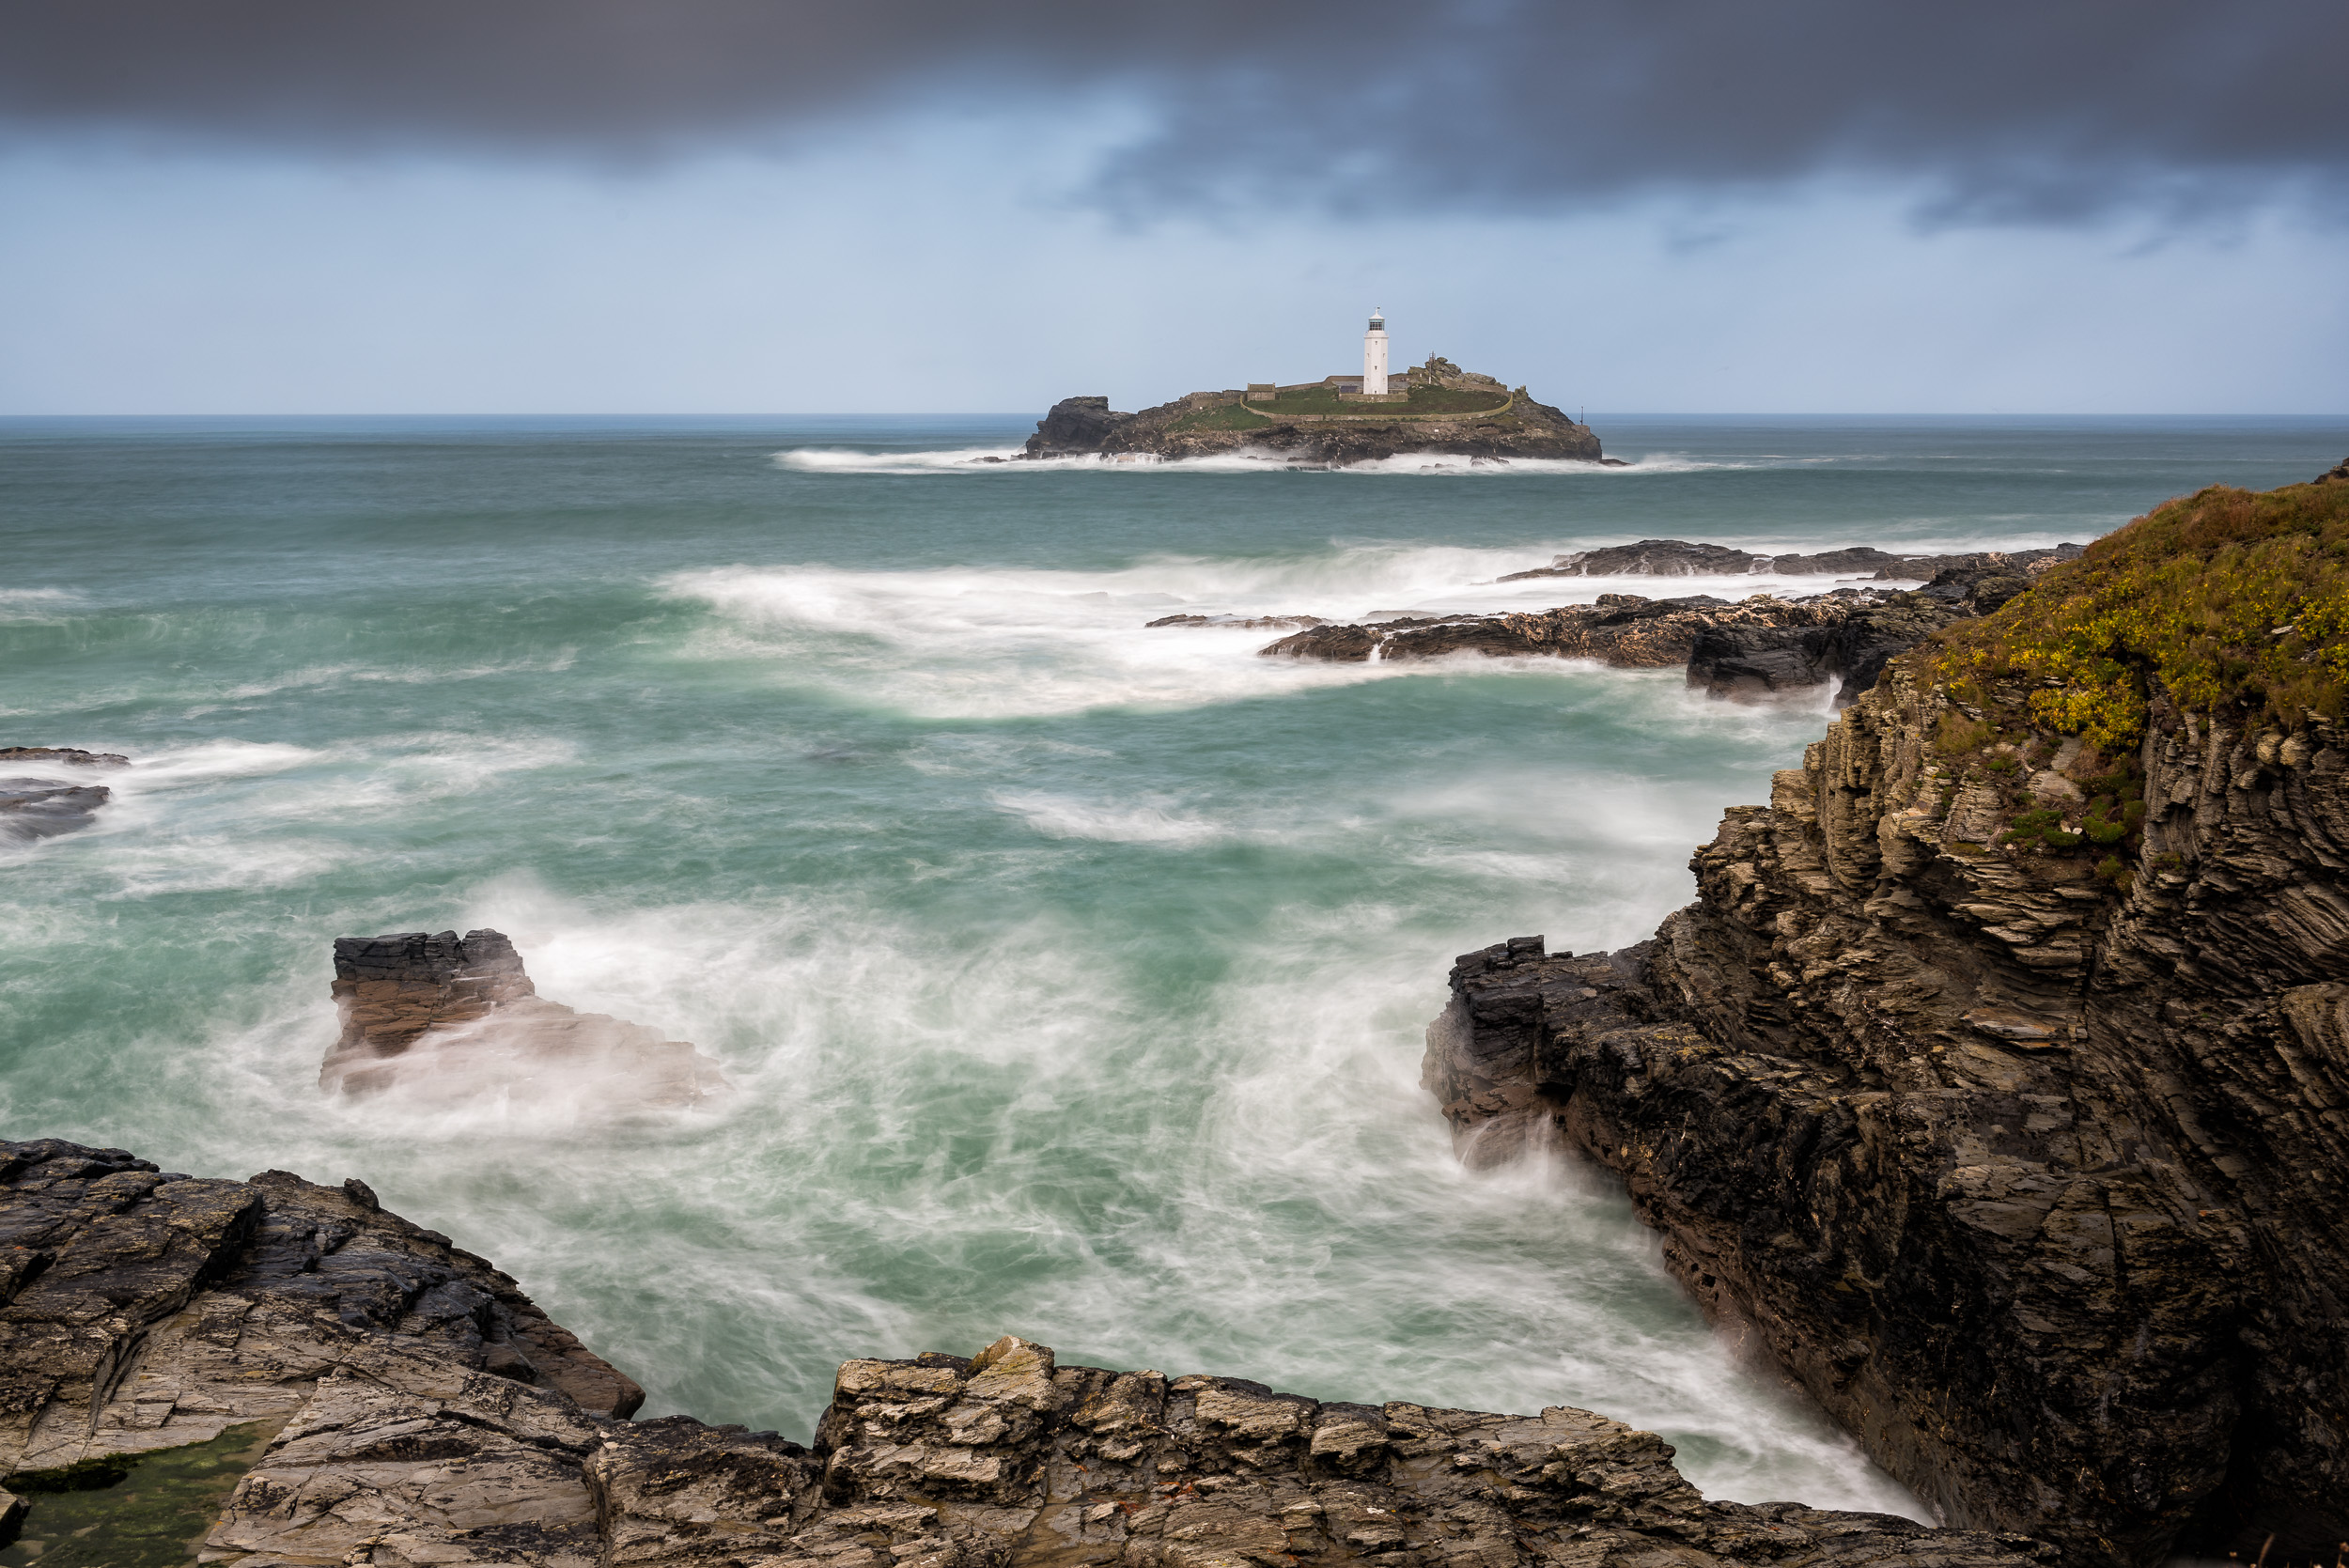
My first image from my visit, shown below, was taken up on the cliffs along the South West Coast Path. It's a pleasing enough image but it lacks dramatic light. Some light on the island or cliff face to the side would have really lifted the image. Normally I would have also gone for a long exposure here, but I wanted to capture the movement of the waves so went for the shorter exposure time.
Godrevy Lighthouse from the South West Coast Path, Cornwall - Nikon D850, Nikkor 16-35 mm f/4 at 25 mm, f/11, 1/10th sec @ ISO 64, Lee Filters Landscape Polariser and 2 stop ND Grad.
For my next spot, I decided to leave the South West Coast Path and head down onto the beach and Godrevy Cove. While the lighthouse is a prominent feature of coastline at Godrevy, not all photographs need to include it. The photograph below is actually my favourite of the evening, so it pays to explore an area before digging in your tripod legs.
Again for this image, I really wanted to capture the movement of the waves. Using a polariser not only enhanced the colours, and reduced glare, but it also reduced the amount of light entering the camera, allowing me to get a slightly longer exposure without the need for an ND filter.
Godrevy Point Waves (Godrevy Cove), Cornwall - Nikon D850, Nikkor 24-70 mm f/2.8 VR at 24 mm, f/13, 1/8th sec @ ISO 64, Lee Filters Landscape Polariser and 2 stop ND Grad.
It's important to try new things every now and again, and it's OK to experiment with your photography. While the photograph of the beach stones below might not win any awards, it was still fun to take and provides a welcome break from photographs of waves!
Godrevy Point Beach Stones (Godrevy Cove), Cornwall - Nikon D850, Nikkor 24-70 mm f/2.8 VR at 70 mm, f/8, 1/4th sec @ ISO 64, Lee Filters Landscape Polariser.
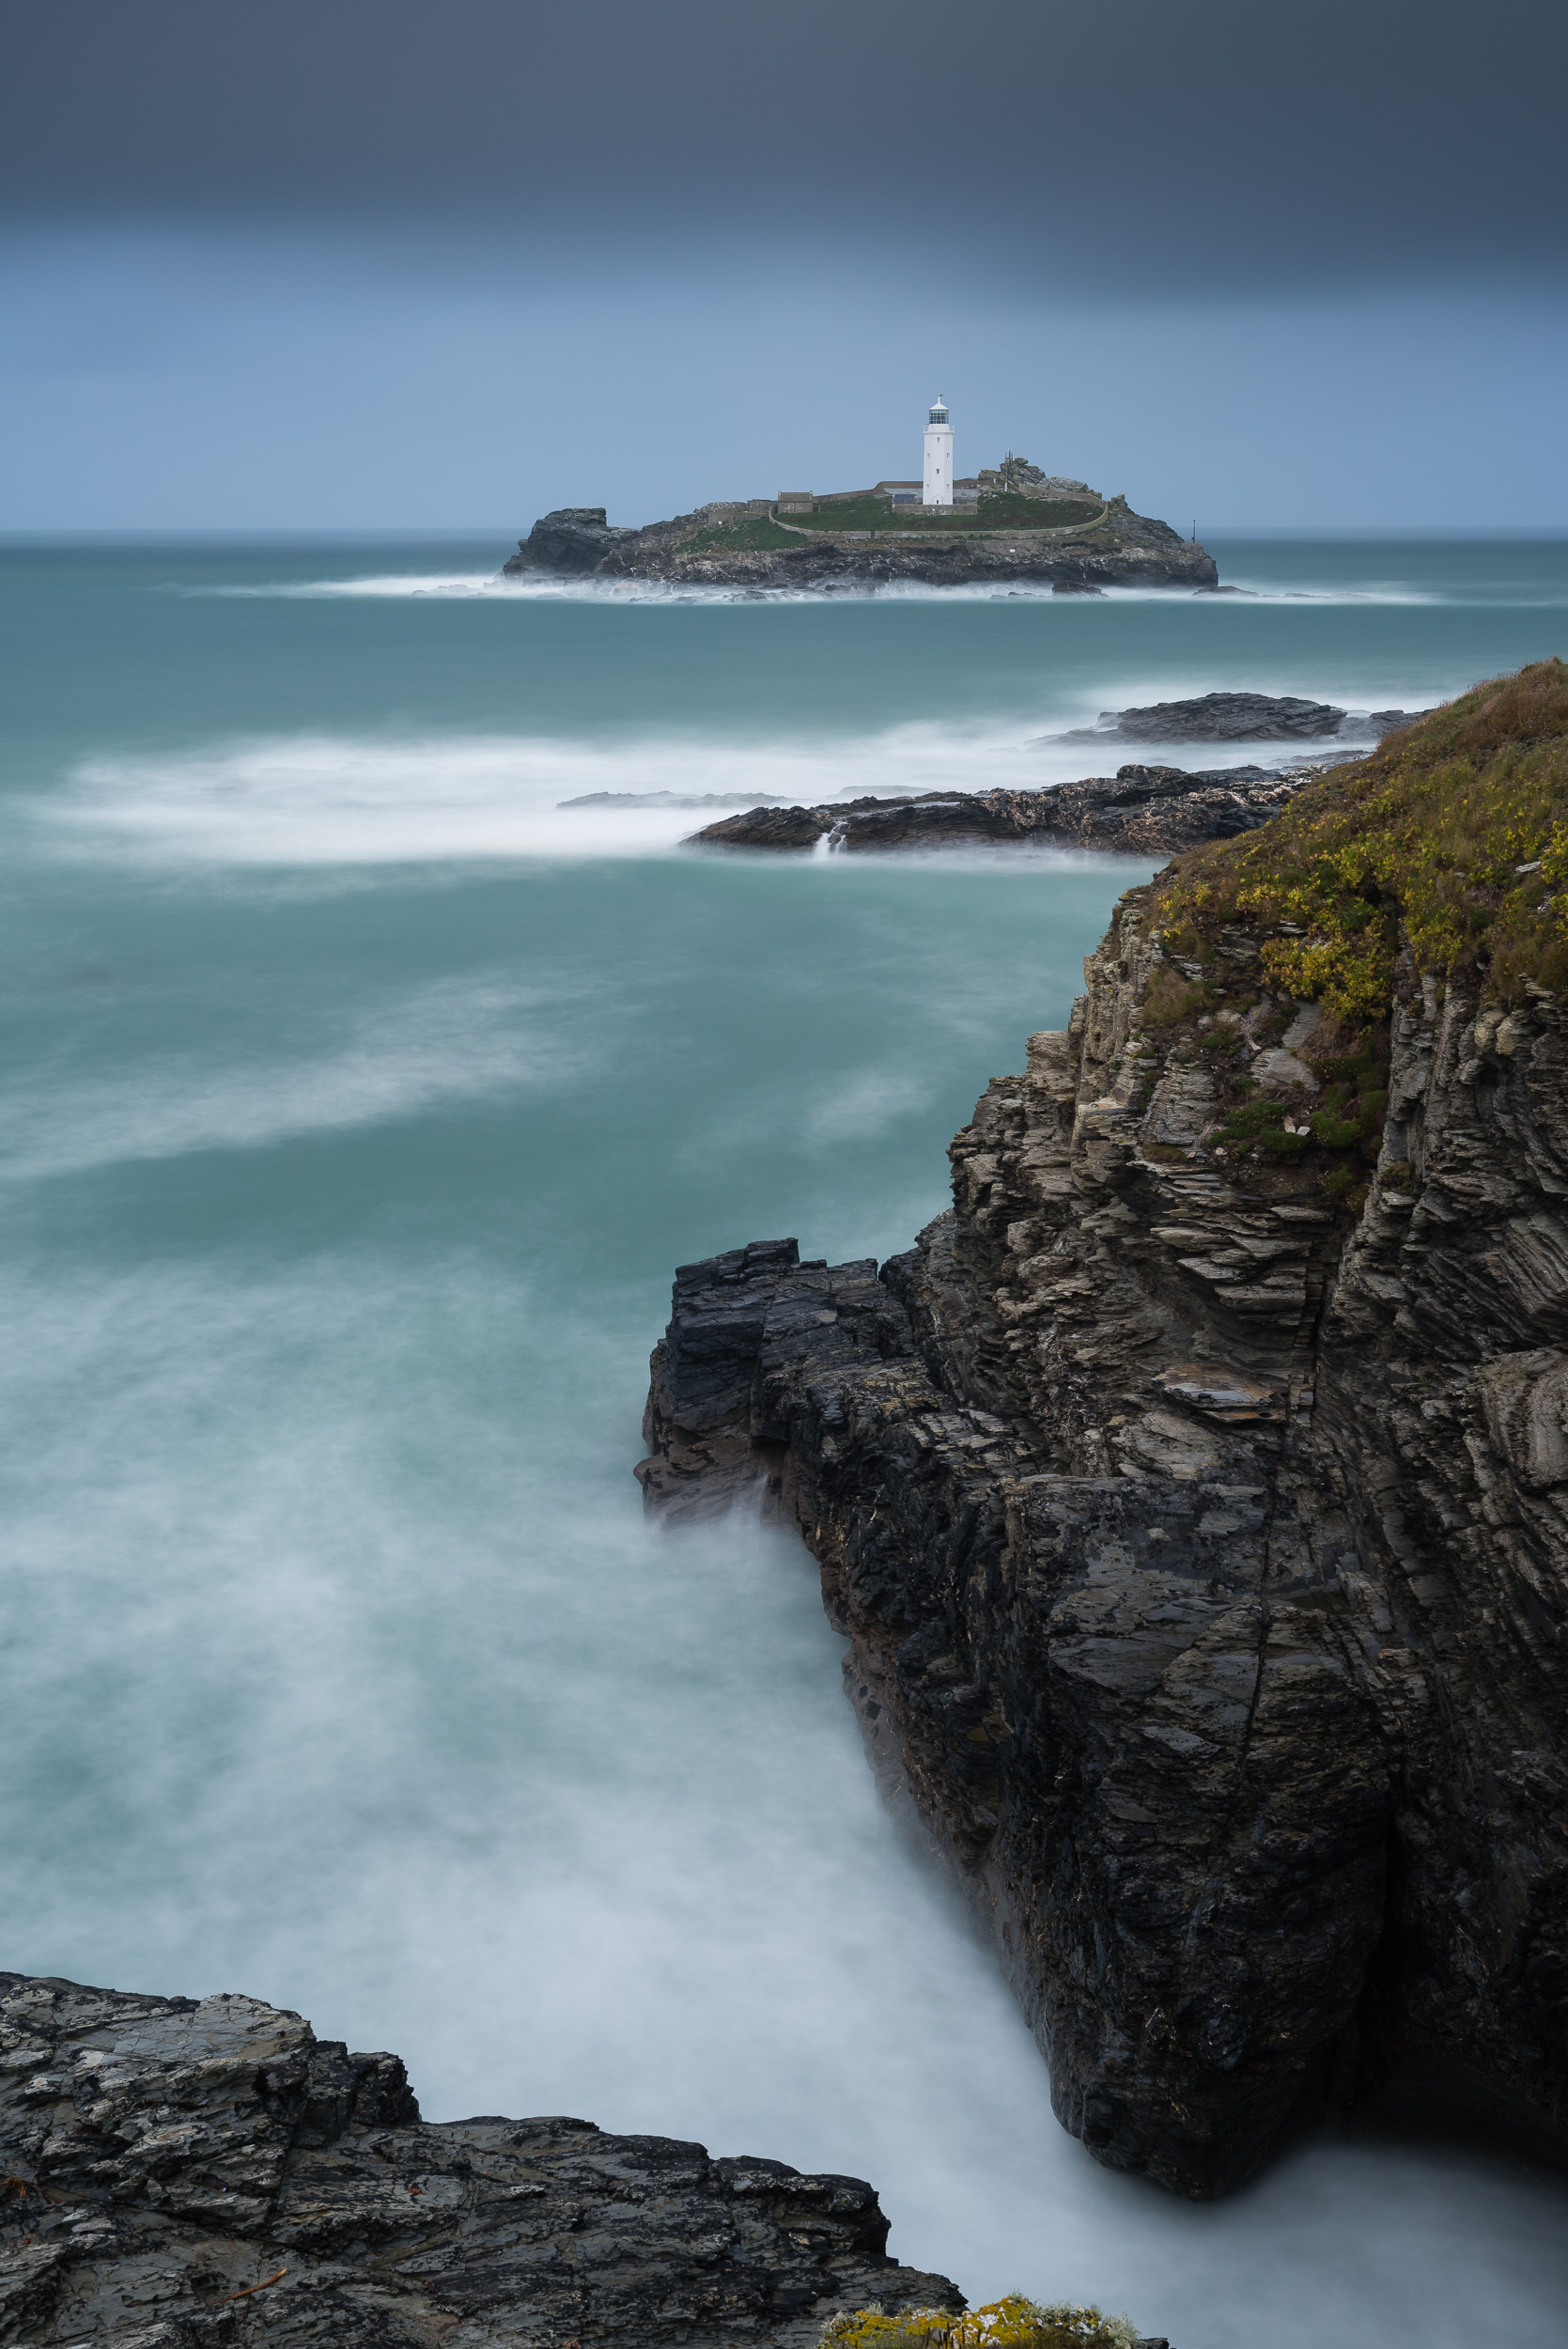
As the sun started to set, I headed down to the rocky ledges to get ready for my final shots of the day. I was hoping for better light, either to illuminate parts of the scene, or for it to go dark and stormy, but I ended up with something in the middle. So while I like the composition of both of the images below, they just lack something to make them special. Maybe I'm just getting fussier with my photogrpahy these days!
Dusk at Godrevy Lighthouse, Cornwall - Nikon D850, Nikkor 24-70 mm f/2.8 VR at 27 mm, f/13, 1.3 sec @ ISO 64, Lee Filters Landscape Polariser.
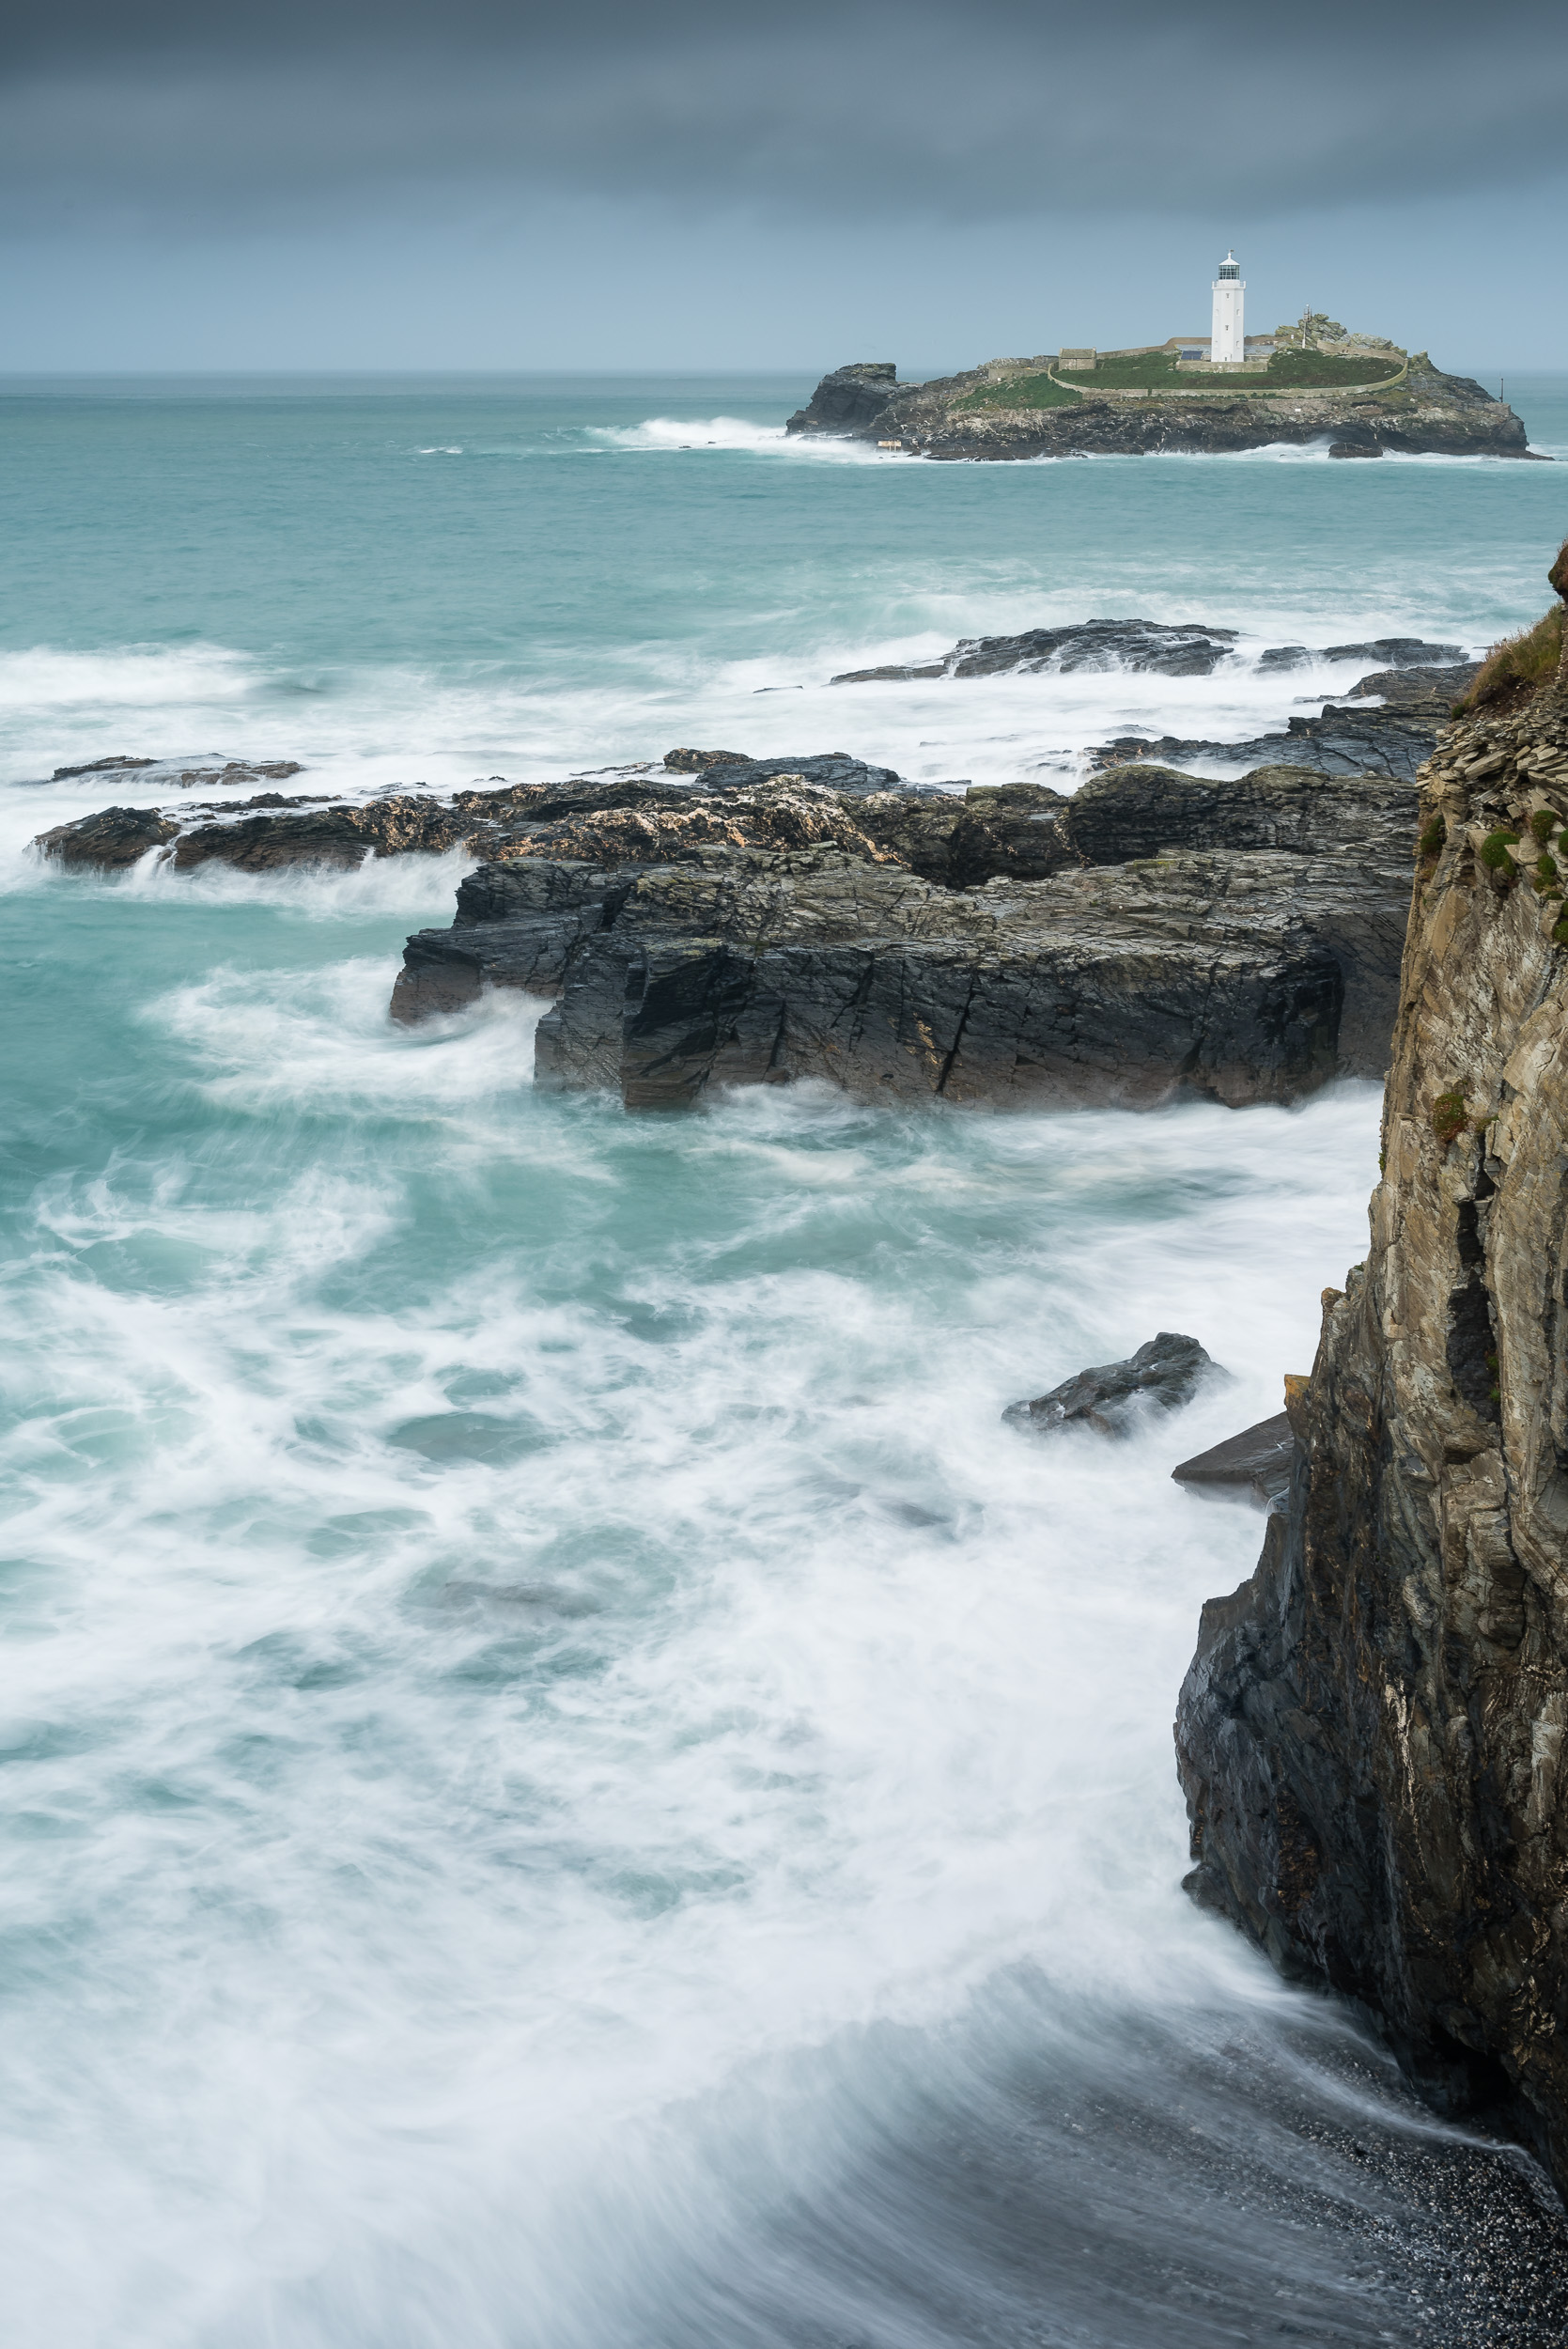
Just a little note on the photography below. Unfortunately, both my main tripod and cable release were away for repair making capturing this photograph tricky. I needed to use the self-timer so there wasn't any camera shake from pressing the shutter button. Normally 2 seconds would be enough, but because the tripod wasn't as stable as my normal tripod, it needed to be 5 seconds. This makes timing really difficult as waves aren't as predictable as you might hope!
Godrevy Lighthouse from Godrevy Point, Cornwall - Nikon D850, Nikkor 24-70 mm f/2.8 VR at 38 mm, f/13, 0.5 sec @ ISO 400, Lee Filters Landscape Polariser.
More Godrevy
I really enjoyed my visit to Godrevy. It was great to be back and I really must make the extra effort to return there again. Looking back at my images from 2014 and those I captured this week, I'm not sure that I don't prefer the images from 4 years ago. I think it probably has something to do with the moodier skies of the images back then. Still, I was very happy that I undertook the 4 hour round trip to Godrevy.
I also have some exciting news. While I was there, I actually did a little filming for my YouTube channel. I'm producing a video on photographing Cornwall's coastline and Godrevy is one of the featured locations. I'm not sure when the video will be ready, but be sure to head over to my YouTube channel and subscribe. Remember to click on the bell icon as well so you'll receive a notification as soon as I post up a new video.
So have you photographed Godrevy Point before? Did you photograph the lighthouse or exclude it? Did you prefer my 2018 or 2014 photographs? Let me know in the comments below.

How I Manage My Images in Lightroom - From Import and Export
In the blog this week I share with you Adobe Lightroom workflow. I show you how I manage my images from import to export and everything in between.
My Lightroom Workflow
I've been using Adobe Lightroom since version 3 and over the years I've been fine-tuning my image workflow around its capabilities. While its image processing speed had left me screaming up until a recent update, I've always liked its ability to organise and manage my photographs.
In the video below I share with you my Lightroom workflow. I show you how I import my images, select images for processing, apply keywords, rate images and finally get them ready for export. There are lots of different ways to do Digital Asset Management (DAM) in Lightroom, so my way is probably neither the right way, nor the wrong way, but hopefully, you'll be able to take something away from this video and use it in your workflow.
Do you have any Lightroom tips for image organisation? How does your workflow differ? Let me know in the comments below.
My Other Workflow Videos
How I Backup my Landscape Photographs
Every landscape photography I take is unique to me and so I want to minimise the risk of data loss at every step. In the blog this week I show you how I protect my data from the moment I press the shutter button up until the point I'm ready to format my memory cards again.
Every Landscape Photograph Is Unique
Every landscape photograph you take is unique and can't be recreated. Each time you press that shutter button it is a unique point in time. The light, the weather, and the conditions will likely never be exactly the same again. So how much care do you take to protect your images from virus outbreaks, deletion, corruption or hardware failure?
To me, every photograph or video I create is important and needs to be protected. Some of the content is priceless, such as photographs of my children, or it might represent an investment of time and money, such as one of my landscape photographs. No matter the content though, to me it has value.
My Backup Workflow
For some people backup is something they think about rather than do. Something to do at some point Maybe. For me, though it's become such an integral part of my workflow now that it's just something I do automatically each time I upload new content to my computer.
So if you've been looking to start putting together a proper backup routine for your workflow or you are simply looking for some tips to improve your existing backup routine, I've created this video which lays out, step by step, how I backup and protect my images.
Backup Products
If you are interested these are some of the products I used in the video as part of my backup workflow:
So do you have a robust and complete backup workflow? Do you backup on occasion? What tools and products do you use? Let me know in the comments below.
My Other Workflow Videos
PS - Some of the links used are Amazon affiliate links. By buying through the links I may receive a commission for the sale. This has no effect on the price for you.

My Photography is Not a Priority
In the blog this week I tell you why photography is not a priority for me!
Burnt Out?
I love creating videos for my YouTube channel. I was already passionate about landscape photography and creating videos about my time out with the camera was a natural extension of my desire to share my photography.
However, there is no doubt it is a lot of hard work. Sometimes my ideas are a bit grand and a little over adventurous. These ideas sometimes pay off, but I normally have to put in a lot of extra effort. It was after one of those "go the extra mile" videos that I decided I need a little rest.
Landscape Photography Not a Priority
I wasn't burnt out. I just needed a rest. I had spent the previous day driving all over the country taking photographs, but I still had the following day free. I wanted to use that spare day to create another full-on landscape photography video, but I decided that I would benefit more from not making photography a priority.
So I headed out for a walk up Conic Hill near Loch Lomond on a beautiful summers day. I still took my camera, but it wasn't my goal to even get it out of the bag. Relaxing from the photography got me thinking and I decided to share my results in this video:
So just a short video. A bit of a brain dump and a chance to try my hand at some cinematic style video. I hope you liked it. Did the message resonate with you? Let me know in the comments below.
Loch Lomond Panorama
As I said in the video, I did take one image and here it is:

Loch Lomond from Conic Hill - Super Wide Panorama on a Super Sunny Day: Nikon D850, Nikkor 24-70 mm f/2.8 at 52mm, 1/160th sec @ ISO 64, f/11, 12 image panoramic stitch.

Photographing Britain's National Parks
In the blog this week I’m very happy to share with you the story of my latest adventure. Check out the images and video I captured as I travel to three different national parks, across three countries and all in one day!
Grand Ideas
One of the primary goals of my YouTube channel is to share my landscape photography adventures. By sharing my adventures I can hopefully provide a little inspiration to my fellow landscape photographers or even encourage people to get out there and see the great outdoors.
Sometimes my adventures are unplanned, but every now and again I come up with a plan for a grand adventure! The problem is that these grand plans aren't exactly simple to execute. Time is the normally the limiting factor for me.
However, when I read about National Parks Week, I thought it was the perfect excuse to execute one of those grand adventures. My idea was simple. I would visit 3 national parks, in 3 different countries and do it all in one day. Would it even be possible? Let's find out.
As you saw in the video, it is indeed possible. I wouldn't exactly recommend it though. It was a lot of driving and a very long day. But I sure did enjoy it! The locations I visited were stunning, and that was only 3 of the 15 national parks in Britain.
If you haven't visited a national park before, or it's been a while, I really recommend that you check out the National Parks website as there is sure to be one near you. I'm really lucky as I have Dartmoor on my doorstep. The national parks are a valuable resource, so if you have some time it's also worth considering spending some time on your local national park as a volunteer. You can see how I got on one year volunteering on Dartmoor here.
I really hope you enjoyed this video. If you are looking for a bit more detail on the locations I visited and the photographs you saw, you'll find them below.
So are heading out for National Parks Week? What is your favourite national park? Let me know in the comments below.
Wales - Snowdonia National Park
For more information about Snowdonia National Park, click here.
Snowdonia National Park - near Plas y Brenin, Wales: Nikon D850, Nikkor 16-35 mm f/4 at 25 mm, 1/20th sec at ISO 64, f/13, Lee Filters Circular Polariser.
England - Lake District National Park
For more information about The Lake District National Park click here.
Haweswater Reservoir - Lake District, England: Nikon D850, Nikkor 16-35 mm f/4 at 17 mm, 1/20th sec at ISO 64, f/13, Lee Filters Circular Polariser.
Scotland - Loch Lomond and The Trossachs National Park
For more information about the Loch Lomond and The Trossachs National Park, click here.
A Pastel Sunset at Ben A'an - Loch Lomond and The Trossachs National Park: Nikon D850, Nikkor 24-70 mm f/2.8 at 70 mm, 1/5th sec at ISO 64, f/13, Lee Filters 2 Stop ND Grad.
Looking North from Ben A'an on a Beautiful Summers Evening - Loch Lomond and The Trossachs National Park: Nikon D850, Nikkor 24-70 mm f/2.8 at 48 mm, 1/3rd sec at ISO 64, f/8, Lee Filters 2 Stop ND Grad.
A Summer Sunset At Ben A'an and Loch Katrine - Loch Lomond and The Trossachs National Park:: Nikon D850, Nikkor 16-35 mm f/4 at 18 mm, 0.5 sec at ISO 64, f/18, Lee Filters 2 Stop ND Grad.

Creating Coastal, Long Exposure, Panoramic Images with the Nikon D850
Have you ever taken a coastal, long exposure, panoramic image before? Well, that's just what I did in my latest video. Sometimes you need to see a scene a little differently to get inspired in a big way.
Getting Inspired
Over the years I've visited Froward Point on the south Devon coast a few times. Despite many attempts I've never really captured an image from that location that I'd really been happy with. In fact, I'd just about given up on it as a location.
However, after being inspired by the work of another local photographer, I thought Froward Point might be worth another visit. This time though, I would leave most of my gear behind, travel light, and wander along the coast path a bit more. Rather than go back to the same spot I always end up going to, I would see what other viewpoints there might be.
Sure enough, as I walked along the coast path I got to see a view of rocks near Froward Point in a totally new way! My creative brain got all excited by the new compositions that I could make photographs from. For me, the scene instantly said that this coastal image would be a long exposure, and would be best suited to the panoramic format. I even thought it would work best on a grey and overcast day.
With a clear vision of what I wanted to photograph, I just needed to return at the right time when I had the weather conditions were right and the tide was high. Here is what happened when I did finally return:
As you'll have seen this video was a bit longer than normal, but I wanted to take you through my thought process, how I set up the camera, and how I eventually captured then printed the final image.
So have you ever captured a coastal, long exposure, panoramic image before? What photography techniques have you combined before? Let me know in the comments below.
The Photographs
A Coastal Long Exposure Panorama - Froward Point, Devon: Nikon D850, Nikkor 70-200 mm f/2.8 at 70 mm, 20 secs at f/11, ISO 64, Lee Filters Circular Polariser. 5 Image stitch.
On an Island - Froward Point, Devon: Nikon D850, Nikkor 24-70 mm f/2.8 at 58 mm, 105 secs at f/6.3, ISO 64, Lee Filters Circular Polariser. 5 Image stitch.
Islands in the Blue - Froward Point, Devon: Nikon D850, Nikkor 24-70 mm f/2.8 at 29 mm, 40 secs at f/11, ISO 64, Lee Filters Circular Polariser.
Friends, Fun and Landscape Photography
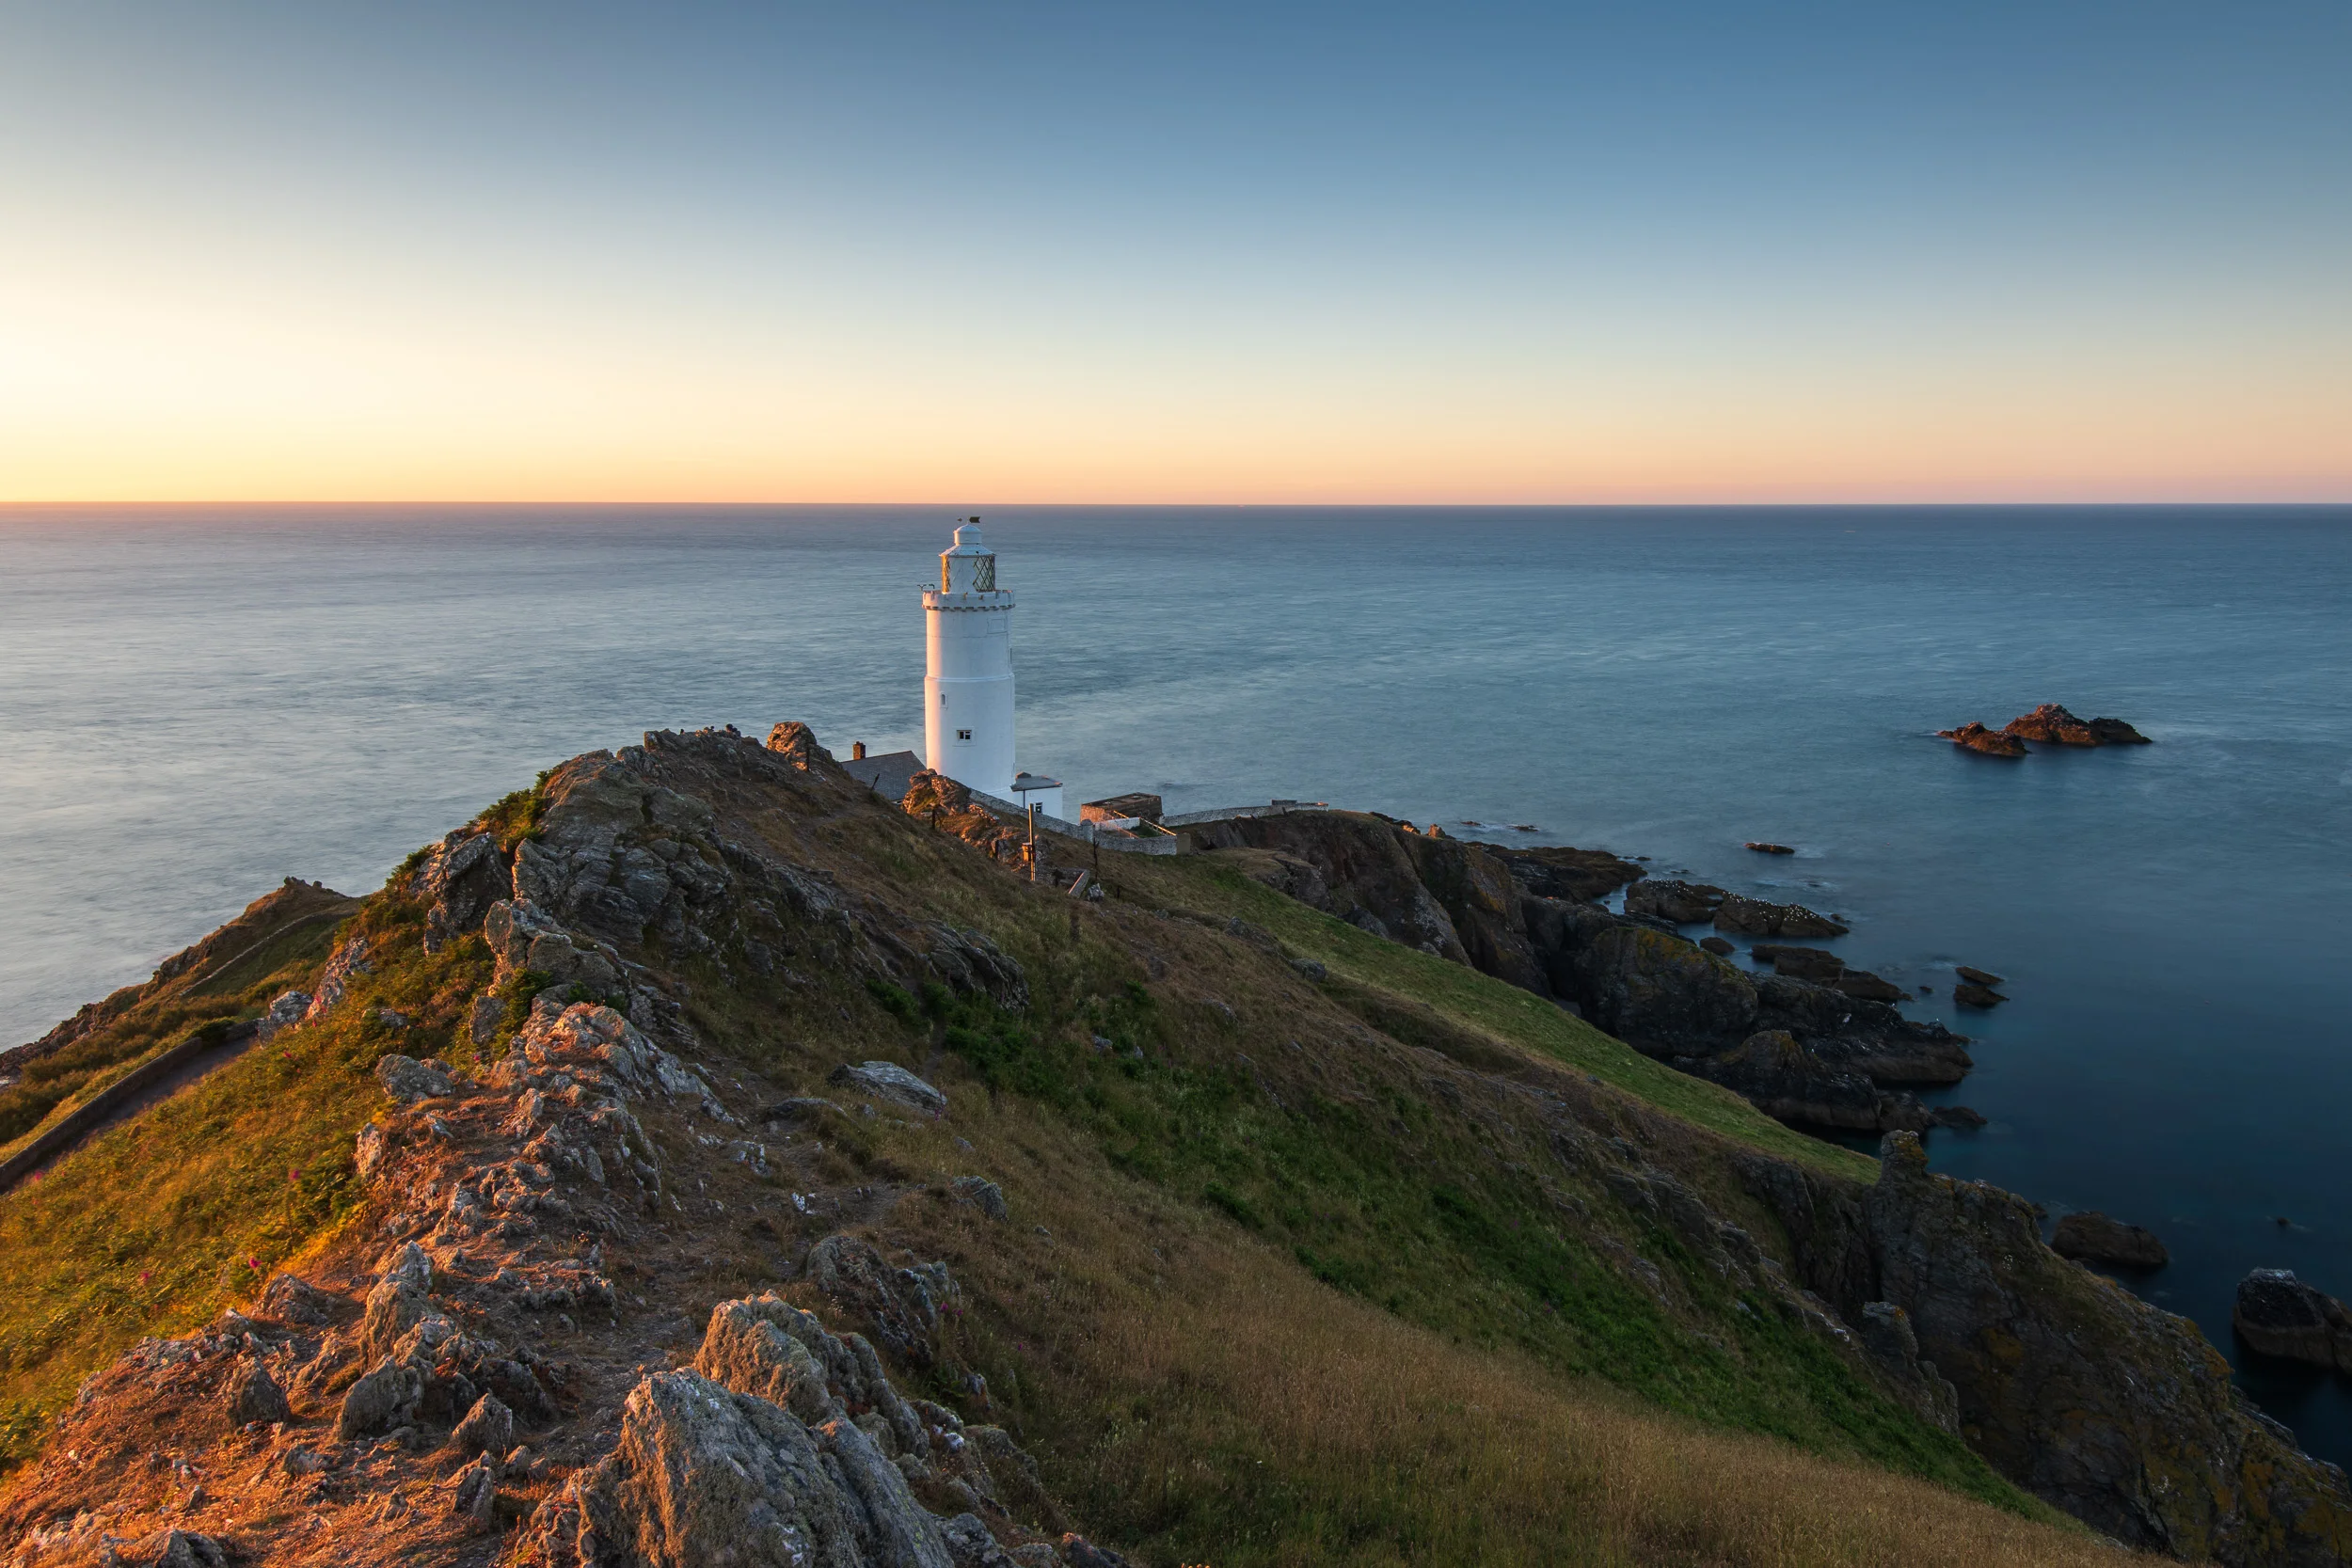
In the blog this week I share with you my latest video where I head out with a couple of landscape photography friends to capture sunrise photographs of Start Point lighthouse on the south Devon coast. Those 3am alarm calls don't seem so bad when you are having fun with friends!
A Solitary Pastime
For me, some of the things I love about landscape photography are the early starts and the solitude. This may sound like an odd thing to say but those unsociable hours mean that my photography generally doesn't interfere with my other commitments. Though I'm a very sociable person, there aren't many better things than watching the start of a new day with nothing but the sound of the breeze and the birds singing.
Don't get me wrong, if you see me one morning out taking photographs, come over and say hello. Many a trip out with the camera has been enhanced with a good old chat.
Photography Friends
One of the unexpected benefits of publishing videos on my YouTube channel is that I've made a few friends along the way. People that not only share my passion for landscape photography but people I can have a bit of a laugh with.
When two of my photography friends Gareth Danks and Chris Sale decided to visit me on my home turf I was delighted. I knew that even if the photography turned out to be challenging, the spirit of friendship and general attitude towards fun would make the whole experience more enjoyable.
You can see how we got on in my latest video:
We did a lot more larking about than was showed in the video, but hopefully, I've shown some of the collective spirit we had that morning. I'm not sure I would have driven all the way to Start Point at that time in the morning if it had been for Chris and Gareth!
If you have time, you should really check out their videos from our little adventure as well:
Is landscape photography something you prefer to do on your own? Do you have any friends that also share your passion? Let me know in the comment below.
Those Photographs
Here are the photographs that you saw in the video.
Sunset at The Daymark - Devon: Nikon D850, Nikkor 16-35 mm f/4 @ 20mm, 1/5th sec @ ISO 64, f/13, Lee Filters Circular Polariser.
Dawn Light on Start Point Lighthouse - Devon: Nikon D850, Nikkor 16-35 mm f/4 @ 19 mm, 10 secs @ ISO 64, f/13, Lee Filters 6 Stop IRND.

I Missed Spring but Hello Summer!
In the blog this week, I share with you my disappointing experience of photographing spring this year. However, I remain in a positive mood as the first shoot of summer goes a little better.
Spring, My Favourite Season
As a landscape photographer and general fan of the outdoors, I like all of the seasons. Each one has its own unique characteristics and they can transform how you view and photograph locations. For me though, there is something special about spring. It could be the improving weather, the changing colour of the landscape, or simply the longer hours of daylight.
Spring officially started on the 20th of March this year and I was determined to make the most of it. The short days of winter were at an end and it would soon be possible to start heading out weekday evenings. I was hoping to spend a few months being busy with the camera.
Now that the spring season has officially ended (21st June), I'm looking back on the photographs I have taken and I can't help but feel a little disappointed. It's not that I didn't get out with the camera, it's just that I can't really pick out a photo and say "I nailed it". Somehow, it seems that spring has passed me by this year.
The problem doesn't appear to be lack of commitment on my part, it's just I haven't been out when the conditions have been at their best. As a photographer with a full-time job and a young family, time is very much at a premium. The times I get to go out with the camera aren't dictated by the weather conditions, but when I have spare time between my other commitments. So if Tuesday evening is the time I am able to go out with the camera, but the conditions will be better on Wednesday, I either go out on Tuesday or not all.
It's not been all bad. Spring at Venford Falls (Dartmoor, Devon) is always worth a visit.
Don't get me wrong, spring hasn't been a total disaster. I managed to create a bunch of videos for my YouTube channel:
I have been busy but I just haven't created an image that has captured the essence of spring. One of the key shots I wanted to get was of the coastal thrift in Cornwall. While I did capture an image of the thrift, the conditions were far from ideal. Unfortunately, the thrift is only at its best for a couple of weeks, and I simply didn't get a chance to get back and try again.
I created this image for my Focus Stacking with the D850 video. If only the light had been better. (Bedruthan Steps, Cornwall)
However, I need to put things into perspective. While I didn't get my "spring" image, I did get out with the camera. For me, anytime out with the camera is a good time, and being able to practice will mean my camera skills will be sharp the next time to conditions are better.
Summer is Here!
Anyway, spring has gone, and summer is here so time to start capturing the delights of a new season. For one of my first shoots of summer, I decided to head to The Rumps in Cornwall with my friend (who is also a photographer and a bit of a lucky charm!).
It was a tricky decision to head out that evening or not. I was already very, very tired after a 3 am start that morning for a dawn shoot, but even though the forecast was for clear skies, we could see enough clouds in the sky to justify giving it a punt. To help us on our way we had some fish and chips, and a coke, and we instantly felt more optimistic.
It was a really nice evening at The Rumps. Unfortunately, there was only a little cloud in the sky, and what cloud there was, was difficult to frame effectively. It was however, a good start to a summer of photography and I captured this image:
Summer at The Rumps #3 - Nikon D850, Nikkor 16-35 mm f/4 at 18mm, 0.8 seconds at ISO 64, f/13, Lee Filters Circular Polariser. (The Rumps, Cornwall)


As the sun dipped below the horizon a band of deep orange appeared along the horizon. It was spectacular to look at but it was one of those views that was best looked at than photographed. Sometimes you just need to sit there and soak up mother natures show with your own eyes.
Did you manage to capture any good photos from spring? Are you looking forward to photographing summer? Let me know in the comments below.

OnePlus 6 Landscape Photography: A Mobile Phone Photography Challenge with Chris Sale
Can you capture a good landscape image using a mobile phone? Well, that's the challenge fellow photographer Chris Sale set me. In the blog, I share with you the video I captured when I headed out to Dartmoor National Park with my new OnePlus 6 mobile phone to capture some landscape photographs.
Landscape Photography Challenges
I like to challenge my landscape photography skills. This could be by doing something new, trying a different bit of kit, or even trying an old bit of kit (see my video Shoot, Print, Surprise). So when my friend and fellow photographer Chris Sale contacted me and suggested a new challenge for us both I immediately asked him to tell me more!
Our previous photography challenge had been a great success. Last time Chris challenged me to ditch my wide angle lens and head out with my 70-200 mm. You can see how I got on here. For this challenge though, Chris asked me to leave my DSLR at home and head out with a mobile phone! This perhaps sounded like a step too far, but I was up for the challenge. Obviously, I sent the challenge back and told Chris he had to do the same.
OnePlus 6
The challenge came at an interesting time as I was actually in the market for a new phone. My heavily used and loved Google Nexus 6p was on its last legs and it couldn't seem to survive much longer than a couple of hours without needing a charge.
I'm not going to bore you with all the reasons why I bought the OnePlus 6, but it was the phone that suited my needs to best. Funnily enough though, camera specs weren't top of my list of things I was looking for in a new phone. I have my Sony RX100M4 as my portable camera so I only ever expected to use the OnePlus 6 to capture the odd photo here and there.
So without knowing too much about the camera capabilities of the OnePlus 6, I head out to Dartmoor National Park to start my challenge. You can see how I got on in the video below:
As I mentioned earlier in the blog, Chris also undertook the same challenge. To see how he got on, check out his video:
Mobile Phone Photography
So can you capture good landscape images with a mobile phone? Sure you can! You can capture landscape images with just about any camera. I'm not saying the camera is irrelevant, but without good light and composition it doesn’t matter what camera you have with you, you might still end up with a dull photo.
So would will I be giving up my Nikon D850 anytime soon? Of course not. While it is perfectly possible to capture good landscape images with a mobile phone, the controls, versatility and image quality of a larger camera will (likely) always be better. As you'll have seen in the video, the dynamic range of the OnePlus 6, is not match for my Nikon D850. But given the price difference, that is hardly surprising is it!
So do you ever take landscape images with your mobile phone? What mobile phone do you have? Did you buy it for its capabilities as a camera? Let me know in the comments below.
The Photograph
Mr Bowerman please meet OnePlus 6 - Bowerman's Nose, Dartmoor, Devon: OnePlus 6, ISO 100, 1/125th sec, f/1.7, DNG processed in Lightroom CC Classic.
PS - The product links used in this article are Amazon affiliate links. By buying through the links I may receive a commission for the sale. This has no effect on the price for you.

Focus Shift / Stacking with the Nikon D850: Capture and Processing
In the blog this week, I finally put the Nikon D850 Focus Shift feature to work by heading out to Dartmoor National park to capture a focus stacked landscape photograph of the waterfalls at Venford.
Using a New Feature of the D850
I love using my Nikon D850. It is without a doubt the best camera I've ever used. I even made a video on the 8 Things I Love About the D850. However, there was one feature that until recently I had never used. That feature was Focus Shift Shooting.
Focus Shift Shooting was a feature introduced with the D850 that allowed the camera to automatically take a series of photographs at different focus points throughout the scene. The idea is that you take those images, each with a different point of focus, and then "stacked" them in Photoshop, to create one super sharp image.
While the idea of focus stacking is hardly a new one, having a camera do the hard work for you is relatively new. Even the amount of work in post processing is much reduced now with Photoshop generally doing an excellent job of merging the photographs automatically.
Using Focus Shift in the Field
With the process of creating a focus stacked photograph becoming easier and easier I thought it was about time, I gave it a look. After all, even if I don't use focus stacking all the time, having another skill in your photographic toolbox can never be a bad thing.
So if you want to learn how I focus stack my images (and you don't necessarily need to own a D850 to do it), then check out my video below:
I hope you enjoyed that brief tutorial. Like I said, you don't have to own a D850 to create a focus stacked image. The D850 just automates the process of capturing the images. I was also a bit hesitant at first on trying out focus stacking. It all seemed a bit like hard work, but as it turns out it's not that difficult and the results are great. It's not needed for every photo, but you'll be glad you learnt the skill should you need it.
So, do you focus stack your images? Do you have a slightly different technique? Let me know in the comments below.
Those Focus Stacked Photographs
Venford Falls - Dartmoor, Devon: Nikon D850, Nikkor 16-35 mm f/4 at 24 mm, 2.5 secs at f/8, ISO 64, Lee Filters Circular Polariser.
Life on the Edge - Bedruthan Steps, Cornwall: Nikon D850, Nikkor 16-35 mm f/4 at 26 mm, 1/15th sec at f/5.6, ISO 64, Lee Filters Circular Polariser.

Can You Print Images Captured from a Drone?
In the blog this week I look at printing images that were captured using a drone. Is there sufficient resolution and quality to justify making a print?
Capturing a Panoramic Image with a Drone
I'm a big fan of drones. I think they are an amazing bit of technology. Though I've taken still photos with my drone before, it is the video features that I use the most. The aerial footage you can insert into a vlog really helps tell the story of the location.
A few weeks ago though I published a video called Creating Panoramic Images of Glen Etive with a Drone. In the video, I used the drone to capture a big panoramic image of the Loch Etive area where I was staying on holiday. It was an image that I couldn't have captured if it wasn't for the drone.
Can You Print an Image Captured from a Drone
When the video was published a few people asked the question about how the image looked in print. After all, the camera sensor in a drone like the DJI Mavic Pro is nowhere as advanced as the sensor in my D850. However, does that mean that the images from a drone aren't worth printing?
As I'd never printed an image captured on one of my drones before I thought it would be a good time to find out. So, can you print an image captured from a drone? Let's find out.
As you saw in the video, it was more of a question of is their sufficient quality from a drone image to justify making a print. I think the answer is definitely yes. As long as the image is well composed and has good light, there is more than enough detail in the DNG files captured on a DJI Mavic Pro to justify making a print.
In the video, you also saw me try out a paper that I haven't used before. It was the Fotospeed Smooth Cotton 300. I really like this paper and this was my first time making a large print on a matt paper. You can really feel the weight of the paper and the surface has a real feel of quality about it. I think I'll need to try a few more prints using some of the matt papers I have in my Fotospeed Matt Smooth Test Pack.
So do you own a drone? Do you take still images with it? Have you ever printed a drone image? Let me know in the comments below.
Loch Etive Panorama - Taynuilt, Argyll: DJI Mavic Pro, 1/125th sec at f/2.2, ISO 100, 26mm (35mm equiv'), stitched from 9 DNG files
Some of the links used in this article are Amazon affiliate links. By buying through the links I may receive a commission for the sale. This has no effect on the price for you.

A Landscape Photographers Basic Guide to Calibration and Profiling
How do I calibrate my monitor? How do I profile my printer? How do I improve the quality of the photographs I print? You don't need to be a colour expert to improve the way your images look on screen and in print. In the blog this week I show you how.
The Science of Colour
A quick search of the internet on the topics of colour management, monitor calibration and printer profiling, and one would be excused in deciding it was all too much effort. However, like many things in photography you can decide to get your head into the science of it, or you can take a more measured approach and make some small changes to your workflow.
Calibration and Profiling
Even though I don't print high volumes of my landscape photographs, I've always strived to make my workflow is as colour accurate as possible. But why? Most people probably won't even view my images on a calibrated monitor. There are a couple of reasons, Firstly, just for my own personal satisfaction. I like to know what I'm looking at is an accurate representation of the colours in my photographs.
The other reason is that when I print one of my images on my Canon Pixma Pro-10s, I want to be confident that what I print matches what I see on screen.
Perhaps the best way to tell you about my workflow is to show you:
In the video, I mentioned a few links that you might want to look at. In case you missed them in the YouTube video description, here they are again:
For me, those extra little steps I take to calibrate and profile my monitor and to also profile my printer are worth a little extra effort in my workflow. I love the satisfaction of watching an image come to life on the screen as I post process it and then watching it turn into something physical when I print it. knowing that the colours remain accurate along each step is an extra bonus.
So does your workflow include calibration and profiling? If not, does this video encourage you to try and implement new workflow? Let me know in the comments below.
That Image of Trevose Head
In case you wanted to see that image of Trevose Head that you saw in the video in a bit more detail, here it is below:
Trevose Head, Cornwall.
If you want a little more information on Trevose Head, then check out my blog post on this fantastic Cornish location.
PS - The product links used in this article are Amazon affiliate links. By buying through the links I may receive a commission for the sale. This has no effect on the price for you.

Grey Mare's Tail and Loch Skene: A 5 Minute Photo Adventure
In this blog post, I share with you the story, photographs and video of my time photographing Loch Skeen and Grey Mare's Tail. This is another location I discovered just off the M74.
If you've been reading my blog over the last few weeks you'll have seen that despite being on a family holiday I still managed to capture images from Dalveen Pass, Kilchurn Castle, and Glen Etive. I even managed to make the experiences into some 5 Minute Photo Adventure videos. This was far more photography that I could have hoped for or even planned for.
So when I finally finished my holiday in Scotland and started the journey back I expected that was the end of my photography activities for this holiday. However, as with the idea behind shooting Dalveen Pass, I thought I might be able to do something similar for the journey back.
Amazing scenery but…
So yet again I picked up my copy of Photographing Scotland and looked for a suitable location. Almost on the opposite side of the M74 from Dalveen Pass, I found the location called Grey Mare's Tail. It looked perfect. Only a few miles off my route it had a big waterfall and a beautiful loch. I had a plan. I would drop my family off at Glasgow Airport, drive down the M74 and then stop and grab some images.
I departed for Glasgow Airport early in the morning and I soon started driving along the banks of Loch Awe. To my surprise there the water was calm and there was a lot of low lying mist hanging over the water. I already knew before I got to Kilchurn Castle that the conditions for taking photographs there would almost be perfect. Glassy water, low lying mist and a ruined castle…what more could you want?
It broke my heart to drive past Kilchurn Castle that morning. I could have taken some amazing photographs but I had to get to the airport. There simply wasn't time to stop. The amazing conditions didn't stop there though. All along the route to Glasgow, there was mist and the low-level cloud hanging about over water. As I approached Loch Lomond I was sure there was a cloud inversion and if I'd had time to ascend Ben Lomond I would have been treated to an epic show!
Grey Mare's Tail
It was tough having to drive past all those amazing locations in those weather conditions but that's just the way it is sometimes. However, I dropped off the family at the airport and started my journey to Grey Mare's Tail. When I arrived and saw the waterfall and the surrounding hills I was not disappointed. It looked amazing. Here's what I got up to:
The conditions weren't ideal, and I was really short of time, but this is definitely a location I need to revisit. There is a lot of different spots along the path past the waterfalls and up along the loch side. I wish I could have spent all day there. However, now I know where it is and what to expect, it's definitely getting added to my custom Google locations map.
Have you visited Grey Mare's Tail before? Did you make the ascent all the way up to Loch Skene? Let me know in the comments below.
The Photographs
Here are some of the images I captured during my brief time at Grey Mare's Tail and Loch Skeen (Skene).
Nikon D850, Nikkor 24-70mm f/2.8 @ 52mm, f/11, 25 seconds at ISO 64, Lee Filters Circular Polariser and 10 stop ProGlass IRND.
Nikon D850, Nikkor 24-70mm f/2.8 @ 32mm, f/11, 13 seconds at ISO 64, Lee Filters Circular Polariser and 10 stop ProGlass IRND.
Nikon D850, Nikkor 24-70mm f/2.8 @ 34mm, f/13, 1/8th seconds at ISO 64, Lee Filters Circular Polariser.
PS - The product links used in this article are Amazon affiliate links. By buying through the links I may receive a commission for the sale. This has no effect on the price for you.

Dawn with Danks - A Mini Adventure with Gareth Danks
In the blog this week I share with you vlog I made when fellow photographer and YouTuber, Gareth Danks paid me a visit. We headed down to the south Devon coast for a bit a coastal photography and a chat.
Meeting Gareth Danks
I've been following Gareth Danks on YouTube for a while and we briefly met up at The Photography Show earlier this year. At the show, we discussed the idea of meeting up to do some photography but finding a date we could both do proved a little tricky.
As spring came around and the days got longer, the number of opportunities to get out with the camera also increased. So when Gareth announced he was going to be making a visit to Devon we thought it would be a great time to meet up. We agreed to shoot sunset on Thursday evening and then shoot sunrise the following day.
Our Adventures
The plan was set and the day soon came around. In the following videos, you can see exactly what we got up to.
The first and only video I made was of the Friday morning shoot at Dawlish Warren and Dawlish. You can see it here:
For an alternative take on the morning, check out Gareth's video from Friday morning:
And finally, if you want to see what we got up to on Thursday evening on Dartmoor, you can see Gareth's video here:
I hope you enjoyed all those videos. I think we both have a similar style when it comes to our vlogs so it was really easy to mix up the photography, shooting my video and appearing in his vlog. Though it was only a short meetup, it was a mini adventure to remember!
My Photographs
You will have seen my photographs from the Friday morning in the video, but as always I like to share them here on the blog as well.
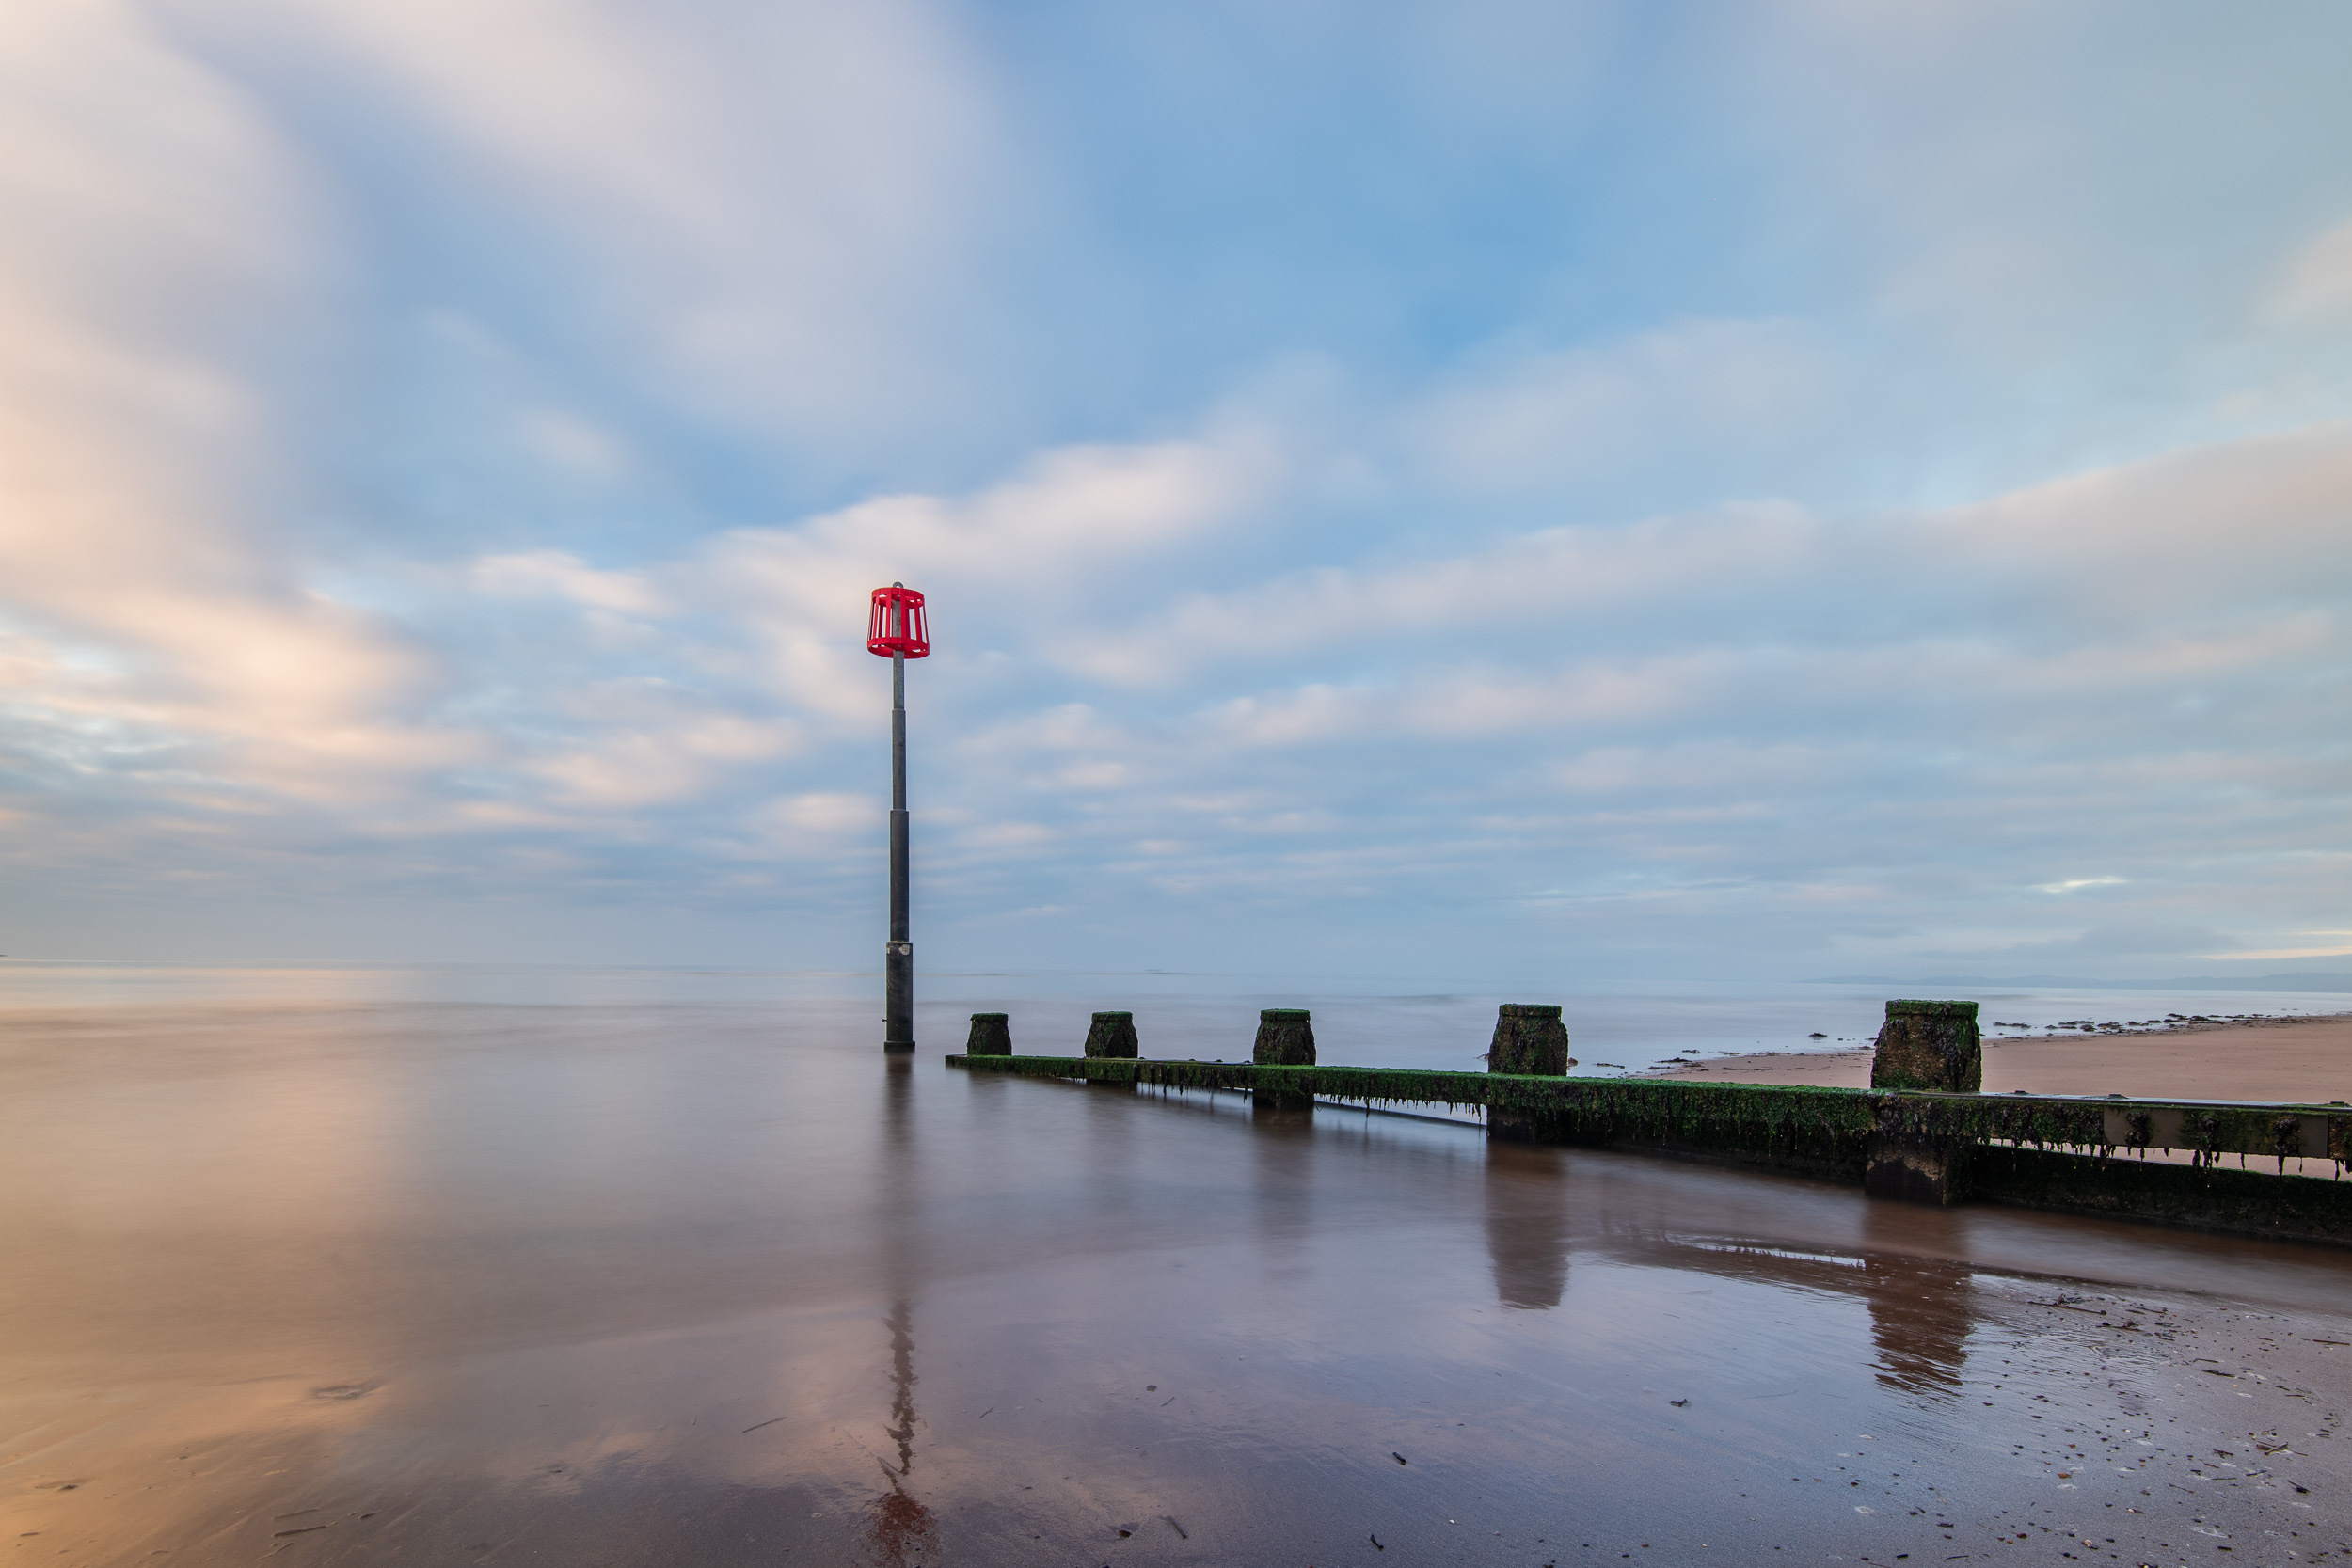

Nikon D850, Nikkor 16-35 mm f/4 at 16mm, f/13, 240 secs at ISO 64, Lee Filters circular polariser and 10 stop ProGlass IRND.
Nikon D850, Nikkor 16-35 mm f/4 at 20mm, f/11, 80 secs at ISO 64, Lee Filters circular polariser, 2 stop hard edge grad and 10 stop ProGlass IRND.
I do hope you also watched Gareth's video. It's really interesting to see how another photographer shoots the same scene at the same time. It was beneficial for me as watching Gareth setup his compositions got me to think about my own compositions.
Do you meet up with other photographers? Do you find yourself learning from them or trying something new out? Let me know in the comments below.
From Dawn to Dusk - Mastering the Light in Landscape Photography - On My Bookshelf S01E05
In this very special blog post I share with you the latest episode of On My Bookshelf. In the episode I interview Mark Bauer and Ross Hoddinott about their latest book on landscape photography, From Dawn to Dusk. I also tell you about a giveaway where you can win all three of their books.
On My Bookshelf
Over the last few months, I've been sharing with you the On My Bookshelf series of videos. Even though my photography life is predominately digital, I still believe the printed book is an important part of my development and enjoyment of photography. So in each episode of On My Bookshelf, I've told you about a book that I've enjoyed reading in the hope that it will also inspire you.
From Dawn to Dusk
When I first heard that two of my favourite landscape photographers were writing another book I knew straight away that I would need to get myself a copy. After all, their last book, The Art of Landscape Photography, had a big impact on my development as a photography and I read it many times.
As the publication date got closer I reached out to Ross Hoddinott and Mark Bauer and asked if they would like to appear on an episode of On My Bookshelf. I was delighted when they both agreed and they invited me along to see them sign and dispatch the first batch of orders of From Dawn to Dusk - Mastering the Light in Landscape Photography.
They also kindly agreed to an interview where I got the chance to ask them about their latest book, what's in it, who's it for, and how it differs from their previous 2 titles. You can see the full interview in the video below.
Book Giveaway!
After the interview, Mark and Ross offered me a signed copy of their latest book to give away to one lucky viewer. Not only that, they also gave me two signed copies of their previous two titles The Art of Landscape Photography and The Landscape Photography Workshop.
There are two ways in which to gain an entry to win all 3 books:
Watch this episode of On My Bookshelf: From Dawn to Dusk on YouTube and then leave a comment in the YouTube comments section for the video. Comments are welcome here, but to enter you need to leave a comment on the video itself.
Share the Facebook post for this video. You can find it here: <insert URL>
You a free to enter using one, either, or both of the above ways. If you do both though, you will be entered into the giveaway twice!
Entries for the giveaway close 12 pm (GMT) 28th May 2018.
If you can't wait to get a copy of From Dawn to Dusk - Mastering the Light in Landscape Photography you can still order a signed copy straight from the authors at http://www.dawn2duskphotography.co.uk/books/
Finally, I just want to say a big thanks to Mark and Ross for the interview! It was a real pleasure talking to you both and judging by the number of pre-orders you were signing and sending out it looks like From Dawn to Dusk - Mastering the Light in Landscape Photography is going to be a big success!
Some of the links used in this article are Amazon affiliate links. By buying through the links I may receive a commission for the sale. This has no effect on the price for you.

Creating Panoramic Images of Glen Etive with a Drone: A 5 Minute Photo Adventure
In this blog post, I share with you the story, photographs and video of how I went about creating some aerial panoramic images with my DJI Mavic Pro drone.
Over the last couple of weeks, I have told you about my recent photography adventures to the Dalveen Pass, and to Kilchurn Castle. To be honest, given both these adventures were undertaken while on a family holiday I thought I was doing really well. After all, I was supposed to be spending time with my family.
Beinn Duirinnis
Landscape photograph aside one of the things I was most looking forward to doing while visiting Scotland was getting up into the hills. Or to be more precise the mountains! I love Devon. It's a beautiful county but I do miss walking the hills and mountains of the Scottish highlands.
When I suggested to my brother-in-law that maybe we should climb a Munro while I was visiting he couldn't have said yes fast enough. However, there was one slight problem. Despite it being April, there was still a lot of snow on the upper slopes of the higher mountains. Unfortunately, my skills as a hill walker don't include snow so we had to revisit our plan.
Almost directly opposite to where I was staying is a hill called Beinn Duirinnis. At only 550 m this was much more likely to be snow free. However, it would deliver magnificent views of north up Loch Etive towards Glen Etive. This was highlighted in Jager Scot's video and I thought a trip up this mountain might mean another chance for some landscape photography.
Unfortunately for me, Mother Nature hadn't finished delivering snow to Scotland, and an unexpected overnight dumping of snow meant that even Beinn Duirinnis became out of reach. Another plan was needed!
Landscape Photography from Your Back Garden
With almost every local mountain out with my skill set, I decided I would try something a little different. I had been playing with the drone a few days taking some panoramic images of the surrounding landscape. This got me thinking. Perhaps I could do some landscape photography without even leaving home and maybe produce a video to go with it!
With all the extra snow on the hills, I decided to send the drone up and see what I could capture. Here is how I got on:
As you saw, a drone can really open up some new creative options. It would have been impossible to capture those images without a drone. While I haven't used the drone that much for stills photography, this really did open my eyes again to the possibilities that this amazing bit of technology can offer.
Do you have an amazing view from your garden? Do you use a drone for stills photography? Let me know in the comments below.
Those Images
Here are those panoramic images you saw in the video. Enjoy!
This is the image I shot the evening I made the video. DJI Mavic Pro, 1/125th sec at f/2.2, ISO 100, 26mm (35mm equiv'), stitched from 11 DNG files.
I took this image a few days before I shot the video. I much prefer the light in this one. DJI Mavic Pro, 1/125th sec at f/2.2, ISO 100, 26mm (35mm equiv'), stitched from 9 DNG files.

#EmbraceTheGrey - Your Photos!
A couple of months ago I published a video asking the photography community to #EmbraceTheGrey I wanted everyone to get out there in all sorts of weathers and conditions and take some photographs. Well, that's exactly what you did! And you did it lots!
Let's All Embrace The Grey
By the end of January this year I'd had enough of the rubbish weather and the impact it was having on my photography. I then had a slight change of attitude and decided that I needed to embrace the grey a bit more.
So I went out and created a video asking the photography community as a whole to #EmbraceTheGrey. You can read that blog post and see the video here. The goal of the video was not only to encourage me to get out with the camera more but to inspire others to also get out there in less than favourable conditions.
In the video, I said I would create a showcase video of the images people tagged with #EmbraceTheGrey as a way of celebrating everyone's efforts.
#EmbraceTheGrey Showcase
So when winter officially finished I decided to see if anyone had tagged any images or videos with #EmbraceTheGrey. Well, I was blown away by the number of photos and videos that had been tagged! You really had taken the challenge on and done so in such a wide variety of scenarios. It wasn't just photographs though. Some of you even create #EmbraceTheGrey photography vlogs!
To celebrate this amazing effort by you all I have pulled together this showcase video of the photographs that I found with #EmbraceTheGrey. At the end of the video, there is also a playlist of all the videos that were tagged as well.
So, please enjoy this amazing video of everyone's creativity!
So did you enjoy this video? Did you spot your image? Let me know in the comments below.