

Bite-Size Blog Post #44 - West Mill Tor - Dartmoor National Park
In the blog this week I head to West Mill Tor on #Dartmoor after I was told it was "it's much more interesting" than East Mill Tor. Find out if it is and see what I else I captured that morning.
East vs West
No, I'm not about start writing about the current political situation but rather East Mill Tor vs West Mill Tor. I recently shared a blog post featuring East Mill Tor and I received a comment on social media that said, "Might as well go to West Mill, it's a much more interesting tor". I'm not one to ignore some feedback, so I did just that and went to West Mill Tor.
It's not that I agree with the comment. East Mill Tor is in fact one of my favourite tors, but it did remind me that I haven't photography West Mill Tor in two years, and it was time to return. East Mill Tor and West Mill Tor, despite their closeness, are very different looking locations, but I wouldn't say that one is more interesting than the other.
All that east vs west stuff aside, West Mill Tor is worth photographing. As you can see from the photographs in this post, it was definitely worth shooting that morning.
When I arrived though, it wasn't obvious that it was going to be a good morning. There was a lot of cloud about, and because it was also cold, and windy enough that I felt I needed to hold onto my tripod, I wasn't exactly what you might call "feeling it". But there is one lesson I've learnt from the decade that I've been photographing Dartmoor and that's not to give up too soon. I have left a location too soon before and been very, very disappointed with my apparent lack of dedication to my art!
Waiting for the conditions to change doesn't mean one should just stand around scrolling Instagram. No, it's the perfect opportunity to explore a location. Even if I've found a composition that I'm reasonably happy with, I will use the time to move about my spot to see what else I can see. More often than not, even a small movement to the left or right can produce a very different composition. This should be demonstrated in the set of photographs below. All were taken within one or two paces of each other. It's one of the reasons why I like photographing Dartmoor. The foregrounds can be complicated/busy, but they provide you with a lot of compositional variety.
West Mill Tor #3, Dartmoor National Park - Nikon Z8, Nikkor Z 14-30mm f/4 S at 18mm, f/13, 1/3 sec at ISO 64.


It can be a bit of a lottery with how the weather conditions will change on Dartmoor at dawn. Frequently they stay poor or get worse. But every now and again they clear up just enough to give you a little bit of light on the landscape. And sometimes all you need is a little bit of light. Some light to catch the tops of the grasses and to add contrast and depth to the tor.
It was a great morning up on West Mill Tor and I captured a series of photographs that I'm very happy with. I still wouldn't say that West Mill Tor is more interesting than East Mill Tor (or vice versa) but I am glad someone reminded me to go photograph it again.

My Favourite Landscape Photograph of 2024 - Bowerman's Nose, Dartmoor
This week's blog covers my favourite photo from 2024: Bowerman's Nose on Dartmoor. It might be one of my best shots of Dartmoor.
An Iconic Dartmoor Location
Looking at my Free Landscape Photography Locations Map, I can see that I have published photographs of Bowerman’s Nose on this blog 14 times. Even if you don’t include the visits where I haven’t created a video or blog post, it’s fair to say that I’ve spent a lot of time at Bowerman’s Nose.
But why would I keep returning to this location? For me at least, it’s one of Dartmoor’s most iconic locations. Dartmoor National Park is covered in beautiful tors, with each one having its own characteristics and geology. But Bowerman’s Nose is unique, in at least as far as I’m aware, it’s the only tor comprised of a single stack of rock over 6 m tall. It protrudes out of the land and stands out against the rest of the landscape.
Its unique shape isn’t it’s only draw. To the east of Bowerman’s Nose is a hill, but in all other directions the view opens and on a good day you can see for miles. The view to the west of Hamel Down and Easdon Down is particularly beautiful. It’s a location that contains almost everything you want from a Dartmoor scene.
However, after more than 14 visits you would have thought I’d have all the photographs I’d want of Bowerman’s Nose. While I have captured many nice photographs of Bowerman’s Nose, I’d always felt I could get a better composition, and with better light and more drama. Something that captured the essence of this iconic Dartmoor location.
What Makes this Photograph So Special?
Photography is hugely subjective. What I find appealing in a photograph could be the opposite of what you think. So, when I say this is photograph is special, it’s special to me. But hopefully you’ll like it too!
For me, the photograph in this blog post is not only the best photograph I have taken of Bowerman’s Nose, but it’s also my favourite photograph that I captured in 2024, and it’s one of the best photographs of Dartmoor National Park I think I’ve ever captured. Let me explain why.
An Autumnal Sunset at Bowerman's Nose, Dartmoor National Park, Devon - Nikon Z8, Nikkor Z 14-30mm f/4 S at 24mm, f/13, 1/20 sec at ISO 800.
I’ll split the photo up into three layers, foreground, midground and background. All three layers add something to the photograph. In the foreground the striking rusty brown autumnal colours of the bracken create a slight V-shape at the bottom of the composition. This helps to frame the lower part of the image, stopping the eye from wandering out of the photograph. There is the tiniest bit of movement in some of the bracken, but it’s not a distraction and movement is very much a part of most the Dartmoor landscape!
Moving through from the foreground to the midground, the rocks and the undulating ground have caught the soft light from the setting sun off to the left. This not only adds warmth to the foreground, but it also adds contrast and depth. These qualities continue with Bowerman’s Nose itself. As dramatic as this tor is, it still looks like a lump of grey granite in flat light. The light hitting the left side brings to tor to life and you can more clearly see its lines, layers and shape.
Moving to the background, with the rolling hills of Dartmoor and a dramatic sky. While there isn’t any dappled light on the hills, this does help the tor that does have light on it, stand out further from the background. But the star of the show for the background is the sky. I’ve been craving for a sky like that in my previous Bowerman’s Nose photos. For me, the sky is perfect balance between colour and cloud. The heavier, darker clouds at the top create a frame for the top of composition and add a bit of drama. But there is also a small gap on the horizon where there is a small patch of blue sky and some of clouds are being lit by the setting sun. I find this balance very pleasing.
Putting all those three layers together delivers what I consider to be a classic Dartmoor landscape photograph. There’s light, colour, drama, texture, nature and an odd shaped bit of granite! No one element dominates the other.
Planning and Preparation
With all that I’ve said you would expect me to tell you that this photograph is one that came about because of planning and preparation. Well, this photograph was unplanned and my expectations that afternoon were low. I knew the sun was setting in a favourable direction, and the weather forecast was OK, but I’d never photographed Bowerman’s Nose in November, so I wasn’t sure what to expect.
When I arrived, I started photographing the compositions that I’d shot lots of times before, but they just weren’t exciting me. Neither was the weather. It all felt a bit repetitive and with no exciting light I thought about going home. But I decided that would be a waste of time and that I should use the time to explore and find new compositions.
You might now expect me to tell you that when I found this composition I was immediately taken with it. But I wasn’t. I don’t even remember being that excited about the picture when I took it. It wasn’t until I got home, and I saw the photograph on my screen that it stood out and I thought I really had something. After editing, the photograph came to life and the more I looked at it, the more I loved it. By the time I had made a print of it, I knew I had something very special.
I don’t often write about my photographs like this. This is because I don’t capture images like this all the time. Which makes it even more special when I do. I just hope I don’t have to wait too long to feel this way again.

A Landscape Photography Adventure in Glencoe
There can't be many better locations to start your 2025 with than Glencoe! In this blog post I share the stories and photographs of the few days I spent there in January. You may be surprised by what you see!
Just a Few Days to Photograph Glencoe
When I started planning my Christmas holiday to Scotland, I was excited about all the things I would enjoy over the festive period. Over the two weeks I would be spending there I'd have plenty of time eat, drink and be merry with my family. I would also have time for another indulgence, namely landscape photography. With Glencoe only being a 60-minute drive from my family home in Argyll it's an easily accessible location. Not only would I have access to some of Scotland's most stunning scenery, with sunrise just before 9am and sunset around 4pm, I would still have plenty of time each evening to socialise with family.
However, the weather gods had other ideas! From the moment I arrived there was a low bank of solid grey cloud covering the landscape. A completely flat, featureless, grey overcast sky. This went on for days. I don't think I saw blue sky or a mountain peak for a week! Not to worry though. It was Christmas so I just ate and drank my way through it!
Finally, after nearly two weeks of truly awful weather it did start to break and with the forecast finally predicting something that might result in reasonable conditions for photography, I was super eager to get up to Glencoe. I would have to work hard though. It was the last few days of my holiday, so I'd had a lot of photography to catch up on!
Here are some of the locations I photographed in Glencoe.
Rannoch Moor - Glencoe
As far as roadside locations go in Glencoe it's hard to beat the lochs around Rannoch Moor. It is a location that I've not had a lot of success at though. It has a lot of great elements to work with such as mountains and islands, but without reflections in the lochs it can leave the foreground looking a little empty.
Arriving near Lochan nah-Achlaise things weren't looking promising. Even though it didn't feel particularly windy, it was windy enough to remove all reflections from the loch which was a shame as the mountains were snowcapped and had taken on a beautiful pink tone from the rising sun.

Lochan nah-Achlaise, Glencoe Scotland - Nikon Z8, Nikkor Z 24-120mm f/4 S at 24mm, f/11, 10 seconds at ISO 64, 4 image panoramic crop (6:17).
As pleasing as the scene was, I needed to look for something a bit different. Fortunately, I was there with a friend and she gave me a heads up on spot that might be worth photographing as the water in the foreground was broken up by some land. At first, I wasn't that excited about it, but then I considered it might be a scene that would look better as a black and white photograph. I immediately switched my Nikon Z8 to the Deep Monochrome profile and I was instantly captivated by the photograph. The scene became less about the reflections and more about the dark and light of the landscape.

Lochan nah-Achlaise, Glencoe Scotland - Nikon Z8, Nikkor Z 24-120mm f/4 S at 30mm, f/13, 60 seconds at ISO 64.
I am creating more black and white photographs but I’m not sure if it works. What do you think? Let me know in the comments below.
River Coupall and Buachaille Etive Mòr
I visited the stretch of the River Coupal that sits beneath the mighty Buachaille Etive Mòr twice during my time at Glencoe. It's an interesting stretch of river with plenty of sections with fast flowing water but balancing the composition wasn’t easy, and for most of my time there I only had cloud on the left side of the mountain!
This first image, taken close to sunset, was originally taken as colour, but I later edited as black and white as I found the different colour palettes between the mountain, the foreground and the relatively clear sky distracting.

River Coupall and Buachaille Etive Mòr, Glencoe, Scotland - Nikon Z8, Nikkor Z 14-30mm f/4 S at 19mm, f/13, 0.4 secs at ISO 64.
Returning a couple of days later presented a different set of challenges. For much of the morning Buachaille Etive Mòr was covered in cloud and when it did finally clear and you could see the peak, there was a distracting band of fog around the base of the mountain. This fog "disconnected" the mountain from the rest of the landscape. However, landscape photography is often a game of patience, and it eventually did clear.

River Coupall and Buachaille Etive Mòr, Glencoe, Scotland - Nikon Z8, Nikkor Z 14-30mm f/4 S at 22mm, f/13, 0.5 secs at ISO 320.
The light remained flat that morning so for me it's the black and white photograph I like the most as it helps bring out the shades and textures of the scene.

River Coupall and Buachaille Etive Mòr, Glencoe, Scotland - Nikon Z8, Nikkor Z 14-30mm f/4 S at 21mm, f/13, 0.5 secs at ISO 320.
River Etive, Glencoe
One spot that I'd never photographed in Glencoe was the River Etive, so when the sky became overcast and the light flat, I thought it would be a good opportunity to photograph some waterfalls. The River Etive flows from the A82 near Buachaille Etive Mòr all the way down to the top of Loch Etive. The drive of 12 miles, which follows the river to the loch is beautiful. But it's single track and full of twists and turns, and it's one way in and one way out. So, give yourself plenty of time if want to drive it.
Fortunately for me the waterfalls I had marked out were near the A82 end of the Glen Etive road, so despite the temptation to drive that road again to Loch Etive, I didn't have far to go before getting my camera out.
There are three waterfalls in short succession, but it was the first waterfall that stood out for me the most. With the mountains in the background, the frost/ice covered rocks and a good flow of water, I thought it made for an interesting composition. There were challenges though, many of which were the rocks which were very icy and therefore slippy. With the potential to slip, break my camera equipment or fall in the icy water, a great deal of caution was used, limiting how I positioned the camera. But despite the challenges, and the flat light, it's a photograph I am happy with.

River Etive, Glen Etive (Glencoe), Scotland - Nikon Z8, Nikkor Z 14-30mm f4 at 17mm, f/13, 0.5 secs at ISO 800.
When I took the photograph, I already had the camera in a black and white profile, so that was my original intention for the image. But I did also process one of the frames as colour. I'm not sure if colour version works as well but I've included it here as a comparison to see what you think.

River Etive, Glen Etive (Glencoe), Scotland - Nikon Z8, Nikkor Z 14-30mm f4 at 17mm, f/13, 0.5 secs at ISO 800.
Kilchurn Castle, Loch Awe
OK, Kilchurn Castle isn't technically in Glencoe, but I have included it as it's near to my family home and was part of my festive landscape photography adventure. Despite its obvious popularity with landscape photographers, it's a location that I will always visit when I'm in the area. But because of its popularity it is also hard to find an original composition and to take a truly unique photograph.
For me though, this isn't a reason not to photograph it. I principally take photographs for my own enjoyment and Kilchurn Castle is a location I love to photograph. A ruined castle on the banks of Loch Awe with mountains in the background is a big draw for me as a photographer. I just needed a morning with the conditions I was looking for. Glassy reflections, mist, and mountains with clouds above them. Not too much to ask is it!
The morning I visited Kilchurn Castle I knew I wouldn't get those conditions, but if I could get a pleasing photograph I would be happy. I decided to opt for a slightly different composition than I normally go for. The mountains in the background were capped with snow so I decided to position myself further along the bank so the castle would be below them.

Kilchurn Castle, Loch Awe, Scotland - Nikon Z8, Nikkor Z 24-120mm f/4 S at 44mm, f/11, 30 seconds at ISO 64.
As the light from the rising sun started to appear it added a beautiful pink glow to snowcapped mountains. When the wind was calm the scene was reflected in the calm waters of the loch. It did however take some time for the light to reach the castle and by the time it did the light on the mountains was a bit too harsh. It was a shame that I didn't get the reflections, the pink mountains and a bit of light on the castle all at the same time, but despite that I still got some photographs I was happy with.

Kilchurn Castle, Loch Awe, Scotland - Nikon Z8, Nikkor Z 24-120mm f/4 S at 42mm, f/11, 1/30th seconds at ISO 64.
The main thing, as always, is that I very much enjoyed my time there. It's a classic scene and just being there to watch the start of a new day is a delightful thing.
Buachaille Etive Beag, Glencoe
Buachaille Etive Beag, affectionally known as The Little Buachaille, isn't a mountain to be ignored. OK, it's big brother Buachaille Etive Mòr is more iconic, but it's hard to drive by The Little Buachaille without being just as impressed. It towers above Lochan na Fola and for a roadside location, it's location that should be on any landscape photographs Glencoe itinerary.
My first photo of Buachaille Etive Beag was taken just before sunset. I was a little late arriving as photographing this location was a bit of a last-minute decision. I may have missed better light, but as you can see, in the right conditions the reflections can be wonderful. I've photographed this view before, and I prefer my previous compositions that have been wider. Still, for a grab shot at the end of day, I'm pleased with the result.

Buachaille Etive Beag, Glencoe, Scotland - Nikon Z8, Nikkor Z 14-30mm f/4 S at 19mm, f/13, 1.3 sec at ISO 64.
Returning a few days later the conditions were quite different. A fresh coating of snow had changed the look and feel of the location, and with no reflections on the lochan I decided to look for something different. Wandering around the edge of the lochan I soon came across an area where some rocks in the water that had a layer of snow on them. They looked like little white islands, and I thought they would make for a good foreground in my composition. Positioning the closest rock was tricky as it was close to the bank of the loch. I had little choice but to place it near the edge of frame, and while I would like the rock to have had more space, the composition still works.

Buachaille Etive Beag, Glencoe, Scotland - Nikon Z8, Nikkor Z 14-30mm f/4 S at 20mm, f/13, 1/4 sec at ISO 64.
A bit further along you find one of the burns that feeds into the lochan. For me, this scene immediately screamed black and white as it was already almost completely void of colour anyway. It took a while to position the burn in the frame so that I could make the most of that beautiful s-shape, but my biggest choice was how much polarisation to use.
In this photograph I have some polarisation, allowing some of the water to reflect light.
Buachaille Etive Beag, Glencoe, Scotland - Nikon Z8, Nikkor Z 14-30mm f/4 S at 22mm, f/13, 0.4 sec at ISO 64.
In this next version though, I have almost completely polarised the water turning it jet black, which in my opinion is a great contrast to the white of snow, making the s-bend of the burn a more prominent feature. However, I'm not totally convinced either way. What do you think?

Buachaille Etive Beag, Glencoe, Scotland - Nikon Z8, Nikkor Z 14-30mm f/4 S at 22mm, f/13, 0.4 sec at ISO 64.
Returning to Glencoe
That’s all from this adventure and I hope you enjoyed all the photographs I captured. I have to admit, I was suprirsed by how black and white photos I captured. But it’s a pleasant surprise and it’s a sign of how my photography is developing.
I will be returning to Glencoe in the near future, so stay tuned to the blog!

Bite-Size Blog Post #43 - Belstone Common - Dartmoor National Park
In this blog post I share with you some of the photographs I captured from the recent snowfall on Dartmoor, and I discuss some of the compositional challenges when there is "too much snow".
A Reminder of the Dangers of Driving in the Snow
I recently wrote in blog about how I photographed Dartmoor in the snow over a period of three days. We are lucky to get one day of snow on Dartmoor before it clears, so I felt fortunate to get out with my camera three times over three days. Aside from a tricky exit from one car park, driving around Dartmoor in the snowy conditions wasn't too bad and it gave me a bit of confidence to try it again should there be another snowfall.
As if luck was on my side, it was early on in January when Dartmoor experienced another dumping of snow. Eager to get out there and add to my library of snowy Dartmoor pictures I ventured out in the car to photograph the area around Row Tor in the Okehampton military zone. The driving conditions on the main roads weren't too bad, but as always, a little extra caution was called for.
All was going well until I started heading up Station Road in Okehampton where there is less traffic and steeper roads. There was clearly ice and snow on the road, but I was feeling bold, and I was eager to capture some photos, so I kept going. Station Road soon turned into Tors Road, and this is where things got tricky. Tors Road is particularly steep in places, and with very little traffic on that road (and certainly no gritting trucks), I found my car sliding on the ice.
I thought I might be able to make it to the boundary of the military camp, but even if I did, coming back down would be horrible. With the likelihood of the car sliding even under gentle braking, I really didn't fancy descending Tors Road and then sliding into something and damaging my car or someone else's property. So, I made a very careful three point turn and slowly descended back into Okehampton. It was a sensible decision.
However, I didn't want to just give up on my desire to capture photographs that morning. With sunrise getting ever closer there was only one place that I thought I could get a car close enough to and that was Belstone.
I had to drive carefully up the country lane to Belstone, but it was passable. I did the sensible thing and parked in the main car park and started the walk up to Belstone Common. It was a beautiful morning and Belstone village looked like a winter picture post card. Up on the moor the walking was hard going as the snow was deep. I was glad I was wearing my Muck Boot Artic Sport wellies!
Too Much Snow for Belstone?

A Snowy Belstone Tor #1, Dartmoor National Park, Devon - Nikon Z8, Nikkor Z 14-30mm f/4 S at 19mm, f/13, 1/15 sec at ISO64
I was surprised to see a few folk up on Belstone at that time of morning, especially with so much snow. My first concern was that they might have already walked through the snow and left foot prints but fortunately for me this wasn’t the case.
Belstone is a place I have photographed numerous times of the years, and I have compositions I know work well. However, as pretty as the snow was, there was more there that I'd ever experienced on Dartmoor and its presence considerably change the look of the location. Compositions featuring my favourite rock formations lost a lot of their definition under a blanket of snow. Don't get me wrong, the snow looked beautiful and some of the patterns that the wind had shaped the snow into looked amazing. But it was hard work finding compositions.

A Snowy Belstone Tor #2, Dartmoor National Park, Devon - Nikon Z8, Nikkor Z 14-30mm f/4 S at 18mm, f/13, 1/30 sec at ISO64
Another challenge was the mostly clear blue sky. With a very white foreground and a blue sky, I felt the scene lacked interest or drama. It was certainly wonderful to look at, but that doesn't always make for a compelling photograph.
While I am often critical of my photographs because I either should have composed them better or the conditions weren't right, the one thing I always do is enjoy my time while I'm out with the camera and I most certainly enjoyed my morning on Belstone Common. Watching the sunrise over the rolling hills of a snowy Dartmoor was a joyous experience and one that I would happily do again.

A SNowy Irishman’s Wall, Dartmoor National Park, Devon - Nikon Z8, Nikkor Z 14-30mm f/4 S at 26mm, f/13, 1/20 sec at ISO64

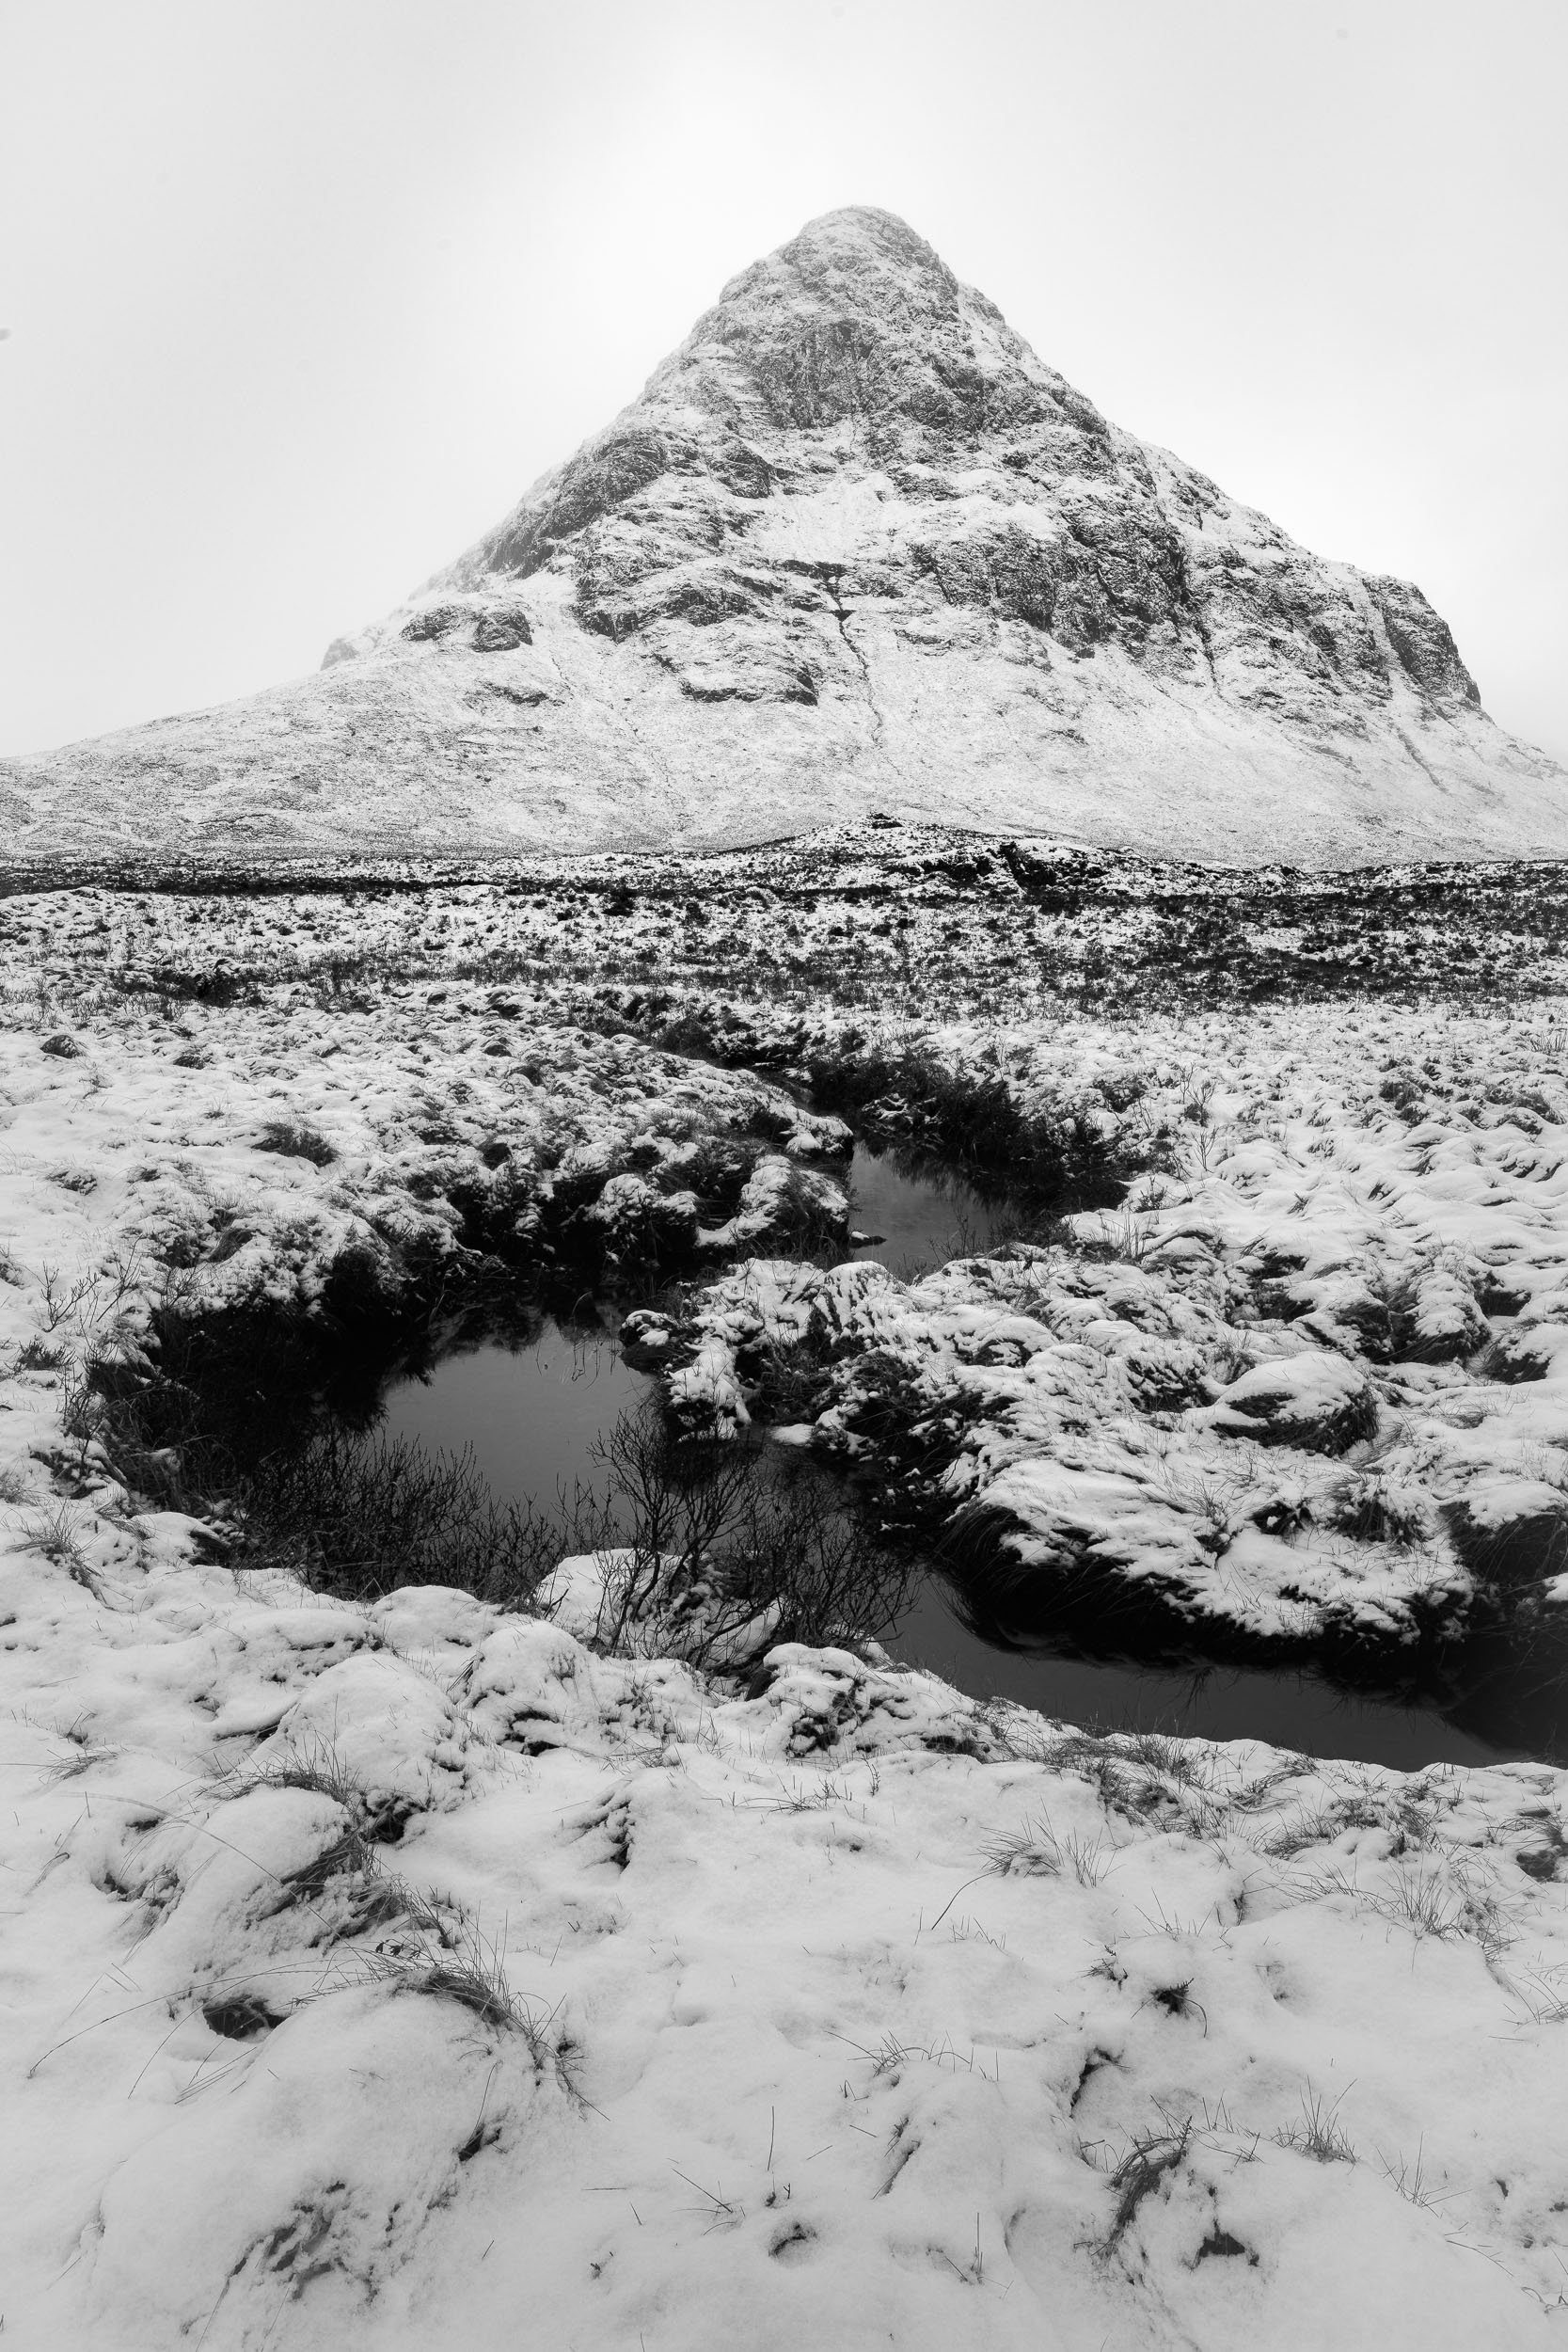
Bite-Size Blog Post #42 - East Mill Tor - Dartmoor National Park
In my blog this week I head to one of my favourite Dartmoor locations, East Mill Tor.
East Mill Tor - A Gem in Northern Dartmoor
To me East Mill Tor is one of Dartmoor's more unique locations to photograph. It's not that the rock stack at the northern edge of the tor is particularly special or that the surrounding landscape has any distinctive features. The stand out element are the small pools of water that are dotted about. It's not the only location on Dartmoor where a tor is near water, but I can't think of any other Dartmoor location where the water is close enough to the tor so that they can both be effectively placed in a composition.
It's not an easy location to photograph effectively either. Direction of light is critically important and obviously there needs to have been sufficient rainfall to fill the pools with water. (With no other source of water they are just muddy holes in the ground without rain). The most challenging bit is setting up the composition.
There are some elements of the composition I can't control, namely the weather. Cloud cover is critically important. Blue skies can be boring, while too much cloud blocks the light from the rising sun. A little wind is OK, and I find some movement in grasses rather pleasing as it adds a dynamic element to the composition.
The bit of the composition that keeps me coming back though is the placement of the pool and the tor in the frame and what their relationship is. A wide angle lens makes the pool appear more dominate in the frame but then makes the tor look further away. Polarisation of the pool is also a fine balancing act. Too much and the water can look black, and too little polarisation and pool has too much reflected light on it.
The final part of the jigsaw for me is where to place the tor and water. Stepping left and right, or panning the camera left and right will change the position of the tor in relation to the pool. Where this objects are placed can significantly change the balance of the composition. Despite several visits to this location, and ignoring all the other aspects of shooting here, I don't think I've created a composition where the balance feels perfect.

East Mill Tor, Dartmoor National Park, Devon - Nikon Z8 with Nikkor Z 14-30mm f/4 S at 18mm, f/13, 3 secs at ISO 64.
In the photo for this blog post I have the pool centrally placed and the tor off to the left hand side. Does it work? Yes. Could it be better? Possibly. I'll just have to come back and try again. But that's no bad thing.

Bite-Size Blog Post #41 - Shaugh Prior - Dartmoor National Park
In my blog this week I tell you about a rare visit I made to the woodlands and river near Shaugh Prior on Dartmoor to capture this autumnal photograph.
The Autumnal Woods of South West Dartmoor
Living in Exeter I'm only a short drive away from large parts of Dartmoor National Park. However, there are some parts of Dartmoor that I haven't properly explored and photographed because they feel a bit too far to drive to. In reality, it's probably a physiological thing rather than a reality. Realistically I can get to most parts of Dartmoor in an hour, maybe 75 mins at most.
There is a wooded area near Shaugh Prior on the very south western edge of Dartmoor that I have rarely visited. It has always felt, well, too far away. In reality it's not. It takes about an hour to drive, and you can walk straight into the woods from the car park.
Late last autumn I finally decided to make some time and wander up the River Plym near Shaugh Prior. It wasn't the sole reason I drove to that corner of Dartmoor. I was meeting someone from the OWPG (Outdoor Writers and Photographers Guild) for a chat and while I was in the area, and I had time, I would also head out with my camera.
The challenge was where to shoot. It would be the middle of the day and the weather was grey, flat and overcast. When I thought about it though, it was perfect conditions for woodland photography. As a bonus it was the autumn so the woodland colours would hopefully be beautiful.
I gave myself a couple of hours to explore the pathway along the River Plym. And while I did happily spend a couple of hours wandering up and down the river, it was the first place I stopped at that gave me the most pleasing photograph of the afternoon.
River Play, Dartmoor National Park, Devon - Nikon Z8, Nikkor Z 14-30mm f/4 S at 16mm, f/13, ¼ sec at ISO 500, Kase Filters CPL.
It's an area that needs further exploration by me and because in reality it's not that far from Exeter I'm sure to return there again soon.

Bite-Size Blog Post #40 - The Cobb - Dorset
Happy New Year everyone! And to celebrate the start of 2025 here is a photograph of the start of a new day at The Cobb in Lyme Regis in Dorset. Read more about his photo in this blog post.
A Return to The Cobb in Lyme Regis
I've been photographing The Cobb in Lyme Regis for nearly a decade now. It's a location I keep returning to, but why? As a landscape photographer I'm drawn to the natural beauty of wilderness and the coast. However, The Cobb is a human-made structure and mostly made of stone. It therefore doesn't fit into the category of natural beauty but yet it remains a compelling subject to photograph.
The Cobb has three aspects to it that make it worth photographing. Firstly, is its shape. Rather than being a straight structure that juts out into the sea, it's distinctive S-shape snakes out into the sea. When photographed from certain positions with a wide-angle lens, that S-shape can provide a very strong foreground subject.
Next is the east to west direction the structure runs. This makes it an ideal subject to photograph during winter when the sunrises from the southeast. Light from the morning sun will bath the structure in glorious orange light, further highlighting the shape of The Cobb.
The last thing that makes it worth photographing is its coastal location and how the sea interacts with it. On calm days the water gently surrounds The Cobb making for wonderful longer exposures. Perhaps my favourite time is when the waves crash up against The Cobb. Freezing a wave as it hits the structure with a short exposure or capturing the trails of water flowing off The Cobb with a longer exposure can make for some really exciting photographs. On those windy days there is a very real risk of getting wet or your camera gear is damaged, or even worse. It can be a dangerous place, so caution is always advised.
However, the morning I captured these photographs, everything was calm, and I experienced a lovely sunrise.
Cobb Sunrise #1, Lyme Regis, Dorset - Nikon Z8, Nikkor Z 14-30mm f/4 S at 14mm, f/22, 30 seconds at ISO 64, Kase Filters CPL.
Every visit to The Cobb gives me a slightly different photograph. That's why I'll probably still be photographing it in another 10 years. You just never know what you’ll come away with.

Three Days of Snowfall on Dartmoor National Park
In this blog post I tell you about the three fantastic days I spent photographing the snow on Dartmoor.
Snow, Dartmoor and Landscape Photography
While snow on Dartmoor isn't that unusual during winter, it is unusual that I get to photograph it. Sometimes you only get a light dusting of snow which, while pretty to look at, doesn't generally make for an interesting landscape photograph as it makes the foreground a little messy.
At the other end of the scale are the times when Dartmoor gets a good dumping of snow. This is when you will see the news websites flooded with pictures of families out with their sledges sliding down the hill at Haytor. It's this level of snowfall that can make for the most compelling landscape photographs of Dartmoor in the snow. However, it's this level of snow that causes me the biggest problem.
I unfortunately don’t live on Dartmoor so accessing Dartmoor in the snow can be challenging. The best time to photograph the snow on Dartmoor is in the morning when the snowfall is fresh. Go later in the day and you risk foot prints, animal tracks and believe it or not, lines left by people skiing! The problem for me going photograph the snow early in the morning when there is fresh snow falls on the roads.
If the snow fall is low enough it can make the main roads treacherous, and even if it's not, the narrow and twisty roads of Dartmoor will be. For me the risk of getting stuck or having an accident is not worth it. Every now and again though the forecast predicts snowfall high enough to cover the highest tors but it's unlikely cause issues on the roads. These are the exact conditions that were forecast late in November.
Great Links Tor - Dartmoor
With the first snowfall being forecast for the higher reaches of Dartmoor there was really only one place I wanted to photograph and that was Great Links Tor. At 586m the summit of Great Links Tor isn't the easiest place to reach. The 45 minute walk is all up hill and it can be challenging to navigate in the dark. But I was determined to be there for sunrise and to make the most of the fresh snowfall.
Over the years I had made several ascents up to Great Links Tor at dawn to try and photograph this magnificent tor at sunrise, but low cloud had often ruined my vision. The lure of snow and a beautiful sunrise was too much to ignore and so I set off on another ascent.
While the roads were clear, it was snowing, and relatively heavily. This made the walking difficult. It was still dark, so I had my head torch on, but the light was reflecting of the snow fall making forward visibility difficult. The normal land marks I look for on the ground looked very different when covered in snow. It was one of those walks where I question if it the risks are worth the effort. Fortunately, because I knew the ascent so well, I was able to still navigate by eye and I had my digital map as a backup.
As I approached the summit it was light enough to turn the head torch off and the snow covered landscape of Dartmoor looked beautiful. As I approached Great Links Tor, I thought that even if I don't capture any photographs this morning, being here on Dartmoor when it looks so beautiful would be reward enough for my efforts.
Great Links Tor, Dartmoor, Devon - Nikon Z8, Nikkor Z 14-30mm f/4 at 14mm, f/13, 1/6 sec at ISO 64.
It took a while, but when the sun did finally make an appearance the light was a little too harsh and the cloud cover wasn’t as interesting as earlier. However, I'm still very pleased with the photograph I captured and more than that I thoroughly enjoyed my morning up on a snowy Dartmoor. The views were amazing and watching the clouds roll across the snowy landscape made all that effort worthwhile.
Bowerman's Nose - Dartmoor
Following my visit to Great Links Tor it continued to snow right into the following day. With so much snow about I was tempted to head out again. The weather forecast in the morning was for heavy snow and low cloud so I didn't feel this wouldn't be ideal conditions for photography. However, if I waited for it to clear up in the afternoon, I could look spectacular.
There are pros and cons to this strategy. The main advantage is that even if it had been snowing on the roads in the morning enough cars would have driven to roads to make them either clear or at least passable. The downside to leaving it until the afternoon is that lots of people will have visited Dartmoor leaving lots of footprints making it very difficult to get a clean composition. However, with so much snow about I believed it was worth the risk. Who knows when I would see snow again!
The best location I could think of was Bowerman's Nose. The roads around Haytor will have been well travelled by the afternoon, and though it's in a popular location I hoped that Bowerman's Nose would be just far enough out of the way that it would be free of footprints.
As I drove up to Haytor it was looking busy. Plenty of people out walking, sledging and even skiing! Normally I park close to Bowerman's Nose, but I thought I'd be pushing my luck by driving down the road in the snow, so I decided to park at the Houndtor Car Park instead.
It was a beautiful walk along to Bowerman's Nose and my optimism that I would have a footprint free scene grew as I appeared to be the first person walking this particular route. When I arrived at Bowerman's Nose, I was a little disappointed that my normal composition was a mess of foot prints but I decided to see this as an opportunity to find new compositions.
I soon discovered that snow was not only forcing me to find new compositions, but it was also presenting compositions that weren't possible without the snow. Looking about I soon found the snow fall had created a beautiful S bend that that I could position in the foreground of Bowerman's Nose. All I needed to do was to wait for the light to soften a little bit and I would have my classic photograph of Dartmoor in the snow!

Bowerman’s Nose, Dartmoor, Devon - Nikon Z8, Nikkor Z 14-30mm f/4 at 27mm, f/13, 1/25 sec at ISO 64.
Rippon Tor - Dartmoor
Having photographed both Great Links Tor and Bowerman's Nose in the snow I should have been content with what I had captured over those two days. But with so much snow still about, why not push for a third Dartmoor snowy shoot? So, I set the alarm for a dawn shoot on Rippon Tor.
Arriving while it was still dark, I could still see there was snow about, so I optimistically started my walk up the hill to Rippon Tor. Unlike the last two days where the weather had been relatively calm, this morning the wind was howling making it feel very, very cold!
The nice thing about the strong wind was that it was whipping up snow from the ground and blowing it along the landscape like a scene from the arctic. It looks especially dramatic as the sun started to rise.
As I found with Bowerman's Nose, a snow fall forces you to look for different compositions. Rocks that might normally look a bit boring are transformed into mini mountains of snow. Add a bit of warm light from the sun and they become majestic.
I found a composition that would take advantage of those elements but the main problem that morning, apart from my cold hands, was that there was hardly any cloud in the sky. But even if it wasn't going to be the perfect scene for photography, it was still a beautiful view and one I was happy to photograph.

Rippon Tor, Dartmoor, Devon - Nikon Z8, Nikkor Z 14-30mm f/4 at 17mm, f/13, 1/100 sec at ISO 1250.
Returning to the car I felt happy with my three snow filled days on Dartmoor and the three photographs I had captured. The only problem I now had was getting my car out of the ice rink cark park I had dumped my car in earlier in the morning!

Bite-Size Blog Post #39 - East Dartmoor Woods - Dartmoor National Park
Dartmoor is more than just barren rolling hills, it also has its fair share of woodlands and lone trees. In my blog this week I take advantage of the autumn colours and head to East Dartmoor Woods to have some fun with the camera
Hands Up Who Likes Autumn!
The change of season into autumn is no more visible than it is in our woodlands. As the green foliage fades its replaced by a splendid show of browns, yellows, and oranges. It's probably the most vibrant of all the seasons and it's no surprise its often considered the landscape photographers favourite season.
Many people think that Dartmoor is a barren landscape of rolling hills, but it also has its fair share of woodlands. So, the natural thing for me as a landscape photographer at this time of year would be to head to woodlands of Dartmoor to photograph the autumnal colours. The trouble is, photographing trees and woodland is not something I do very often, and I find it a difficult subject. I very much admire the work of photographers that produce such compelling woodland images.
But there's only one way to get good at photographing woods and trees and that's to practice! With little in the way of expectations I decided to grab my camera and head to East Dartmoor woods to see if I could find my inner woodland photographer.
When I arrived though, I had the bright idea that it might be easier to photograph one tree rather than the entire woodland. While that does sound easier on paper, when it came to the execution, I'm not entirely sure it was any easier.
East Dartmoor Woods, Dartmoor, Devon - Nikon Z8, Nikkor Z 24-120mm f/4 S at 42mm, f/11, 1/6 sec ISO 64
Looking at this photo I can most certainly find room for improvement in the composition, and while the light on the tree itself is pleasing, the conditions lack interest. But saying all that, it's probably the best picture I could capture that morning, and I had fun doing so. It's important to remember that not every photograph you capture has to be a "banger". Some pictures can bring you joy just because you got out there and captured it.

Bite-Size Blog Post #38 - Oke Tor - Dartmoor National Park
Those Perfect Summers Evenings on Dartmoor
In my video series Discovering Dartmoor you will often hear me talk about how nice it is during the summer months to go for an evening walk on Dartmoor. If the wind is calm and the skies are clear it really can be one of life’s great pleasures. However, Dartmoor being Dartmoor, the conditions can be just as unsettled as they are in the summer as they are in the winter. So packing jackets and gloves is always recommend!
You might now be thinking that this is a story of being out in wintry conditions in the middle of summer. Well for once, it's not! This is a story of one of those summer evenings where the conditions were perfect for a nice stroll around my favourite area of Dartmoor.
As is often the case when the conditions are ideal for walking, I only go out with the intention of enjoying a walk and not to capture landscape photographs. That doesn't mean I won't take my camera with me, it's just means that the primary reason for going out is to enjoy a walk.
I started my evening walk with no real plan other than I'll park near Row Tor, head south and see where I end up. When I got parked the car, I could see East Mill Tor in the distance, so I thought that was a good a place as any to head to. I had been discussing East Mill Tor with a fellow photographer a few days before, so I decided to head there to review some compositions at both the north and south end of the tor.

Oke Tor Sunset #1, Dartmoor National Park - Nikon Z8, Nikkor Z 14-30mm f/4 S at 15mm, f/13, 1/40th at ISO 200.
Expansive Views of Dartmoor
As I stood on the southern edge of East Mill Tor I took in some deep breaths and admired the landscape that stretched out in front of me. It was glorious! But where to go next? Scanning the horizon I could see Oke Tor. If I went there then I could make a nice little loop back to the car.
As I approached Oke Tor I could see the light dancing along the landscape and despite me not having the intention of capturing photographs that evening, I started to get excited about the possibility of getting the camera out. It was getting late though, and I was worried that there might not be enough time to get up onto the tor and to make use of the nice light.
Sure enough, I got up onto the tor and the light had gone. However, it was a beautiful evening, and I was in no hurry so I decided to be patient and waited to see what would happen. It was so peaceful there and I just stood there looking at the view. I could see patches of light illuminating the landscape but there were unfortunately not landing on the tor where I was.
Even as I stood there, I remember thinking that even if I don't get any photographs, I would return home having had a lovely walk and seen some spectacular views.
As most landscape photographers will tell you, patience is something you need to have lots of in this field of photography. It's not often you get rewarded for your patience, but on this evening, I was, and I captured a beautiful image of Oke Tor.
Oke Tor Sunset #2, Dartmoor National Park - Nikon Z8, Nikkor Z 14-30mm f/4 S at 14mm, f/13, 1/3 at ISO 64.
As I walked back to the car, I thought about how fortunate I am to be able to experience Dartmoor in the ways that I do. I can freely walk all over Dartmoor and enjoy everything nature has to offer, and if I put myself in the right place at the right time, I can also use my camera to capture those unique moments in time.

Bite-Size Blog Post #37 - Dawlish
In this blog post I head to Dawlish to photograph something a little different but I'm not sure of the results.
And now for something completely different…
Over the last couple of years, I've spent a lot of time photographing Dartmoor. It feels like the only thing I've been photographing! Looking back at the list of blog posts I've published recently it's probably a fair assessment. Apart from the odd deviation, it’s all been Dartmoor, Dartmoor, Dartmoor!
Despite my need for a change of scenery I decided the best place for me to photograph with my next block of available free time would be Dartmoor! After such a good run photographing the heather on Dartmoor, I wanted to push my luck and go for one more shoot. However, while driving to Dartmoor I could clearly see the that the conditions weren't the same as what the weather forecast had predicated. The sky was looking very overcast. Glancing over to the coast however, there were patches of blue sky. A change of plan was needed!
It was already too late to go anywhere too far away like Dorset or Cornwall, so after pulling over to check my map, I settled on Dawlish. I had spotted a large stone groyne last time I was there, and I remember thinking it might make for a good long exposure photograph. I knew the tide was high, but as with any sunset shot there's always a risk that you get there to find the groyne populated with people or anglers.
I needn't have worried as to my surprise it was free of people, so I quickly got to work and captured this photograph.
Dawlish Groyne, South West Coast Path, Devon - Nikon Z8 with Nikkor Z 24-120mm f/4 S at 24mm, f/13, 15 secs at ISO 64, Kase Filters CPL and ND Grad.
Looking at the photograph now, I'm not convinced it works though. I like the tones, the cloud cover and the simplicity of the image. However, I think my main issue is that while the horizon is completely level, the groyne doesn’t appear level in the frame. There’s one simple reason for this and that's because it's not actually level. Well, not at that point on the groyne anyway. It does level of a bit further down, but that would require me to shot it at a lower tide. (Which would also allow the red marker post at the end to be larger in frame).
I think the groyne being unlevel unbalances the composition in a composition where I feel balance is everything. It's also possible that this view simply doesn't work as a photograph. Just because it's a simple composition, and a long exposure, doesn’t make it good. Time will tell. I'll look at it again in a few months and I'll either think it does work, or I wish I hadn't bothered. Well, that’s not true. I'm glad I tried something different. It's important that I did and perhaps I need to do so more often.

Bite-Size Blog Post #36 - Trevose Head
Does anyone get nervous sometimes about processing their photos? Do you get worried that the feeling of joy you had taking the photographs doesn't carry on into the edit? Learn why I'd been putting off editing these images of Trevose Head in this blog post.
If in Doubt, Trust an Old Friend
Living in the south west of England I am spoilt for choice when it comes to locations to capture landscape photographs. I have Dartmoor National Park, Exmoor National Park and 600 miles or so of the South West Coast Path to photograph. There’s a lifetime worth of locations to visit.
So why is it some locations keep calling you back again and again? Even when you already have a fine portfolio of photographs from that location, you still feel the need to return. Is it because you know you can capture good images there? Or because it’s just a beautiful place to be?
There is one such place in Cornwall that falls into that category for me, and that’s Trevose Head. Looking at my free landscape photography locations map, I can see that I’ve written about Trevose Head at least 6 times here on the blog. But why do I keep going back? Is it because I consistently capture photographs that I like at Trevose Head? Or maybe because it’s a dramatic and stunning section of coastline? Whatever the reason, I like it there.
I built up a bit of a back log of blog posts so the photographs you see in this post are a few months old now, but I’ll be honest with you, I can’t remember the real reason I went back to Trevose Head. It might have been that the weather conditions and tide were going to suit Trevose Head, or I was in a bit of a creative rut, and I felt safe going there, or maybe I just drove there subconsciously! I don’t know, and maybe it doesn’t matter, because the evening I took these photographs was special.

Trevose Head Sunset #1, South West Coast Path, Cornwall - Nikon Z8 with Nikkor Z 14-30mm f/4 S at 18mm, f/13, 0.5 secs at ISO 640, Kase Filters CPL
I could tell just standing there on the cliffs that the conditions were good for photography and that feeling continued as I captured the photographs. On the long drive home, I knew I had captured some photographs that I would be happy with. When I imported them into Lightroom I could see the raw files had promise.
So why has it taken so long to share them? Yes, I had a backlog of blog posts to write, but the main reason I’ve left it this long to write about them is that I was nervous about processing them. What if I found they weren’t that good after all? I wanted to hold onto to magical time at Trevose Head and I didn’t want it to be spoilt by disappointing photographs. Maybe that’s missing the point of enjoying my time there. Perhaps I should just enjoy the memory of that experience.
As it turns out though, I needn’t have worried. I’m very happy with the photographs I captured that evening. So much so, I want to go back. But that’s no bad thing.

Trevose Head Sunset #1, South West Coast Path, Cornwall - Nikon Z8 with Nikkor Z 14-30mm f/4 S at 18mm, f/13, 6 secs at ISO 64, Kase Filters CPL

Bite-Size Blog Post #35 - Hookney Tor - Dartmoor National Park
Sometimes it's the small rocky outcrops rather than the tors that are the highlight of a location.
In Search of Heather - Part 5
If you've been reading my blog over the last few weeks, you'll know that I've been busy exploring Dartmoor looking to capture some compelling images of heather. After a slow start, I've had a good run of capturing photographs I am happy with. Not one to quit while I'm ahead and finish on a positive note, I decided to push for another photograph by heading to Hookney Tor.
In part 2 of this mini heather themed series of blog posts I mentioned that I struggled with finding a balanced composition at Hookney Tor, so I eventually changed location and photographed Grimspound instead. However, I was sure that with a bit more exploration I would find a composition featuring Hookney Tor. One observation I made during my previous visit was that I thought that Hookney Tor might be better at sunset rather than sunrise.
Despite some pleasant evening conditions up on Hookney Tor, I continued to struggle to find a composition with the tor and the heather. In a moment of frustration, I walked to the viewpoint of Grimspound to capture some photographs, but I was using the same composition as my previous visits, and arguably, the images weren't as good.

Grimspound Heather, Dartmoor National Park - Nikon Z8, Nikkor Z 14-30mm f/4 S at 24mm, f/13, 1/13 sec at ISO 64.
Over the years that I've been photographing Dartmoor National Park I've come to the conclusion that not all tors are worth photographing. Perhaps Hookney Tor was going to fall into this category? When it started to cloud over, I packed my bag and started walking back to the car.
It was at this point that I got inspired. On the path was a small rocky outcrop which was catching the light from the setting sun. There was even a small clump of heather to include in the composition. I frantically got my camera back out of the bag and grabbed a few shots. I was just in time as no sooner had I captured the image the light was gone.
Hookney Heather, Dartmoor National Park - Nikon Z8, Nikkor Z 14-30mm f/4 S at 23mm, f/13, 1/4 sec at ISO 64.
While the image isn't as good as my previous heather photographs this year, I am still pleased with the result. Especially as I thought I was going home with no photographs. But I also learnt an important lesson. During my visits to Hookney Tor I had been very focused on the large rock stacks and making them part of my composition. What I also need to keep an eye out for is the small things. The small rocky outcrops of Dartmoor, that despite their size, can still make for good photographs.
Will there be a part 6 to my Dartmoor National Park heather series of photographs? I don't think so, but you never know!

Bite-Size Blog Post #34 - Honeybag Tor - Dartmoor National Park
My run of good luck with photographing the heather on Dartmoor continues with a visit to Honeybag Tor.
In Search of Heather - Part 4
In my last blog post I shared with you some of the heather themed photographs I captured at Chinkwell Tor. With the heather looking good at that part of Dartmoor National Park, I decided to keep the momentum going and heading to Chinkwell's neighbouring tor, Honeybag Tor.
It was a further 10 days on since I'd been to Chinkwell Tor so I had high hopes this would be the peak of heather season, and I was not disappointed. There were some beautiful clumps of heather mixed in with the yellow of the gorse bushes. I just needed to find a composition and more importantly, wait for a break in the cloud. I still had a bit of time before sunrise, so I decided to have a wee wander about.
Though I'd never properly taken the time to photograph Honeybag Tor, as I explored the area I started to pick out compositions. But my big worry was that most of these would suit a sunset rather than a sunrise, and what I thought were they good compositions didn't actually include any heather!
Dartmoor can be a tricky place to photograph though, particularly in flat light. It's hard to previsualise compositions. Or at least I can struggle to previsualise. Not to worry though, mother nature to the rescue! Just as I was about to conclude that the area had nice heather but no suitable compositions, the cloud broke and divine light shone on my composition!
Heather at Honeybag Tor #1, Dartmoor National Park - Nikon Z8, Nikkor Z 14-30mm f/4 S at 21mm, f/13, 1/3 sec at ISO 64.
Knowing that light like that is very fleeting on Dartmoor I immediately got to work and started taking pictures. No sooner has I grabbed a couple of frames and tweaked my composition, the light disappeared. It was a very exciting few minutes and very much a typical Dartmoor photography experience! That is, you wait ages and just when you are on the cusp of giving up and going home, you get 5 minutes of light to work with, and then you are done.
Five minutes is all you need some mornings though. I'd captured my photographs, and I was happy. With two successful shoots under my belt, should I push for a third one? Find out next time.

Heather at Honeybag Tor #2, Dartmoor National Park - Nikon Z8, Nikkor Z 14-30mm f/4 S at 21mm, f/13, 1/3 sec at ISO 64.

Bite-Size Blog Post #33 - Chinkwell Tor - Dartmoor National Park
My journey to photograph the heather on Dartmoor takes a big step forward with a visit to Chinkwell Tor!
In Search of Heather - Part 3
Unlike my trials and tribulations with capturing photographs of thrift, photographing heather should be easier. It's not that the art of photographing heather is easier than thrift, it's just that Dartmoor National Park is considerably closer than Cornwall (where the thrift is). The closeness of Dartmoor means I can go there more often, greatly increasing my chances of capturing a heather themed photograph.
A week on from my visit to Grimspound in my last blog post, I decide this time to visit Chinkwell Tor. Chinkwell Tor has a special place in my photography heart as it's the only other place where I've captured good photographs of heather.
Chinkwell Tor Heather, Dartmoor National Park - Nikon Z8, Nikkor Z 14-30mm f/4 S at 24mm, f/22, 0.4 sec at ISO 64.
However, the saying "past performance does not guarantee future results" is true for a reason, but I arrived at Chinkwell Tor cautiously optimistic. I needn't have worried though. I soon discovered a few clumps of heather beautifully mixed in with the luscious yellow of the gorse bushes. But would I get the weather conditions? Would overcast or clear blue skies spoil the party?
Honeybag Heather #1, Dartmoor National Park - Nikon Z8, Nikkor Z 14-30mm f/4 S at 24mm, f/13, 1 sec at ISO 64.
As you can see from the photographs, the answer is no. It's not often everything comes together, but when it does, it's extremely satisfying. I'm not suggesting the photographs here are outstanding, but that's rarely the goal. The goal is always to spend some quality time on Dartmoor, experience the start of a new day, and if possible, capture some photographs that make me happy. And these photographs make me happy.
Saying that, I'll probably head out in a few days again. The heather was looking good, so no point in stopping now.
Honeybag Heather #2, Dartmoor National Park - Nikon Z8, Nikkor Z 14-30mm f/4 S at 29mm, f/13, 1 sec at ISO 64.

Bite-Size Blog Post #32 - Grimspound - Dartmoor National Park
In this blog post I continue my search for a compelling photograph of the heather on Dartmoor by visiting Grimspound.
In Search of Heather - Part 2
In my last blog post I talked about my search for a compelling photograph of the heather around the Haytor area of Dartmoor National Park. As I said in that blog post it was a little early in the heather season to get a good photograph.
Despite that I decided to head out the following morning, but this time to Hookney Tor. Even within the borders of Dartmoor, different areas reach their heather peak at various times so it was a reasonable assumption that a change of location could yield better results.
Arriving at Hookney Tor I found myself a little lost. Creatively speaking that is. Though I've visited Hookney Tor a few times, I'd never taken the time to properly photograph it. There were patches of heather, but I found it difficult to balance the clumps of heather with the tor. It didn't help that it was cloudy, and the landscape looked a bit flat.
I decided that Hookney Tor wasn't working for me, so I opted to photograph a location that I had shot before, Grimspound. I first discovered Grimspound when I visited it in Episode 2 of Discovering Dartmoor. The photograph that I captured during that episode also had heather in it, so there was a danger of capturing the same photograph, but it was my best option.
Grimspound Sunrise #2, Dartmoor National Park - Nikon Z8, Nikkor Z 14-30 f/4 S at 21mm, f/13, 1/200 sec at ISO 640.
Grimspound is one of Dartmoor National Parks most important bronze age sites, but it's best photographed from the path leading down from Hookney Tor. I was keen not to repeat the same composition, but despite hunting around for a better one, I kept returning to the same view. However, while the composition might be similar to my first visit during Discovering Dartmoor, the conditions were different, and dare I say better.

Grimspound Sunrise #1, Dartmoor National Park - Nikon Z8, Nikkor Z 14-30 f/4 S at 14mm, f/13, 1/25 sec at ISO 64.
The heather isn't as prominent in the photograph as I might like, but the light coming in from the side is lovely thanks to some diffusion from the clearing cloud. I took two variations of the composition, just changing my position slightly. I'm not sure which one I prefer.
So, my search for a compelling photograph of the heather on Dartmoor continues, but my morning at Hookney Tor and Grimspound was time well spent.

Bite-Size Blog Post #31 - Haytor - Dartmoor National Park
In my blog this week I start to tell you the story of my goal to capture a compelling photograph of the heather on Dartmoor.
In Search of Heather
I recently wrote about the frustrations and challenges I have with photographing the thrift on the Cornish coast. It can be such a small window of opportunity to photograph it at its best and because life has a habit of getting in the way of important things like photography, I sometimes miss out.
I often tell myself not to bother with photographing these brief seasonal events. It only leads to frustration! But with that kind of attitude, I’d never capture anything interesting so here I am again, just this time with the heather!
By the time you read this, heather season will be well and truly over, but over the next few weeks here on the blog, I will share my photography adventures as I search for a compelling photograph of heather. Hopefully, I won’t run out of time and the weather gods will be good to me before heather season is over.
Heather at Haytor
Heather is widespread across Dartmoor National Park, but there are areas such as Haytor which turn purple in August. Arriving early August, I had low expectations that I would see fields of purple heather and I wasn’t exactly wrong. There were patches of heather but not enough to make an interesting photograph.

Haytor Heather (Lowman's Rock), Dartmoor National Park - Nikon Z8, Nikkor Z 14-30mm f/4 S at 22mm, f/13, 1/3 sec at ISO 64.
I was a little too early in the heather season, but as it was such a pleasant evening I took the opportunity to go for a walk. There are few things better than taking a long walk around the Haytor area on a summers evening. It was a wonderful opportunity to clear my head and relax a little bit. Sometimes a good evening isn’t defined by how good the photography was.
As it turned out though, when I returned to the car and looked onto Haytor (Lowman’s Rock), it was beautiful lit by the setting sun, so I quickly grabbed a photograph. It might not feature any heather, but I’m still pleased with the image, and even more pleased that I spent time on Dartmoor.

Haytor at Sunset (Lowman's Rock), Dartmoor National Park - Nikon Z8, Nikkor Z 24-120mm f/4 S at 51mm, f/11, 1/4 sec at ISO 64.

Bite-Size Blog Post #30 - Watern Tor - Dartmoor National Park
Watern Tor is one of Dartmoor's most remote locations, but is it worth a 15km round trip walk to photograph it?
One of Dartmoor’s Most Remote Tors
Watern Tor is one of Dartmoor National Park’s most remote tors. Fur Tor is commonly recognised as Dartmoor’s most remote tor, but that doesn’t mean Watern Tor is easy to get to. Far from it.
In Discovering Dartmoor Episode 5 I walked to Watern Tor from Batsworthy which was a distance of 5.5 km. If I was to wait for sunset, the walk back could be tricky as it wouldn’t stay light long enough for me to safely get back to the car. However, wild camping solves this problem and also provides the additional benefit of being able to photograph Watern Tor at sunset and sunrise.
Watern Tor is not only remote, but it is also spectacular, so ever since filming there for Discovering Dartmoor, I’ve been eager to get back. However, I wanted to see if there was a quicker route there. One that didn’t require me to wild camp but rather allowed me to walk back after sunset.
Watern Tor #1, Dartmoor National Park - Nikon Z8, Nikkor Z 14-30mm f/4 S at 18mm, f/11, 1/10 sec at ISO64
Dartmoor’s Military Roads
Like it or not, we must share Dartmoor National Park with the military. While this means that sometimes access to certain parts of north and west Dartmoor is prohibited, it does also mean that if you need to walk somewhere fast, there might be a road you can make a fast walk on.
My idea was to pick up the road at East Okement Farm and follow it south until I was adjacent to Steeperton Tor. Cars are prohibited just past East Okement Farm, so you’ll only find farm and military vehicles using it, and while the surface isn’t the greatest, it’s more than suitable for a fast paced walk.
I managed to walk to Hangingstone Hill in good time by taking a more direct path that runs along the base of Steeperton Tor. Once at Hangingstone Hill it was a simple case of turning east and tracking to Watern Tor. Distance wise it was actually further than walking in from Batworthy. However, the 7km walk took almost as long, but importantly, I could be back on the road for the bulk of return walk after a relatively short walk from Watern Tor. It’s much easier to walk along a road in the dark than a path.

Watern Tor #2, Dartmoor National Park - Nikon Z8, Nikkor Z 14-30mm f/4 S at 18mm, f/11, 1/10 sec at ISO64
Photographing Watern Tor
After all that walking and navigation, did I capture any photographs? Of course I did, and I’m pleased to say I found some different compositions from my previous visit.
Unsurprisingly though, the conditions were challenging. Around Watern Tor the sky was relatively cloud free, but to the west where the sun was setting it was rather cloudy. So even when the cloud cleared a little and I got some light on the tor, they sky wasn’t very interesting. It’s at times like this that I find the best approach to composition on Dartmoor is to try and make the tor large in the frame.
At first, I was struggling to do this as I was focused on one particular composition. The side on view of Watern Tor is iconic (in Dartmoor terms), but it also means shooting wide making it difficult to appear large in the frame. Thinking I need to do something different I put the tripod away and went for a walk with the camera until I found the composition you see in these photographs.
I have included both a colour and B&W version of the composition. Both work well but for different reasons. When there isn’t direct sunlight on the tor, I prefer the B&W version, and when there is light on the tor, I prefer the colour edits. What do you think? They do look very similar, but when the light on the tor isn’t the soft warm light you get directly from the sun, the tor can look very uninteresting and a bit flat. Converting to B&W brings out the texture and contrast of the tor.
As is the case more often than not, the photographs are a bonus to me. The real treat was the walk. Now that I know I can make the walk for sunset without having to camp, I’ll be returning to Watern Tor again soon. It is a location with huge potential and I can’t wait to return.

A Little Bit of Glencoe
Back to the Homeland
I've returned to my homeland of Scotland a couple of times this year and each time I have, I made sure that I took my camera so that I could photograph of the beautiful Scottish landscape. Despite my best intentions though, I never captured any photographs. But how could I possibly go all the way to Scotland and not take any landscape photographs?
My primary reason for going to Scotland was to see family and friends, not to take photographs. So, when I was there and I was spending time with the people that are close to me, my motivation for early alarm calls and staying out late to take pictures evaporated. Dare I say, but there is more to life than photography!
However, I've just returned from another trip to Scotland, and despite this being another friends and family type visit, I was determined to get out and use my camera! Add in the fact that it was the height of autumn, and the colours would be at their best in the landscape, there was no way I was returning home without capturing at least one landscape photograph!
An Ascent of Beinn a' Chrùlaiste
With Glencoe being only a 60 minute drive from my family home in Scotland, it became the obvious choice to go on a photography adventure. One of my all-time favourite Glencoe viewpoints is looking towards Stob Dearg (Buachaille Etive Mòr) from up on Beinn a' Chrùlaiste. You don't even need to get all the way to the summit to get a good viewpoint. By reaching Stob Beinn a' Chrùlaiste you can get a perfect side on view of Stob Dearg. It might be an all uphill walk in the dark, but to sit on that hill side and watch the sun come up over Glencoe is nothing short of magical.
As I said, it is one of my favourite viewpoints so I have photographed it before, but I've always felt I could get a better photograph, or at least a photograph with different weather conditions. Maybe even a temperature inversion!
Stob Dearg Sunrise, Glencoe, Scotland - Nikon Z8, Nikkor Z 24-120mm f/4 S at 29mm, f/11, 1.6 secs at ISO 64.
Alas, as you can see from my photograph I didn't get a cloud inversion. In fact, I didn't get much in the way of cloud at all. There was a blanket of very high level cloud that didn't add much to the scene and all it really did was stop the sky looking too blue. Other than that, the light was beautiful and the way it catches the mountain, and the autumnal colour of the ground is a sight I will never bore off. It's a composition I've captured before, but I'll happily keep going back and doing it again.
After spending a wonderful hour on the side of the hill, the light had become bright and harsh, so I felt there weren't many more opportunities to capture photographs. I had the choice of going back the way I ascended and to the car or continuing my walk to the summit of Beinn a' Chrùlaiste. As I'd never been to the summit, I thought this would be the perfect opportunity to do so. I'd get a nice walk, and I might find some compositions to come back to another morning.
After reaching the summit I descended down the eastern ridge, a route that I'd never done before. The highlight of the descent was hearing the roaring sounds of the stags. It was the height of the rutting season, and the noise of the stags could be heard everywhere. I even managed to spot one close to the Kinghouse Hotel.
After 13km of walking, my circular route took me back to the car feeling happy and content with my morning adventure in Glencoe.
Glencoe Lochan
A few days later I met up with a friend and fellow photographer who has a lot more experience of photographing Glencoe than me. She took me to a location I'd never been to before, Glencoe Lochan. While the light wasn't amazing, the water was calm, and autumn colours were beautiful.

Glencoe Lochan, Glencoe, Scotland - Nikon Z8, Nikkor Z 24-120mm f/4 S at 24mm, f/13, 1 secs at ISO 64.
This is by no means an amazing photograph, but I wanted to capture it so I could remind myself to return here next time I'm in the area.
River Coe
The afternoon weather in Glencoe had turned cloudy and wet, but the great thing about Glencoe is that even in the stormiest of conditions, you will likely find something to shoot. With the hope that there would be a gap in clouds rapidly fading, we decided to head down to the River Coe to see if we could make a composition featuring the river and the mountains. Even with the absence of light, the autumn colours of the landscape were striking.
It was late in the day when we got down to the river, and with so much cloud in the sky, the light levels were low. I admit that this did cause me to feel a little rushed and finding a balanced composition in a complex scene was tricky. The river has many twists, turns, pools, and waterfalls, and trying to place these effectively in a composition along with the trees and mountains, is something that requires time and exploration.

River Coe Rapids #1, Glencoe, Scotland - Nikon Z8, Nikkor Z 14-30mm f/4 S at 14mm, f/13, 0.5 secs at ISO 500.
I'm not complaining though. This is another part of Glencoe that I haven't explored before and just being there was exciting. It's another Glencoe location that I will revisit when I have more time, and I'm wearing a pair of wellies. I could easily spend a few hours (carefully) exploring this stretch of the River Coe.

River Coe Rapids #1, Glencoe, Scotland - Nikon Z8, Nikkor Z 14-30mm f/4 S at 14mm, f/13, 3 secs at ISO 400.
My time photographing Glencoe was short, but I loved it. I'm so glad I made the effort to tear myself away from my family and to head out with the camera. I photographed one of my favourite Glencoe locations and I found a couple of new ones. I had clear, calm weather one day, and wind and rain the other. But no matter the weather, Glencoe is still one of the most spectacular places in the country. No matter if I'm just enjoying a walk or taking landscape photographs, I will never get bored of it. I can't wait to go back.

Manfrotto Befree GT PRO Carbon Tripod Review
A good tripod provides should provide a stable platform for a landscape photographers camera. In this blog post I head to the Scottish Highlands to test out the Manfrotto Befree GT PRO Carbon Fibre tripod. Will it do the job I need it to?
Why I Have the Manfrotto Befree GT PRO Carbon Tripod
As I recently mentioned in my review of the Manfrotto PRO Light Backloader Backpack, tripods and camera bags are one of the photographic accessories you will likely replace the least often. A well-made, solid tripod should span the lifetime of more than one camera.
For most photographers the inclusion of one tripod in their kit bag is enough to cover most of their photographic needs. I on the other hand normally need access to a 2nd tripod. This might be a tripod that I carry in addition to my main tripod to allow me to create video content at the same time as taking photographs, or it might be a lightweight tripod I use when hillwalking in Scotland.
Unlike my primary tripod which has remained consistent for longer than I can remember, it's my secondary tripod that I've struggled to settle on. I've found it challenging to find something that is lightweight, versatile and stable. So when Manfrotto reached out to me and asked if I'd like to review their Manfrotto Befree GT PRO Carbon Tripod, I jumped at the chance.
In this blog post I'm going to tell you a little bit about this tripod, and I'll share my real-world experience of using it.
Before I go any further though, I must say that Manfrotto sent me this tripod free of charge in exchange for writing this review. However, they have not asked me to say anything and everything I write here are my own thoughts (good and bad). They will see this review for the first time when I publish it here.

The Manfrotto Befree GT PRO Carbon Tripod high up on the hills around Glencoe in Scotland.
Where To Buy the Manfrotto Befree GT PRO Carbon Tripod
If you'd like to buy the Manfrotto Befree GT PRO Carbon Tripod, it's available just about anywhere, including:
Please note that the Amazon and WEX links are affiliate links. I may receive a small commission if you purchase through those links, but it does not affect the price that you pay.
Features of the Manfrotto Befree GT PRO Carbon Tripod
In this review I'm going to talk about most of the features and specifications of the Manfrotto Befree GT PRO Carbon tripod, but if you want a full breakdown of everything this tripod has then check out all the specifications over on the Manfrotto website. This tripod is also part of the Manfrotto Befree collection so many of the same features in this tripod apply to the other tripods in the range. If you like the look of this tripod but it doesn't quite match your requirements, do check out the other tripods in the collection.
Tripod Legs
The tripod is made of carbon fibre and weighs approximately 1.55 kg (including the supplied head). Closed down the tripod length is 43 cm, extended it is 138cm and with the centre column extended it reaches a maximum height of 162 cm. Closed down the tripod is both small enough and light enough to carry by hand or it can be attached to your camera bag (or inside a checked bag if flying).

The Manfrotto Befree GT PRO Carbon Tripod attached to the Manfrotto PRO Light Backloader Backpack
Each leg comprises of 4 sections that can be extended or contracted using a twist lock style mechanism. The angle of the legs can also be independently adjusted.
Other features include:
The legs have rubber feet.
The tripod supports a maximum weight of 12kg.
There is a hook should you wish to hang something off it like a camera bag.
The tripod has a Manfrotto Easy Link connector allowing you to add accessories such as lights.
A tripod carrying case is supplied.


Tripod Head
My tripod came as a kit which means the box contained both the tripod legs and a Manfrotto Advanced 496 Aluminium Centre Ball Head. The ball head has three controls. There is an independent panoramic knob that allows the head to pan 360 degrees without adjusting the position of the camera on the ball head. The other two controls are for the ball mechanism itself. The first control allows you to adjust the position of the camera on the head, and the other control allows you to adjust the friction level of the head.
You mount your camera to the tripod head using the included Manfrotto quick release plate, the RC2.


Using the Manfrotto Befree GT PRO Carbon Tripod in the Real World
What Is the Real World?
For me, the main function of this tripod is for landscape photography and video content creation. So, it will either be my primary tripod for my landscape photography when I need something compact and lightweight, or my video tripod when I'm creating content for YouTube. As this review will mostly focus on my use of this tripod for landscape photography, I decided to put it to use on a recent trip to the highlands of Scotland. With cold, wet and windy weather, and plenty of hills and mountains to climb, it's a great real-world environment to test this tripod.
Carrying the Befree GT PRO

Closed down the Befree GT PRO tripod is easy to carry.
At just 43cm closed down, and a weight of 1.55kg the Befree GT Pro is easy to carry around. For the most part I had the tripod attached to the side of one of my camera bags. Once on my bag I barely noticed it was there. It's not heavy so I didn't feel it pulling the bag to one side, and it's shorter than my camera bags so it fits neatly on the side as well.
Moving about with the tripod in your hands is easy as well. With the legs still extended it's easy enough to walk short distances, and if I need to walk a bit further it's compact and light enough to carry by hand.
Extending and Closing Down the Befree GT PRO
If a tripod is difficult to extend or collapse and fold away, you are much less likely to use it. I didn't have any problems with the twist locks on this tripod. The locks were easy to twist and unlock, releasing the legs to be extended. I didn't experience any sticking, and I was able to use them with cold hands and with gloves on. I could extend all three legs to their maximum length in no time at all.
The centre column can also be extended, and this has a separate mechanism at the top of the tripod.


Equally, closing down the tripod was a simple affair. It takes slightly longer as you need to turn each twist lock separately, but it's hardly an arduous task. You then have the option of folding the closed legs up towards the tripod head to make it even more compact, but this also requires you to extend the centre column as well. For me, this small bit of extra effort isn't worth the few centimetres in height it saves. It is something I would consider doing if I was travelling with the tripod though.
Tripod Heads
I'm not a big fan of ball heads as I much prefer the precision nature of a geared head. However, ball heads are often smaller and lighter and therefore they are often a better choice if you are spending the day walking in the mountains. I was pleasantly surprised with the Manfrotto 496 head that is included in this kit. Yes, it lacks the total precision of a geared head, but thanks to the addition of the friction control knob it's possible to dial in just the right amount of friction for the weight of your camera and lens. This means it is a lot easier to control the movement of the head when you do release it. This doesn't make me a ball head convert, but it does make the choice of taking a ball head instead of a geared head a lot easier.
But the good thing about this tripod is that the head isn't fixed to the legs so you can remove it. This opens up a whole world of different tripod heads (with 3/8" mounting) that you can fit to the Befree GT Pro. For me, I was able to use my favourite geared head, or when I really wanted to keep the weight to a minimum, I have an even lighter weight Manfrotto ball head (though it lacks the friction control of the 496 head).
For video work, I can also mount my Manfrotto video head.
Load, Balance and Stability
The primary purpose of a tripod is to provide a stable platform for your camera. If it can't do this then there is little point in carrying it about with you. However, the stability of a tripod is greatly affected by factors such as camera system weight (body and lens), environmental conditions (wind), and the types of photographs you will be taking (e.g. long exposures).
All reviews are subjective, but tripod reviews are particularly so. What is a good tripod for me, might not be for another person. So, bear in mind if I think this tripod provides a good stable platform, that's subjective and based on how I use it. If you shoot wildlife with an 800mm lens, your milage may vary!
With all that said, I used this tripod for landscape photography which means I was using my Nikon Z8 with either a Nikkor Z 14-30 f/4 S lens or Nikkor Z 24-120mm f/4 S lens. This gives me a maximum system weight of approximately 1540g, plus maybe bit extra for filters. All well within the weight limit of 12kg for the tripod.

The Befree GT PRO with my Nikon Z8 and Nikkor 24-120mm f/4 S
In a horizontal orientation I experienced no issues with balance, even with my 24-120mm lens fully extended. With the camera in a vertical orientation, I still didn't experience any issues, though I do tend to be a bit more wary and may adjust the angle of one of the legs to provide additional balance. This is one of the reasons why I prefer my geared head as I can use my camera L-bracket to put the camera in a vertical orientation rather than using the ball head to do it.
For a lightweight tripod stability is good and I didn't experience any wobbles even when the wind was a bit breezier. I was also able to confidently capture some long exposure photographs. But this is a lightweight tripod, and it will have limits. I haven't found those limits yet, but there will be occasions where the wind is very strong and longer exposures will be challenging. In very windy conditions I would avoid extending the centre column to much (but this goes for any tripod with a centre column).
But based on my experience I would be confident with the stability of this tripod in most of the conditions I would be willing to be out in with my camera.

The ability to independently adjust the angle of the legs of the Befree GT Pro provides additional stability on uneven ground like this hillside.
Things I Would Change
No product is perfect, and the Befree GT Pro is no different. There are just a couple of minor things I would change:
Tripod spikes - I would like to have seen Manfrotto include spikes as well as rubber feet. While I believe you can buy a set of Manfrotto spikes, these are a proprietary fit and so you can't use standard 3rd party spikes. I'm a big fan of spikes as these can really improve the stability of a tripod.
Manfrotto 496 Head - Many of the Manfrotto heads require your camera to have an RC2 plate attached rather than the more universal arca-swiss style mounting (such as the one found on my L-bracket). It is possible to attach the RC2 plate to my L-Bracket, and then I attach it to the head, but I don't find this to be a versatile solution. Additionally, if you are shooting vertically, you really need to make sure the RC2 is tightly attached, or you may find the camera slipping on the plate (especially during long exposures).
Long Term Durability
The one thing I haven't been able to test is the long-term durability of the tripod. However, given it's manufactured by Manfrotto, and it comes with a 2+8-year warranty, I can't see any reason why it wouldn’t give me many years of happy use.
In Summary
I am very happy with my experience so far with the Manfrotto Befree GT Pro tripod. It's lightweight, compact, and sturdy. It's the perfect tripod if you are trying to keep your kit weight to a minimum and it easily attaches to my camera bags without becoming a burden. It's even the type of tripod I'd be happy to take out on family walks to capture those special group shots. Nothing bores the family more than waiting 10 minutes as you set up your tripod!
If your camera is mirrorless or generally lightweight, you'll find the maximum payload of 12kg more than enough even to make this your only tripod.
The tripod feels like a quality product and the legs extend and collapse easily making it a tripod you will want to use on a regular basis. The ball head is surprisingly nice to use, and proprietary plates aside, is a good addition to the legs.

The carbon fibre legs provide a stable platform for longer exposures.
As I said earlier in the review, there's no such thing as a perfect tripod and what's good for me, might not be good for you. It's always worth carefully considering how you will use any tripod and what camera you will be putting on it. But for me, Manfrotto Befree GT PRO is the perfect companion for me and my Nikon Z8 and those beautiful long walks in the Scottish Highlands.
I hoped you enjoyed this review of the Manfrotto Befree GT PRO backpack and if you have any questions, please leave me a comment below.