Bite-Size Blog Post #29 - The Quiraing
I love the view towards the Quiraing but I always seem to struggle to get a photograph I'm happy with in. I got a chance to go back recently, but was this the best I could get?
In Search of The Needle
The Isle of Skye is magical and for the landscape photographer, it’s heaven. Like most of the Hebridean islands, it offers a lot of variety to adventurous photographer. You can photograph the coast and the mountains and everything in between.
Unfortunately, this blog post isn’t a story about how I spent many wonderful days on the island capturing portfolio images every day. No, this is a brief story about just one morning on Skye. Don’t feel sad for me though, I was on my way to spend 10 days on Harris and Lewis!
With just one morning on Skye, it can be difficult to select a location, but when your next stop is Uig and the ferry to Harris, it’s almost impossible to not be drawn to the Quiraing. I had photographed it on my last visit but I wasn’t completely happy with the photographs. I had unfinished business at the Quiraing!
So, would this trip yield any better results? Well, no, not really. I’m not unhappy with the photograph I captured. I did what I could with the conditions and light that I had. I just feel that this photograph lacks the drama that I would want to see from this view. Perhaps I’ve had my perception skewed from all the photographs I have seen of the Quiraing over the years.
I’m not going to worry about it though. It’s just inspired me to want to go back and next time with enough time for repeat visits.
While I was there though, and with the thought of coming back in my mind, I decided to explore a little more of the area. I particularly wanted to see The Needle, but managed to miss the path that takes you up to it. It wasn’t the end of the world though as the two hour circular walk that I went on revealed some very nice locations that would shoot well in the right conditions.
I might not have captured the most amazing image of the Quiraing, but it was definitely time well spent. It was goodbye to Skye, but I know I will be back one day. Soon.
The Quiraing, Isle of Skye, Scotland - Nikon Z8, Nikon Z 24-120mm f/4 S at 27mm, f/11, 1/4 sec at ISO 64.

Bite-Size Blog Post #28 - Glencoe
With so many amazing spots to photograph in Glencoe it can be hard to know what to shoot. But sometimes you just need to take a chance, recce a location and then see what happens. Find out why I captured this image in the blog this week
There Are Worse Places to Stop
Back in March I went on a photography adventure to Harris and Lewis in Scotland. It’s a very long journey from Devon to the Outer Hebrides so an overnight stop somewhere will always need to be on the itinerary. Fortunately, Devon to Glencoe is about doable in a day, so me and my friend decided a quick overnight there would be perfect. We’d be there in time for sunset, and we could sneak in a quick sunrise shoot before continuing our journey north.
It may sound like an odd thing to say, but when you only have a short amount of time in a location, particularly a location like Glencoe, deciding what to shoot is not as easy as it might appear. You are literally spoilt for choice so there was a lot of debate on where to shoot, both on the drive up and at the hotel. A decision had to be made though and after a bit map scrolling, we spotted a loch that if the weather forecast was accurate, it could be still enough for reflections.
The evening forecast was a little unsettled so we sacrificed the evening shoot to go and recce a spot on the loch. Best be prepared for the morning rather than turn up and then be in a panic when the conditions are good. As it turned out, it was a beautiful evening. There was plenty of drama in the sky with lots of clouds lit up by the setting sun, and there were also so nice reflections on the loch. The only thing missing was light on the landscape. But our time there wasn’t wasted as we both agreed that if we get great conditions the next morning, this will be the place to be.
We headed back the following morning and we weren’t disappointed! The loch was perfectly still, there was plenty of cloud in the sky, and though we had to be patient, we did finally get light on the hills and then magically on the trees! What a perfect way to start a two week photography adventure.
Just for fun, I’ve included two versions of my favourite image that I captured that morning. The first is the uncropped version. I love this version as it shows how good the reflections were. I also love the panoramic crop version. I’d be really tempted to print that version to have on my wall. What do you think? Let me know in the comments below.

Glencoe, Scotland - Nikon Z8, Nikkor Z 24-120mm f/4 S at 24mm, f/11, 1/8th sec at ISO 64, Kase CPL.

Glencoe, Scotland - Nikon Z8, Nikkor Z 24-120mm f/4 S at 24mm, f/11, 1/8th sec at ISO 64, Kase CPL, single image panoramic crop..

Bite-Size Blog Post #27 - Bedruthan
In the blog this week I'm back in Cornwall to see if I can capture a compelling photograph of the thrift along the Cornish coast? Did I succeed? Find out in the blog at
That Pesky Thrift Part 2
Last week in the blog I wrote about the challenges I have with photographing seasonal events such as when the thrift blooms along the coast of Cornwall. While I wasn’t unhappy with my photograph from Trevone, the thrift wasn’t at its peak. A return trip was needed!
One of the best, and most popular locations to photograph the thrift is Bedruthan. For large stretches of the cliff tops at Bedruthan you can find beautiful clumps of flowering thrift, just like you see in the photograph below.

Bedruthan Thrift #1, South West Coast Path, Cornwall - Nikon Z8, Nikkor Z 14-30mm f/4 S at 28mm, f/11, 25 secs at ISO 64
While finding clumps of thrift was easy enough, the weather conditions weren’t what you might call inspiring! As is often the case on the Cornish coast, the line between amazing and flat conditions is thin. On one hand the skies had plenty of interesting clouds that if lit up by the setting sun would prove to be very photogenic. But on the other hand, the sun was playing hide and seek behind those lovely clouds.
While the photographs I captured are pleasing enough, what they are really missing is the warm, soft light from a sun low on the horizon. That kind of light can utterly transform a scene as it would light up the cliffs adding contrast and depth, and it would also illuminate the underside of the clouds.
This problem is that when you know the conditions can be better and what that means for your photographs, you aren’t completely happy if you don’t get those conditions. However, I captured the best photographs I could that evening and more than that, I had a great time doing so! There is something special about spending time at the coast. It’s good for the soul!
I’d like to say there is a part 3 to this story and that next week I capture an awe-inspiring photograph of the Cornish thrift, but alas there isn’t. I didn’t make it back in time and thrift season came to an end. Maybe next year I’ll just move to Cornwall for spring. I’ll have no excuses then!
Bedruthan Thrift #2, South West Coast Path, Cornwall - Nikon Z8, Nikkor Z 14-30mm f/4 S at 14mm, f/13, 20 secs at ISO 64

Bite-Size Blog Post #26 - Trevone Thrift
I normally miss thrift season in Cornwall, but not this year! In the blog this week I head to Trevone to capture some photographs of this beautiful pink flower but capturing and processing the images were a little tricky.
That Pesky Thrift
Like most seasonal flowers, photographing thrift not only requires skill but also good timing. There is probably only a two or three week window when the flowers are looking their best. It’s not that you can’t create lovely pictures outside of that window, but if you can get them just at the right time, when the conditions are lovely, you can end up with a superb photograph!
And here lies the problem. The thrift along the Cornish coast is lovely, but the drive is anything between 1.5 and 2 hrs for me, so it doesn’t take much for that journey not to be worth it or even possible. And before you know it, the peak has passed, or sometimes I’ve missed the whole thrift season!
I made a commitment to myself that 2024 would be different. I would fully commit to capturing the thrift! Unfortunately, life got in the way, and I only made to Cornwall twice! I’ll talk about my visit to Bedruthan in a later post, but in this blog post I’m going to share the photograph I captured from Trevone.
The photograph is a three frame focus stacked image. (If you want to know how to focus stack then check out either of my videos here or here). I originally shot the sequence using four frames, with the last frame being a longer exposure to smooth out the sea. Capturing the four frame was tricky as the light on cliff tops would change too much between the first and forth frames.
I did manage to get a couple of four frame sequences, but the post processing proved too tricky. The frames would focus stack, but it would then involve a lot of manual blending in photoshop between the short exposure frame and the long exposure frame. I’m sure someone with greater Photoshop skills than me might have managed it, but I gave up in the end!
As it turned out, I rather like the three image stack with its rougher sea. Either way, at least I have a photograph of the thrift looking its best!
Trevone Thrift, South West Coast Path, Cornwall - Nikon Z8, Nikkor Z 14-30mm f/4 S at 17mm, f/8, 1/60 sec at ISO 64, three image focus stack.

Bite-Size Blog Post #25 - Bude Sea Pool
Photographers will often say that you need to find the right subject for the conditions. As I briefly discuss in the blog this week, there's an element of truth to it.
And Now for Something Completely Different and Unexpected
My last few blog posts have all featured photographs of Dartmoor. Hardly surprising given that it’s my local area for landscape photography! I do however like to venture further afield, especially to Cornwall, but the driving distances involved normally mean I’ll only go if there is a good reason to. i.e. The conditions are looking favourable for a bit of coastal photography.
The story behind this photograph is a little different though. This wasn’t a planned shoot. In fact, I was only going through to Cornwall to pick up a tripod which I had left in a friend’s car after a long photography trip. I had already checked the weather, and it was looking overcast and flat. But sometimes the forecast is wrong, so I packed my camera anyway. Better to have it and not need it, than the other way around.
Arriving at my friend’s house the weather was indeed a bit rubbish. No chance of an epic sunset over some high cliff tops or over a golden beach. He made a very good suggestion though, and that was to try Bude Sea Pool. I had photographed once before, but without any real success, so a return trip to capture some moody long exposures seemed the perfect thing to do.
And here’s the result. Perhaps not the most original of compositions but there’s only so many angles you can shoot the sea pool when it’s high tide and the waves are crashing in. I rather like it and it’s very different from my recent Dartmoor photographs. So not only did I get my tripod back, but I also bagged a pleasing photograph. Happy days.
Bude Sea Pool, Cornwall - Nikon Z8, Nikkor Z 24-120mm f/4 S at 92mm, f/11, 90 secs at ISO 64, Kase Filters CPL and ND.

Bite-Size Blog Post #24 - Yes Tor
I'm on a journey to expand my creative toolbox to include black and white photography. Find out in this blog post why my Dartmoor photography is changing.
Are My Tastes Maturing?
My kids have a limited palette when it comes to the foods they eat. There was a phase that if the food wasn’t yellow and it hadn’t came from the freezer, they wouldn’t eat it! I was certainly no different at that age, living on a steady diet of turkey drummers. But as I got older my tastes changed, and by the time I had a “proper” job I was eating at restaurants and drinking wine. Ginger beer and heavily processed turkey breaded drumsticks were not on the menu.
Much in the same way my food palette has expanded, it looks like my photographing style is expanding to include black & white photography. I’ve always been able to appreciate a good black & white landscape photograph, but I’ve never been able to effectively translate the style into my own photographs.

Yes Tor, Dartmoor National Park, Devon - Nikon Z8, Nikkor Z 14-30mm f/4 S at 14mm, f/13, 1/15 sec at ISO 64.
Life Without Colour
Recently though I’ve started taking more black & white photographs, especially of my local area, Dartmoor National Park. I admit, my first few black & white Dartmoor photographs were hasty conversions in an effort to save a mediocre shot, but I have now started to look at what the world would look like without colour.
I would classify myself as a classic landscape photographer and this I believe is reflected in the photographs I capture of Dartmoor. Lots of big open views taken during the golden hours. I like to think of these photographs as showing off Dartmoor in its best light. And while these photographs a true representation of Dartmoor, those conditions can be rare. Frustratingly rare!
It’s from that frustration that my interest in photographing Dartmoor in black & white has come about. Being able to see Dartmoor in a way that suits the conditions has freed me a little from the constraints of only being pleased when there is a certain type of light.

Cosdon Hill, Dartmoor National Park, Devon - Nikon Z8, Nikkor Z 24-120mm f/4 S at 56mm, f/13, 1/20 sec at ISO 64.
Previsualtion
One of the reasons I am starting to photograph Dartmoor more in black and white is the effectiveness of Picture Controls on my Nikon Z8. In particular the Picture Control “deep tone monochrome” has become invaluable in helping me previsualise a Dartmoor photograph in black and white. Being able to previsualise the scene in black & white on my camera has freed me from the guilt of believing I’m only converting as a last resort
And now that Lightroom also has that profile built in, I have to do a lot less guess work in getting the photograph to look the way I saw it on the back of the camera when I captured it.

Hunt Tor, Dartmoor National Park, Devon - Nikon Z8, Nikkor Z 24-10mm f/4 S at 120mm, f/13, 1/20 sec at ISO 64.
The End of Colour in My Dartmoor Photographs?
As much as I have and will continue to enjoy taking Dartmoor photographs in black and white, this does not mean the end of colour for me. Far from it. Getting up early in the morning and experiencing the joy of a glorious sunrise is something I will always love to witness and to photograph.
What black and white gives me though is another tool in my creative toolbox. Something that I have in my portfolio of photography styles, rather than something to fall back on. I know what all you hardcore black and white photographers are saying…what took you so long! All I can say is, it doesn’t matter how long it took me to get here, the point is that I’m here, and I love it.

Yes Tor, Dartmoor National Park, Devon - Nikon Z8, Nikkor Z 24-10mm f/4 S at 26mm, f/13, 1/20 sec at ISO 64.

Bite-Size Blog Post #23 - Wild Tor
In the blog this week I take a long walk to one of Dartmoor’s most remote tor, Wild Tor, and question if it was all worth all the effort!
A Long, Featureless Walk
Wild Tor is wild by name and wild by nature. It’s one of Dartmoor’s most remote tors and no matter which direction you come at it from, it will be a long walk. Not that a long walk is a bad thing on Dartmoor. If it’s a 7km walk to a tor worth photographing, then I’m more than happy to put in the effort. Besisdes, they do say it’s about the journey and not the destination.
Having walked to Wild Tor before I was keen to try an alternative route. Normally I’d walk in via Oke Tor and Steeperton Tor, but for this adventure I decided to start in Belstone village and head up to the summit of Cosdon Beacon, track along to Little Hound Tor, and then straight along to Wild Tor. On paper, this looked like a lovely route.
The trek up from Belstone village to Cosdon Beacon was a bit of slog. I couldn’t find a clear path, so I mostly had to follow animal tracks to the summit. It seemed to take ages but when I finally made it the views were dramatic. I could see for miles in all directions.
I could also see my next waypoint, Little Hound Tor, which was almost on a straight track south. The walk was easy enough, but despite some clear views, it wasn’t exactly the most exciting of walks. Don’t get me wrong, a walk on Dartmoor is rarely something I regret and I certainly wasn’t regretting this walk, it was just this route was a little featureless and dull. Maybe I was just feeling a bit grumpy!

Wild Tor #1, Dartmoor National Park, Devon - Nikon Z8, Nikkor Z 14-30mm f/4 S at 17mm, f/11, 1/50 sec at ISO 64.
Feeling Isolated and Remote on Dartmoor
The last stretch of my walk to Wild Tor was familiar enough, and soon I had reached my destination. If a feeling of isolation or a sense of being away from it all is what you are after, then Wild Tor is the location for you! It’s one of the reasons I love going there. I rarely see anyone else and there’s not a road of building to be seen for miles!
While I love the way Wild Tor makes me feel, it’s the opportunity to photograph this magical tor that makes me undertake that long walk.

Wild Tor #2, Dartmoor National Park, Devon - Nikon Z8, Nikkor Z 14-30mm f/4 S at 17mm, f/11, 1/50 sec at ISO 64.
Well, I say magical, but when I got there and I had a wander about, I felt decidedly uninspired! Maybe I was in a grumpy mood or perhaps I had over hyped Wild Tor in my head. Was the alure of how remote this Dartmoor tor is was skewing my judgement?
Sometimes though, a lack of creativity is a temporary thing. So, I had a sit down, ate a snack and enjoyed the view. Sure enough, a little rest and food allowed me to reset, and I was soon feeling inspired! And once you feel like you capture one good image, it’s easier to carry on capturing more.

Wild Tor #1, Dartmoor National Park, Devon - Nikon Z8, Nikkor Z 14-30mm f/4 S at 15mm, f/13, 1/6 sec at ISO 64.
A Different Vision of Wild Tor
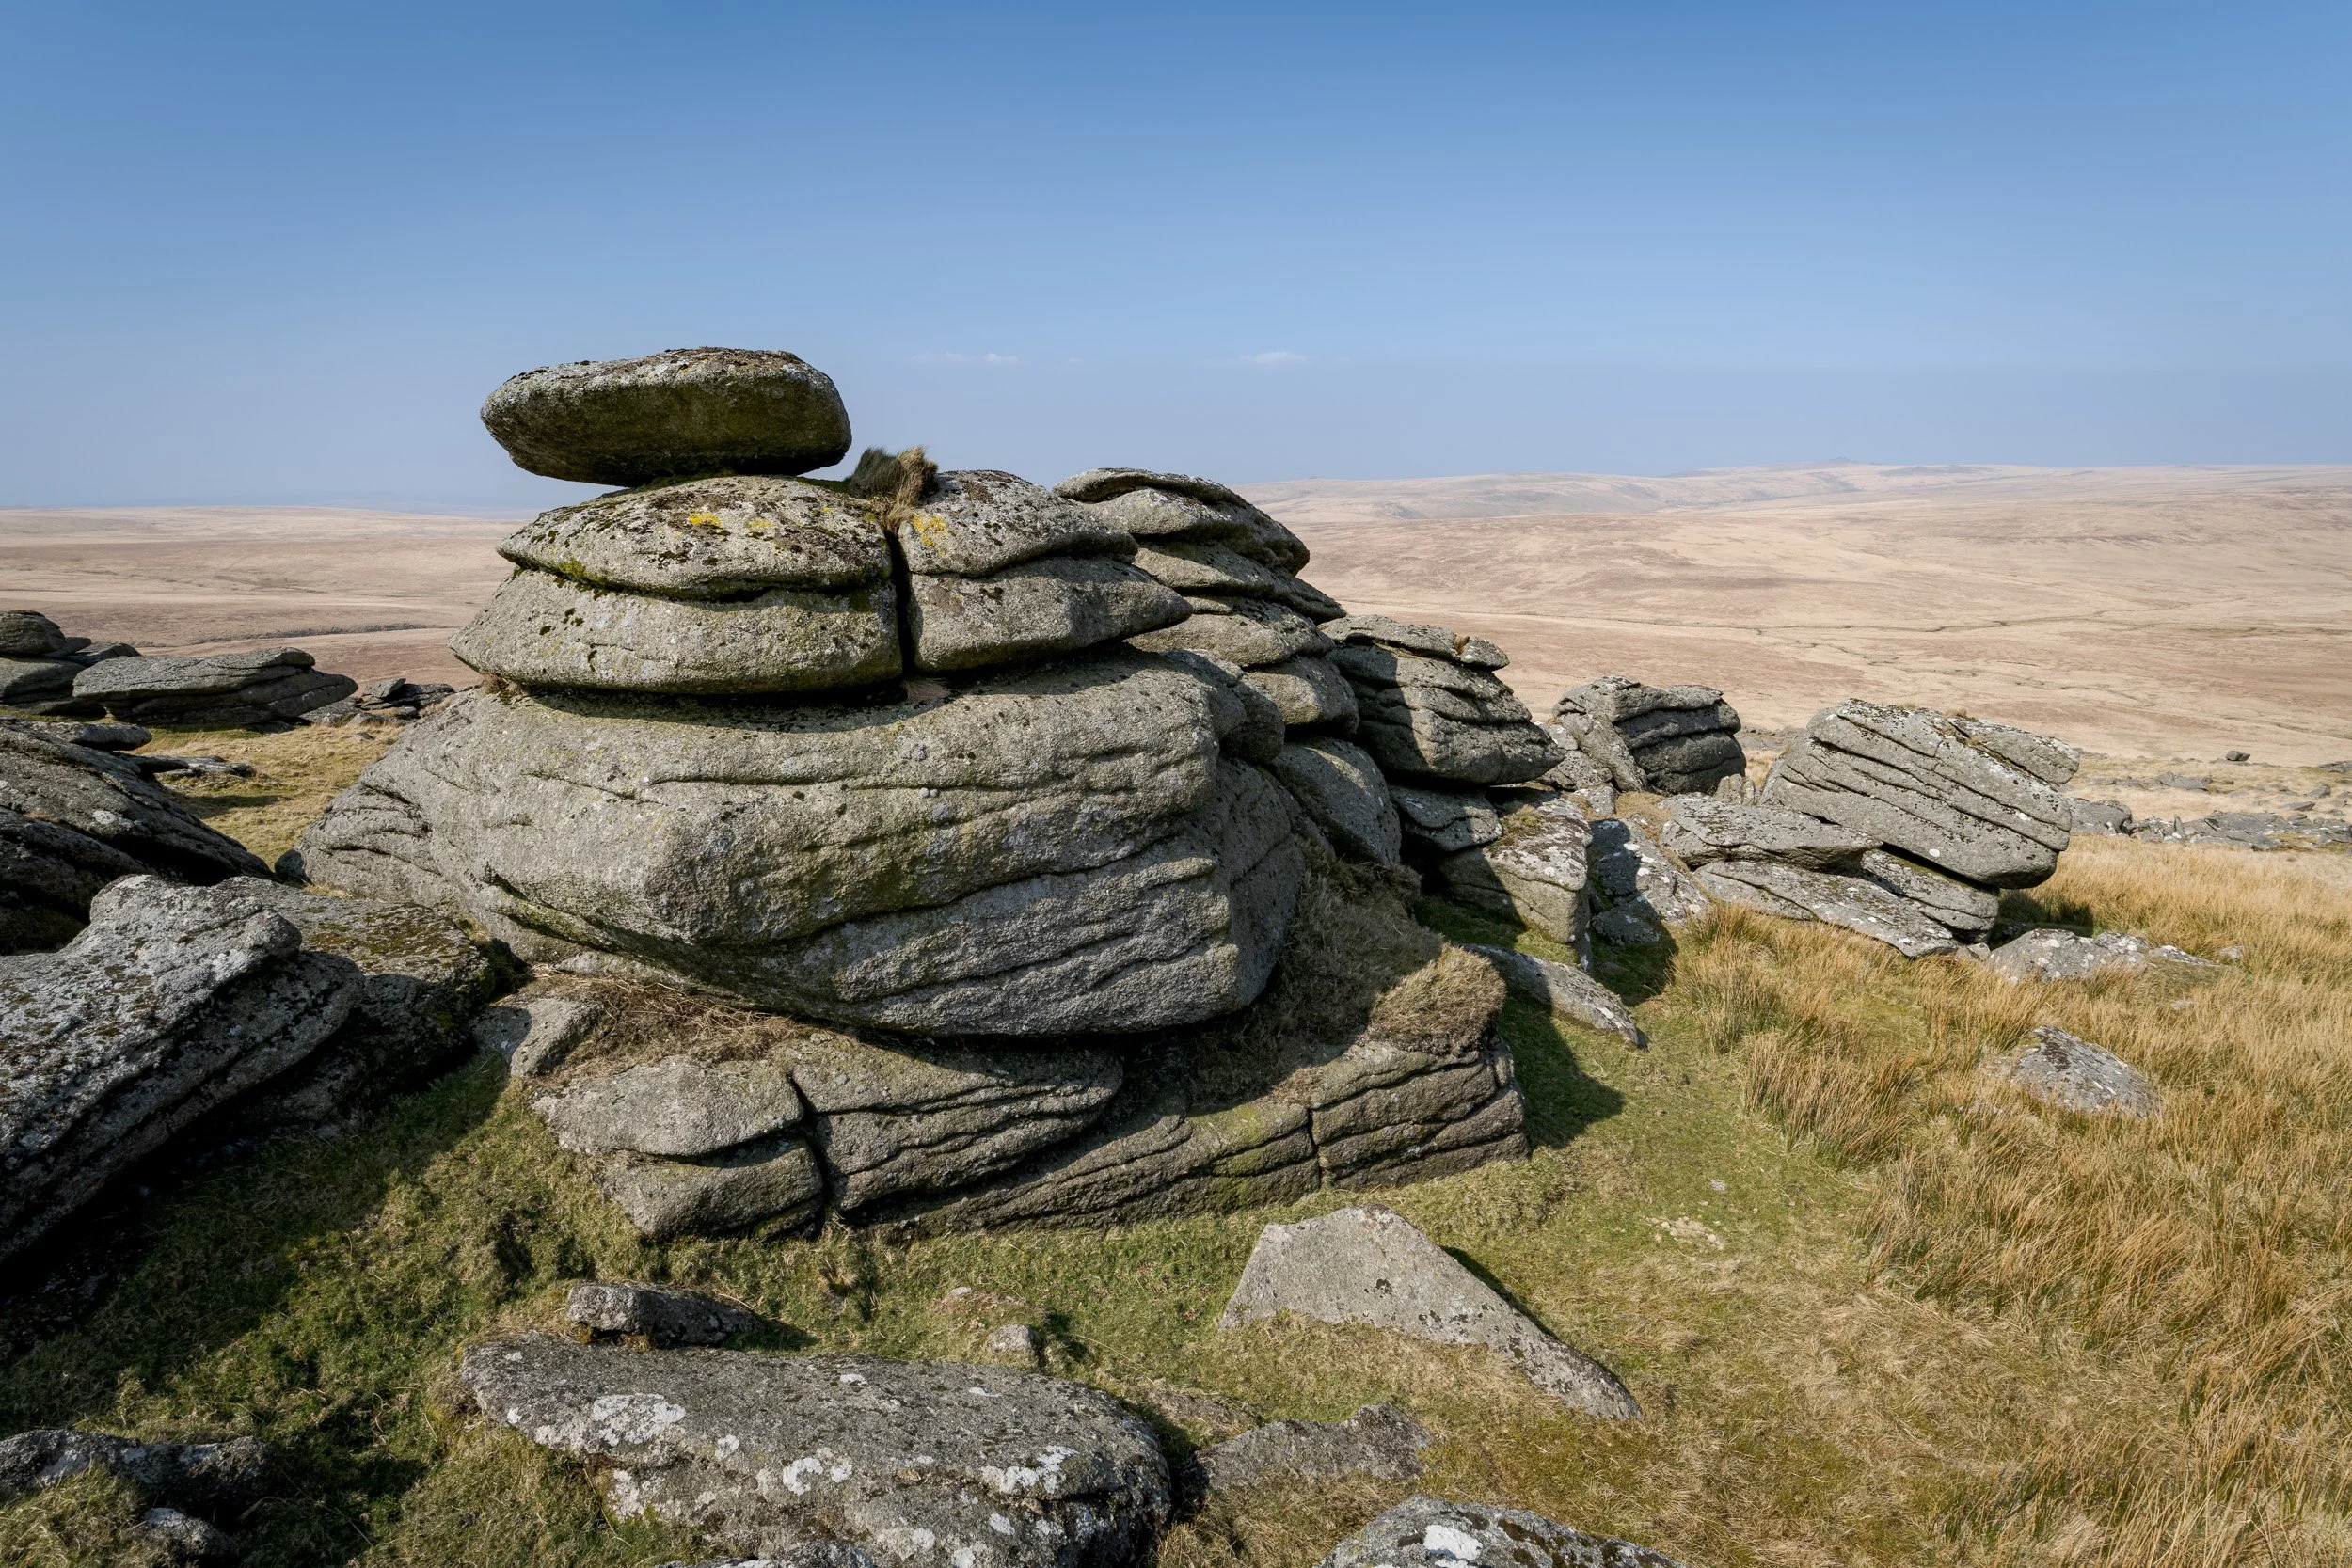
The first photographs I captured are from viewpoints that I’ve shot from before. They are photographs that are very much in my style of Dartmoor photography. But as the sun got lower in the sky what cloud there was started to clear leaving bright blue skies.
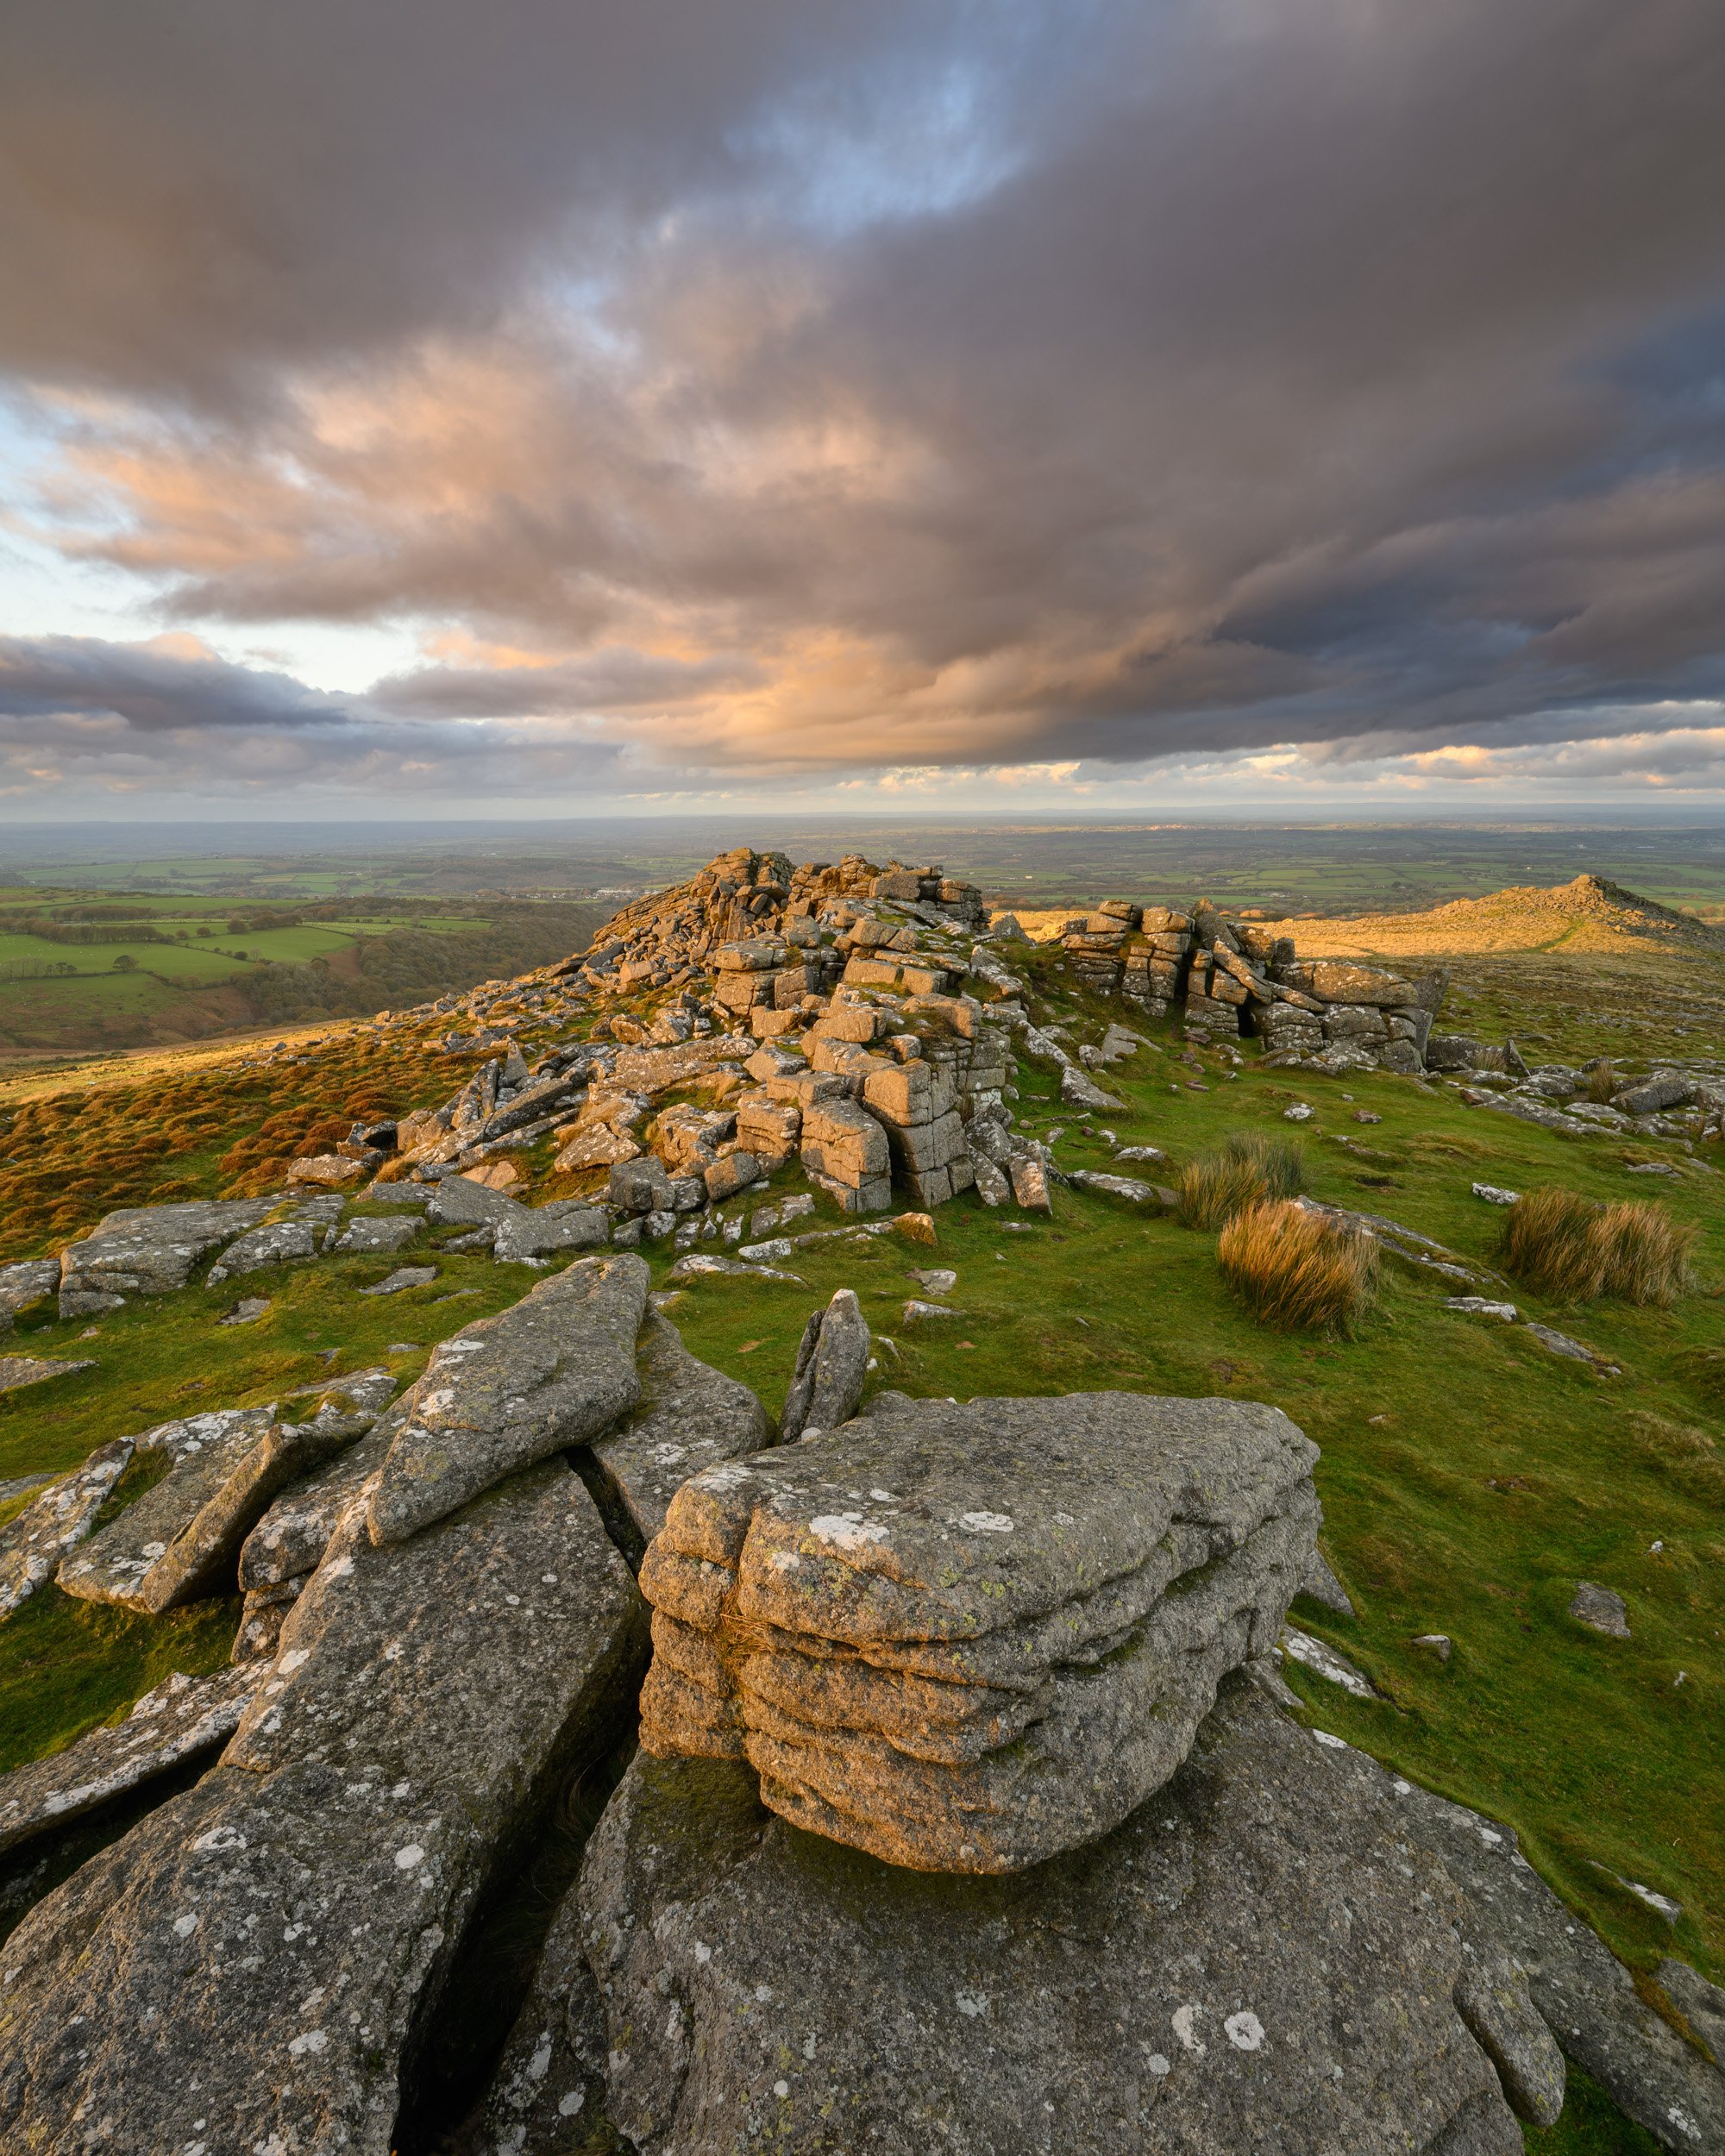
Not to be put off by the clearing skies, I decided to look for a composition that didn’t depend on an interesting sky. I soon found what I was looking for! What interests me about this new composition is that it not only features a new angle on a tor I’d already photographed, but the postioning of the three rock stacks is something I’d not seen on Dartmoor before. It’s this composition that makes these photographs uniquely Wild Tor.
After a few hours of feeling a little grumpy, I left Wild Tor feeling great and inspired to come back. I even enjoyed the walk home….though I did take an alternative route back!

Wild Tor #4, Dartmoor National Park, Devon - Nikon Z8, Nikkor Z 14-30mm f/4 S at 14mm, f/13, 1/6 sec at ISO 64.

Wild Tor #5, Dartmoor National Park, Devon - Nikon Z8, Nikkor Z 14-30mm f/4 S at 14mm, f/13, 1/5 sec at ISO 64.

Bite-Size Blog Post #22 - Sharp Tor - Dartmoor National Park
In my blog this week, I do something that I haven't done before and that's photograph Sharp Tor near Willsworthy on Dartmoor.
Somewhere New on Dartmoor National Park!
I’ve been photographing Dartmoor for well over a decade and sometimes it feels like I’ve photographed it all! With Dartmoor National Park being just over 365 square miles in size, I think that it is unlikely that I have. But, as time goes on, it has become increasingly hard to find a location that I have never photographed before.
Inspiration can come when you least expect it though. I had a spare evening but going out to take pictures wasn’t top of my list of things to do. The weather was looking good and what I really fancied was a good walk! Opening my OSMaps app I scanned Dartmoor for a suitable route. Hovering around the Willsworthy Range I realised that I had explored very little of that area. In particular I had never been to Sharp Tor which I had visually spotted a few weeks earlier while photographing Ger Tor.

Sharp Tor#1, Dartmoor National Park, Devon - Nikon Z8, Nikkor Z 14-30mm f/4 S at 20mm, f/11, 1/100 sec at ISO 640.
Always Take Your Camera to Dartmoor
Excited to have found somewhere new to explore, I packed my bag with everything I would need for an evening walk on Dartmoor, including my camera. I know I said taking photographs wasn’t top of my list of things to do that evening, but that doesn’t mean I wouldn’t take my camera. Only that it wasn’t the primary focus of the evening!
I rarely leave home without the camera when going on a walk. You never know what you might see! It’s better to have the camera and not need it, than need the camera and not have it!

Sharp Tor#2, Dartmoor National Park, Devon - Nikon Z8, Nikkor Z 14-30mm f/4 S at 18mm, f/13, 1/6 sec at ISO 64.
The walk up to Sharp Tor is fairly straight foward. Having already checked there was no live firing in the range that evening, I parked at the car park near the entrance to the range. Walking up the road to the range I walked past a tent with some military folks in it I double checked it was OK to proceed and that I wasn’t going to be seen as a moving target. I was casually and politely waved on. Nothing to worry about then!

Sharp Tor#3, Dartmoor National Park, Devon - Nikon Z8, Nikkor Z 14-30mm f/4 S at 15mm, f/13, 1/6 sec at ISO 64.
Sharp Tor on Dartmoor - Hit or Miss?
Arriving at Sharp Tor, I was hot, but bullet free! As with the views from Ger Tor and Great Links Tor, the views from Sharp Tor are expansive and on a clear evening like I had I could see well into Cornwall.
While the views were great and well worth the walk, I wasn’t particularly convinced that Sharp Tor itself was very photogenic. Some tors immediately capture your imagination, others take several visits or a specific set of conditions. As nice as the area around the tor was, I struggled to find a strong composition of the tor itself.
So, am I done with Sharp Tor? No. Looking at my photographs now I still believe there might be some potential there. It might just take a few visits to find what makes Sharp Tor special. Not that making repeated visits to Sharp Tor will be a hardship. It’s a walk and a view that I will always look forward to.

Sharp Tor#4, Dartmoor National Park, Devon - Nikon Z8, Nikkor Z 14-30mm f/4 S at 14mm, f/13, 1/8 sec at ISO 64.

Bite-Size Blog Post #21 - Bowerman's Nose - Dartmoor National Park
In my blog this week, I set a very early alarm call so I can be at Bowerman's Nose on Dartmoor for sunrise, but to my surprise I experience more than just good light.
A Spring Morning on Dartmoor
As you’ll have guessed by the heading, this blog is a retrospective post, but it’s still a story worth sharing.
Every season on Dartmoor brings something special but the season of spring can be one of the most vibrant and noisy! Spring is also an opportunity to photograph one of Dartmoor’s most unique tors, Bowerman’s Nose, at sunrise. It’s only around springtime that the light from the rising sun isn’t blocked by a hill to east.
There is a downside though. Sunrise is at 5:30am! I don’t mind an early start, but a 5:30am sunrise is normally a 4am alarm call (at the latest!). However, if you can get past the early start, being up on Dartmoor National Park at that time day can be magical.
Bowerman’s Nose #1, Dartmoor National Park, Devon - Nikon Z8, Nikkor Z 14-30mm f/4 S at 20mm, f/13, 1/6 sec at ISO 64.
Tranquility on Dartmoor
I can only describe that morning up on the eastern edge of Dartmoor as tranquil. As I sat on a small rocky outcrop looking down on the valley below, all I could see was a sea of fog. There was so much of it that I found it difficult to pick out places that I knew! As the sun hadn’t risen yet there was no light on the landscape, so I just decided to sit there and take in the view. (Check out my Instagram post to see a video of what I saw).
As if the visual delights weren’t enough, I was also surrounded by a chorus of bird song. I’m not sure how many birds there were, but given the levels of sound, I thought every bird on Dartmoor was at the same spot I was. The noise was almost overpowering, but it also came with a sense of tranquillity.
It’s not often I get a sense of inner peace at 5am, but as I sat there on my rocky outcrop watching the fog flow through the valley below, listening to a thousand birds sing, I truly felt like I was in the best place in the world and that I could spend all morning there. As it turned out, thThe photographs I captured that morning of Bowerman’s Nose were just a bonus and not the main event.
If only all mornings on Dartmoor were like that one.
Bowerman’s Nose #2, Dartmoor National Park, Devon - Nikon Z8, Nikkor Z 14-30mm f/4 S at 26mm, f/13, 1/4 sec at ISO 64.

Wild Camping at Steeperton Tor - Dartmoor National Park
In my latest blog post I embark on a wild camping adventure to capture photographs of Steeperton Tor on Dartmoor from dusk to dawn! See more photographs from that adventure and learn why I think wild camping is such an important right.
Supporting the Campaign to Protect the Right to Wild Camp
Before I get into the story and photographs from my recent wild camp on Steeperton Tor, I just want to highlight the issue of wild camping rights on Dartmoor National Park. People have been enjoying wild camping (backpack camping) on Dartmoor for decades, but a recent legal challenge puts all that at risk.
I’m not going to go into the well documented history of this legal case and what it means for those who enjoy wild camping responsibly, other than the loss of the right to wild camp responsibly would have a dramatic impact to the way many of us like to enjoy Dartmoor. It’s a critical issue regardless of if you wild camp or not. It’s an issue that could eventually impact how any of us access and use our countries wild spaces.
I recently saw a request from the Dartmoor Preservation Association for people to share their positive stories of backpack camping and what it means to them. While I am just one voice in a chorus of voices, I thought it was important to add my voice to that chorus, if only to make it a little louder. Here is the 30 second video I made while I was wild camping at Steeperton Tor.
As I said in the video, you can simply show your support by liking and sharing the video. However, if you can, please donate to one of the funds that are providing direct support to Dartmoor National Park Authority (DNPA) to battle this case in the Supreme Court on 8th October 2024. I personally have chosen to donate to the Dartmoor Preservation Association who will use the funds to support the DNPAs legal case. You can find out more about their campaign and how to donate here.
Thank you.
Sunset Camp at Steeperton Tor
I had been looking for the right weather conditions for a photography wild camp on Dartmoor National Park for a few weeks. For me, wild camping gives me the opportunity to photograph some of Dartmoor’s most remote locations both at sunset and sunrise, without having to make a difficult or potentially dangerous walk to or from the car in the dark. To make a wild camp worthwhile for photography I therefore need good conditions at sunset and sunrise the following day.
This isn’t as easy as it might first sound. More often than not, you’ll get a good sunrise but not a good sunset, and vice versa. However, with summer coming to an end and September marking the start of Autumn, I decided to soften my requirements a little. i.e. As long as the sunset or sunrise would be good, I’d take a chance on the other.
Sunset at Steeperton Tor #1, Dartmoor National Park - Nikon Z8, Nikkor Z 14-30mm f/4 S at 14mm, f/13, 0.5 sec at ISO 64.
For the last camp of summer, I really wanted to go to Fur Tor, Dartmoor’s most remote tor, but for that to work, and to make the effort of getting there really worth it, the conditions would need to be pretty special. As it wasn’t looking that way, I decided to settle for Steeperton Tor. It’s a location I’ve wanted to shoot at both sunrise and sunset, and it was remote enough to make a camp worthwhile.
Sunset at Steeperton Tor #2, Dartmoor National Park - Nikon Z8, Nikkor Z 14-30mm f/4 S at 14mm, f/13, 0.5 sec at ISO 64.
The route I chose was to walk in from Belstone village along the western bank of the river Taw. It’s a flat and easy going. That is until you reach the base of Steeperton Tor and then it’s an uphill slog (with camera and camping gear) for around 150m of ascent! This wouldn’t have been so bad if I could have found the path up! But I made it eventually. Just a little hot and tired.
Sunset at Steeperton Tor #3, Dartmoor National Park - Nikon Z8, Nikkor Z 14-30mm f/4 S at 16mm, f/13, 0.8 sec at ISO 64.
After some refreshments I then spent a fair bit of time trying to work out where I would pitch my tent. Not normally a difficult thing for most wild campers, but I was trying to think ahead and not pitch my tent in a way that could compromise my sunset or sunrise compositions. I finally picked a nice flat area beside the military lookout point. The lookout huts ruin the viewpoint anyway, so might as well stick my tent there as well!
The great thing about wild camping on Dartmoor is that I never feel the temptation to leave early if I don’t think I’m going to get good conditions. You might as well hang about and see what happens because you are already at the place where you’ll be spending the night. Just as well, because about 15 mins after I would have normally gone home, I got the light I was hoping for.
Sunset at Steeperton Tor #4, Dartmoor National Park - Nikon Z8, Nikkor Z 14-30mm f/4 S at 17mm, f/11, 3 sec at ISO 64.
Stargazing at Dartmoor National Park
With my sunset photographs captured I decided to retire to my tent. Despite Steeperton Tor being fairly remote, internet access isn’t an issue, and with around 10 hours to sunrise, I decided to settle down to watch a film on Netflix.
The Night Sky at Steeperton #1, Dartmoor National Park - Google Pixel 6 Pro
At around 11pm I decided to pop my head out of the tent to see if there were any clear skies and to my delight there were! Though I have captured photographs of the night sky before, I would never consider myself a night sky photographer, but that doesn’t mean I wasn’t going to give it a go.
The Night Sky at Steeperton #2, Dartmoor National Park - Nikon Z8, Nikkor Z 14-30mm f/4 S at 14mm, f/14, 20 sec at ISO 6400.
My efforts aren’t going to win me any competitions, but that’s not the point. Not only was I having fun capturing photographs of the night sky, but I deny anyone to look at the night sky and see all those stars and not do so without a sense of wonder and awe. It was breath taking!
The Night Sky at Steeperton #3, Dartmoor National Park - Nikon Z8, Nikkor Z 14-30mm f/4 S at 14mm, f/14, 20 sec at ISO 3200.
Sunrise at Steeperton Tor
The wind picked up during the night and was still blowing when my alarm went off. I cautiously opened the tent but was pleasantly surprised to see blue sky. My optimism was short lived though. To the east, where the sun was going to rise, there was a large bank of hazy cloud that would be sure to block any soft light from the rising sun.
I thought if I gave it an hour though, the sun would eventually rise above the cloud and I would get some light on the landscape, but a bank of fast-moving low cloud from the southeast came in and covered the sky. That was the end of any chance of getting some good sunrise photos. There was a little gap in the distance which gave me a little light to work with, so I have a least one picture from the morning.
Sunrise at Steeperton Tor, Dartmoor National Park - Nikon Z8, Nikkor Z 24-120mm f/4 S at 120mm, f/8, 1/100 sec at ISO 500.
As I wasn’t in a hurry, I slowly packed away hoping that the conditions will change but unfortunately this wasn’t to be the case. Just to give myself some options should the conditions unexpectedly change, I decided to walk back via Oke Tor and Belstone Tor. As it turns out, leaving was the right decision because by the time I got to Oke Tor, Steeperton Tor has disappeared into cloud!
While the conditions for sunrise were disappointing (but not unexpected), I still walked home feeling great. I got some nice photographs at sunset, I’d camped under the Milky Way and most importantly I’d had an adventure. An adventure that I was free to do and didn’t require me to gain any permission or buy any permits. It was true freedom.

Bite-Size Blog Post #20 - Ger Tor - Dartmoor National Park
A trip to Ger Tor on Dartmoor where I expected nothing and got something!
Just Out for a Wander
Most of my decisions to go out with the camera are based on what the weather is doing. Will the time, effort, and cost of going result in the reasonable likelihood of capturing a good landscape photograph? This approach might sound like it lacks any spontaneity, and to a certain extent it does, but with limited resources and availability, I need to be pragmatic about these things sometimes. However, life isn't always about making pragmatic or even the best decisions. Sometimes you just want to throw caution to the wind and go out for a walk.
I had a spare evening a few weeks ago, and while the weather forecast didn't look great for photography, I really wanted to go for a walk and because I feel naked without my camera, I took it with me anyway. After scanning my OS Maps and struggling to find somewhere new to explore, I settled on Ger Tor. This is a location I had briefly walked to before, but that was some time ago and now seemed as good as time as any to give it another visit to see if I was missing anything.
Time To Explore
It's a reasonable walk from the car park to Ger Tor but I wasn't in any hurry or stressing about photography, so I took my time to enjoy the experience. Arriving at Ger Tor I spent about an hour wandering about looking for compositions. I'd get the camera out every now and again and I shot a few handheld photos of this new Dartmoor photography location. It was a really positive experience giving myself the time to explore a location without the pressure of capturing a good photograph.
Ger Tor #1, Dartmoor National Park, Devon - Nikon Z7, Nikkor Z 14-30mm f/4 S at 20mm, f/11, 1/125 secs at ISO 1000.
Relax and the Photographs Will Come
Taking a break, I sat down and took in the view. In one direction the forecasted clouds started to roll in and it looked like I might be in for a soaking. I was just about to pack up when the sun made an appearance behind me, and dappled light appeared on the landscape and the rocks. These moments on Dartmoor can be fleeting so I immediately grabbed my camera and captured some more handheld shots.
Ger Tor #2, Dartmoor National Park, Devon - Nikon Z7, Nikkor Z 14-30mm f/4 S at 19mm, f/11, 1/125 secs at ISO 1000.
The light was indeed fleeting, but I captured some unexpectedly nice photographs of Ger Tor. Certainly, nice enough for me to stick a (virtual) pin on my map for it. But more than that, it was a good reminder not to overly plan my Dartmoor photography and to be a bit more spontaneous. You never know what might happen.
Ger Tor #3, Dartmoor National Park, Devon - Nikon Z7, Nikkor Z 14-30mm f/4 S at 17mm, f/11, 1/125 secs at ISO 1000.

Bite-Size Blog Post #19 - Yar Tor - Dartmoor National Park
Giving up on Venford Falls and discovering Yar Tor on Dartmoor National Park.
First Stop, Venford Falls
For many years, Venford Falls has been one of my favourite Dartmoor locations to photograph. Its iconic twin waterfalls are a unique sight for Dartmoor and in the right conditions they can be extremely photogenic (though compositions are limited).
I took my favourite shot of Venford Falls back in 2016, and despite returning several times and producing very pleasing shots, I’ve never felt I’d improved over that 2016 image. However, I keep going back every year to see I can’t get a slightly better shot. After my most recent visit this year though, I’ve decided to give up.
The main problem for me is that the location has become very messy. It’s always been a bit muddy and a bit slippy, but the amount of natural debris that litters the location now makes it a bit of a mess. So, for me at least, Venford is off the shot list (for now anyway).
Let’s Go…Here!
As I’d already made the journey out into the middle to Dartmoor to photograph Venford Falls I thought it would be a bit of a waste of time and petrol just to drive home. But where to photograph? I got my phone out, opened OS Maps and started to have a scan of the area. Looking around it felt like I’d photographed everywhere that was worth photographing. Then I spotted Yar Tor.
Somewhere in my subconscious I was aware of Yar Tor but I couldn’t picture it (excuse the pun) so I wasn’t sure if it were a location worth photographing. With nothing to lose though, I set of to see what I could see!
Yar Tor
Arriving at Yar Tor I was initially underwhelmed. The views were lovely but there was little in the foreground to make for a compelling photograph. I kept my camera in my bag and do what I normally do when arriving at a Dartmoor location and that is to just wander about and view the scene with my eyes rather than through the viewfinder.
After a short while inspiration hit me, and I captured this photograph.
Yar Tor #1, Dartmoor National Park, Devon - Nikon Z7, Nikkor Z 14-30mm f/4 S at 24mm, f/11, 0.4 secs at ISO 64.
By the time I captured this image it was getting late, so I decided to return the following evening.
Return To Yar Tor
Returning the following evening to Yar Tor on Dartmoor I was able to capture a different compisition. I had spotted it the previous night but thanks to some better light it was worth capturing this time.
Yar Tor #2, Dartmoor National Park, Devon - Nikon Z7, Nikkor Z 14-30mm f/4 S at 17mm, f/13, 0.8 secs at ISO 64.
As the sun got close to setting the orange glow got stronger so I decided to head back the composition I captured the previous night to see if I could get a slightly different image, or at least an image with a different feeling.
Yar Tor #3, Dartmoor National Park, Devon - Nikon Z7, Nikkor Z 14-30mm f/4 S at 18mm, f/13, 0.5 secs at ISO 64.
Despite me feeling sometimes that I’ve photographed everywhere on Dartmoor, it’s good to know there are still new gems to be found. I shall be returning to Yar Tor, and maybe I’ll just check in on Venford Falls on the way.

Discovering Dartmoor - All 5 Episodes Now Available
A few years ago, I asked myself the questions, “What do I know about Dartmoor? What makes this place so unique?”.
When I couldn’t answer those questions, I made a commitment to myself to not only see more of Dartmoor, but to learn more about it.
And from that commitment, Discovering Dartmoor was born, a 5 part video series where I explore and photograph 24 of Dartmoor's finest locations and speak to some of Dartmoor's most passionate ambassadors so I could find out for myself what makes Dartmoor so special.
My Discovering Dartmoor Journey is Born
Want to quickly know more? Here is a 60 second introduction to Discovery Dartmoor!
If you are a subscriber to my newsletter or regular viewer of my YouTube channel, I expect you've already heard about my Discovering Dartmoor video series. Hopefully, you've already watched some of the four and half hours of content or even watched all of it! Either way, thank you and I hope you enjoyed it.
For those of you who aren't familiar with Discovering Dartmoor, let me tell you all about it. It was sometime in 2020 that friend of mine said "you can't claim to love a place unless you really know it". I might be paraphrasing a little but that was the general gist of it. He had moved to an area and then completely immersed himself in the culture, language, and landscape. He truly had taken his new home to heart.
Though I'd moved to Devon from Scotland over a decade ago, I couldn't say that I had done something similar with Dartmoor. Dartmoor was a place I really enjoyed photographing and I was getting to know all the best spots for landscape photography. But, when I thought about how much I actually knew about Dartmoor, I had to be honest and admit that I knew very little about Dartmoor.
I decided therefore to learn more about Dartmoor. Not only would this be beneficial to me and my photography, but if I also documented my journey to discover more about Dartmoor, others could be inspired to learn more about Dartmoor or their local area.
At first, I wasn't sure how to start or structure my journey of discovery, so I just decided to go across Dartmoor from A to Z. If I selected a Dartmoor location for each letter of the alphabet, I would surely cover a wide range of Dartmoor locations. With a "robust" plan in place, Discovering Dartmoor was born. Full of passion and excitement I thought it might take me a few weeks of hard work to get all the filming done. Maybe a few months. Six months worst case scenario.
The Culmination of Three Years of Work
I have to admit, I did somewhat underestimate how much work was required to film at 26 locations. First, I had to find 26 locations. Not as easy as you might think. For example, there aren't really any Dartmoor locations beginning with Z! Then, when you find a location, is it interesting? Is there something to learn there? Sometimes you can't be 100% sure so you have go and have a look first to see if the story of the location is worth telling. If not, you find somewhere else, and if it is, your return to film that location.
If you do that for each location, and you mix in the fact that you have other commitments (work and personal), time soon escapes you. As it turned out, it took over two years to film 24 locations.
You would then think that this is enough. Nope. Not me. What about the people who live, work and relax on Dartmoor? They all have stories and information to share. So, I decided to film some interviews as well. This took another year.
Add in all the post production (which I also underestimated) and over three and half years go by before Discovering Dartmoor was ready to release. But ready to release it was, and I sent it out into the world!
Watch Discovering Dartmoor
The production of Discovering Dartmoor was every bit as difficult as you might think making a 5 part documentary series about Dartmoor is. But now that it's out there, I am very proud of it and all that hard work and stress seems a small price to pay.
The feedback I've been getting from the people that have watched it, and from the people I interviewed has also been wonderful. There were some dark moments over those last three and half years, and I wondered if it was all worth the effort, but reading the comments people have left has made all that work feel worthwhile.
If you haven't seen Discovering Dartmoor yet and you want to find out what I produced from all that work, then all five episodes from the series are available to watch below (or directly on YouTube here). Let me know what you think in the comments below and if you want to know more about the Discovering Dartmoor book, prints or how to support the series, then just head to julianbaird.com/discoveringdartmoor.
The Discovering Dartmoor Gallery
Below you will find all 55 landscape photographs from the series. I’ve also produced a small book that features all 55 of the photographs and if you wish to purchase a copy you can do so by clicking here.


All the locations for these photographs are also featured in my Free Landscape Photography Locations Map.
Acknowledgments
The following text is extracted from the Discovering Dartmoor book, but it’s very much worth repeating here.
My journey across Dartmoor has been one of the most enriching experiences of my life. It’s been full of ups and downs (some literal, some emotional) but one of the highlights has been the people I’ve met along the way. The people that work, live, and relax on Dartmoor.
A special thanks goes to Tom Usher & Kelly Rich from the Dartmoor Preservation Association, Josephine Collingwood, Max Piper, Mark Owen, and Emma Cunis. I can’t thank you enough for giving up your time and talking to me. Without our conversations Discovering Dartmoor wouldn’t be what it is.
Thank you also to Rob Hayward for letting me read from his dad’s book Dartmoor 365 and to Julian Cartwright for giving me permission to use his photograph of a rushlight.
Finally, thanks to my dear friends Ross and Chris. Thank you for your creative support in helping me stay focused on this lengthy project. Most of all, thanks for your friendship during those difficult personal times that accompanied me on my Discovering Dartmoor journey.
All good journeys need good friends.

Manfrotto PRO Light Backloader Backpack Review
Nothing tests the protection of your camera bag quite like a British music festival! In my latest blog post I look at the Manfotto PRO Light Backloader bag to see how it performs while I photograph Devon's biggest festival.
Why I Have the Manfrotto PRO Light Backloader Backpack
Like tripods, camera bags are probably the one item of photography equipment you replace the least. A good camera bag should last you a long time.
However, all bags will eventually need replacing. Nothing lasts forever and unfortunately my previous bag had a zip failure and was no longer fit for purpose. While it's not the main bag I use for my landscape photography adventures, it did get used a lot. And I mean a lot! It was multi-purpose, serving as a camera bag and a general backpack. It went everywhere from my local beaches daytrips to holidays in Iceland. It had a hard life and when it died, it owed me nothing.
Back in the day when I bought that bag, camera backpack choices were more limited than they are today. If you do a Google search now for "camera backpacks" you are presented with a dizzying array of choices. However, with a music festival in my photography schedule rapidly approaching, I needed a new bag to carry and protect my camera gear.
As if by divine intervention, Manfrotto got in contact and asked if there was anything in their product range that I would like to review. Well, funnily enough there was! The Manfrotto PRO Light Backloader Backpack S looked like a good fit for me and it was from a reputable brand. A few days later I had one in my hands.
So, in this blog post I'm going to tell you a little bit about this backpack, the features that are relevant to me, how I plan to use the bag, and I'll share my real world experience of using it.
Before I go any further though, I must say that Manfrotto sent me this bag free of charge in exchange for writing this review. However, they have not asked me to say anything and everything I write here are my own thoughts (good and bad). They will see this review for the first time when I publish it here.
Where To Buy the Manfrotto PRO Light Backloader Backpack
If you'd like to buy the Manfrotto PRO Light Backloader S, it's available just about anywhere, including:
Please note that the Amazon and WEX links are affiliate links. I may receive a small commission if you purchase through those links, but it does not impact the price that you pay.
Features of the Manfrotto PRO Light Backloader Backpack
I'm not going cover all the specifications and features of the Manfrotto PRO Light Backloader S, only those that are relevant to how I will use the bag. If you want a full list of all the features, you can see the bag on Manfrotto's website here. This bag is also part of the Manfrotto PRO Light collection, so many of the same features in this bag apply to the other bags in the range. If you like the look of the bag but it doesn't quite match your requirements, do check out the other bags in the collection.
Exterior Dimensions
Let's start with the outside of the bag first. It weighs approximately 1.6kg and it measures 51 x 13.5 x 43 cm. This should mean that it will fit within most airlines cabin baggage/carry on limits. However, these restrictions can vary so please do check with your airline of choice.

External Materials and Protection
The backpack is made of water-repellent RipStop nylon/polyester fabric with that is reinforced in key areas. The material is not only water repellent, but it also looks good. Given the conditions this backpack is likely to find itself in (e.g. a muddy festival field), I'm glad the bag is all black in colour. It also helps the bag be a little more inconspicuous when I’m in crowds.
I'm very pleased to see that Manfrotto has also included a raincover with the bag. Anyone who's been to a UK music festival will know that rain is an ever present threat, so it's good to know the raincover is there when you want more than protection from rain or mud. Cleverly though, if you turn the raincover inside out so the silver side is on the outside, the cover will deflect direct sunshine and prevent overheating of the contents.
The bag aslo features a SAS-TEC bottom that provides extra absorbance which is very reassuring.


Exterior Side Pockets
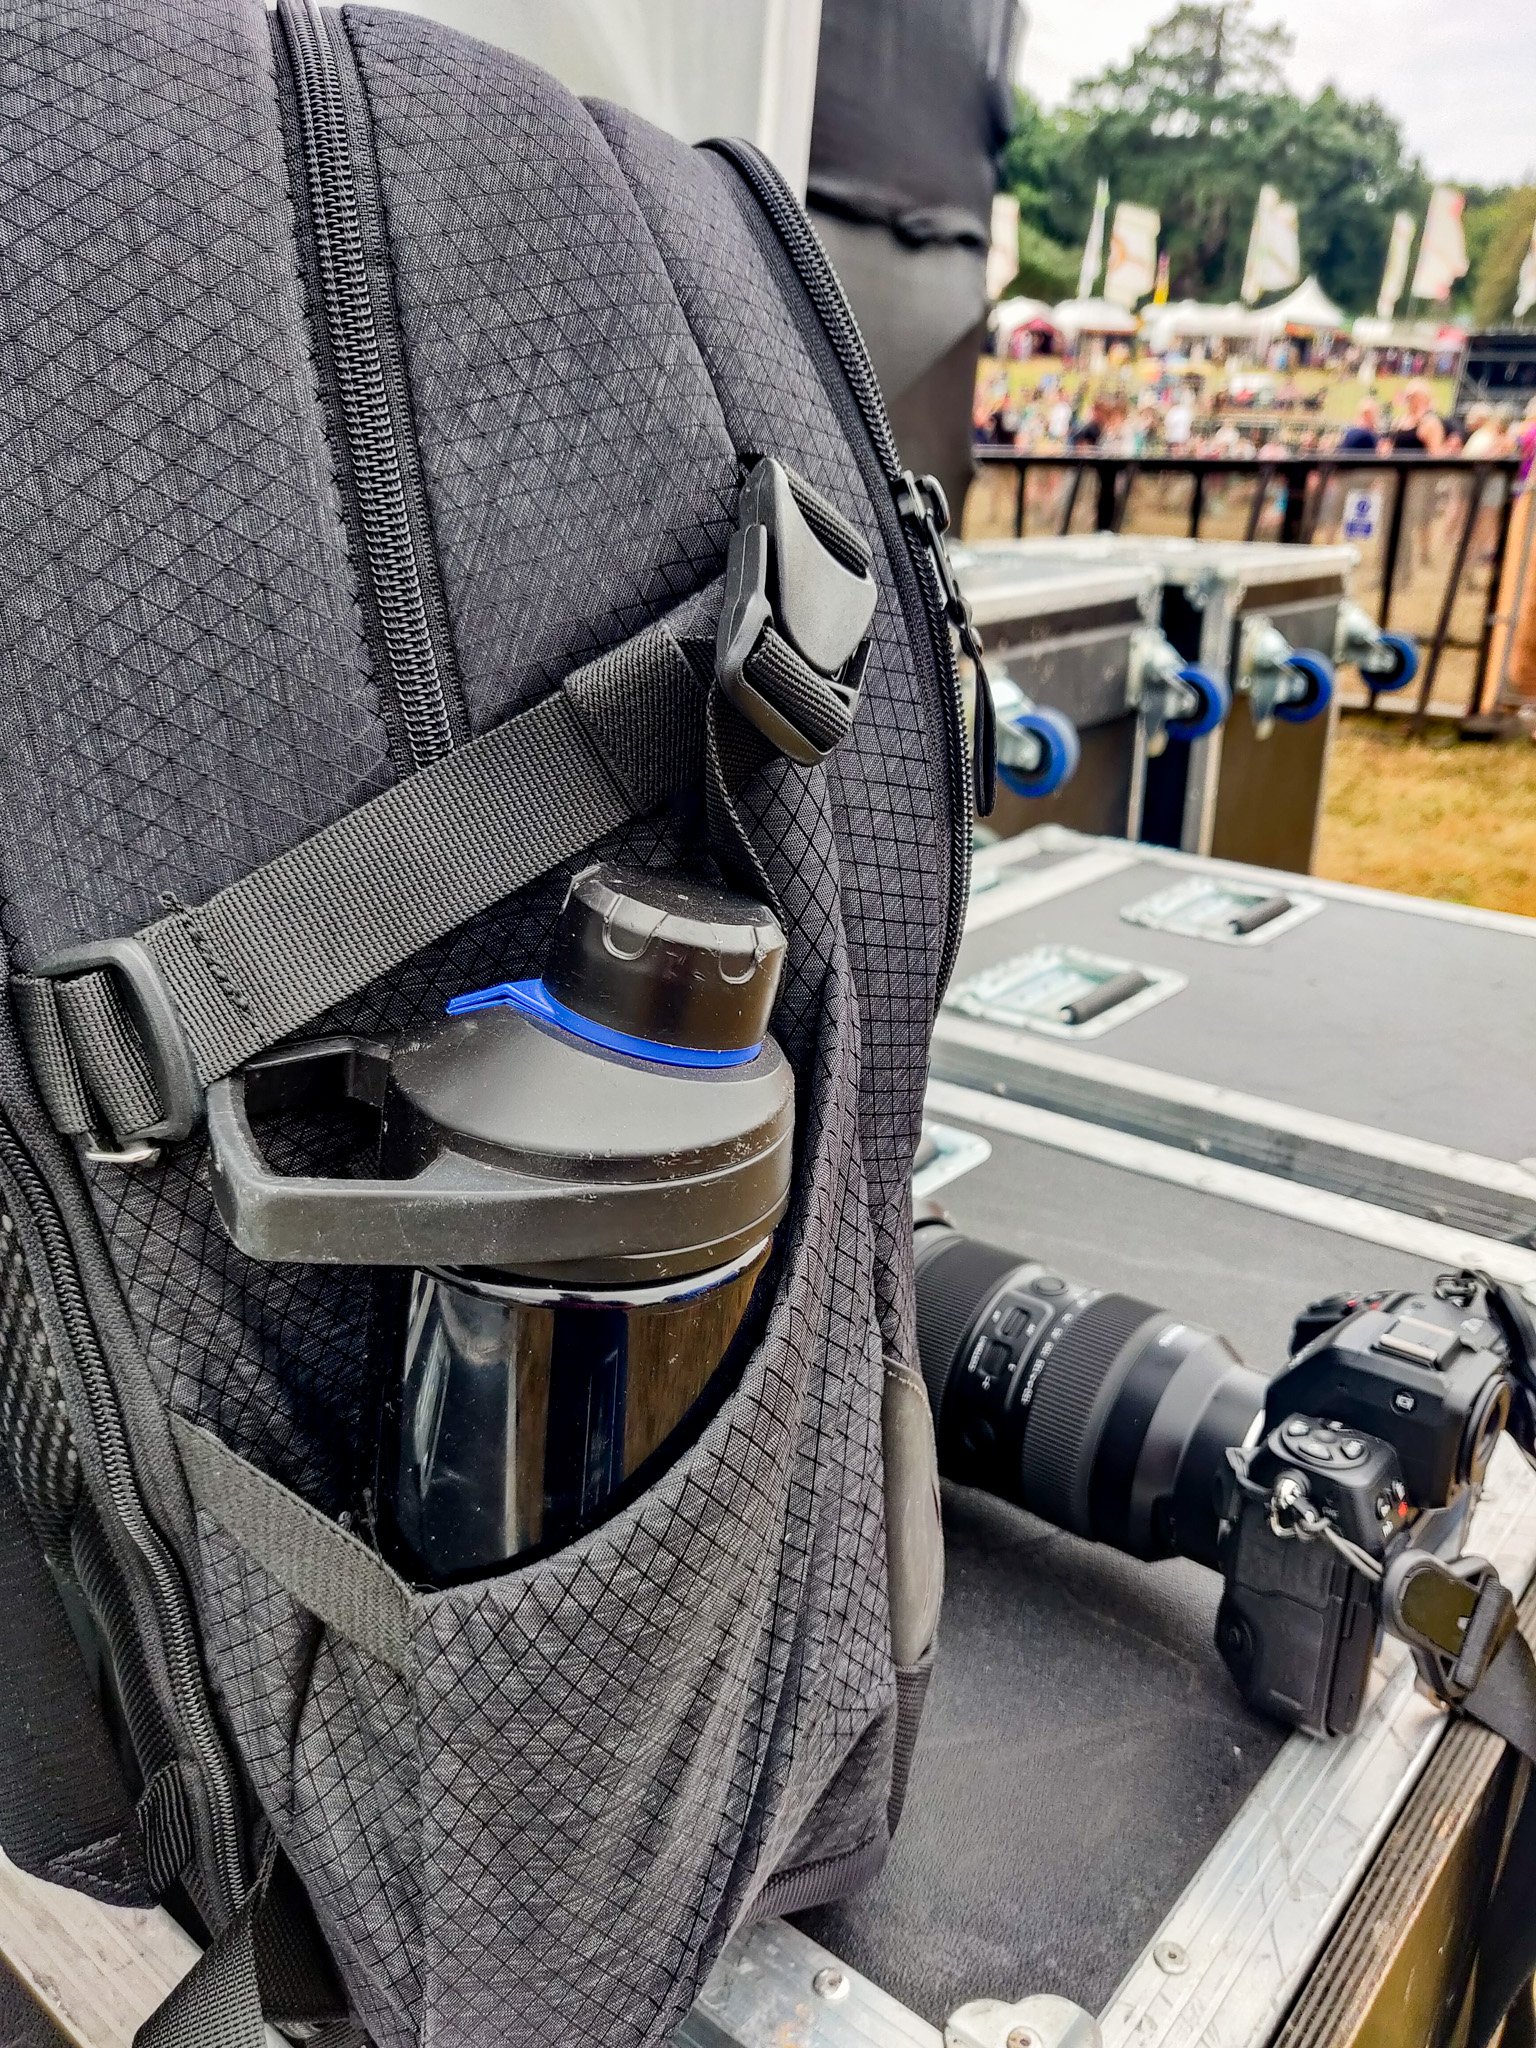
There are two side pockets with compression straps should you want to mount a tripod. It's not often I'll use a tripod with this bag so I will more likely use these pockets for storing drinks such as a water bottle. The pockets are of a generous size as well.
Bag Carrying and Shoulder Straps
There are two well padded shoulder straps. While the position of these straps can’t be adjusted the can be pulled tight. Both shoulder straps will also allow you to attach something like a Peakdesign Capture Clip should you need to keep you camera at hand. The bag also has a mesh ventilated area at the bag to prevent your back getting too sweaty (on those rare warm festival days!)
There are pickup handles on both the top of the bag and the side. The latter being useful should you want to place the bag over luggage handle.


Zips
The zips are high quality YKK zippers but the really interesting thing here is that the zippers for the main compartments have metal loops. Why? This is so you can loop them into the integrated TSA approved padlock. While it won't stop someone walking off with your backpack, it will prevent someone sneakily opening your bag and removing the contents.
Exterior Compartments
There is a large compartment at the front of the bag. It's deep compartment so ideal for stashing clothing items but you'll also find two mesh pockets which you can use for smaller items.
There is also a top opening to the bag where you can directly access some of your camera gear, but if you change the interior layout of the main camera compartment, you can make this top opening a separate compartment from your camera gear. This makes it very handy for storing items that you want quick access to such as snacks or a rain jacket.


Rear Access (Camera) Compartment

The Manfrotto PRO Light Backloader Backpack S has plenty of room to store gear. I have changed to layout of the interior to give me space at the top of the bag for personal items.
The main compartment is accessed at the back of bag, has two zips, and is full of storage goodies. There's a laptop sleeve (up to 15" and well padded), and three mesh compartments (one of which is large and zipped).
But the main function of this area is for storing your camera gear. Manfrotto say it will hold 2 to 3 mirrorless bodies (without battery grips) plus multiple lenses. This far exceeds any of my requirements for cameras and lenses so it still leaves lots of room for camera accessories such as batteries and lens cloths. As I mentioned earlier, you can change the size of this compartment to make a separate compartment at the top of the bag.
Finally, the camera compartment can be adjusted to suit your combination of camera equipment thanks to the M-Guard dividers. The provide a lot of flexibility on how you use the available space and because they are made of high-density EVA foam the provide very high levels of shock absorption but yet they are slim enough not to consume valuable space.
Using the Manfrotto PRO Light Backloader Backpack in the Real World
What Is the Real World?

The Manfrotto PRO Light Backloader Backpack S also stood up well to the harsh environment of a wet Scottish island walk.
No, I’m not going to ask you to take the red pill or green pill, but I thought I’d let you know how I’ve been using this bag in the real world. Most of my real world experience with this bag has been at a multi-day music festival in the UK. Generally speaking, these aren’t the friendliest environments for camera gear. Even though I was there as Press and I had a pit pass, I still have to deal with bad weather, bringing my own supplies (food & drink), and accept that my bag will be subject to the odd knock!
While most of my experience with this bag has been in a festival environment, I have also been using it as a day bag for family adventures, and when I needed a more lightweight landscape gear setup. Needless to say, the bag has proved to be very capable and versatile.
What I Packed in the Bag
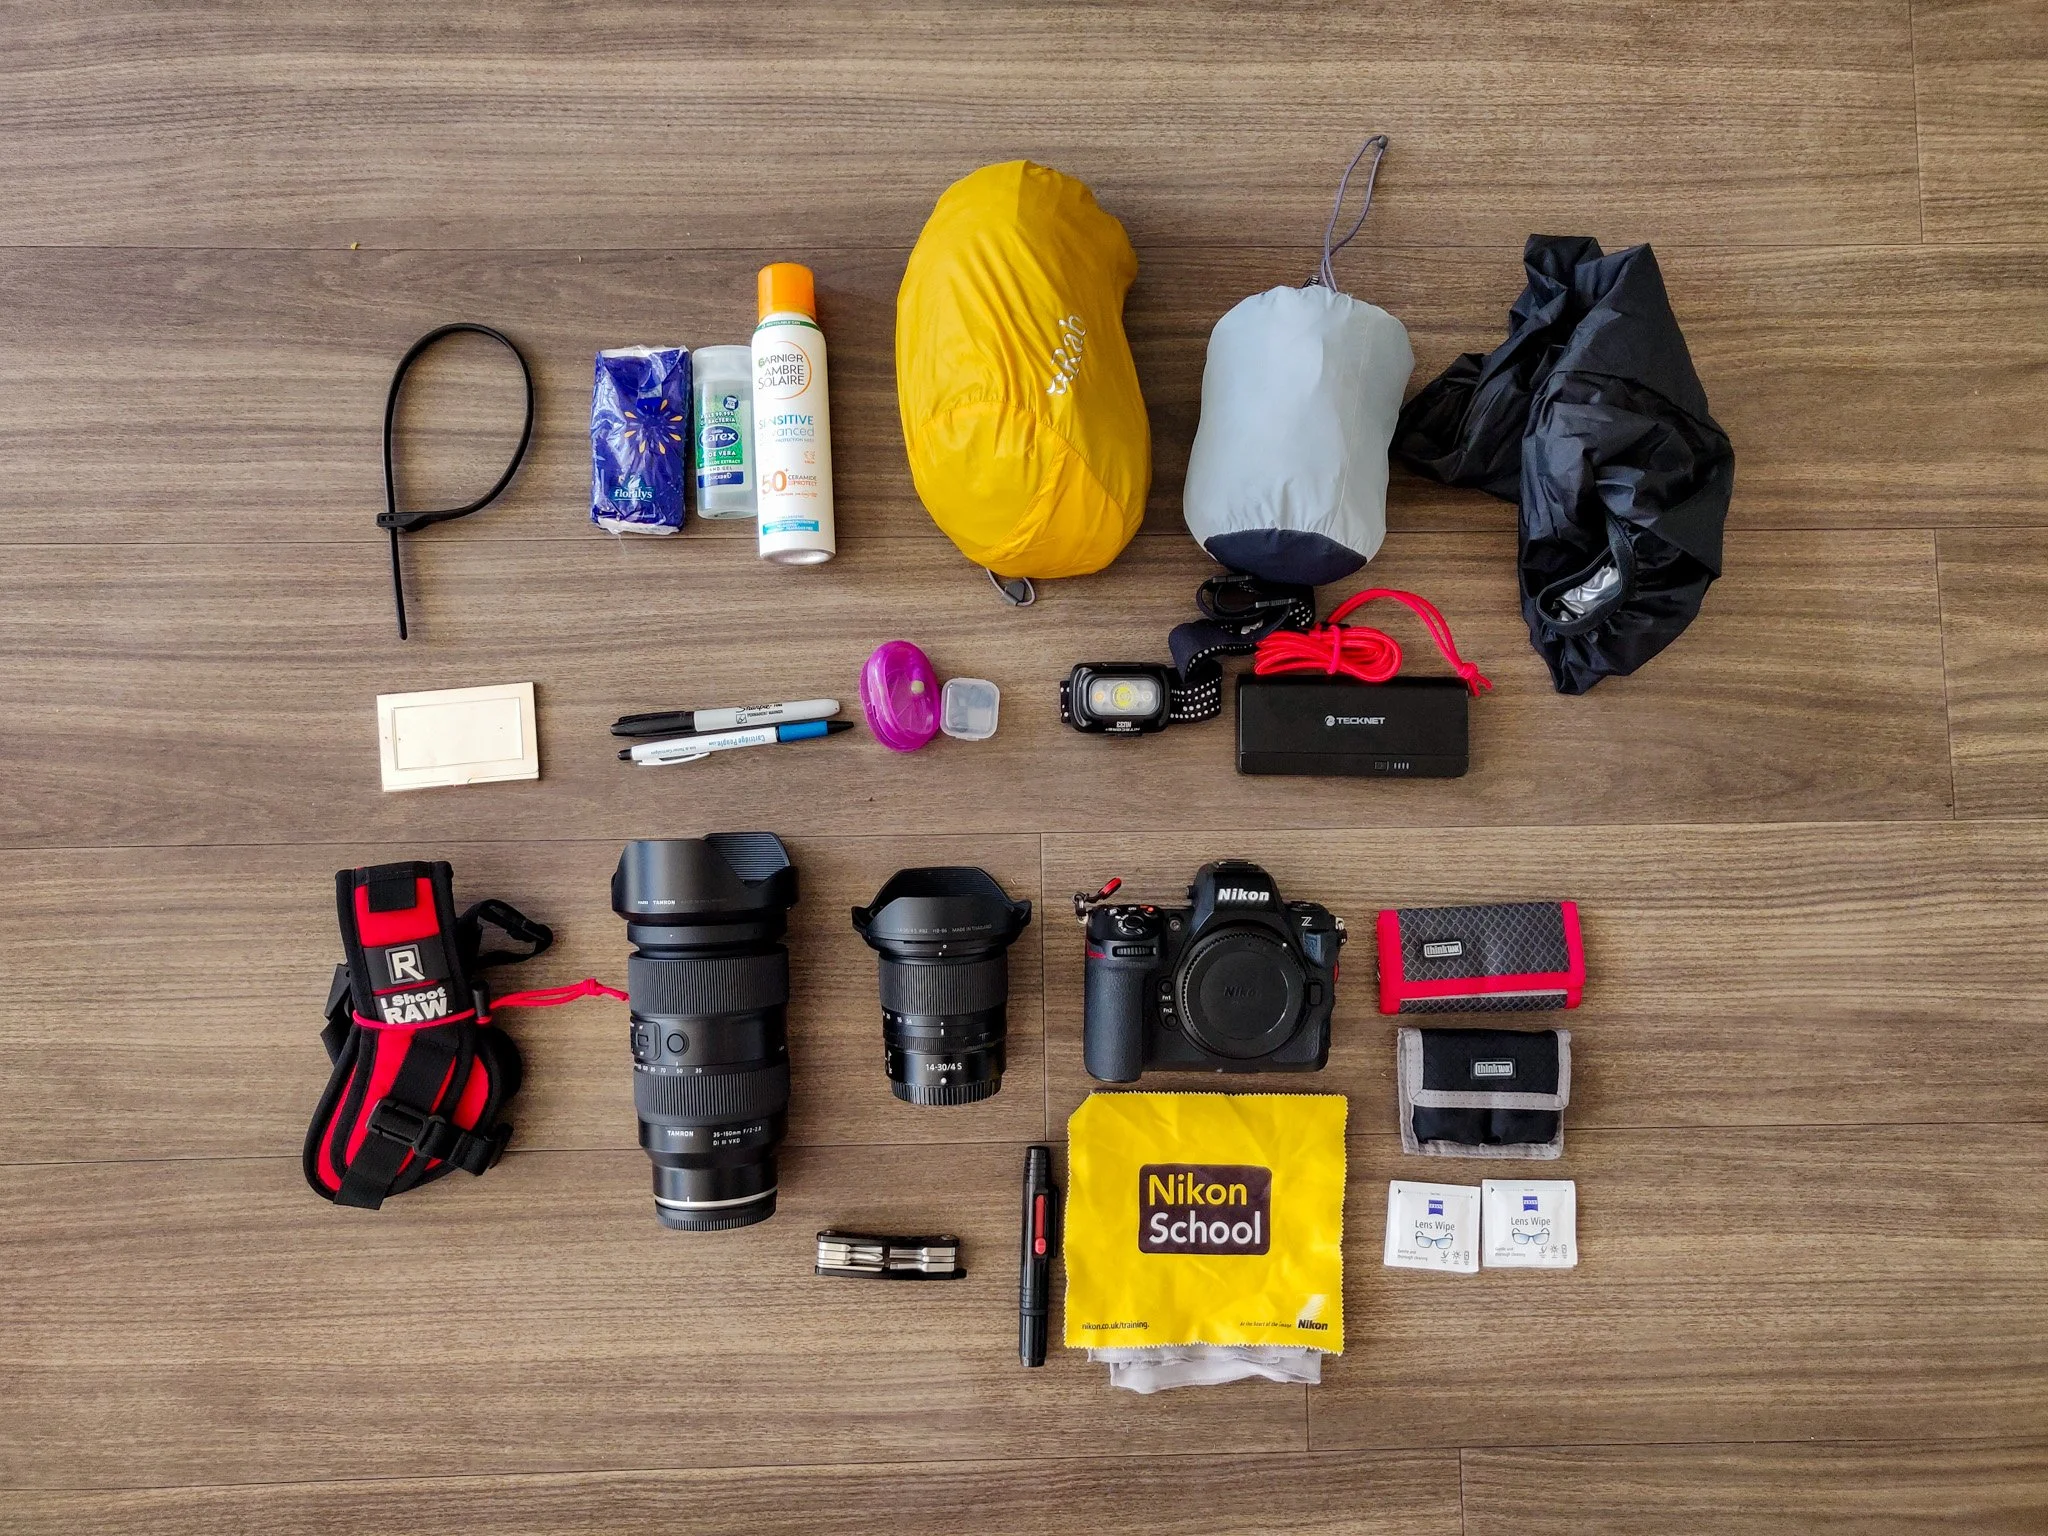
One of the key reasons I decided on the Manfrotto PRO Light Backloader Backpack S is that it allows you to change the amount of space you dedicate to camera gear and personal items. This is important to me as the amount of camera gear that I take with me is relatively small. Most of what I need for a festival is food, drink and protection from the elements! Here's what I take:
Camera Gear
Nikon Z8 - check out all my Z8 videos (including my review) here
Tamron 35-150mm F2-2.8 Di III VXD - this is a recent addition to my kit bag. With a fast aperture and good zoom range, it's ideal for festivals. If you want to see a review, let me know in the comments. (You purchase this lens from Amazon or Wex.
Nikon Z 14-30mm f/4 S - handy in case I need a super wide shot!
2 x Spare EN-EL15 batteries
Spare memory cards - 1 x CF Express Type B, 1 x xQD, 1 x SD
BLACKRAPID Camera Strap
Peakdesign Capture Clip
Lens clothes - you can never take too many of these!


Other Essentials
USB Battery bank - just in case!
Sunblock
Business/contact cards
Ear Plugs
Hiplok Z LOK Armoured Security Tie - useful for securing the bag to a solid object
Water Bottle (750ml)
Snacks!
Waterproof Trousers
Waterproof Jacket
You'll notice that I don't take a laptop. For this particular festival I was able to return home each night and upload my photos to my computer. Any photos that I needed to publish immediately I would do on my phone using a combination of Nikon SnapBridge and Lightroom Mobile. However, the bag does have a laptop sleave so if I do need to take my laptop in future, there is still plenty of room.
With or without a laptop, the Manfrotto PRO Light Backloader Backpack S offers lots of space to carry everything I need. Plus the M-Guard dividers offer plenty of flexibility on how that space is used. I have no complaints around the capacity of the bag, and I particularly like the flexibility in how I size and format the main compartment.
Accessing and Securing Your Gear
There's no point in having a spacious bag that protects all your gear if you can't access it easily. As the name suggests, the Manfrotto PRO Light Backloader is a rear access style bag, so to get to the bulk of your camera gear, you need to take the bag off your shoulders. Depending on how you are using your camera bag you will see this is as a good thing or a bad thing. Fortunately, Manfrotto offer a range of bags so if you prefer a different style of gear access, there's likely to be a bag for you in the range.
For me though, the rear access is just what I want. When the camera is in the bag and I have the bag over both shoulders, no one can access the main compartment as it is against my back. As well as shooting from the pit, I will also be walking between stages and performances through busy crowds. It's good to know that anyone following me can't sneakily open the bag.
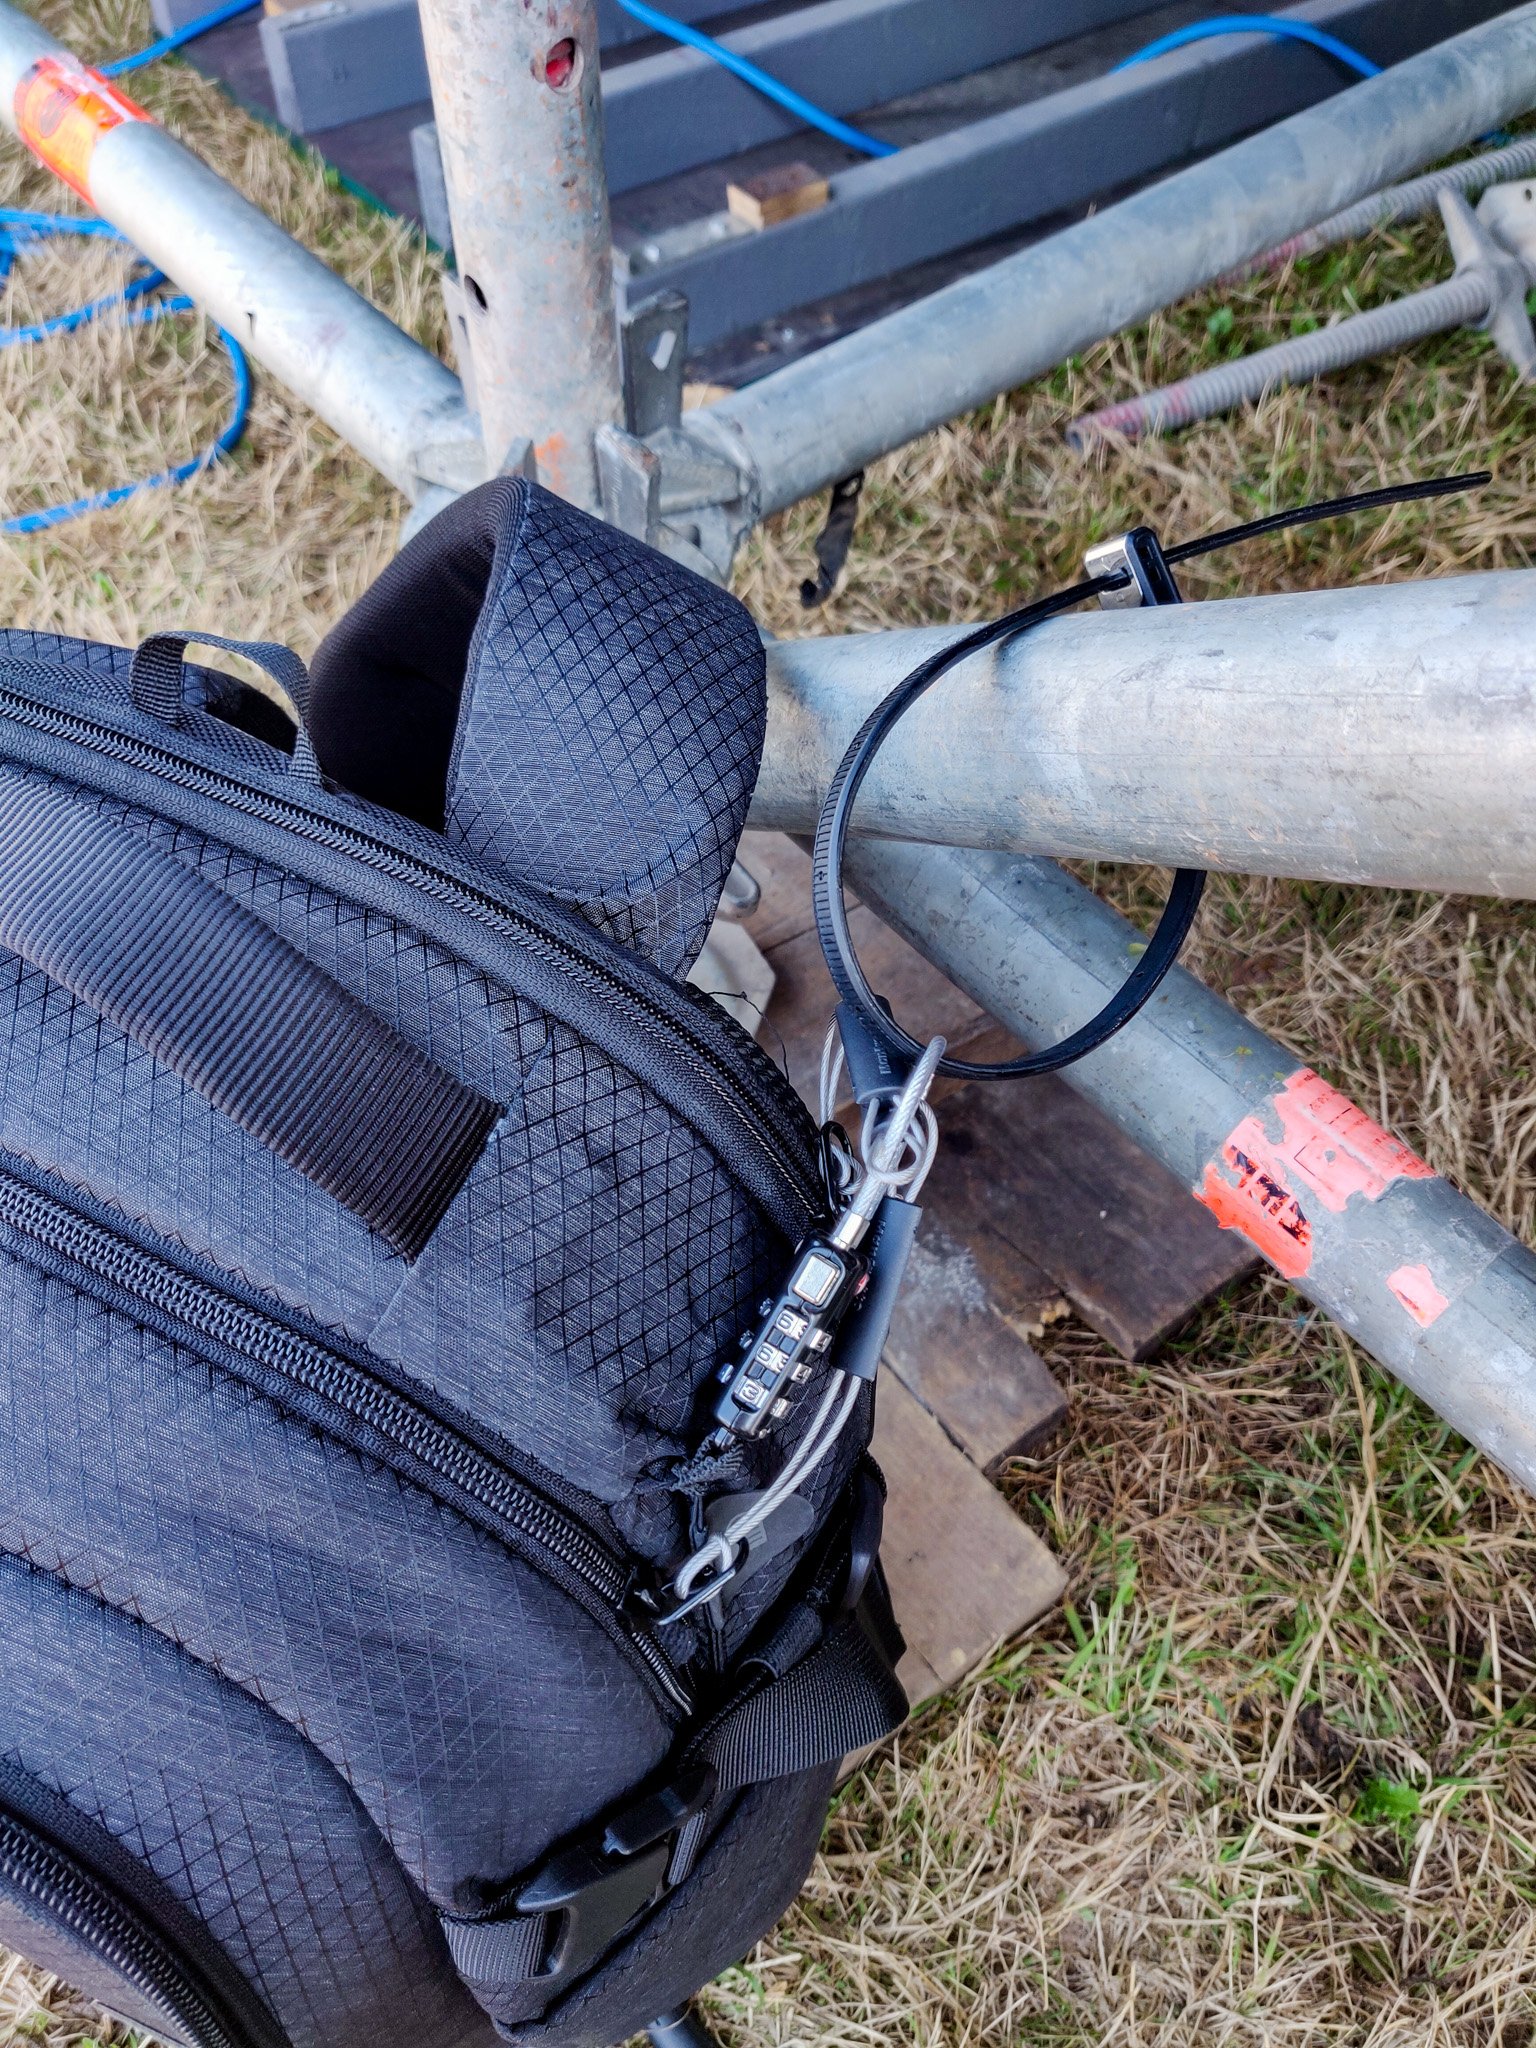
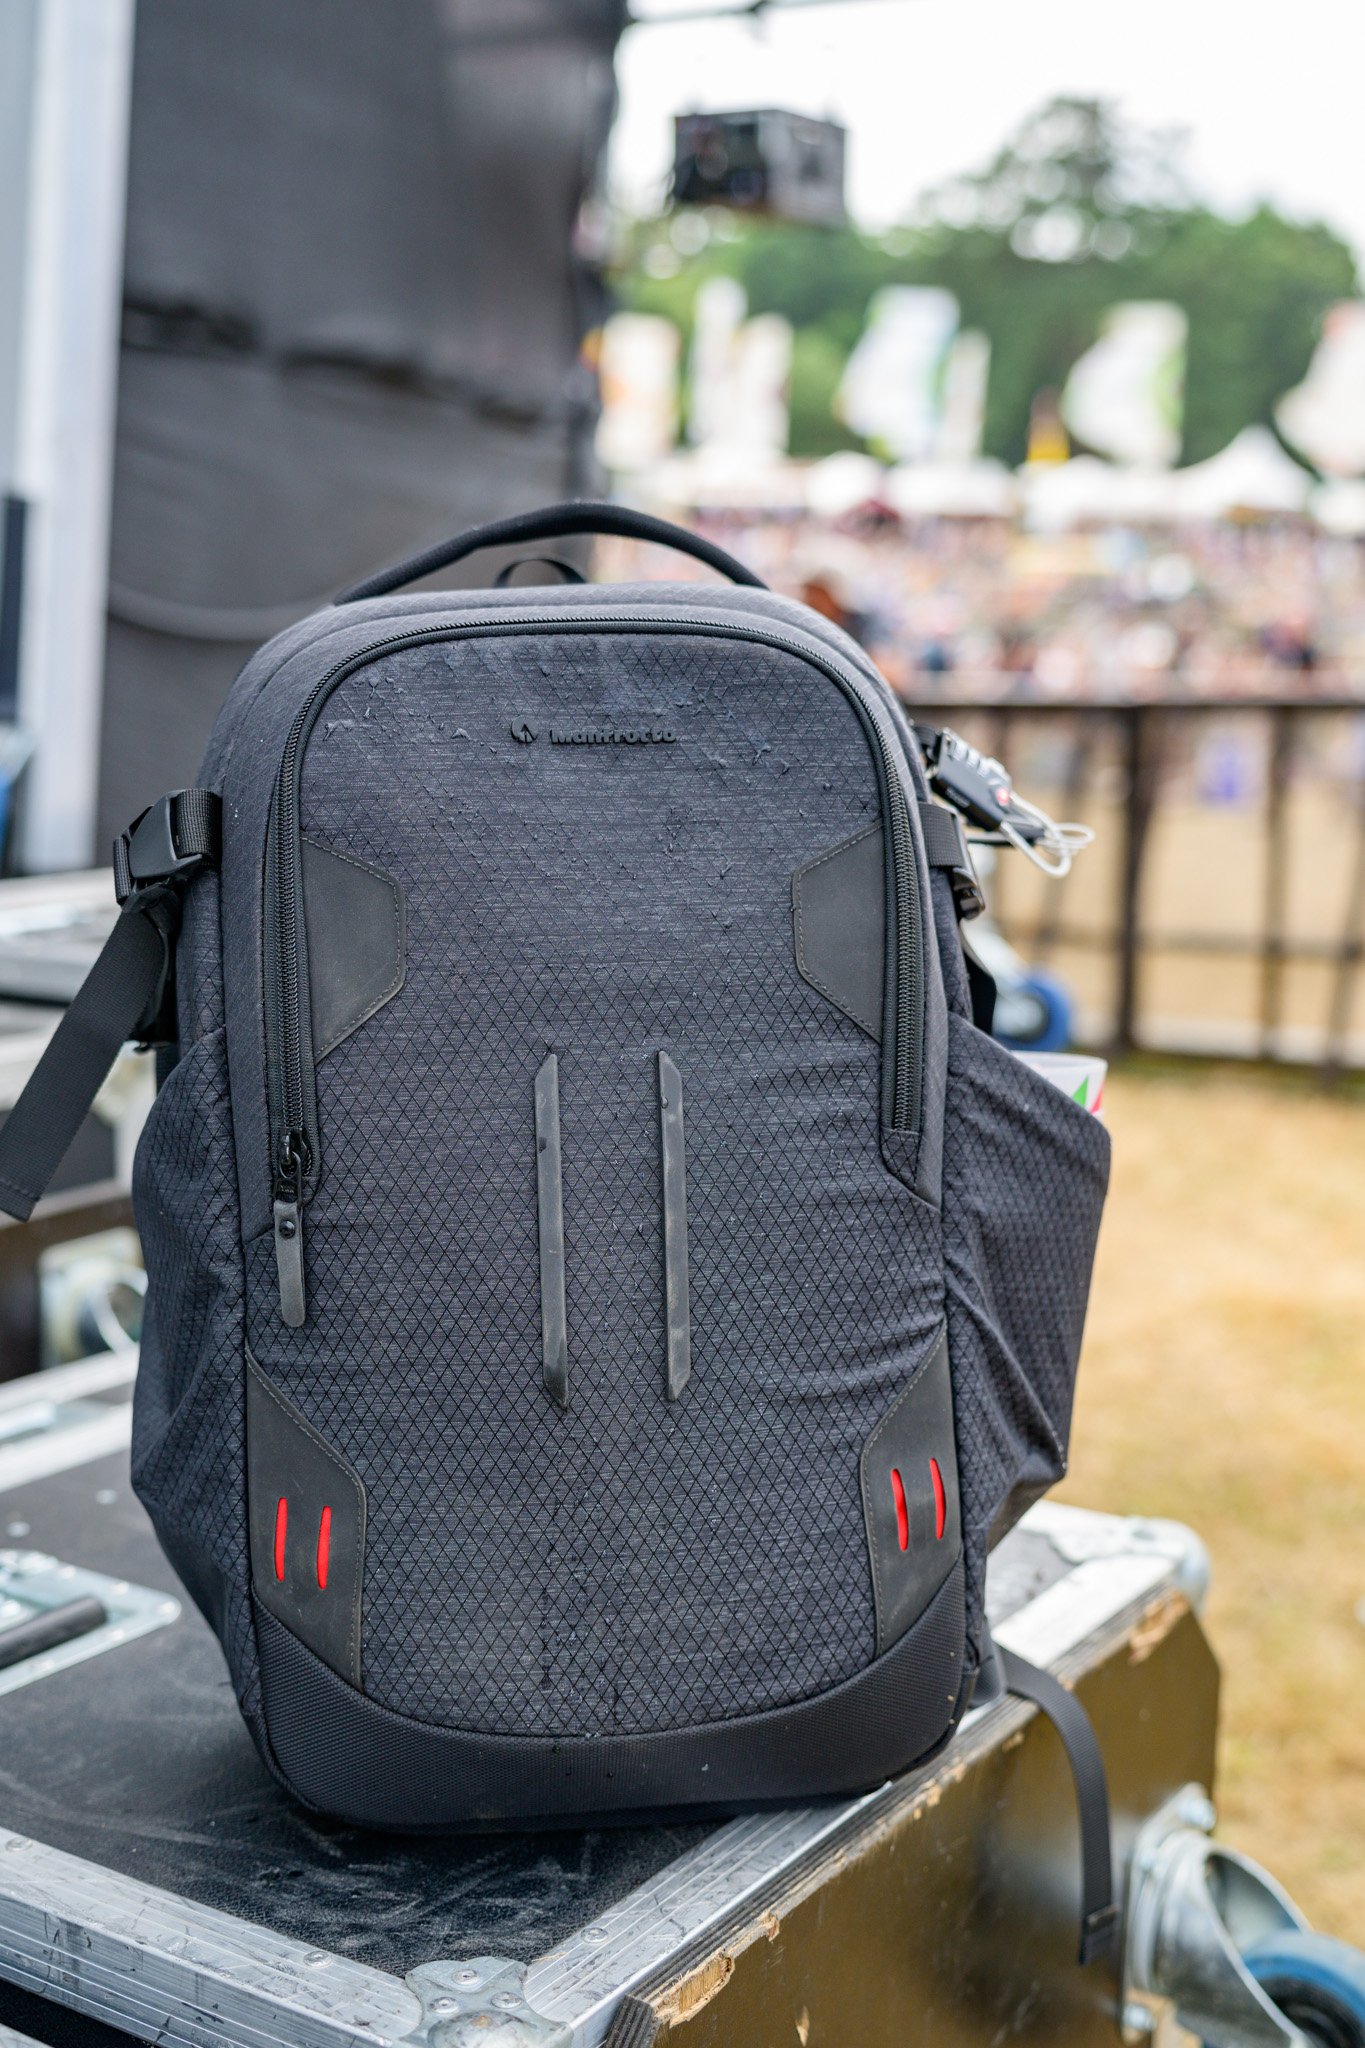
Securing the Manfrotto PRO Light Backloader Backpack S bag to the stage with the integrated TSA lock and a Hiplock Security Tie.
Sometimes the walk between stages leaves me tight for time so being able to access my gear efficiently is important. Getting the bag of my shoulders and onto the ground is a simple process. I also had no concerns putting the bag on the ground, even when the ground was wet and muddy. Thanks to the large metal loops on the rear compartments zips, finding them easy allowing me open the bag quickly. I could then quickly get at my camera and start taking photos.
In a busy pit area, it's either prohibited or at least bad etiquette to take your bag into the pit. This normally means leaving it at the side near the entrance of the pit. If I arrive with time to spare I will stow my bag under the stage. I will use one of my Hiplock Security Ties to attach the bag to something immovable like a bit of stage scaffolding. This combined with the integrated TSA lock on the bag gave me the reassurance that people can't access the critical areas of my bag, nor simply just walk off with it.
Overall, I found I had no issues accessing my camera quickly and easily, and with the backloading system and the integrated TSA lock my gear also felt secure.
Comfort
If you talk to anyone who has photographed a festival, they will tell you that it involves a lot of walking and waiting about. During that time you will inevitably have your backpack on. Even when you are carrying a modest amount of equipment, you’ll want that experience to be as comfortable as possible.
My initial concern with the Manfrotto PRO Light Backloader was that it didn't have a hip belt. A hip belt takes some of the load from your shoulders and distributes it to your hips. However, I'm carrying less gear and lighter gear these days so my worry about the lack of a hip belt in the end wasn't justified.
The shoulder straps are well padded and even after a full day of the bag being on my shoulders I wasn’t in any discomfort. The area of the bag that sits against your back is also well padded and ventilated. While it won't stop your back sweating in the heat, it is comfortable, and it does allow some air to flow.
The shoulder straps don't have a huge amount of adjustability. They can be adjusted so they are pulled tight, and with the sternum strap I was able to achieve a snug but comfortable fit. There's no way to adjust the position of the shoulder straps but that's not entirely unexpected with a bag this size.
he Manfrotto PRO Light Backloader Backpack S was comfortable enough to wear all day and into the night.
I would have preferred to see slightly wider shoulder straps with some storage pockets though. Being able to store items such as mobile phones, access/press passes, emergency snacks and festival maps would have been very useful.
That aside, I did find the bag comfortable to wear. There's no escaping the fact that carrying a bag full of equipment all day is a tiring experience, but at least with this bag it doesn't have be an uncomfortable one.
Durability and Protection
Music festivals are harsh environments even when they are rain and mud free. Any bag will get knocked as you walk through crowds, drinks get spilt as you walk by, and despite your best intentions, sometimes you won't always put your bag down as gently as you should. Some of these things are within your control and others you just can't help. It's the nature of carrying a bag at a festival.
You therefore want a bag that can protect all your precious gear against those bumps, spills and weather. I'm pleased to say that the Manfrotto PRO Light Backloader is a backpack that I can confidently say handles the harshness of a British music festival. My camera gear was well protected inside thanks to protection of the M-Guard dividers. The bag is also well padded on the outside, but the addition of high impact strips on the front and base of the bag meant I was a little less worried when I "dumped" my bag on the ground.

The Manfrotto PRO Light Backloader Backpack S material is water repellant.
The outer material is also well suited to outdoor environments. The RipStop fabric meant that I was less concerned on where I put my bag or it catching it on some fencing or in a narrow space (which I did a couple of times). While the material isn't waterproof (you need the included raincover for that), it is water repellent meaning I was comfortable enough getting it wet during most rain showers.
Even in the driest of music festivals, you can almost guarantee there will be mud somewhere, and normally where you put your bag! While keep the bag looking new isn't a top priority, it looks like keeping this bag looking smart is an easy enough job. Using a damp cloth I was able to wipe any mud off at the end of the day.
The Manfrotto PRO Light Backloader certainly gives me the confidence that my gear will be well protected but what about the durability of the bag. I've only had the bag for a few weeks so at the moment I can't comment on the long term durability of the bag. But from what I have experienced, the quality of materials, and that it is a Manfrotto bag, I have little concern that long-term this will last every bit as long as my last one.
In Summary
I'm very happy with how the Manfrotto PRO Light Backloader has performed over the time I have been using it. There are lots of things I like about it. The materials are excellent, it offers lots of flexible storage space, it protects my gear, it has some nifty security features, and it's comfortable to wear.
My only slight criticism is that I would have liked a hip belt and slightly wider shoulder straps with pockets but given the size of this bag it's not a total surprise these things aren't there. I would have also liked to have seen a mechanism to securely attach keys inside the bag.
But overall, I love this bag, and it will continue to get heavily used. It will be my go to bag for gigs and festivals, a bag for those lighter weight landscape photography adventures and it will also serve as a general use day pack.
I hoped you enjoyed this review of the Manfrotto PRO Light Backloader backpack and if you have any questions, please leave me a comment below.
Nikon Z8 Pixel Shift Shooting for Landscape Photography
180 Megapixel raw files and reduced noise are all claims of Nikon’s Pixel Shift Shooting feature, but is it useful to the landscape photographer? In this video I show you how to shoot with Pixel Shift (on location) and how to merge the files in post-processing. I'll also look at the results to see if this is a feature that is useful to landscape photographers.
Learn How and When to Use Pixel Shift Shooting
Pixel Shift Shooting is a feature of the Nikon Z8 that was introduced in Firmware 2.0 (and it shipped with the Nikon Zf). Depending on how you configure it, Pixel Shift Shooting can generate 180-megapixel raw files with better colour reproduction and reduced noise. Sounds like a no-brainer for every shot, doesn’t it?
Well, things are rarely that easy in the world of landscape photography. With Pixel Shift Shooting there’s the risk of too much subject movement during capture (yes, the landscape does move!), there’s the additional storage space required for all the individual raw files, and there’s the additional post-processing required to create a single merged file. Even after all that, does it really make deliver you a better file to process for your landscape photograph?
I was curious to find out if this was just a headline grabbing feature or something of genuine use to the landscape photographer. So, in this rather long video I head out on location to show you how to capture a Pixel Shift sequence, then how to merge the sequence in post-processing to create a .NEFX file, and then I’ll look at the results to see if I can really notice any difference.
I hope you enjoyed this video, and you found the information useful. As I said in the video, I wouldn’t use Pixel Shift Shooting for all my landscape photographs (it has limitations), but the important thing is to know how it works and more importantly when to use it. It’s another tool at my disposal and one that I’m sure to use again in the future.
How to Showcase Your Prints with Spring Back Binders
Looking for a way to make your prints stand out? In this video I'll tell you how you can take your prints and present them in a way that will give them a WOW factor! I'll show you how I prepare my landscape photographs for print and then insert them into a Fotospeed Spring Back Binders. The result is the perfect way to showcase your photographs and make anyone looking at them go "WOW!".
Give Your Prints the WOW Factor
Over the years I’ve shared the various ways I display my landscape photography prints. The most impactful is the framed print, but for a larger body of work, a book or zine is also a great choice. Both options have pros and cons.
While I was on Harris & Lewis earlier this year a photographer showed me his portfolio of photographs displayed in a Spring Back Binder from Fotospeed. I was blown away! I thought it was such a wonderful way to view a collection of prints. Being able to look through a collection of hand-crafted prints was amazing. But the best bit, unlike a book or zine, is that you can add or remove prints anytime making it extremely versatile.
As soon as I got home, I knew I wanted to display my Harris and Lewis photographs in this way. So, I got to work editing my photos (not an easy task) and then selecting which photographs would feature in my printed collection. This time though I wasn’t going to print just the photographs, I would create a template that would add text and some of my branding to each print. Just to give it an extra bit of wow!
As I was doing this it occurred to me that I should share what I was doing with you! After all, I know a great many of you also print your photographs so having another option on how you present your prints will be of interest to you. Even if you don’t print your photographs, maybe this will inspire you to do so once you see some of the amazing things you can with them.
So let me show you how I prepare, print and present my photographs to give them the WOW factor.
I hope you enjoyed this video and if you have any questions or comments, please do let me know below.
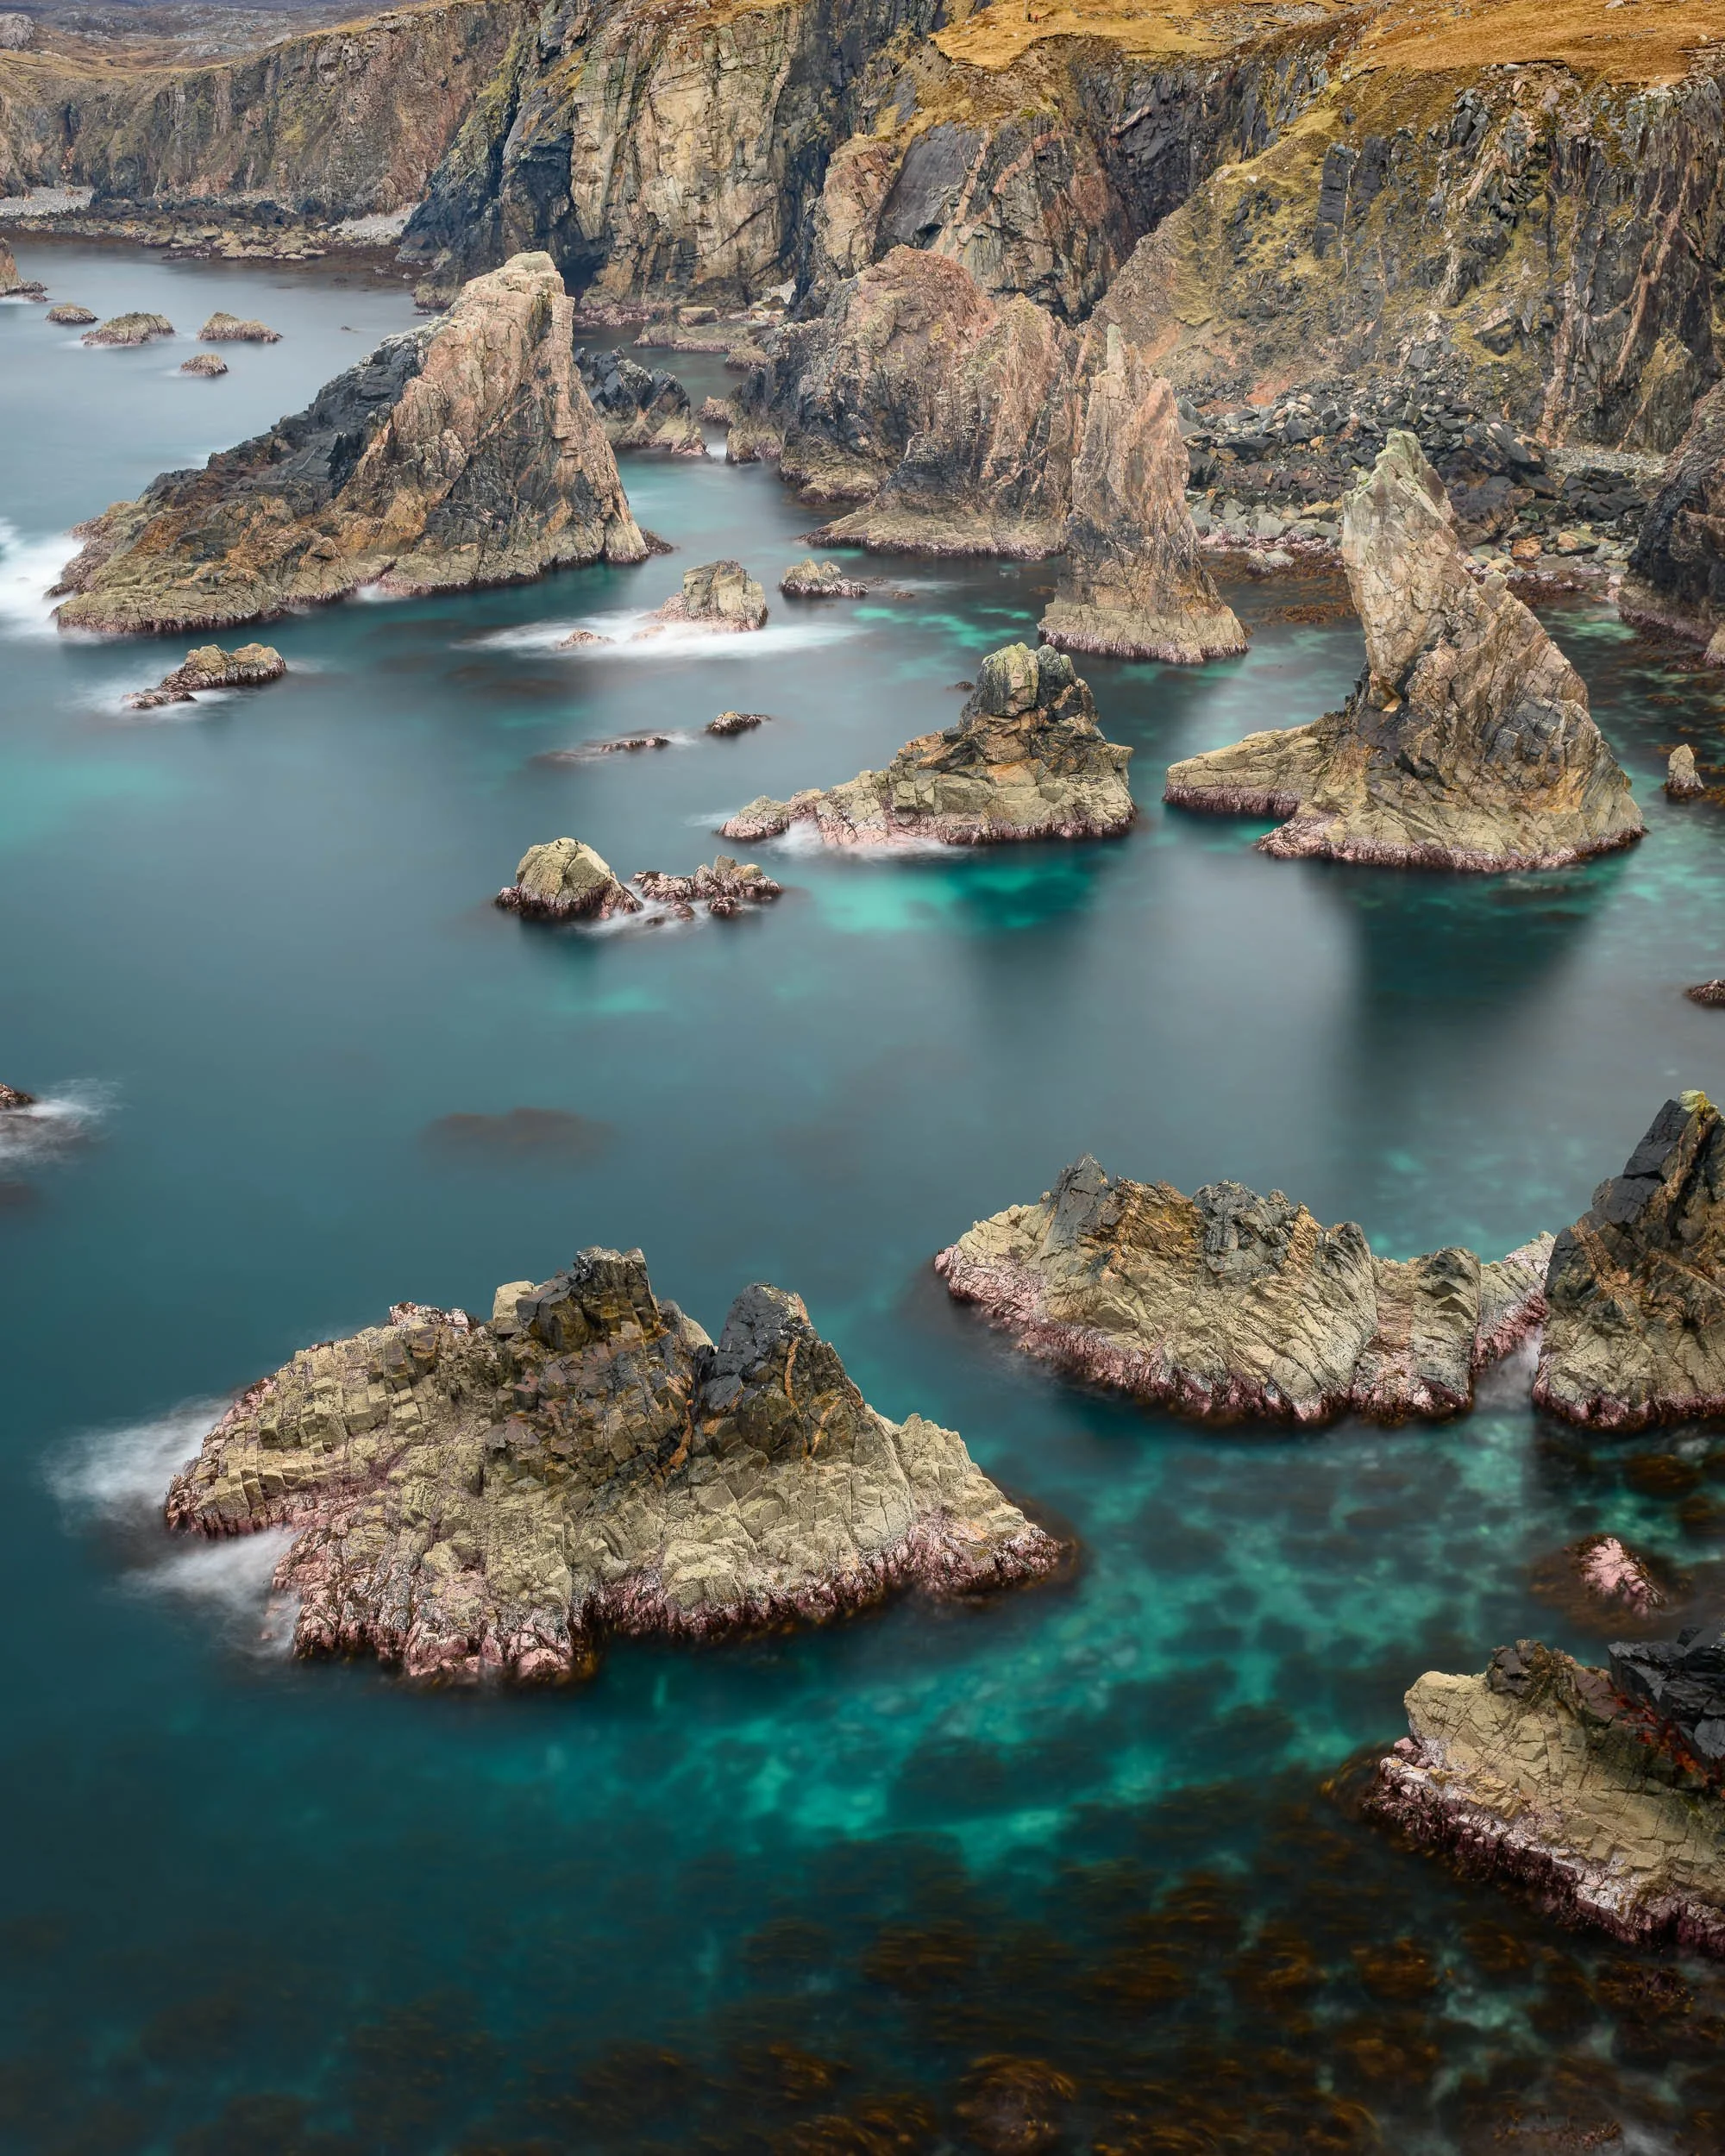
Photographing Scotland's Most EPIC Landscapes - The Isles of Harris and Lewis
What if I told you there was a photography location that has everything? Somewhere that will inspire your creativity, provide you with a sense of calm, but also excite you with a rich variety of subjects to photograph. And all this in on a small Scottish Island. Welcome to The Outer Hebrides!
A Return to the Ultimate Landscape Photography Location in the UK
Back in 2018 I made my first visit to The Outer Hebrides and the Isles of Harris and Lewis. From the moment I visited my first location and stood on the beach at Luskentyre I knew this place would capture my heart (photographically speaking). I spent the next week exploring and photographing some of the most spectacular and amazing scenery I had ever seen in the UK. As soon as I left, I wanted to go back. And go back soon.
However, as most you will know, life has a funny habit of getting in the way of such grand plans and it would be nearly 6 years before I was able to return. My memories of that amazing island didn’t fade over that time and I told anyone that would listen that they must also visit Harris & Lewis, even if they weren’t a photographer.
So, when an opportunity presented itself to return to this magical island I jumped at the chance. Not even a two-day road trip was enough to put me off reaching my Hebridean destination.
The problem with setting high expectations is that it can often lead to disappointment. Surely the Isles of Harris & Lewis wouldn’t do that to me? Though I didn’t film at every location I photographed, I hope this video will give you an idea of what it was like there. Was I disappointed or am I already thinking about going back? Enjoy!
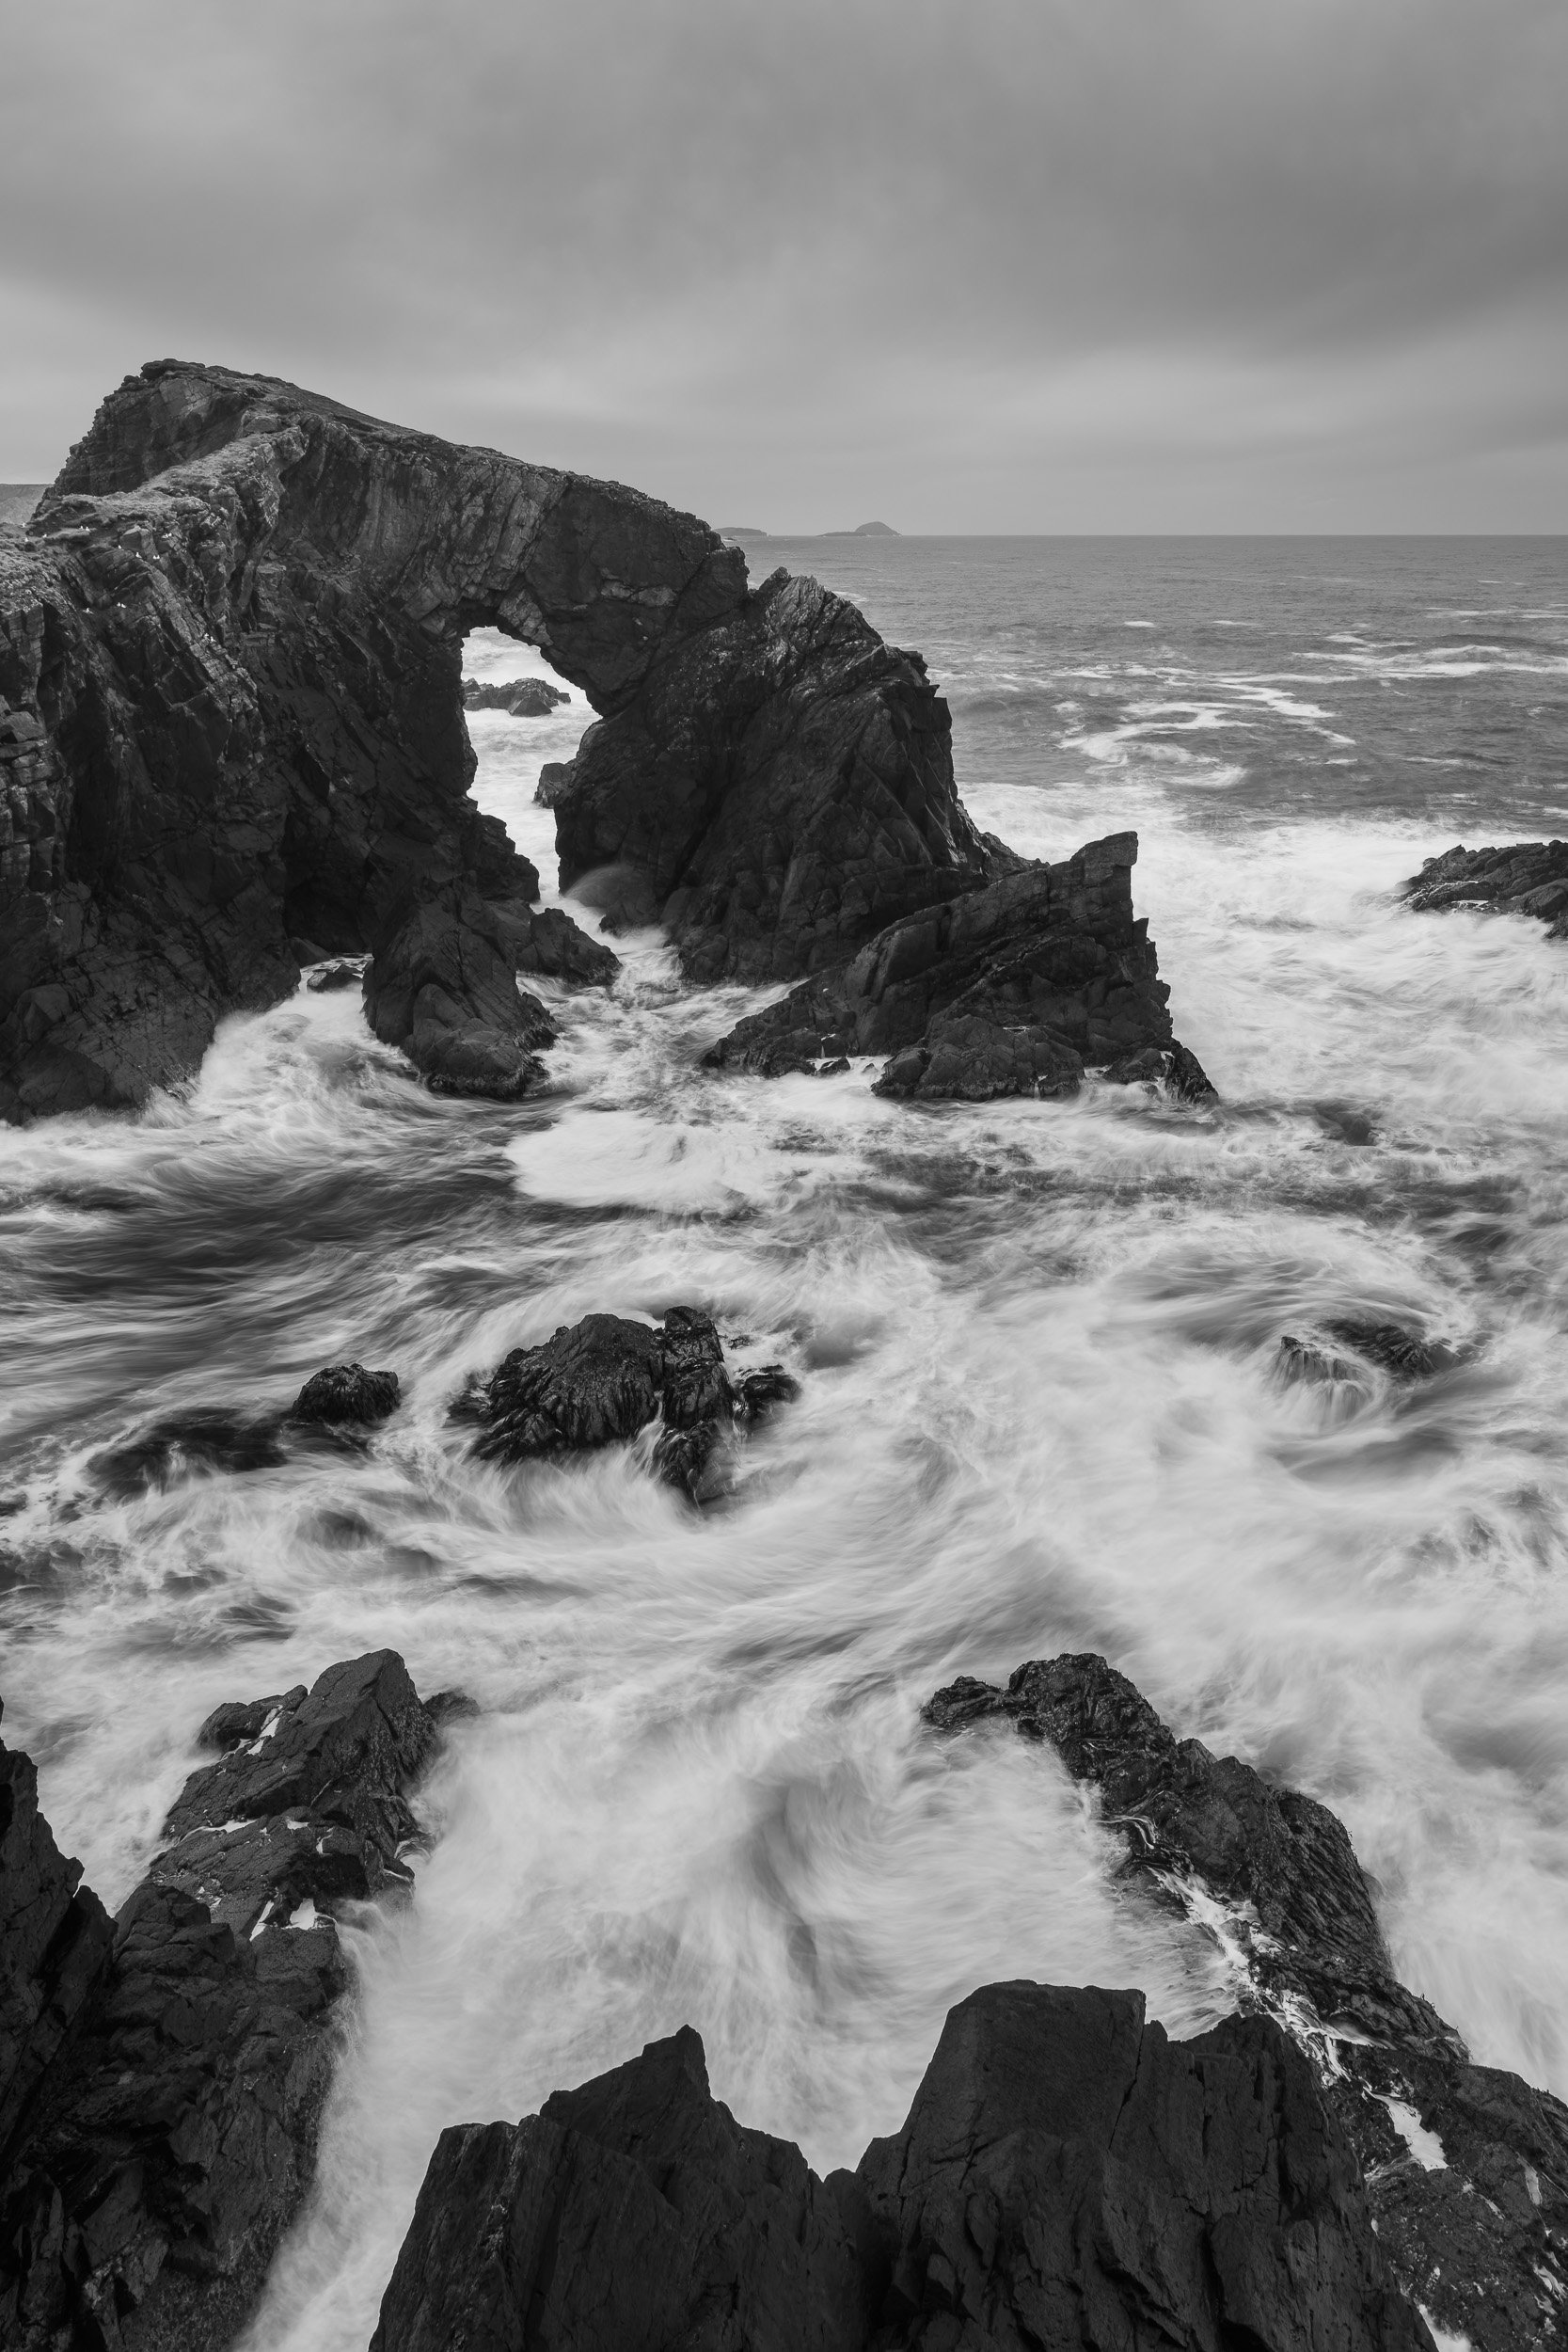
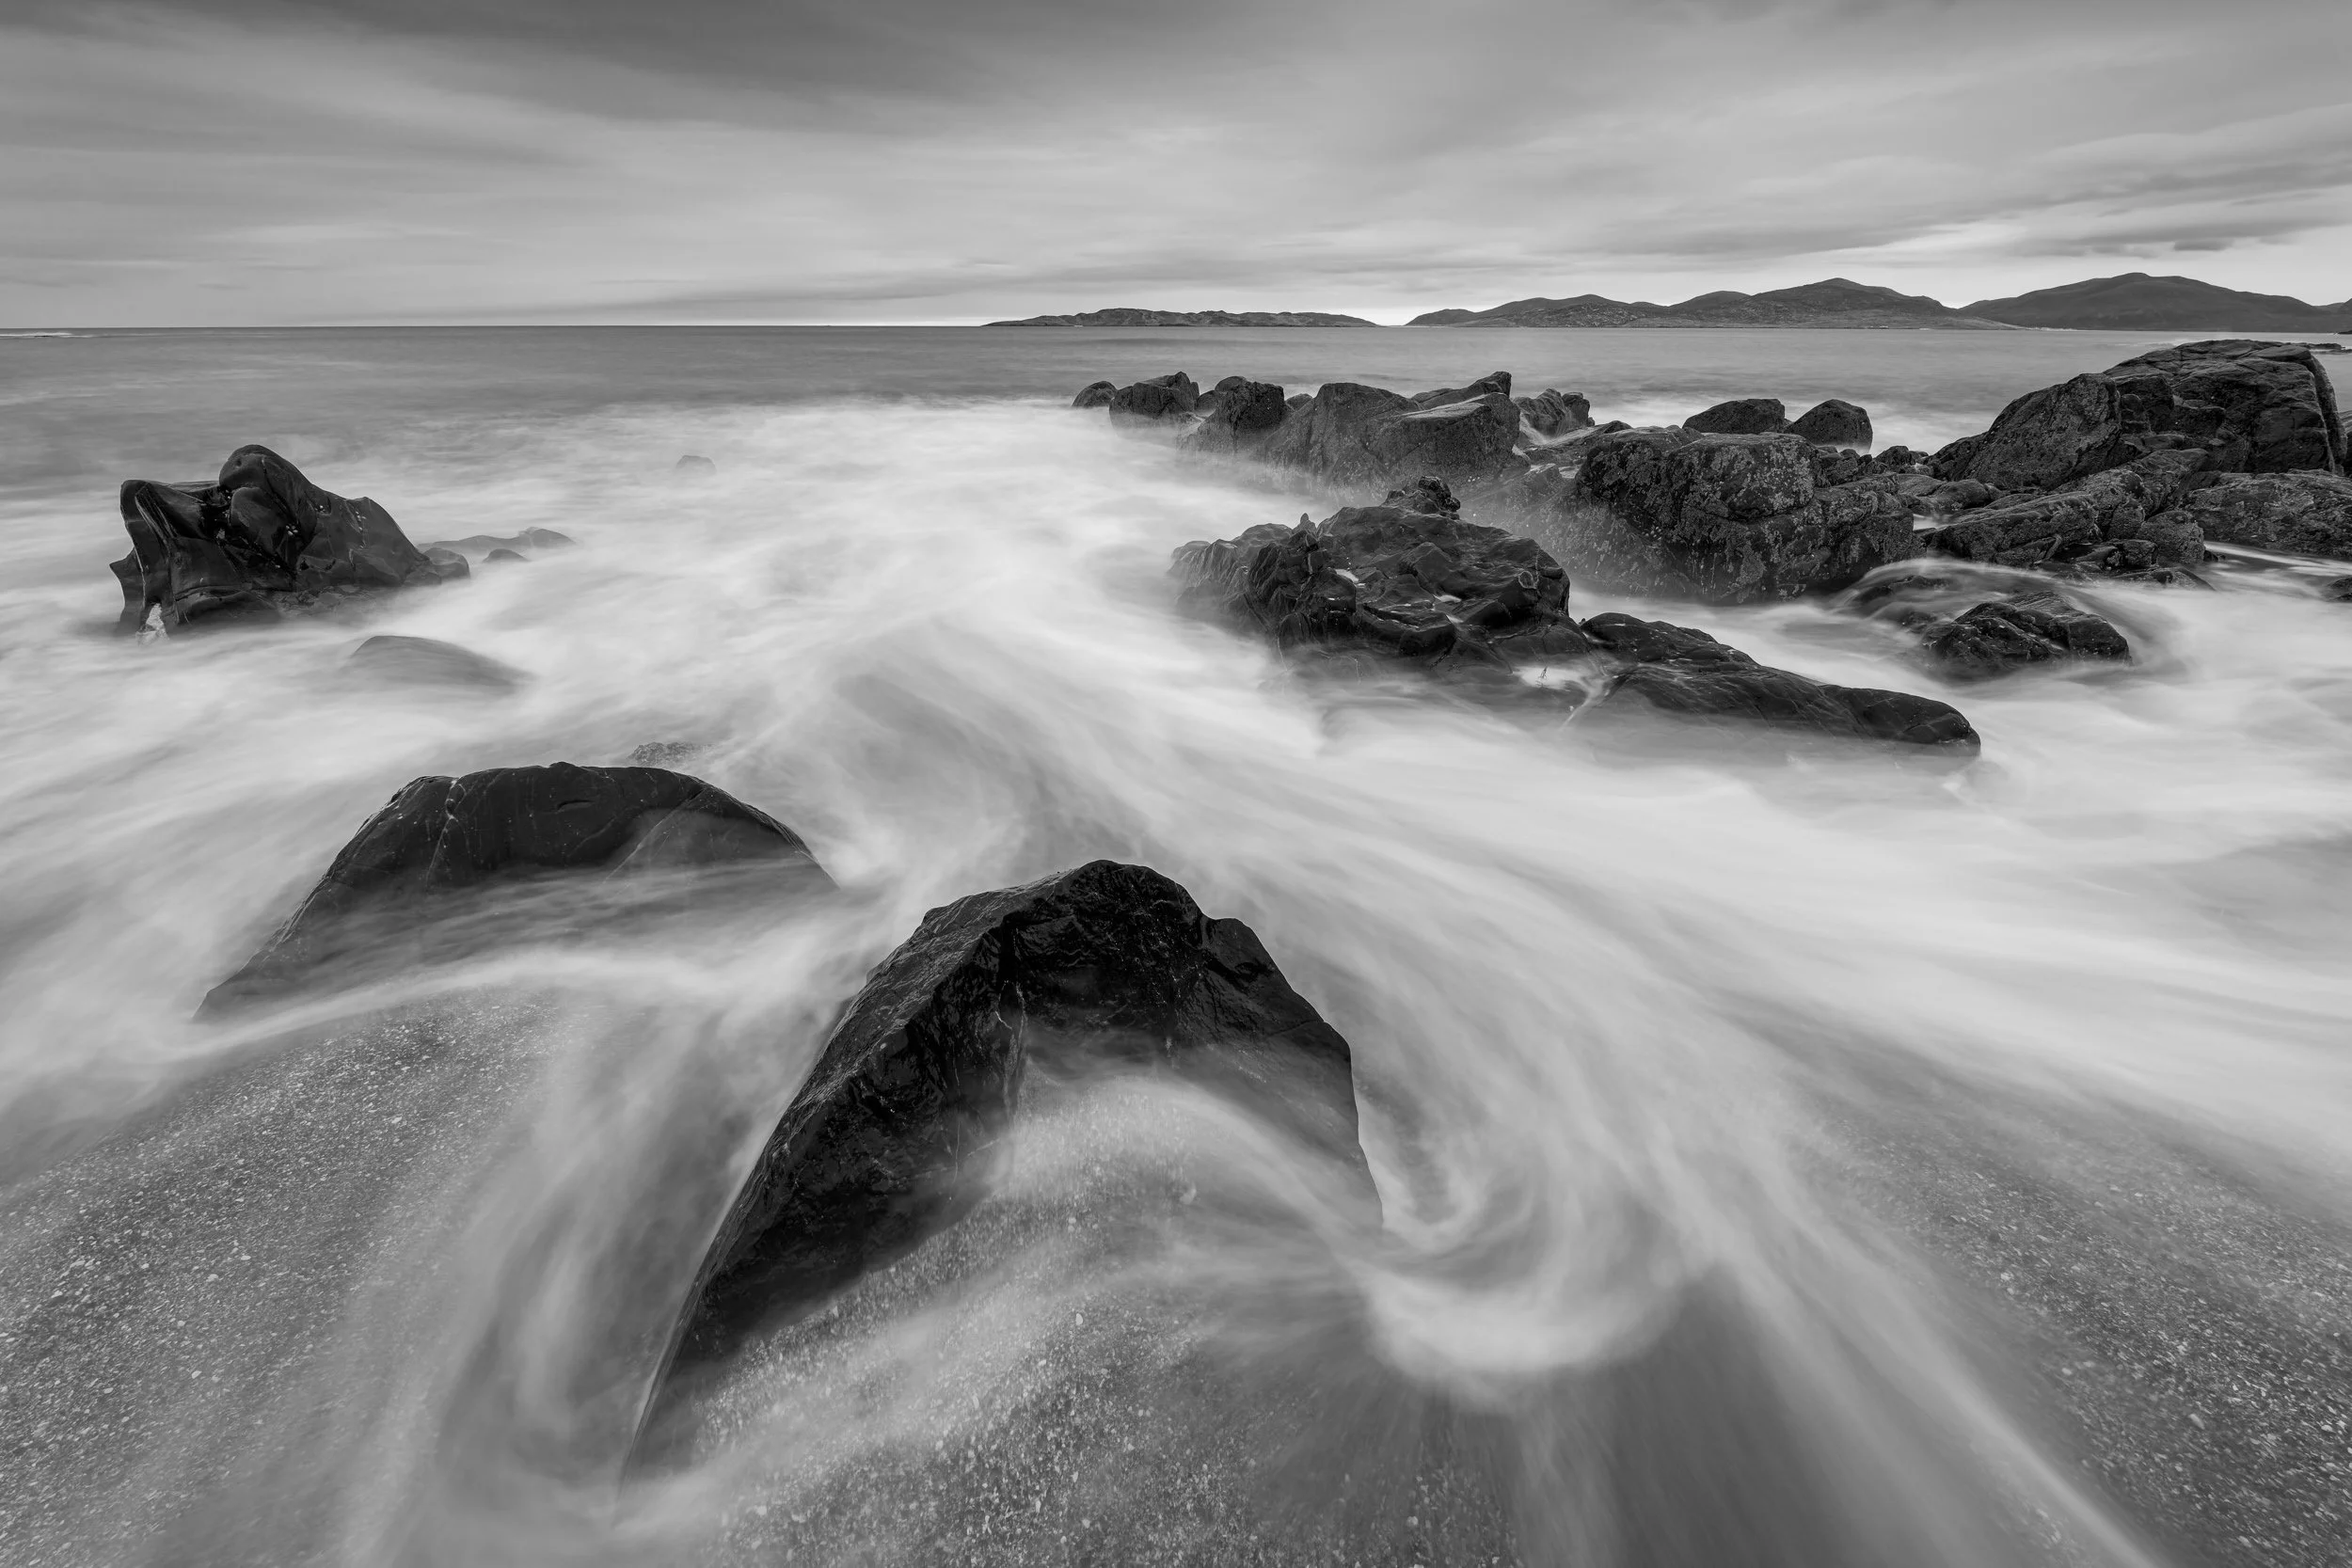
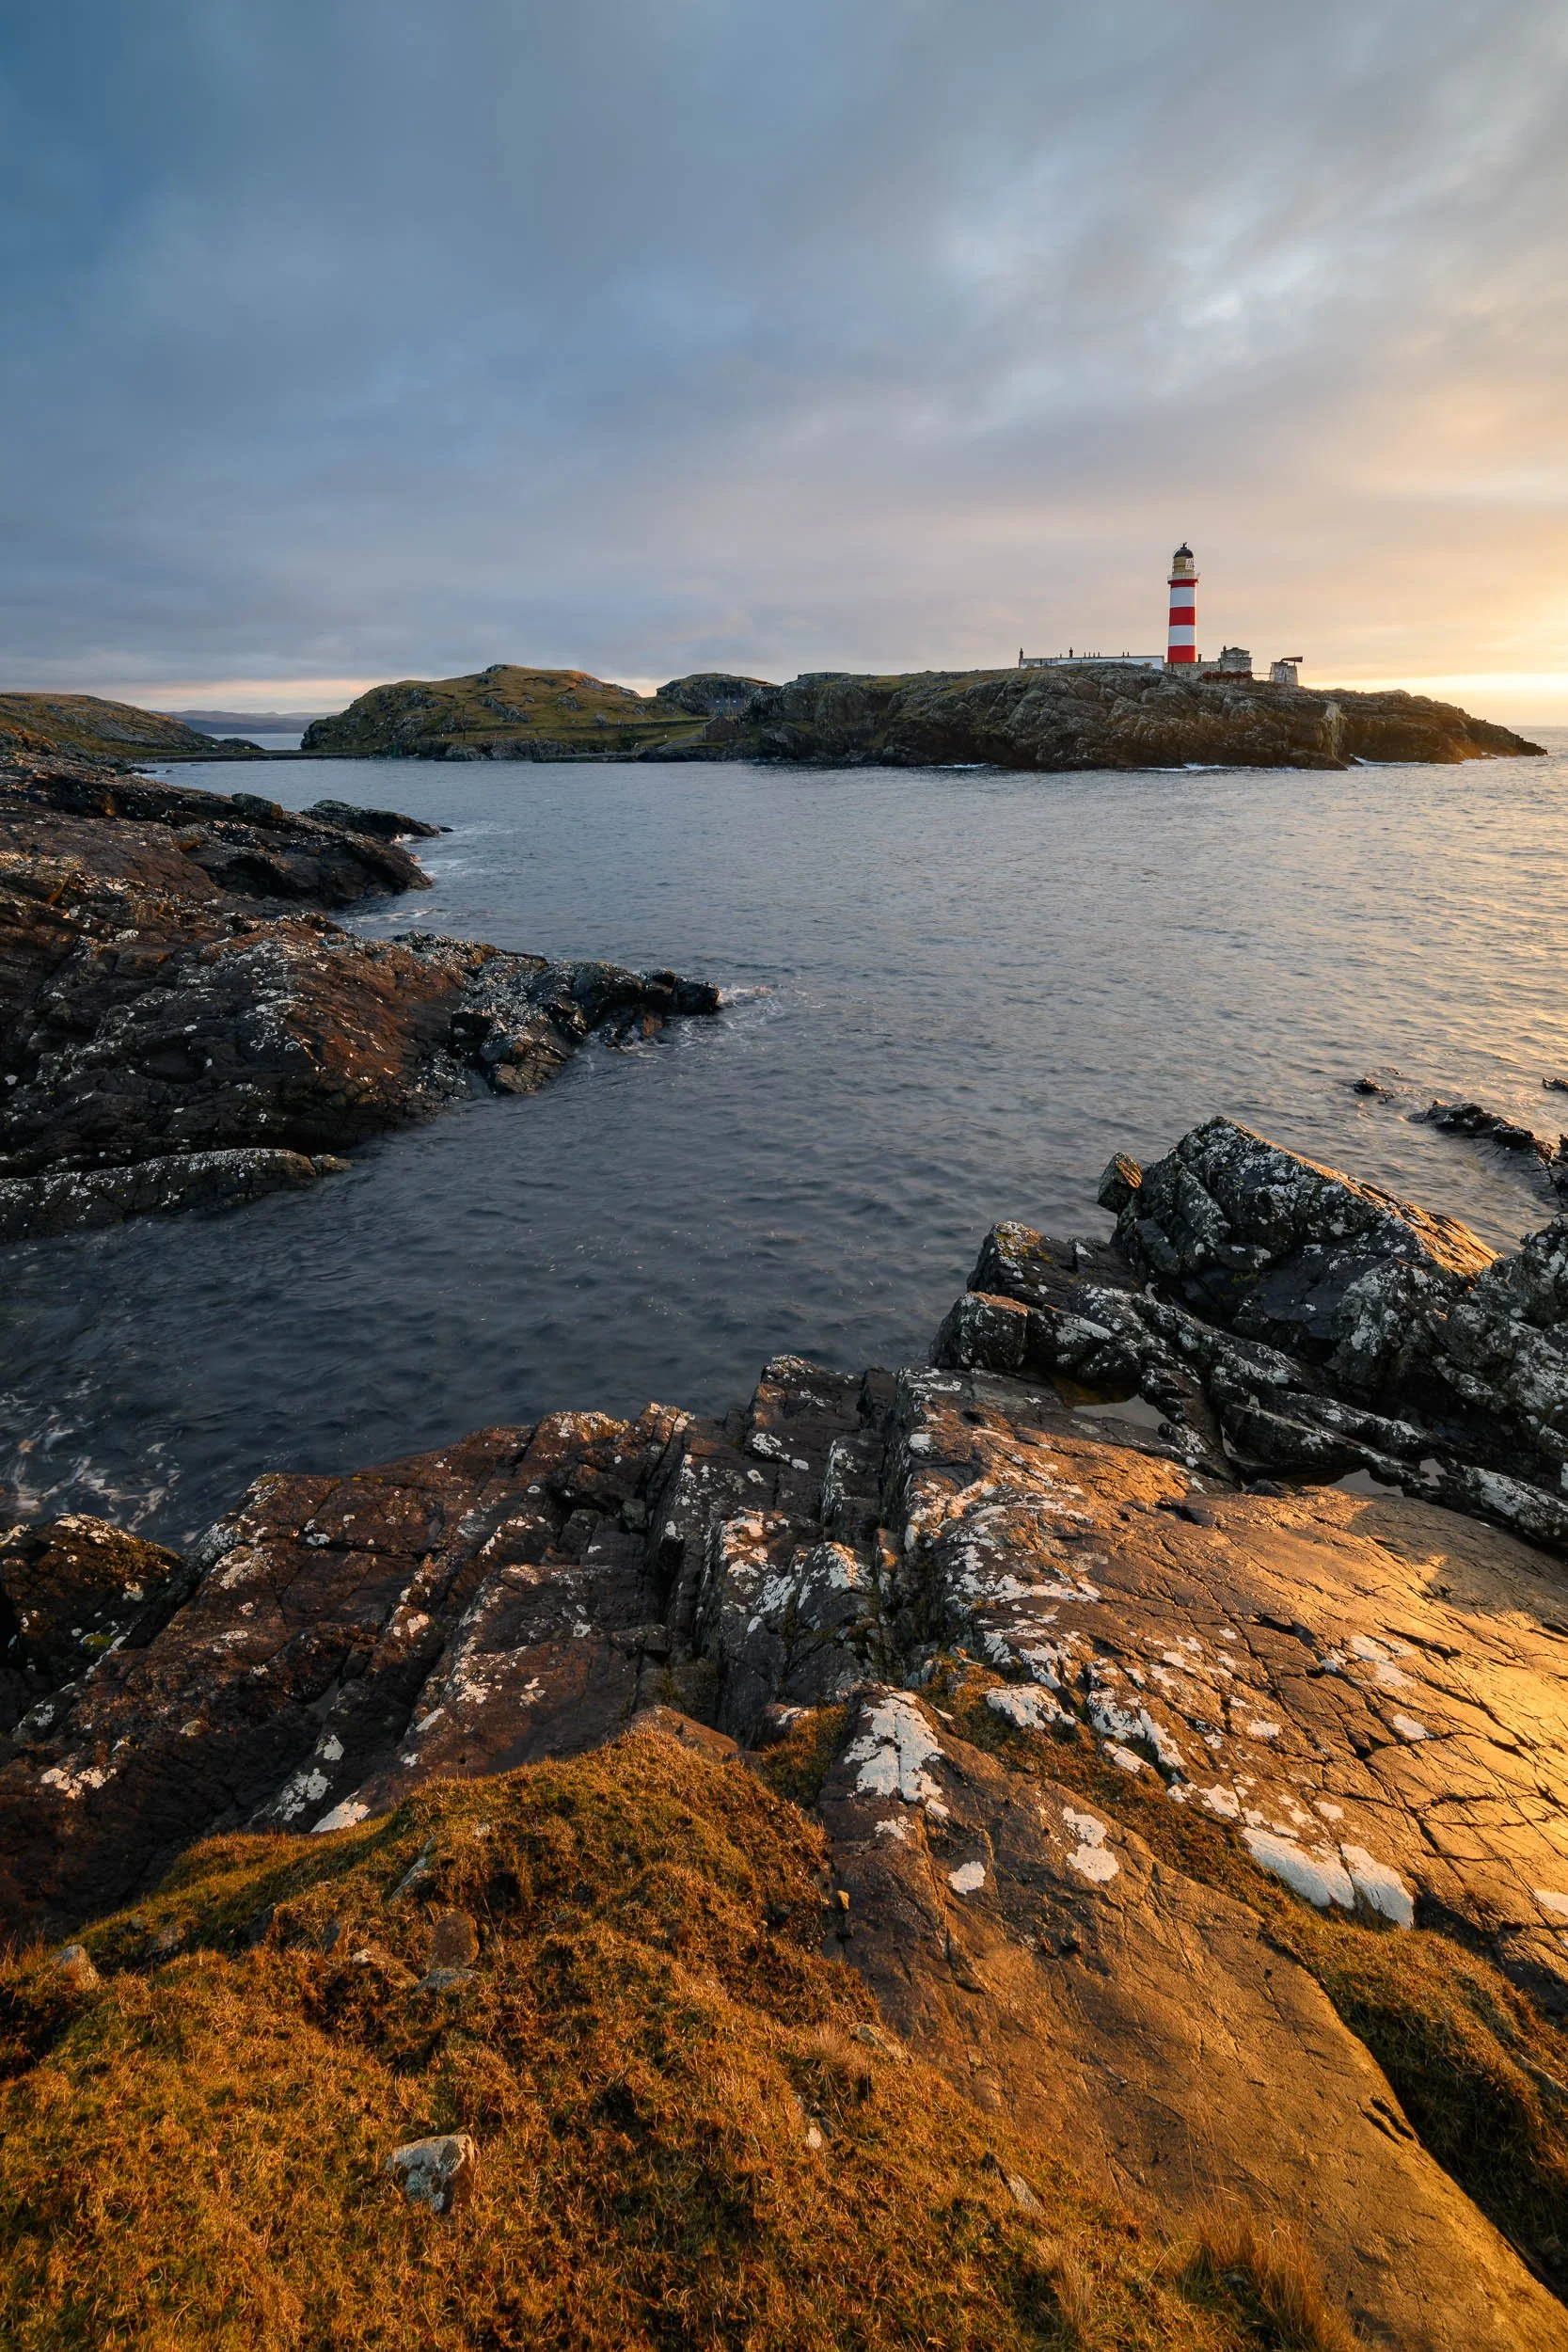
Landscape Photographs of Harris and Lewis
Here are the landscape photographs that you saw in the video. I captured and processed about twice as many, but I had to draw the line somewhere!


Explore & Discover the Outer and Inner Hebrides published by fotoVUE - On My Bookshelf S06E06
The Scottish Hebrides is a photographer’s paradise but with so much to see and to photograph, it can be hard to know where to start. Explore & Discover the Inner Hebrides and the Outer Hebrides by Christoper Swan and published by fotoVUE aims to transform your time in the area from random chaos to an efficient voyage of discovery and exploration.
In this special on-location edition of On My Bookshelf, I put Explore & Discover The Outer Hebrides to a real-world test to see if it can get me to a new location so I capture a photograph of the Isle of Harris.
Photographing the Best Locations in the Hebrides
I purchased my first fotoVUE title (Photographing the Lake District) in 2017 and ever since then I’ve been regulary adding these location guides to my bookshelf. Some of them I use on a regular basis, some every now and again, and there are some I have yet to utilise (though I will get those places one day!).
When I found out that fotoVUE were publishing two new titles, Explore & Discover The Inner Hebrides and Explore & Discover The Outer Hebrides, I was very excited as it couldn’t have come at a better time. The publishing of these books would be just before I headed off to the Harris & Lewis for the 2nd time. From my previous experience of using fotoVUE guidebooks I knew they would be a fantastic resource to help me discover new locations and explore further the locations I had visited last time.
As well as producing my primary video for my photography adventure on Harris & Lewis, I thought the release of these two books on the Hebrides would make for a great episode of On My Bookshelf. Best of all, as I would be on Harris and Lewis, I could produce the video on-location and show you how useful these fotoVUE guidebooks can be through a practical example!
So, sit back, relax, and see how I used the book to find a viewpoint on Harris that I had not photographed before.
Buy fotoVUE Explore & Discover Books
✔️ Use the discount code JULIAN to get 20% off all books at fotovue.com .
💳 You can purchase Explore & Discover The Outer Hebrides, The Inner Hebrides, and Scotland, here - https://fotovue.com/shop/
Please note - the discount code does not work on pre-orders or on the "both books bundle" for Inner and Outer Hebrides as the bundle is already discounted.
By using this discount code I may receive a commission for the sale. This has no effect on the price for you.
Harris Location 1, Luskentyre Beach
Here are the photographs that I captured in the video. In the book it’s viewpoint 3, Tràigh Rosamol Dunes.
Tràigh Rosamol Dunes #1, Luskentyre, Isle of Harris - Nikon Z8, Nikkor Z 24-120mm f/4 S at 48mm, f/13, 2 minutes at ISO 200, 16:9 crop.
Tràigh Rosamol Dunes #2, Luskentyre, Isle of Harris - Nikon Z8, Nikkor Z 24-120mm f/4 S at 33mm, f/14, 1.6 seconds at ISO 400.

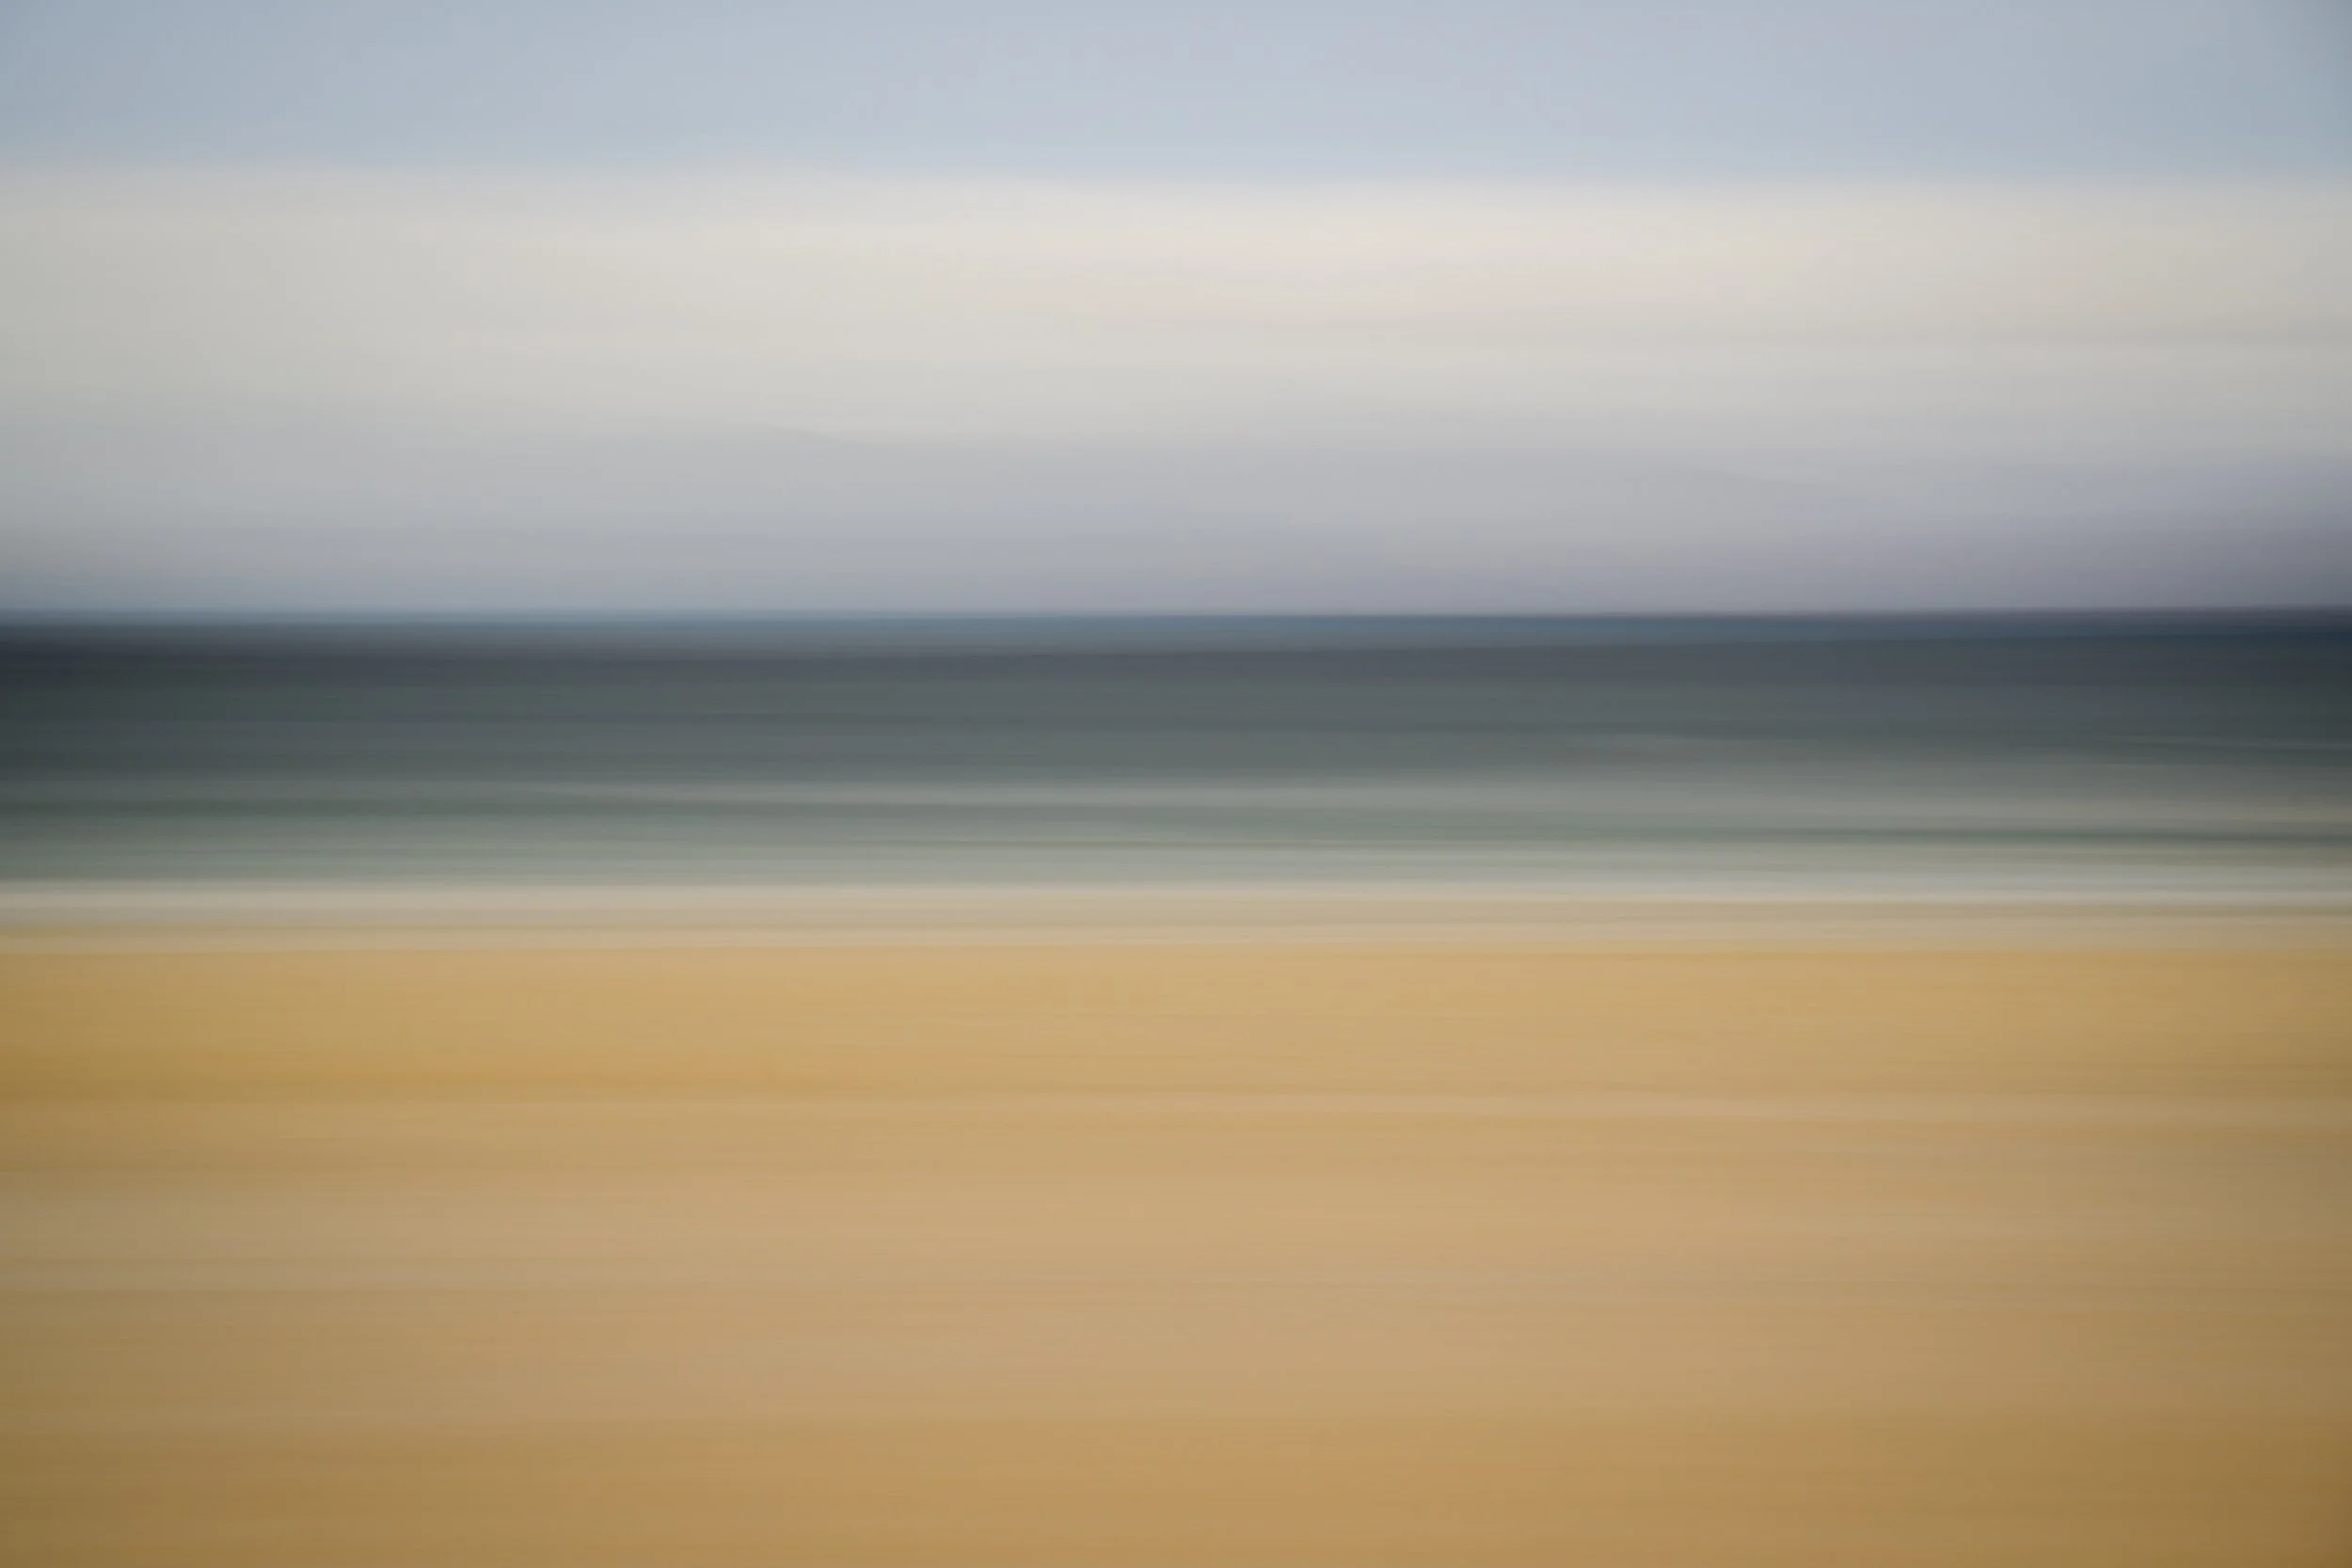
A Colourful Return to Dawlish Warren
After almost a yearlong gap, I return to Dawlish Warren where I’m treated to a unexpectedly colourful sunrise.
From Grey Skies to Colourful Skies
Winter on Dartmoor is often my favourite time of year for photography. Sunrise isn’t too early, and you can shoot sunset and still be home in time for dinner. The colour of the Dartmoor landscape is also particularly photogenic.
This winter has been tough though. Lots of overcast damp days. I can work around most weather conditions, but there are some conditions that make photographing Dartmoor really challenging. It’s not that I haven’t had some good days on Dartmoor this winter, but they have been few and far between.
Sometimes you need to take a different approach. Or in my case, a different location. Having spent what seemed like hours, if not days staring at forecasts over the winter, I concluded that I was perhaps focusing too much on Dartmoor. I’m surrounded by amazing coastlines so why aren’t I out there photographing it! The weather can be a bit more forgiving on the coastline as you can benefit from even the smallest of gaps on the horizon for the sunrise or to make the most of a darker, moodier sky.
To get myself back into coastal photography I decided to head back to an old favourite, Dawlish Warren beach. A location I have photographed many, many times. It’s also close to home and given I haven’t photographed it in over a year it seemed the perfect choice.
Looking at the weather forecast for that morning it didn’t look great but when I analysed the cloud coverage, I could see there might be the possibility of gap between the horizon and the lower clouds. If all went well the rising sun would break the horizon and bath the scene in light before it disappeared behind the cloud.
It’s not often that a specific analysis like that transpires into reality but in this case it did exactly that.
Dawlish Warren #2, Devon - Nikon Z8, Nikkor Z 24-120mm f/4 S at 120mm, f/11, 30 sec at ISO 64, Kase CPL and ND.
Dawlish Warren #4, Devon - Nikon Z8, Nikkor Z 24-120mm f/4 S at 120mm, f/8, 90 sec at ISO 64, Kase CPL and ND.
As you can see, the light was beautiful. It was also very brief. It can’t of lasted much more than 10 mins. But what a 10 minutes it was! With the soft pastel colours of the scene, I went for simple compositions which work well when combined with a long exposure.
There is something special about the coast, something which I think I’d forgotten and returning to Dawlish Warren has reignited my spark to photograph to it. Of course, not every visit to the coast will result in good photographs, but that’s not a reason not to explore and photograph the hundreds of miles of coastline I have access to.
I’m also going to print and hang one of these photographs. What better way to celebrate a morning photographing the coast than by creating a print.
Do you photograph your local coastline? What does it mean to you? Let me know in the comments below.

The Unpublished Collection 4
While I’m Away…
It’s rare that I get to completely immerse myself in my landscape photography. Even more rare that I’ll be doing this for two weeks! Heaven! Well, at least I hope it will be heaven, and given that I’m photographing the Outer Hebrides I’m sure it will be.
But while I’m away I thought I’d take some time to publish some photographs that have never seen the light of day. It’s not that these are poor photographs, it’s just that I never got around to publishing them anywhere. Sometimes I just go out and take photographs with no intention of writing a blog post or producing an associated video.
However, no photograph should just be left to die a slow death on a hard drive so every now and again I like to gather up those unpublished photographs and bring them into the light. The eight photographs below cover a 12 month period and three different counties. Enjoy!